•
Activate each of function in the system which causes a binary input to pick up.
•
Check the reaction in the Status column of the dialog box. To do so, the dialog box must be updated. The
options may be found below under the margin heading “Updating the Display”.
•
Finish the testing (see margin heading below “Exiting the Test Mode”).
If ,however, the effect of a binary input must be checked without carrying out any switching in the plant, it is
possible to trigger individual binary inputs with the hardware test function. As soon as the first state change of
any binary input is triggered and the password No. 6 has been entered, all binary inputs are separated from
the plant and can only be activated via the hardware test function.
Test of the LEDs
The LEDs may be tested in a similar manner to the other input/output components. As soon as the first state
change of any LED has been triggered, all LEDs are separated from the internal device functionality and can
only be controlled via the hardware test function. This means e.g. that no LED is illuminated anymore by a
protection function or by pressing the LED reset button.
Updating the Display
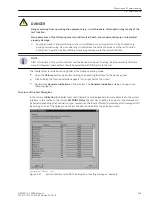
As the Hardware Test dialog opens, the operating states of the hardware components which are current at
this time are read in and displayed.
An update is made:
•
for each hardware component, if a command to change the condition is successfully performed,
•
for all hardware components if the Update button is clicked,
•
for all hardware components with cyclical updating (cycle time is 20 seconds) if the Automatic Update
(20sec) field is marked.
Exiting the Test Mode
To end the hardware test, click on Close. The dialog box is closed. The device becomes unavailable for a brief
start-up period immediately after this. Then all hardware components are returned to the operating conditions
determined by the plant settings.
Checking the Protection Data Communication
General
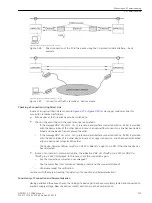
You can check the device communication from the PC using DIGSI.
You can either connect the PC directly to the device on-site using the front operator interface or the service
interface port B of the PC (
). Or you can log into the device using a modem via the service interface
[topologie-ankopplung-pc-geraet-240702-kn, 1, en_US]
Figure 3-27
Direct connection of the PC to the device - basic example
3.3.6
Mounting and Commissioning
3.3 Commissioning
236
SIPROTEC 4, 7SD80, Manual
E50417-G1100-C474-A2, Edition 02.2018
Содержание SIPROTEC 4 7SD80
Страница 8: ...8 SIPROTEC 4 7SD80 Manual E50417 G1100 C474 A2 Edition 02 2018 ...
Страница 10: ...10 SIPROTEC 4 7SD80 Manual E50417 G1100 C474 A2 Edition 02 2018 ...
Страница 18: ...18 SIPROTEC 4 7SD80 Manual E50417 G1100 C474 A2 Edition 02 2018 ...
Страница 248: ...248 SIPROTEC 4 7SD80 Manual E50417 G1100 C474 A2 Edition 02 2018 ...
Страница 298: ...298 SIPROTEC 4 7SD80 Manual E50417 G1100 C474 A2 Edition 02 2018 ...
Страница 312: ...312 SIPROTEC 4 7SD80 Manual E50417 G1100 C474 A2 Edition 02 2018 ...
Страница 322: ...322 SIPROTEC 4 7SD80 Manual E50417 G1100 C474 A2 Edition 02 2018 ...
Страница 400: ...400 SIPROTEC 4 7SD80 Manual E50417 G1100 C474 A2 Edition 02 2018 ...
Страница 402: ...402 SIPROTEC 4 7SD80 Manual E50417 G1100 C474 A2 Edition 02 2018 ...

