background image


PLC Subroutines Manual 

64


6FC5397-0FP40-0BA0, 08/2013 

Local variable definition 

Table 3-40 

Inputs 

Name 

Type 

Description 

SP_STOP_K 

BOOL 

Spindle stop 

Outputs 
None 

Assigned global variables 
None 

Relevant PLC machine data 

No. 

Unit 

Range 

Description 

MD14512[19].7 

1: to enable the manual machine function 
0: to disable the manual machine function 

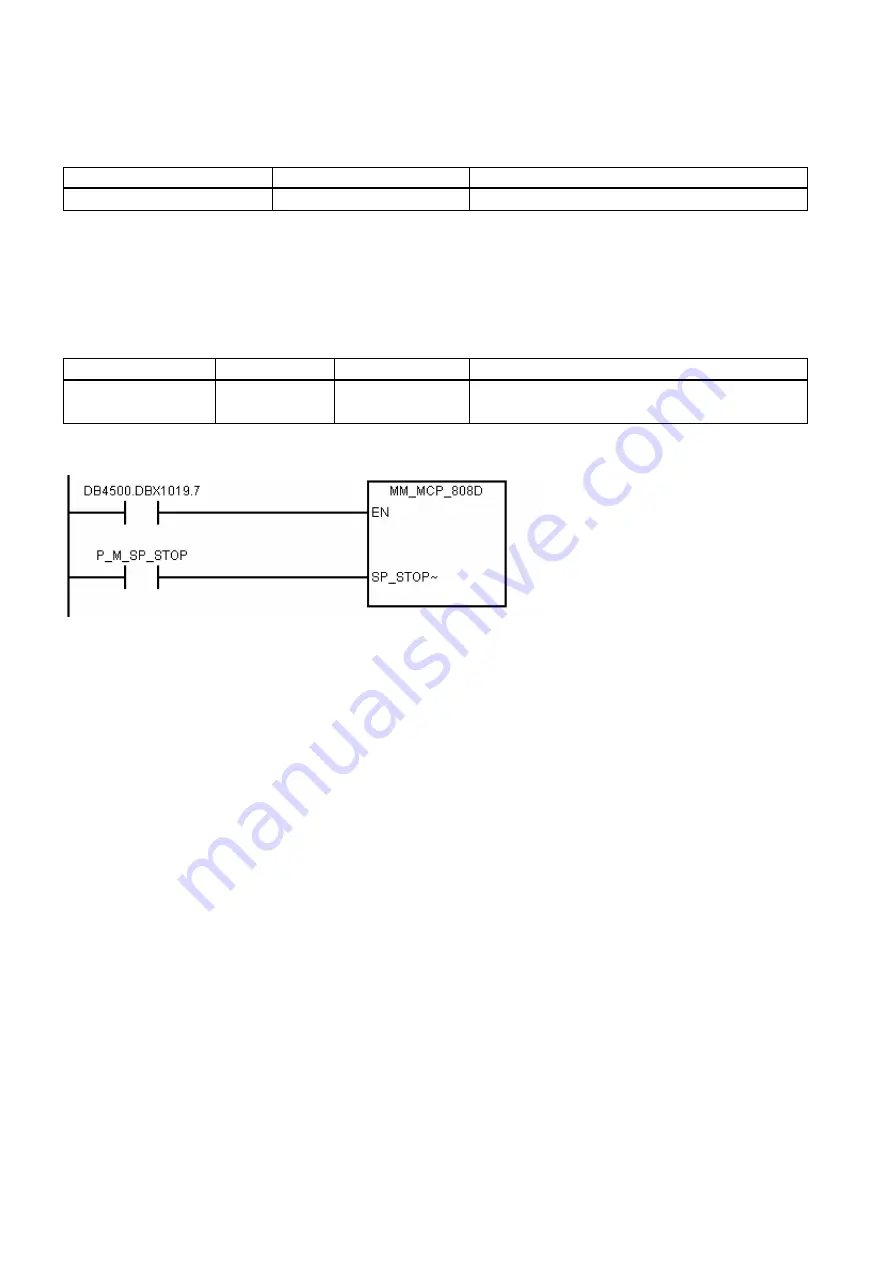
Example for calling subroutine 59 


3.32  


Subroutine 60 - Disk_MGZ_M (disk-style tool magazine for milling) 

Purpose 
You can use subroutine 60 to control the disk-style tool magazine on a milling machine.  
In the reference point mode, initialize the tool magazine by pressing the "Original position of the tool magazine" key. 
In the manual mode, you can rotate the tool magazine clockwise or counter-clockwise, and enable the tool magazine to 

reach the spindle or tool change position respectively through the "Clockwise rotation of the magazine", "Counter-clockwise 

rotation of the magazine", "Tool magazine reaching the spindle", and "Tool magazine reaching the tool change position" 

keys. 
In the auto mode, you need to execute M06 to call the tool change subroutine when compiling a part program. Subroutine 60 

and the tool change subroutine must be used together during the tool change process. Three operations are involved in the 

tool change control, that is, tool return, tool retrieval, and tool change. 
1.


The tool return operation is to return the tool on the spindle back to the tool magazine disk when compiling T0 and a tool 

is located on the spindle. 

2.


The tool retrieval operation is to get the desired tool from the tool magazine disk and install it on the spindle when 

compiling Tx (x ≠ 0) and no tool is on the spindle.


3.


The tool change operation is to first return the tool on the spindle back to the tool magazine disk and then get the desired 

tool from the tool magazine disk when compiling Tx (x ≠ 0; x ≠ number of the tool on the spindle).


For details, please refer to the tool change subroutine. 
The following machine data is involved in this subroutine: 
MD10715: M_NO_FCT_CYCLE[0] 
MD10716: M_NO_FCT_CYCLE_NAME[0] 
MD22550: TOOL_CHANGE_MODE 

Содержание SINUMERIK 808D ADVANCED M

Страница 1: ...rning notice representing the highest degree of danger will be used A notice warning of injury to persons with a safety alert symbol may also include a warning relating to property damage Qualified Personnel The product system described in this documentation may be operated only by personnel qualified for the specific task in accordance with the relevant documentation in particular its warning not...

Страница 2: ...issioning engineers and service and maintenance personnel Function Manual Mechanical and electrical designers technical professionals Parameter Manual Mechanical and electrical designers technical professionals PLC Subroutines Manual Mechanical and electrical designers technical professionals and commissioning engineers My Documentation Manager MDM Under the following link you will find informatio...

Страница 3: ... 3 9 Subroutine 33 EMG_STOP 37 3 10 Subroutine 37 MCP_NCK MCP and HMI signal processing 38 3 11 Subroutine 38 MCP_Tool_Nr display tool number on the MCP 39 3 12 Subroutine 39 HANDWHL selecting a handwheel according to HMI interface signals 39 3 13 Subroutine 40 AXIS_CTL controlling the spindle and axes 40 3 14 Subroutine 41 MINI_HHU handwheel hand held unit 42 3 15 Subroutine 42 SPINDLE spindle co...

Страница 4: ...fault_ManMachPlus_T ptp sample application for Manual Machine Plus With the sample applications you can get a good understanding about how to create or call a PLC subroutine You can realize most machine functions by re organizing the PLC subroutines or modifying some must networks WARNING Make sure that you perform a complete machine test to all subroutines used in your main program in order to ve...

Страница 5: ... by the manufacturer 2 IO_2 Distributed I O are defined by the manufacturer 3 5 7 13 Reserved for the manufacturer 6 MANMACH JOG function 14 ASUP ASUP function 15 PLC_sel_PP PLC selects part programs 16 IS_MCP Signals from to the MCP 17 IS_HMI Signals from to the HMI 18 IS_AUX Auxiliary functions from the NCK 19 IS_NCK Signals from to the NCK 20 IS_CHA Signals from to the channel 21 IS_AX1 Signals...

Страница 6: ...et control of the turning machine turret type Hall element transistor 4 6 position 52 Turret2_BIN_T Turret control of the turning machine turret type position detection with encodings 53 Turret3_CODE_T Hydraulic turret control of the turning machine turret type position detection with encodings 54 Turret2_3_ToolDir Evaluate tool direction and calculate tool position called by Turret2_BIN_T Turret3...

Страница 7: ...100 DBB7 DB1100 DBB8 7 SEG LED 1 DB1100 DBB9 7SEG LED 2 DB1100 DBB10 DB1100 DBB11 DB1100 DBB12 DP 2 2 DP 1 1 1 The decimal point of the 7 SEG LED 1 2 The decimal point of the 7 SEG LED 2 Note Interfaces where nothing has been entered are reserved for the next version You can understand the relationship between the PLC interface addresses and the SINUMERIK 808D MCP from the following illustration f...

Страница 8: ... Software Readme_OSS SinuComPCIN Access MyMachine P2P AMM Installing the 808D toolbox The toolbox installation folder is shown below To start the installation double click the Setup exe file In the setup dialog select one or multiple options that you desire to install 2 2 PLC instructions Various instructions are available in the PLC Programming Tool You can view them in the instruction branch on ...

Страница 9: ...estarted For the retentive data there is a data range of 1400 0000 1400 0127 This location can be used to save all the data which is to remain valid after POWER OFF ON With the aid of the PLC MD see user interface you can pre assign your program with data or parameterize various parts of the program 2 4 Program organization When programming the PLC you must structure your program into finished pro...

Страница 10: ... 808D ADVANCED PLC Programming Tool Testing and monitoring a PLC program with the HMI There are three ways for program testing and monitoring in the SYSTEM operating area You can enter an operand to view its status Use the softkey or respectively to increase decrease the bit of the operand Use the softkey to change the value of the operand and the softkey to delete all the entered operands ...

Страница 11: ...status of a PLC signal By default three signal status lists inputs flags and outputs are displayed in three columns You can change column sequence or assign a new signal status list variables with the softkey You can also change the status of a PLC signal with the softkey ...

Страница 12: ...LC Subroutines Manual 12 6FC5397 0FP40 0BA0 08 2013 You can view the status of the main program or use the softkey to view the status of a subroutine Two windows are available for you to view the program ...

Страница 13: ...h the RS232 interface Page 13 Establishing a direct connection with the Ethernet interface Page 17 Establishing a network connection with the Ethernet interface Page 20 2 Use the menu command to view the status of a PLC signal You can also first click the status chart symbol and then click the symbol to view the status 2 6 Establishing a connection with the RS232 interface You can establish a comm...

Страница 14: ...e the RS232 connection with this softkey No modifications to the settings are possible in this state The active or inactive state is retained even after a power on except when starting with the default data In the lower right corner of the screen the icon shows that the connection to the PG PC via the RS232 interface is active Operating sequence to configure communications in the PLC Programming T...

Страница 15: ...le clicking the icon in the project tree or choosing from the main screen menu 2 Double click the access point symbol Then the following Set PG PC Interface dialog is displayed Check the PG PC interface being used For RS232 communication you must assign the interface PLC802 PPI to the PLC programming tool ...

Страница 16: ...OTE The baud rate you select must be the same as what you have set on the control 4 Open the Local connection tab to specify the COM port to which the RS232 V24 cable is connected 5 Click this button twice to exit the Set PG PC Interface dialog 6 Double click this icon on the right side of the communication setting window It will take several minutes to search for a valid address 7 Wait until the ...

Страница 17: ...PC PG via the Ethernet interface Operating sequence to enable an Ethernet peer to peer connection to the control 1 Connect the control system with the PC PG using an Ethernet cable 2 Select the desired operating area on the PPU 3 Set up a direct connection on the control system by pressing these three softkeys in succession The following dialog pops up The IP address and subnet mask shown are fixe...

Страница 18: ...Choose these two menus from the menu bar to open the following communication setting window Also you can click the communication button in the navigation bar or click the communication icon in the project tree to display the window 2 Double click this icon on the right side Then the following interface setting dialog is displayed ...

Страница 19: ...for the corresponding SINUMERIK 808D ADVANCED control which is previously displayed in the link setting dialog on the control as shown below 4 Double click this icon on the right side of the communication setting window to establish a connection to the specified IP address Note Before configuring communications in the PLC Programming Tool make sure the connection must be already enabled on the con...

Страница 20: ...on the PPU 3 Press these two softkeys in succession to enter the service control window 4 Press this softkey to enter the window for network configuration Note In this case make sure the following vertical softkey is deselected 5 Configure the network as required in the following window You can configure the DHCP with the hardkey If you select Yes for the DHCP the IP address and subnet mask will b...

Страница 21: ... Operating sequence to configure communications in the PLC Programming Tool 1 Choose these two menus from the menu bar to open the following communication setting window Also you can click the communication button in the navigation bar or click the communication icon in the project tree to display the window 2 Double click this icon on the right side Then the following interface setting dialog is ...

Страница 22: ...the right side of the communication setting window to establish a connection to the specified IP address Note Before configuring communications in the PLC Programming Tool make sure the connection must be already enabled on the control 2 9 PLC application Download Upload Copy Compare You can save copy or over write a PLC project or PLC application on the control system by using the following PLC P...

Страница 23: ...llows 1 Establish the communication between the control and the PLC Programming Tool You can establish the connection by using the following three methods Establishing a connection with the RS232 interface Page 13 Establishing a direct connection with the Ethernet interface Page 17 Establishing a network connection with the Ethernet interface Page 20 2 Choose these two menus from the menu bar or c...

Страница 24: ...ion You are recommended to download the PLC application when the PLC is in the stop mode Downloading the PLC application when the PLC is in the run mode can cause machine damages or even human injuries 5 The download starts and it will take several seconds to do it 6 The download finishes when the following message appears Then click this button to end your operations Note If you have chosen to do...

Страница 25: ...B interface at the front of the PPU 3 Select the desired operating area on the PPU 4 Open the USB stick by pressing these two softkeys in succession 5 Select the pte file and then press this softkey to copy the file 6 Press this softkey and then access the NCK PLC data folder by pressing the hardkey 7 Press this softkey 8 A warning note appears warning you that the original pte file will be overwr...

Страница 26: ...s 1 Choose these two menus from the menu bar or click in the tool bar to create a new and empty PLC application 2 Establish the communication between the control and the PLC Programming Tool You can establish the connection by using the following three methods Establishing a connection with the RS232 interface Page 13 Establishing a direct connection with the Ethernet interface Page 17 Establishin...

Страница 27: ...e upload icon to start the upload and the upload dialog pops up 4 Click this button to proceed directly You can also select the checkbox Data Blocks only actual values to include the actual values of the data blocks and then click this button 5 The upload has been completed when the following message appears ...

Страница 28: ...PU 2 Select the desired operating area on the PPU 3 Access the 808D data screen by pressing these two softkeys in succession 4 Access the NCK PLC data folder by pressing this hardkey Then select the machine manufacturer s PLC application file pte 5 Press this softkey to copy the selected file 6 Press this softkey and paste the pte file into the USB stick with the softkey 7 Unplug the USB stick and...

Страница 29: ...bar to create a new and empty PLC application 9 Import the pte file from the USB stick by choosing these two menus from the menu bar 10 Click this button or double click the pte file It will take several seconds to import the pte file 11 After successfully importing the PLC application you can view the import results ...

Страница 30: ... compare the project in the PLC Programming Tool with the project on the control by performing the following steps 1 Choose these two menus from the menu bar You can also select the checkbox Data Blocks only actual values to include the actual values of the data blocks ...

Страница 31: ...e control after the system is started up Then you can view the detailed information about the currently active PLC application in the version display through the following steps In the PLC Programming Tool right click the OB1 block and choose Properties In the opened OB1 property dialog in the comment text box you can add your own additional information for the PLC application Then in the version ...

Страница 32: ...512 18 Special configurations for a machine Bit 2 automatic lubrication after first power on factory setting Bit 4 signal that external spindle stops Bit 5 spindle positioning direction Bit 6 the hardware limit is independent from a PLC program Bit 7 each feed axis has a hardware limit switch activated when Bit 6 0 14512 19 Bit 1 function of spindle braking Bit 2 password clearing by power on 0 de...

Страница 33: ...t indicates that you have used the same symbol name or address for another symbol there is also a red wave under its name or address In this case you must check the repeated name or address and change it Symbol table 6 MANMACH This symbol table is for the function of a manual machine Symbol table 14 ASUP This symbol table is for the ASUP function It defines the start operating results and other pr...

Страница 34: ...is Symbol table 27 MD_PLC The symbol table 27 defines the PLC machine data from the NCK Symbol table 28 ALARM The symbol table 28 defines each bit of a PLC user alarm V1600 000x Symbol table 29 NV_MEM The symbol table 29 defines all the user data 128 byte retentive used in the standard subroutines Symbol table 30 SPC_MEM The symbol table 30 defines the seven special memories of the SINUMERIK 808D ...

Страница 35: ... de activates the working lamp Local variable definition None Relevant PLC machine data None Example for calling subroutine 20 3 5 Subroutine 22 AUX_SAFE_DOOR safe door Purpose Subroutine 22 is used to control safe door and can be called in AUX_MCP Local variable definition None Relevant PLC machine data No Description 14512 16 2 Selection of safe door function 0 do not use 1 use 14512 16 3 Safe d...

Страница 36: ...n 0 do not use 1 use Example for calling subroutine 23 3 7 Subroutine 31 PLC_ini_USR_ini user initialization Purpose Subroutine 31 is used for user initialization and can be called in subroutine PLC_INI Since the subroutine PLC_INI can be called only during the first PLC cycle the subroutine PLC_ini_USER_ini can be called also only during the first PLC cycle Local variable definition None Relevant...

Страница 37: ...ther this subroutine complies with the relevant safety requirements or not Purpose Subroutine 33 handles the Emergency Stop Pressing down the Emergency Stop button produces an emergency stop alarm and disables the control enable signal for SINAMICS V70 If you want to clear the emergency stop alarm you must first release the Emergency Stop button and then press the RESET key on the MCP This subrout...

Страница 38: ... subroutine 33 3 10 Subroutine 37 MCP_NCK MCP and HMI signal processing Purpose Subroutine 37 is used to transfer the interface signals from the MCP and HMI to the NCK interfaces and thus to activate the specific operating mode and control sequences It has the following main functions Selecting specific operating mode Selecting override Transferring signals from the HMI to NCK interfaces for insta...

Страница 39: ...lecting a handwheel according to HMI interface signals Purpose Subroutine 39 is used to select one of the two handwheels to control an axis X Y or Z in the machine coordinate system or the workpiece coordinate system according to the HMI signals With the HANDWHEEL key and axis selection key on the MCP you can assign the handwheel 1 in the workpiece coordinate system to any axis Note You cannot use...

Страница 40: ...e limit switches This subroutine activates the NCK hardware limit function via the NCK interface DB380xDBX1000 0 or DB380xDBX1000 1 according to the configurations of the hardware limit switches and thus makes the NCK produce a feed stop signal to an over distance axis Furthermore you can also connect the output OVlmt of this subroutine with the input HWL_ON of subroutine 33 to activate the Emerge...

Страница 41: ...L NC being in the cyclic state and able to enable the drive OPTM BOOL Brake release switch NO used for drive optimization reserved _1LMTp BOOL 1st axis hardware limit switch NC 1 _1LMTn BOOL 1st axis hardware limit switch NC _1REF BOOL 1st axis reference cam NO _2LMTp BOOL 2nd axis hardware limit switch NC 1 _2LMTn BOOL 2nd axis hardware limit switch NC _2REF BOOL 2nd axis reference cam NO _3LMTp ...

Страница 42: ...gnals for a simulated axis are output to the PLC otherwise an alarm will be thrown out indicating axis enable missing Example for calling subroutine 40 3 14 Subroutine 41 MINI_HHU handwheel hand held unit Purpose Subroutine 41 is used to support the customer s handheld units With a handheld unit you can assign the handwheels to X axis Y axis and Z axis and select incremental override X1 X10 X100 a...

Страница 43: ...aking function When the braking function is activated in the JOG mode press the SPINDLE LEFT key or SPINDLE RIGHT key and then press the SPINDLE STOP key after that the spindle brakes In the AUTO mode the spindle brakes when it changes rotating direction or coasts down When the spindle brakes corresponding output becomes active meanwhile the spindle does not accept rotary command until braking com...

Страница 44: ...pindle braking duration unit 0 1 s 14512 19 1 BOOL Selection of spindle braking function 1 enabled 0 forbidden Example for calling subroutine 42 3 16 Subroutine 43 MEAS_JOG measurement in the JOG mode Purpose Subroutine 43 is used to process the information from the measuring probe and to realize the measuring in the JOG mode function You can use this subroutine to calibrate the probe and measure ...

Страница 45: ... ESC_MEASJOG M241 5 Interrupt Meas_JOG DRY_MEASJOG M241 6 Dry run Meas_JOG SBL_MEASJOG M241 7 Single block Meas_JOG Relevant PLC machine data None Example for calling subroutine 43 3 17 Subroutine 44 COOLING cooling control Purpose Subroutine 44 is used to start stop cooling using the buttons on the MCP in the JOG mode or to start using the auxiliary function M07 M08 in the part program or to stop...

Страница 46: ...p Normally lubricating starts automatically and cyclically according to specified time interval Lintv and operates for a specific time Ltime at each cycle Lubrication stops in case of an Emergency Stop lubrication motor overload low lubricant level This subroutine can activate following alarms Alarm 700020 lubrication motor overload Alarm 700021 low lubricant level Local variable definition Table ...

Страница 47: ...PLCASUP1 SPF or PLCASUP2 SPF called by the PLC The SINUMERIK 808D ADVANCED provides two ASUPs for the PLC The two ASUPs can not be simultaneously executed and the PLCASUP1 SPF has a higher priority over the PLCASUP2 SPF In a program firstly you can initialize the ASUP1 and ASUP2 by setting PI index DB1200 DBB4001 and NCK read write start DB1200 DBX4000 0 and then use a rising edge to trigger ASUP1...

Страница 48: ...upied global variables IniASUP1 M229 0 Mark of ASUP1 initialization IniASUP2 M229 1 Mark of ASUP2 initialization Relevant PLC machine data None Example for calling subroutine 46 3 20 Subroutine 47 PLC_Select_PP PLC selects a subroutine Purpose Subroutine 47 is used to select a part program You firstly need to create a PLC program calling table and assign a program index to each part program in thi...

Страница 49: ...eated a service plan on the SINUMERIK 808D ADVANCED When the pre alarm time arrives the machine outputs a notification message When the final alarm time arrives the machine outputs an alarm message Note To perform a service plan on the PLC you need to download DB9903 SP_INI and DB9904 SP_ACT Local variable definition Table 3 21 Inputs Name Type Description Deact0 BOOL Freezing a service plan AckMs...

Страница 50: ...ar change delay time unit 0 01 s D_MON WORD Gear change monitoring time unit 0 01 s D_S0 WORD Spindle stop delay time unit 0 01 s T_GC WORD Monitor time for whole gear change process must D_CHG D_MON D_S0 unit 0 01 s S_hold BOOL Signal of zero spindle velocity NO S_alarm BOOL Spindle alarm NO LGi BOOL Low detection switch NO HGi BOOL High detection switch NO Table 3 24 Outputs Name Type Descriptio...

Страница 51: ...hg TIMER T25 Delay for monitoring the gear change Relevant PLC machine data None Example for calling subroutine 49 3 23 Subroutine 50 GearChg2_Virtual virtual spindle gear change Purpose Using subroutine 50 you can requests the system to switch to the corresponding gear after changing the gear manually The corresponding gear is set when M41 M45 are executed This subroutine must not be used togethe...

Страница 52: ...or from being broken In the AUTO and MDA modes the T function starts a tool change operation In the JOG mode a short strike on the MCP key changes a turret position During a tool change the NC interface signals Read in disable DB3200 DBX6 1 and Feedhold DB3200 DBX6 0 are set this means that the part program can only continue to run after the tool change The turret positioning is prohibited in the ...

Страница 53: ...RR3 BOOL Tool positioning time out ERR4 BOOL Turret motor overload ERR5 BOOL Wrong setting of the max tool for the turret ERR6 BOOL Reserved Assigned global variables T_cw_m M156 0 Position marking for turret CW rotation T_ccw_m M156 1 Position marking for turret CCW rotation CcwDelay M156 2 Turret CCW rotation delay K_active M156 3 Manual key active Tpos_C M156 4 Turret position changed Tp_eq_Tc ...

Страница 54: ...on action is forbidden in case of an emergency stop turret motor overload or program test simulation This subroutine can activate the following alarms Alarm 700022 Turret motor overload Alarm 700023 Programmed tool number higher than the max tool number of the turret Alarm 700024 Wrong setting of the max tool number for the turret Alarm 700026 Not able to find expected tool in monitor time Alarm 7...

Страница 55: ...d pre index signal in expected time ERR5 BOOL Not able to lock in expected time Assigned global variables T_CURRENT VD14000064 Current tool retentive data T_cw_m M156 0 Position marking for turret CW rotation T_ccw_m M156 1 Position marking for turret CCW rotation T_P_INDX MD160 Monitoring the tool change buffer zone in the JOG mode T_DES M164 Desired tool number T_DIR M168 0 Direction of adjacent...

Страница 56: ...e the NC interface signal Feedhold DB3200 DBX6 0 is set this means that the part program can only continue to run only after the tool change The turret positioning is prohibited in the case of an Emergency Stop turret motor overload or program test simulation Local variable definition Table 3 30 Inputs Name Type Description M_time WORD Monitoring time for the tool change T_key BOOL Manual tool cha...

Страница 57: ...7 1 Direction for searching for an adjacent tool Relevant PLC machine data No Unit Description 14510 22 0 1 s Monitoring time for searching for a tool Example for calling subroutine 53 3 27 Subroutine 54 Turret2_3_ToolDir tool change direction Purpose Subroutine 54 is used to find out the direction of searching for an adjacent tool and the pre indexing position this is the previous position of the...

Страница 58: ...WORD The max turret tool position number Pnum DWORD Programmed tool number Tcurr DWORD Current position of the turret Table 3 33 Outputs Name Type Description P_INDXo DWORD Pre indexing position the previous tool position of the desired tool in the direction of an adjacent tool DIR BOOL Tool change direction 1 CW 0 CCW Assigned global variables None Relevant PLC machine data None Example for calli...

Страница 59: ...rward TailRet_O BOOL Output to move the tailstock backward Assigned global variables SP_RUNm BOOL M236 0 Indicate that the spindle is running TailAdv_m BOOL M229 2 Indicates that the tailstock is moving forward TailRet_m BOOL M229 3 Indicates tailstock is moving backward Relevant PLC machine data None Example for calling subroutine 55 3 29 Subroutine 56 Lock_unlock_T clamping control for turning m...

Страница 60: ...oot_switch BOOL Foot switch signal Table 3 37 Outputs Name Type Description Lck1_O BOOL Clamping output 1 Lck2_O BOOL Clamping output 2 Lck_LED BOOL Clamping state ExtIn_LED BOOL External inside clamping state 0 external clamping 1 inside clamping Err1 BOOL No chuck operation during the running of the spindle Assigned global variables ChuckLcked BOOL M229 4 Chuck clamped ChuckLckLED BOOL M239 2 Ch...

Страница 61: ...of the spindle SP_CCW BOOL Counter clockwise rotation of the spindle SP_STOP BOOL Spindle stop NC_START BOOL NC start NC_STOP BOOL NC stop AUTO_ENABLE BOOL AUTO mode allowed MDA_ENABLE BOOL MDA mode allowed ROV BOOL Rapid rate Table 3 39 Outputs Name Type Description AL_03 BOOL Not approaching the reference point on axis X AL_04 BOOL Not approaching the reference point on axis Z AL_09 BOOL Incorre...

Страница 62: ...le 0 90 Cone angle 0 MB175 HMI MM Direction key enabled Spindle rotated MB176 HMI MM Working step enabled Groove enabled Thread chaining enabled Drilling enabled Arc enabled Cutting enabled Thread enabled MB177 HMI MM MB178 MB179 MB180 Recutting canceled Recutting performed Recut the thread or not Relevant PLC machine data No Unit Range Description MD14512 19 7 1 to enable the manual machine funct...

Страница 63: ...on for the SINUMERIK 808D ADVANCED T Turning The subroutines 46 58 and 59 must be used together Normally the spindle will be stopped after you press the NC reset key However when a manual machine is started you do not want to stop the spindle after pressing the NC reset key In this case call subroutine 59 MM_MCP_808D after executing subroutine 37 MCP_NCK Then you do not need to rewrite subroutine ...

Страница 64: ...ne reaching the spindle and Tool magazine reaching the tool change position keys In the auto mode you need to execute M06 to call the tool change subroutine when compiling a part program Subroutine 60 and the tool change subroutine must be used together during the tool change process Three operations are involved in the tool change control that is tool return tool retrieval and tool change 1 The t...

Страница 65: ...ition for the tool magazine T_rel_k BOOL Tool release key for the spindle T_rel_EnK BOOL Enabling key for the tool release of the spindle Table 3 42 Outputs Name Type Description MgzCW_o BOOL Clockwise rotation of the tool magazine MgzCCW_o BOOL Counter clockwise rotation of the tool magazine MgzSp_o BOOL The spindle position for the tool magazine MgzOrg_o BOOL The original position for the tool m...

Страница 66: ...and automatically switching it off after a certain time period A total of six hold switches and two delay switches are available in this subroutine with the delay duration being configurable The key inputs or outputs of the subroutine can be connected with any physical inputs or outputs The inputs and outputs of all idle switches are respectively ZERO and NULL_b M255 7 Local variable definition Ta...

Страница 67: ...scription From SBR 700010 DB1600 DBX1 2 HHU is active SBR41 MINI_HHU 700011 DB1600 DBX1 3 Not able to lock tool in expected time 700012 DB1600 DBX1 4 Spindle in braking progress SBR42 SPINDLE 700013 DB1600 DBX1 5 Operation while chuck is not locked SBR56 Lock_unlock_T 700014 DB1600 DBX1 6 Gear change time out SBR49 GearChg1_Auto 700015 DB1600 DBX1 7 Gear level position error 700016 DB1600 DBX2 0 D...

Страница 68: ...Spindle not reach tool release pos in time SBR60 Disk_MGZ_M 700036 DB1600 DBX4 4 Spindle not reach tool lock pos in time SBR60 Disk_MGZ_M 700049 DB1600 DBX6 1 Reference point X axis not reached SBR58 MM_MAIN 700050 DB1600 DBX6 2 Reference point Z axis not reached SBR58 MM_MAIN 700051 DB1600 DBX6 3 Wrong spindle direction started SBR58 MM_MAIN 700052 DB1600 DBX6 4 Watchdog timer JOG program SBR58 M...

Страница 69: ...vel I1 7 Tool path detecting signal T6 Valid at a low level I2 0 Turret motor overload Normally closed I2 1 Reserved for other types of turrets Reserved I2 2 I2 3 Chuck foot switch Normally open I2 4 Coolant level too low Normally closed I2 5 Cooling pump motor overload Normally closed I2 6 Lubricant level to low Normally closed I2 7 Lubrication pump motor overload Normally closed I3 0 Reserved I3...

Страница 70: ...k Structure of the sample application OB1 Call Conditions Subroutine Name Description Each scan SM0 0 AUX_MCP SBR20 Auxiliary function First scan SM0 1 PLC_INI SBR32 PLC initialization Each scan SM0 0 EMG_STOP SBR33 Emergency Stop control Each scan SM0 0 MCP_NCK SBR37 Transferring MCP and HMI signals to the NCK interface Each scan SM0 0 HANDWHL SBR39 Selecting a hand wheel through the interface si...

Страница 71: ...d Z with a hardware limit switch respectively in the positive and negative directions of each axis An analog spindle SP the fourth axis PLC controlled timely and quantitatively lubrication system PLC controlled cooling system Table 5 3 Assignment of inputs and outputs Signal Description Remark I0 0 Emergency Stop button Normally closed I0 1 Limit switch in the direction of axis X Normally closed I...

Страница 72: ...Valid at a high level I4 2 Handheld unit axis Z selected Valid at a high level I4 3 Handheld unit fourth axis selected Reserved I4 4 Handheld unit increment X1 Valid at a high level I4 5 Handheld unit increment X10 Valid at a high level I4 6 Handheld unit increment X100 Valid at a high level I4 7 Handheld unit enabled Valid at a high level Q0 0 Working lamp Q0 1 Q0 2 Chip forward Q0 3 Chip backwar...

Страница 73: ... Each scan SM0 0 COOLING SBR44 Cooling control Each scan SM0 0 LUBRICAT SBR45 Lubrication control Setting relevant PLC machine data Machine data Corresponding function 14510 12 JOG key layout 14510 13 Time for spindle braking 14510 20 The maximum number of tool positions 14510 24 Lubrication interval in 1min 14510 25 Lubrication duration in 0 01s 14512 16 Bit 1 Function of chip remover Bit 2 Funct...

Страница 74: ...broutine 60 subroutine 63 symbols used in the subroutines System resource distribution U user alarms Trademarks All names identified by are registered trademarks of Siemens AG The remaining trademarks in this publication may be trademarks whose use by third parties for their own purposes could violate the rights of the owner Disclaimer of Liability We have reviewed the contents of this publication...

Отзывы: