background image

aus

6

Getting to know your
appliance

Diagrams of the control panel and the
interior of the appliance can be found
in the envelope at the front.
Individual positions are referred to in
the text.

Control panel

1

Main switch

2

Additional options*

3

Time delay

4

Rinse-aid refill indicator

5

Programme buttons

6

Door Opener

7

Digital display

* some models

Appliance interior

20

Upper basket with 2-tiered cup rack

21

Additional cutlery basket for the top
basket *

22

Upper spray arm

23

Lower spray arm

24

Filters

25

Cutlery basket

26

Lower basket

27

Lock for detergent dispenser

28

Dispenser for rinse aid

29

Detergent compartment

30

Nameplate

*  not on all models

You will need to purchase the
following before using the
dishwasher for the first time:

– detergent
– rinse-aid

Downloaded from DishWasher-Manual.com Manuals

Содержание SE 66T372

Страница 1: ... Downloaded from DishWasher Manual com Manuals ...

Страница 2: ...Downloaded from DishWasher Manual com Manuals ...

Страница 3: ...he dishwasher 8 Arranging crockery glasses etc in the dishwasher 9 Detergents 13 Overview of programmes 15 Washing dishes 16 Additional functions 18 Maintenance and care 19 Fault finding 21 Customer Service 24 Information 24 Installation 25 Waste disposal 27 Downloaded from DishWasher Manual com Manuals ...

Страница 4: ...der a continuous work surface which is attached to the adjacent cupboards in order to ensure that the appliance is entirely stable After the appliance has been installed the mains plug should still be easily accessible Not on all models The plastic housing on the water input contains an electrically operated valve The connecting wires are inside the inlet hose Do not cut through this hose and do n...

Страница 5: ...ening and closing the door that children are not caught or crushed between the appliance door and the cupboard door situated below Child proof lock some models Comply with the drawings in the back of the envelope 40 Switch on the child proof lock 41 Open the door with child proof lock switched on 42 Switch off the child proof lock When the door is open the child proof lock offers no protection If ...

Страница 6: ...s 6 Door Opener 7 Digital display some models Appliance interior 20 Upper basket with 2 tiered cup rack 21 Additional cutlery basket for the top basket 22 Upper spray arm 23 Lower spray arm 24 Filters 25 Cutlery basket 26 Lower basket 27 Lock for detergent dispenser 28 Dispenser for rinse aid 29 Detergent compartment 30 Nameplate not on all models You will need to purchase the following before usi...

Страница 7: ...t alter the setting of the rinse aid control unless streaks turn knob towards or water marks turn knob towards are left on the dishes 28 Rinse aid controller Rinse aid refill indicator As soon as the rinse aid refill indicator lights up on the control panel 4 refill with rinse aid Switching the rinse aid indicator on or off You can switch the rinse aid indicator on or off This function can be chan...

Страница 8: ... cycle Even some types of glass e g crystal glass objects may turn cloudy after many wash cycles Recommendation In future buy utensils which are identified as dishwasher proof Damage to glassware and other dishes Possible causes type of glass or manufacturing process chemical composition of detergent water temperature and duration of dishwasher programme Suggested remedy Use glassware or porcelain...

Страница 9: ... that water can run off D they are stacked securely and cannot tip over D they do not prevent the spray arms from rotating while washing takes place Very small items should not be washed in the dishwasher as they could easily fall out of the baskets Removing the dishes To prevent water dripping from the top basket onto the dishes in the lower basket we recommend that you empty the lower basket fir...

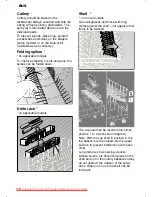
Страница 10: ...n Knife rack on applicable models Shelf not on all models Lean tall glasses and those with long stems against the shelf not against other items to be washed The cup shelf can be inserted into either position 1 or 2 as shown in diagram Note With the cup shelf in position 2 the top basket must be locked into the upper position to prevent interference with each other Long items such as serving utensi...

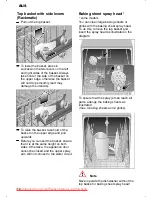
Страница 11: ...on either its upper or lower rollers according to requirement This enables more height to be gained for bigger dishes in either the top or bottom basket If required the height of the top basket can be adjusted in order to create more space for large utensils either in the top or bottom basket Select one of the two following procedures according to the design of the top basket for your appliance mo...

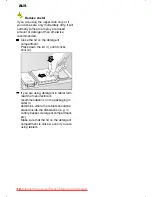
Страница 12: ...sure that it is at the same height on both sides Otherwise the appliance door cannot be closed and the upper spray arm will not connect to the water circuit Baking sheet spray head some models You can clean large baking sheets or grilles with the baking sheet spray head To do this remove the top basket and insert the spray head as illustrated in the diagram To ensure that the spray jet can reach a...

Страница 13: ...e whether a particular product is suitable for use with silverware If you have any further questions we recommend that you contact the customer advice departments of the various detergent manufacturers Detergent compartment with measuring marks The side of the detergent compartment is marked with lines to help you determine how much powder to add The capacity of the detergent container is 15 ml up...

Страница 14: ...nt compartment Press down the lid 1 until it clicks shut 2 If you are using detergent in tablet form read the manufacturer s recommendations on the packaging in order to determine where the tablets should be placed inside the dishwasher e g in cutlery basket detergent compartment etc Make sure that the lid on the detergent compartment is closed even if you are using tablets Downloaded from DishWas...

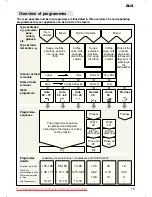
Страница 15: ... Dry Dry Rinse aid 45_ Interme diate rinse Wash 45_ Prerinse Rinse aid 55_ Interme diate rinse Wash 45_ Prerinse Non delicate Mixed Wash programme Very little Little Large High Normal Lightly Adhesive Amount of food remnants State of food remnant Auto 65_ 75_ Auto 55_ 65_ Auto 35_ 45_ Normal 45_ Quick 45_ Prerinse Low Normal 105 135 1 45 1 75 14 21 30 0 70 10 19 0 05 4 95 150 1 15 1 55 10 18 105 0...

Страница 16: ...his way the water consumption is reduced by approx 4 litres for utensils which are less dirty Switching the dishwasher ON Turn on the tap Set main switch 1 to ON Indicators light up according to the last programme that was selected This same programme will run again if no other programme button 5 is pressed The numerical display 7 shows the expected duration of the programme Close door The program...

Страница 17: ...as ended Open the door when the programme has ended Set main switch 1 to OFF Turn the water tap off Does not apply when Aqua Stop unit has been fitted Remove dishes etc when they have cooled down Interrupting the programme Open the door Caution There is a risk of water squirting out from inside the appliance Do not open the door fully until the spray arm has stopped rotating Set main switch 1 to O...

Страница 18: ...form a pre soak cycle before the main programme This cycle enables cookware e g pans bowls etc to be pre soaked and pre rinsed in the lower rack If you wish to pre soak the dishes this programme option must be selected by pressing the Pre Soak button before the programme starts The recommended detergent amount is approx 5 g poured onto the inside of the door Time reduction time saving Pressing the...

Страница 19: ...y consequential damage Regularly wipe the front of the appliance and panel with a damp cloth water and a little washing up liquid will suffice Do not use sponges with a rough surface or abrasive detergents as these could scratch the surfaces Attention Never use other chlorinated household detergents Health hazard Rinse aid As soon as the rinse aid refill indicator lights up on the control panel 4 ...

Страница 20: ...d 23 and the arm mountings Inspect the nozzles in the spray arms for blocked holes due to remnants of food If necessary pull the lower arm 23 upwards and lift it off Unscrew the upper spray arm 22 Clean both spray arms under running water Refit the spray arms Ensure that the lower arm has locked into place and the upper one is screwed tight Downloaded from DishWasher Manual com Manuals ...

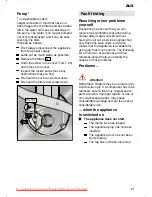
Страница 21: ...u can resolve most problems that arise during normal daily usage yourself without having to call out a service engineer Not only does this save costs but it also means that the appliance is available for use again that much sooner The following list of common occurrences and their remedies should help you identify the causes of most problems Problems Attention Remember Repairs may be carried out b...

Страница 22: ...up with detergent Compartment must be dry before detergent is added Water remains inside appliance after programme has ended Blockage or kink in drainage hose Pump is jammed Filters are blocked The programme is still running Wait for the programme to end numerical display will indicate 0 Perform Reset function during washing Unusual amount of foam is created Normal washing up liquid has been poure...

Страница 23: ...set too low Although water is quite hard no salt has been put in appliance Water softener was set too low Lid on salt container is not screwed tight If you used a phosphate free detergent try a detergent containing phosphates and compare results Dishes cutlery etc have not been dried Selected programme did not include drying function Amount of rinse aid was set too low Items were removed from dish...

Страница 24: ...ne of the problems previously discussed is not free of charge even during the warranty period Information Notes on comparison tests You will find details of the conditions for the comparison tests on the additional Notes on comparison tests sheet The consumption values for the relevant programmes are given in the introduction General Built under and integrated appliances which are subsequently ins...

Страница 25: ...he drainage hose is not kinked crushed or twisted ensure that there is no sealing cover which prevents the waster water from flowing away Fresh water connection Using the enclosed parts connect the fresh water connection to the tap according to the installation instructions Ensure that the fresh water connection is not kinked crushed or twisted When replacing the appliance always connect a new wat...

Страница 26: ...may seep into the control module and cause subsequent errors with programme functions The appliance must be drained in the following sequence Turn on the tap Close the door Set main switch to ON Select the B programme The programme duration in minutes is shown in the numerical display Wait for approximately 4 minutes Terminate the programme by pressing A and C simultaneously The time display chang...

Страница 27: ...y friendly manner Keep children away from shipping carton and packaging components Danger of suffocation from folding cartons and plastic film D Corrugated cardboard consists mainly of wastepaper D The moulded polystyrene parts do not contain any chlorofluorohydrocarbons D The polyethylene film PE consists partly of secondary raw materials D The wooden frames if fitted are made of untreated residu...

Страница 28: ...aus 28 aus Subjekt to modification Downloaded from DishWasher Manual com Manuals ...

Страница 29: ...Downloaded from DishWasher Manual com Manuals ...

Страница 30: ... 0 Siemens Electrogeräte GmbH Carl Wery Straße 34 81739 München To contact us directly use the tel no or fax no in the enclosed customer service list Downloaded from DishWasher Manual com Manuals ...

Отзывы: