RUGGEDCOM RX1000P
Installation Guide
Chapter 2
Installing the Device
Mounting the Device on a DIN Rail
7
Section 2.1.2
Mounting the Device on a DIN Rail
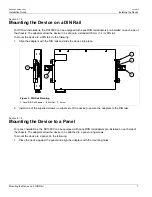
For DIN rail installations, the RX1000P can be equipped with panel/DIN rail adapters pre-installed on each side of
the chassis. The adapters allow the device to be slid onto a standard 35 mm (1.4 in) DIN rail.
To mount the device to a DIN rail, do the following:
1. Align the adapters with the DIN rails and slide the device into place.
2
1
2
3
3
Figure 3: DIN Rail Mounting
1.
Panel/DIN Rail Adaptor
2.
DIN Rail
3.
Screw
2. Install one of the supplied screws on either side of the device to secure the adapters to the DIN rails.
Section 2.1.3
Mounting the Device to a Panel
For panel installations, the RX1000P can be equipped with panel/DIN rail adapters pre-installed on each side of
the chassis. The adapters allow the device to be attached to a panel using screws.
To mount the device to a panel, do the following:
1. Place the device against the panel and align the adapters with the mounting holes.
Содержание RUGGEDCOM RX1000P
Страница 10: ...RUGGEDCOM RX1000P Installation Guide Chapter 1 Introduction Ports Controls and Indicator LEDs 4 ...
Страница 38: ...RUGGEDCOM RX1000P Installation Guide Chapter 3 Communication Ports Connecting Multiple RS485 Devices 32 ...
Страница 42: ...RUGGEDCOM RX1000P Installation Guide Chapter 4 Technical Specifications Mechanical Specifications 36 ...
Страница 46: ...RUGGEDCOM RX1000P Installation Guide Chapter 5 Dimension Drawings 40 ...


