
CE1B3072en / 03.03.2013
Subject to alteration
Siemens Building Technologies / HVAC Products
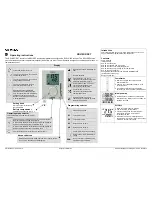
Set the first switch on time
1.
Set the programming selector to position A1. The setting for the first switch on
time flashes.
2.
Turn the setting knob counterclockwise
-
to decrease the time, or clockwise
+
to
increase the time.
3.
When the required switch on time is displayed, move the programming selector
to any other position to confirm the setting.
Set the first switch off time
1.
Set the programming selector to position A2. The setting for the first switch off
time flashes.
2.
Turn the setting knob counterclockwise
-
to decrease the time, or clockwise
+
to
increase the time.
3.
When the required switch off time is displayed, move the programming selector
to any other position to confirm the setting.
Set the second switch on time
1.
Set the programming selector to position A3. The setting for the second switch
on time flashes.
2.
Turn the setting knob counterclockwise
-
to decrease the time, or clockwise
+
to
increase the time.
3.
When the required switch on time is displayed, move the programming selector
to any other position to confirm the setting.
Set the second switch off time
1.
Set the programming selector to position A4. The setting for the second switch
off time flashes.
2.
Turn the setting knob counterclockwise to decrease the time, or clockwise
+
to
increase the time.
3.
When the required switch off time is displayed, move the programming selector
to any other position to confirm the setting.
Set comfort temperature
1.
Set the programming selector to position
.
2.
The setting for the current comfort temperature flashes.
3.
Turn the setting knob counterclockwise
-
to decrease the
temperature setting, or
clockwise to increase the temperature setting.
4.
When the required comfort
temperature is displayed, move the programming
selector to any other position to confirm the setting.
Set energy saving temperature
1. Set the programming selector to position
2. The setting for the current energy saving temperature flashes.
3. Turn the setting knob counterclockwise
-
to decrease the temperature setting,
or clockwise
+
to increase the temperature setting.
3. When the required energy saving temperature is displayed, move the
programming selector to any other position to confirm the setting.
Note:
Set the controller to RUN when all programming is completed.
Temporarily change current setpoint
1. The current programmed temperature can be changed temporarily when the
operating mode selector is in the AUTO position and the programming selector
in the RUN position.
2. Turn the setting knob slightly in either direction to display the current programmed
temperature, turn it counterclockwise to decrease the temperature, or clockwise to
increase the temperature .This new temperature is maintained until the next
switching time. The hand symbol is displayed when activated.
Changing
the batteries
1. Get 2 new alkaline batteries type AA, 1.5 V.
2. Within 1 minute: Remove the battery holder, then the batteries, insert the new
batteries and replace the battery holder.
The old, set values must be checked!
3. Properly dispose of old batteries per environmental regulations.
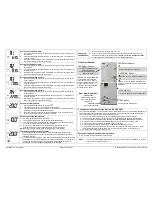
Front View Receiver
LED Signal Indicator
LED Relay Indicator
The signal is good when the
LED is solid green.
A solid red LED indicates that
there is no signal.
Orange LED indicates relay is on.
OVERRIDE Button *
* Note:
When press OVERRIDE
the RF data will not affect the
output during 15 min. After 15
min, the output and LED will not
change if not RF receive. If
receive RF, the output and LED
will follow the RF data.
Press this button to manually switch on or
off
RESET : Press the LEARN & OVERRIDE
button for 4 seconds to delete all transmitter
addresses.
LEARN Button
Rear View Room Unit
(Transmitter)
Press the button to put into learn mode
TEST Button
Used for testing transmission.
Mounting plate must be
removed to get access
to the back!
Learn Button
Press to learn telegram
Configuration instructions for the Siemens RDJ10RF/SET
The Transmitter RDJ10RF room unit and the receiver RCR10/433 are set to communicate (bonded) with
each other at the factory. If they fail to do so at installation or it is necessary to re bond the units due to
loss of communication please follow the following instructions.
1. For room unit: Set the programming switch to RUN and the selector switch to AUTO.
2. If room unit is wall mounted remove from wall or if on table stand remove grey backing plate
3. For receiver Reset by simultaneously pressing the LEARN & OVERRIDE button for 4 seconds.
4. On Receiver Press and release the LEARN button. This puts the receiver in learn mode.
5. On room unit Press and release the LEARN button on the back.
6. A green solid LED indicates a good signal, a red solid LED indicates no signal.
7. To test transmission, press the TEST button on the transmitter, this switches the relay to ON on
the receiver regardless of temperature. The RF TEST symbol appears on the display (1 s).
8. An orange LED indicates that the relay is on.
Energy saving tips without sacrificing comfort
Do not allow room temperatures to exceed 21 ºC.
NOTE:
You can press the OVERRIDE button on the receiver to manually switch ON/OFF for a faulty
room unit or transmission protocol.