background image


Siemens ProtoAir Start-up Guide


Page 36 of 66


o


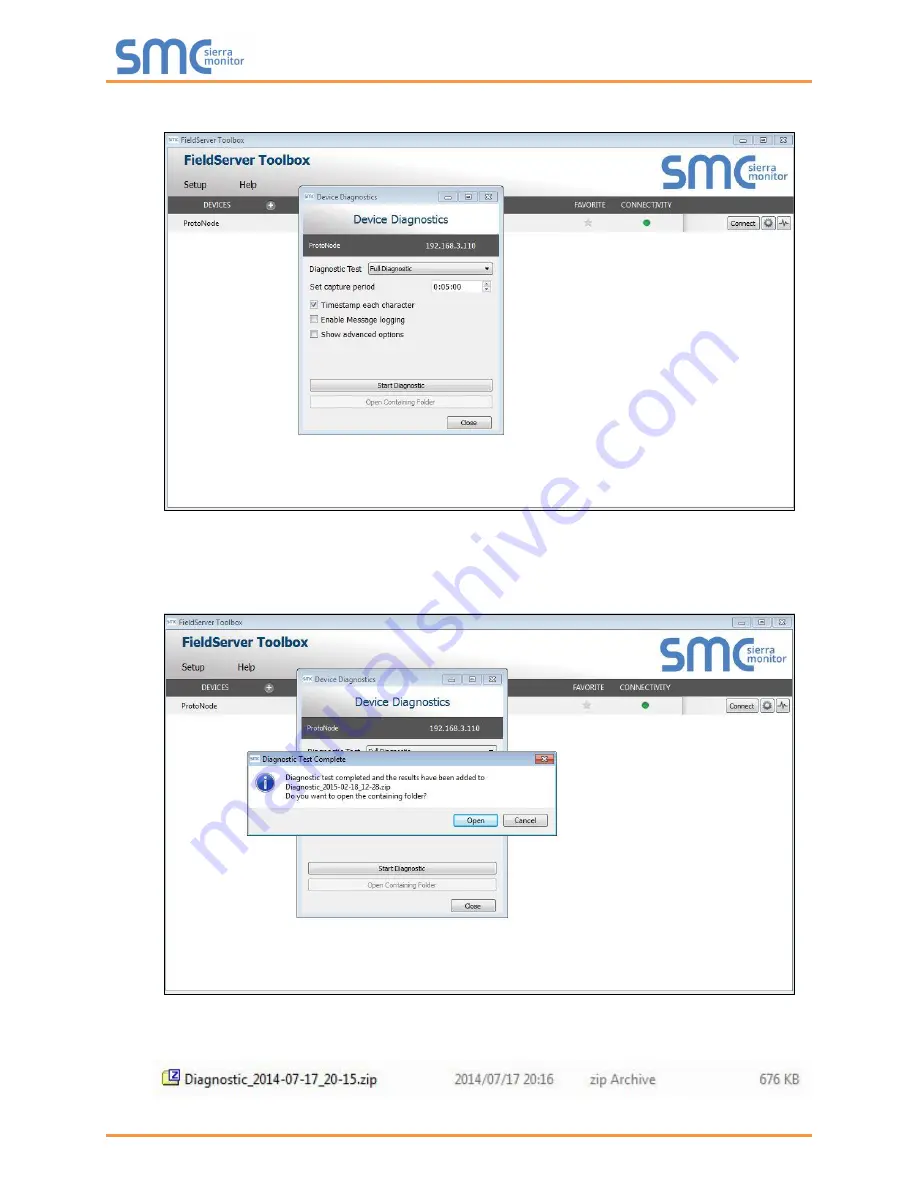
Click on “Start Diagnostic” 


o


Wait for Capture period to finish, then the Diagnostic Test Complete window will appear 


Step 2

: Send Log 

o


Once the Diagnostic test is complete, a .zip file is saved on the PC 


o


Choose “Open” to launch explorer and have it point directly at the correct folder 

o


Send the Diagnostic zip file to technical support 


Содержание ProtoAir FPA-W44

Страница 1: ... Interfacing Siemens Products FC410 MAG6000 MASS6000 FST030 To Building Automation Systems and SMC Cloud BACnet MS TP BACnet IP Modbus TCP IP and EtherNet IP APPLICABILITY EFFECTIVITY Explains ProtoAir hardware and how to install it The instructions are effective for the above as of January 2019 ...

Страница 2: ...ion does not provide direct support If Siemens needs to escalate the concern they will contact Sierra Monitor Corporation for assistance Support Contact Information Siemens Industry Inc 2060 Detwiler Road Suite 111 Harleysville PA 19438 Customer Service Toll Free 800 333 7421 Outside US 423 262 5710 Website www siemens com For Support Online create a support request via usa siemens com support req...

Страница 3: ...t the ProtoAir 3 pin RS 485 R2 port to the field protocol cabling Section 4 2 5 Connect power to ProtoAir s 3 pin connector Section 4 5 6 Connect a PC to the ProtoAir via Ethernet cable or by the ProtoAir s Wi Fi Access Point Section 5 7 Use a web browser to access the ProtoAir Web Configurator page to select the profile of the device attached to the ProtoAir and enter any necessary device informa...

Страница 4: ...he ProtoAir Web Configurator 19 6 2 Select Field Protocol Configuration 19 6 3 Setting ProtoAir Active Profiles 20 6 3 1 Verify Device Communications 21 7 BACnet Setting Node_Offset to Assign Specific Device Instances 22 8 How to Start the Installation Over Clearing Profiles 23 9 Network Settings 24 9 1 Navigate to the FS GUI Network Settings 24 9 2 Change the ProtoAir IP Address 26 9 2 1 Update W...

Страница 5: ...4 Appendix C 2 MAG6000 Modbus RTU Mappings to BACnet and EtherNet IP 45 Appendix C 3 MASS6000 Modbus RTU Mappings to BACnet and EtherNet IP 47 Appendix C 4 FST030 Modbus RTU Mappings to BACnet and EtherNet IP 50 Appendix D Reference 65 Appendix D 1 Specifications 65 Appendix D 1 1 Compliance with UL Regulations 65 Appendix E Limited 2 Year Warranty 66 ...

Страница 6: ...s 20 Figure 15 Web Configurator Showing Active Profile Additions 21 Figure 16 Web Configurator Node Offset Field 22 Figure 17 Active Profile 22 Figure 18 Web Configurator Page Diagnostics Button 24 Figure 19 FS GUI Landing Page 24 Figure 20 Generic FS GUI Navigation Panel Network Settings 25 Figure 21 FS GUI Ethernet Port Network Settings 27 Figure 22 FS GUI Wi Fi Client Network Settings 28 Figure...

Страница 7: ...hat indicates that a product has passed a series of rigorous tests conducted by an independent laboratory which verifies that the product correctly implements the BACnet features claimed in the listing The mark is a symbol of a high quality BACnet product Go to www BACnetInternational net for more information about the BACnet Testing Laboratory Click here for the BACnet PIC Statement ...

Страница 8: ... tested profiles configurations for the supported devices FPA W44 Connectivity Diagram The ProtoAir can connect with Sierra Monitor s SMC Cloud The SMC Cloud allows technicians the OEM s support team and Sierra Monitor s support team to remotely connect to the ProtoAir The SMC Cloud provides the following capabilities for any registered devices in the field Remotely monitor and control devices Col...

Страница 9: ...llows Model Part Number ProtoAir FPA W44 1762 Figure 1 ProtoAir Part Numbers FPA W44 units have the following 3 ports RS 485 Ethernet RS 485 3 2 Point Count Capacity and Registers per Device The total number of registers presented the device s attached to the ProtoAir cannot exceed Part number Total Registers FPA W44 1762 1 500 Figure 2 Supported Point Count Capacity Devices Registers Per Device F...

Страница 10: ... Set Node ID for Any Device Attached to the ProtoAir Set Node ID for the device attached to ProtoAir to 1 Document the Node ID that is assigned The Node ID assigned is used for deriving the Device Instance for BACnet IP and BACnet MS TP Section 7 NOTE The Modbus TCP IP field protocol Node IDs are automatically set to be the same value as the Node ID of the device 3 4 Attaching the Antenna Wi Fi An...

Страница 11: ...as a 3 pin Phoenix connector for connecting RS 485 devices on the R1 port NOTE Use standard grounding principles for RS 485 GND Device Pins ProtoAir Pin Pin Assignment RS 485 Pin 1 RS 485 RS 485 Pin 2 RS 485 RS 485 GND Pin 3 RS 485 GND Figure 5 RS 485 Connections from Devices to the ProtoAir G Figure 6 Device RS 485 Wiring Setup ...

Страница 12: ...to the 3 pin RS 485 connector on the R2 port Figure 7 o Use standard grounding principles for RS 485 GND See Section 5 for information on connecting to an Ethernet network BMS Wiring ProtoAir Pin Pin Assignment RS 485 Pin 1 RS 485 RS 485 Pin 2 RS 485 Pin 3 RS 485 GND Figure 7 Connection from ProtoAir to RS 485 Field Network G ...

Страница 13: ...10 ohms which is in line with the BACnet spec It should only be enabled at one point on the bus for example on the field port were there are very weak bias resistors of 100k Since there are no jumpers many gateways can be put on the network without running into the bias resistor limit which is 500 ohms NOTE See www ni com support serial resinfo htm for additional pictures and notes NOTE The R1 and...

Страница 14: ...rmination resistor is also used to reduce noise It pulls the two lines of an idle bus together However the resistor would override the effect of any bias resistors if connected NOTE The R1 and R2 DIP Switches apply settings to the respective serial port NOTE If the gateway is already powered on DIP switch settings will not take effect unless the unit is power cycled R1 Termination Resistor DIP Swi...

Страница 15: ...added to the power supply of the host system A safety margin of 25 is recommended Figure 10 Required Current Draw for the ProtoAir Apply power to the ProtoAir as shown below in Figure 11 Ensure that the power supply used complies with the specifications provided in Appendix D 1 The ProtoAir accepts 12 24VDC or 24VAC on pins 4 and 5 Frame GND should be connected Power to ProtoAir ProtoAir Pin Pin A...

Страница 16: ...g the Subnet of the Connected PC The default IP Address for the ProtoAir is 192 168 1 24 Subnet Mask is 255 255 255 0 If the PC and ProtoAir are on different IP networks assign a static IP Address to the PC on the 192 168 1 xxx network For Windows 10 Find the search field in the local computer s taskbar usually to the right of the windows icon and type in Control Panel Click Control Panel click Ne...

Страница 17: ...then the IP Address doesn t need to be changed the ProtoAir is already on the same subnet Skip the rest of the section and go to Section 6 Select Network Settings in the Configure Device window Modify the IP Address N1 IP Address field of the gateway Ethernet port o Change additional fields as needed NOTE If the gateway is connected to a router the Default Gateway field of the gateway should be se...

Страница 18: ...tion to the ProtoAir with Wi Fi To connect to the ProtoAir Wi Fi Access Point Click the icon found in the bottom right corner of the computer screen to open the available Wireless Network Connections Select the desired ProtoAir and click Connect Enter the Security key The default is 12345678 The available Wireless Network Connection menu should now show that the computer is connected to the ProtoA...

Страница 19: ...Address of the ProtoAir has been changed the IP Address can be discovered using the FS Toolbox utility See Appendix A 1 for instructions 6 2 Select Field Protocol Configuration On the Web Configurator page the first configuration parameter is the Protocol Selector Select the configuration desired using the number key under the Parameter Description header and click the Submit button o A message wi...

Страница 20: ...ive Profiles are shown below the configuration parameters The Active Profiles section lists the currently active device profiles including previous Web Configurator additions This list is empty for new installations or after clearing all configurations Figure 14 Figure 14 Web Configurator Showing no Active Profiles ...

Страница 21: ... the Profile to the list of devices to be configured Repeat this process until all the devices have been added Completed additions are listed under Active profiles as shown in Figure 15 NOTE If multiple devices are connected to the ProtoAir set the BACnet Virtual Server Nodes field to Yes otherwise leave the field on the default No setting 6 3 1 Verify Device Communications Check that the port R1 ...

Страница 22: ...ge the Node_Offset value as needed using the calculation below Device Instance desired Node_Offset Node_ID For example if the desired Device Instance for device 1 is 50 001 and the following is true Device 1 has a Node ID of 1 Then plug device 1 s information into the formula to find the desired Node_Offset 50 001 Node_Offset 1 50 000 Node_Offset Once the Node_Offset value is input it will be appl...

Страница 23: ...ROFILES Follow the steps outlined in Section 6 1 to access the ProtoAir Web Configurator At the bottom left of the page click the Clear Profiles and Restart button Once restart is complete all past profiles discovered and or added via Web configurator are deleted The unit can now be reinstalled ...

Страница 24: ...etwork Settings Open the FS GUI page o From the Web Configurator page click on the blue Diagnostics Debugging button in the bottom right corner of the screen Find the Navigation tree on the left side of the screen Figure 19 FS GUI Landing Page Figure 18 Web Configurator Page Diagnostics Button ...

Страница 25: ...e 25 of 66 Click the orange arrow next to the ProtoAir CN number and title to expand the tree Click on the orange arrow next to Setup to expand the tree Click on Network Settings Figure 20 Generic FS GUI Navigation Panel Network Settings ...

Страница 26: ...of the ProtoAir in the following methods When using the Ethernet port to connect to the local network Section 9 2 1 When connecting the ProtoAir to a local wireless access point configure the Wi Fi Client Settings in the ProtoAir Section 9 2 2 NOTE For Wi Fi Access Point network information see Appendix B 4 ...

Страница 27: ...t the Default Gateway to the same IP Address as the router Click Update IP Settings then click on System Restart to restart the Gateway and activate the new IP Address Connect the ProtoAir to the local network or router NOTE If the FS GUI was open in a browser the browser will need to be pointed to the new IP Address of the ProtoAir before the FS GUI will be accessible again IP Setting Fields Defi...

Страница 28: ... IP gateway to the same IP Address as the router Click Update Wi Fi Settings then click on System Restart to restart the gateway and activate Wi Fi Client settings Go to Common settings Section 9 2 3 to set the Primary Connection to Wi Fi Client Wi Fi Client Fields Definition Connection Status Status of connection MAC Address BSSID Channel Wi Fi Client MAC Address BSSID and Channel Tx Rx Msgs Numb...

Страница 29: ...s are available Select the desired option from the drop down menu on the right Click Update Common Settings then click on System Restart to restart the gateway and activate the new settings NOTE If using Wi Fi Client and not Ethernet change Primary Connection to Wi Fi NOTE The fields below the update button show the settings as they were set in the IP Settings or Wi Fi Client pages They are not ed...

Страница 30: ...he executable file and complete the installation Connect a standard Cat 5 Ethernet cable between the user s PC and ProtoAir Double click on the FS Toolbox Utility and click Discover Now on the splash page Check for the IP Address of the desired gateway If correcting the IP Address of the gateway click the settings icon on the same row as the gateway then click Network Settings change the IP Addres...

Страница 31: ...s of the ProtoAir into the web browser or use the FieldServer Toolbox to connect to the ProtoAir Click on Diagnostics Button then click on view and then on connections If there are any errors showing on the Connections page refer to Appendix A 3 to check the wiring and settings Figure 25 Error Messages Screen ...

Страница 32: ...ProtoAir Appendix A 4 o Check baud rate parity data bits stop bits o Check Detector ID matches the correct device o Verify wiring o Verify the device was listed under the Web Configurator Active Profiles Section 6 Field COM problems o Visual observations of LEDs on the ProtoAir Appendix A 4 o Verify IP Address setting o Verify wiring NOTE If the problem still exists a Diagnostic Capture needs to b...

Страница 33: ...error screen of the FS GUI interface to support for evaluation PWR This is the power light and should always show steady green when the unit is powered TX The TX LED will flash when a message is received on the serial port on the 3 pin connector If the serial port is not used this LED is non operational TX1 applies to the R1 connection while TX2 applies to the R2 connection RX The RX LED will flas...

Страница 34: ...c capture utilities are embedded in the FS GUI web interface Starting a diagnostic capture takes a snapshot of the loaded configuration files and a log of all the communications over a specified period of time This works for both serial and Ethernet connections NOTE The information in the zipped files contains everything support needs to quickly resolve problems that occur on site Appendix A 5 1 U...

Страница 35: ...ir Start up Guide Page 35 of 66 Step 1 Take a Log o Click on the diagnose icon of the desired device o Ensure Full Diagnostic is selected this is the default NOTE If desired the default capture period can be changed ...

Страница 36: ...re period to finish then the Diagnostic Test Complete window will appear Step 2 Send Log o Once the Diagnostic test is complete a zip file is saved on the PC o Choose Open to launch explorer and have it point directly at the correct folder o Send the Diagnostic zip file to technical support ...

Страница 37: ...gnostic Capture will accelerate diagnosis of the problem Open the FieldServer FS GUI page Click on Diagnostics in the Navigation panel Go to Full Diagnostic and select the capture period Click the Start button under the Full Diagnostic heading to start the capture o When the capture period is finished a Download button will appear next to the Start button Click Download for the capture to be downl...

Страница 38: ...ndix A 6 Wi Fi Signal Strength Wi Fi 60dBm Excellent 70dBm Very good 80dBm Good 80dBm Weak Figure 28 Wi Fi Signal Strength Listing NOTE If the signal is weak or spotty try to improve the signal strength by checking the antenna and the ProtoAir position ...

Страница 39: ...he left hand side do the following a Click on Setup b Click on File Transfer c Click on the General tab 5 In the General tab click on Choose Files and select the web img file extracted in step 1 6 Click on the orange Submit button 7 When the download is complete click on the System Restart button Appendix B 2 BACnet Setting Network_Number for More Than One ProtoAir on the Subnet For both BACnet MS...

Страница 40: ...as unrestricted access to the ProtoAir The User account can view any ProtoAir information but cannot make any changes or restart the ProtoAir The password needs to be a minimum of eight characters and is case sensitive If the password is lost click cancel on the password authentication popup window and email the password recovery token to technical support to receive a temporary password from the ...

Страница 41: ...ssword SSID Broadcast and Channel NOTE The default channel is 11 Click Update Wi Fi Settings then click on the System Restart to restart the Gateway and activate the Wi Fi settings NOTE If the FS GUI was open in a browser via Wi Fi the browser will need to be updated with the new Wi Fi details before the ProtoAir FS GUI will be accessible again Wi Fi AP Fields Definition Connection Status Status o...

Страница 42: ...Siemens ProtoAir Start up Guide Page 42 of 66 Appendix B 5 Mounting The ProtoAir can be mounted using the DIN rail mounting bracket on the back of the unit Figure 33 DIN Rail Din Rail Bracket ...

Страница 43: ...Siemens ProtoAir Start up Guide Page 43 of 66 Appendix B 6 Physical Dimension Drawing Figure 34 ProtoAir FPA W44 Dimensions R1 Serial Port Power Port Wi Fi Antenna Socket R2 Serial Port ...

Страница 44: ...alizerFractionalPart_XXX Reset totalizer AV 19 ResetTotalizerWR_XXX Pause totalizer AV 20 PauseTotalizerWR_XXX Resume totalizer AV 21 ResumeTotalizerWR_XXX Access level AI 22 AccessLevel_XXX User password AV 23 UserPasswordWR_XXX Set To Default AV 24 Operating Time Total AI 25 Operating Time AI 26 Driver Current AI 27 DriverCurrent_XXX Pick up Amplitude 1 AI 28 PickUpAmplitude1_XXX Pick up Amplitu...

Страница 45: ...atch Reg 4 AI 9 Totalizer 1 AI 10 Totalizer1_XXX Totalizer 2 Batch AI 11 Totalizer2Batch_XXX Run indicator AI 12 Product code AI 13 Capability bits Reg 1 AI 14 Capability bits Reg 2 AI 15 Flowmeter revision AI 16 MODBUS revision AI 17 MODBUS module HW version AI 18 Last Coil Error AI 19 Last Coil Error AI 20 Last HoldReg Error AI 21 Last HoldReg Error AI 22 Flow direction AV 23 Q max AV 24 Q max 2...

Страница 46: ...1 ErrorPending7_XXX Error pending list Reg 08 AI 82 ErrorPending8_XXX Error pending list Reg 09 AI 83 ErrorPending9_XXX Error pending list Reg 10 AI 84 Error pending list Reg 11 AI 85 Error pending list Reg 12 AI 86 Error pending list Reg 13 AI 87 Error pending list Reg 14 AI 88 Error pending list Reg 15 AI 89 Error pending list Reg 16 AI 90 Error pending list Reg 17 AI 91 Error pending list Reg 1...

Страница 47: ...V 154 ResetTotalizer2_XXX ResetTotalizer2WR_XXX Hold Totalizer 2 BV 155 HoldTotalizer2_XXX HoldTotalizer2WR_XXX Start Batch BV 156 StartBatch_XXX StartBatchWR_XXX Pause Batch BV 157 PauseBatch_XXX PauseBatchWR_XXX Appendix C 3 MASS6000 Modbus RTU Mappings to BACnet and EtherNet IP Point Name BACnet Object Type BACnet Object ID EIP Read Tag Name Absolute Massflow AI 1 DA_Flt_XXX 0 Absolute Volumefl...

Страница 48: ..._U16_XXX 32 Current Output 1 time constants AV 58 DA_Flt_XXX 24 Digital Output 1 function AV 59 DA_U16_XXX 33 Pulse 1 selection AV 60 DA_U16_XXX 34 Pulse 1 direction AV 61 DA_U16_XXX 35 Pulse 1 width AV 62 DA_U16_XXX 36 Frequency 1 selection AV 63 DA_U16_XXX 37 Frequency 1 Direction AV 64 DA_U16_XXX 38 Frequency 1 Fmax AV 65 DA_U16_XXX 39 Frequency 1 Timeconstants AV 66 DA_Flt_XXX 25 Limit Digital...

Страница 49: ...X 75 USM II Error pending list Reg 23 AI 128 DA_U16_XXX 76 USM II Error pending list Reg 24 AI 129 DA_U16_XXX 77 USM II Error pending list Reg 25 AI 130 DA_U16_XXX 78 USM II Error pending list Reg 26 AI 131 DA_U16_XXX 79 USM II Error pending list Reg 27 AI 132 DA_U16_XXX 80 USM II Error log list Reg 01 AI 133 DA_U16_XXX 81 USM II Error log list Reg 02 AI 134 DA_U16_XXX 82 USM II Error log list Reg...

Страница 50: ...bus RTU Mappings to BACnet and EtherNet IP Point Name BACnet Object Type BACnet Object ID EIP Read Tag Name Volume flow AI 1 DA_Flt_XXX 0 Mass flow AI 2 DA_Flt_XXX 1 Flow velocity AI 3 DA_Flt_XXX 2 Sound velocity AI 4 DA_Flt_XXX 3 Density AI 5 DA_Flt_XXX 4 Pressure AI 6 DA_Flt_XXX 5 Kinematic viscosity AI 7 DA_Flt_XXX 6 Medium temperature AI 8 DA_Flt_XXX 7 Standard volume flow AI 9 DA_Flt_XXX 8 St...

Страница 51: ...AV 68 DA_U16_XXX 28 Totalizer 1 Standard Volume units AV 69 DA_U16_XXX 29 Totalizer 2 Volume units AV 70 DA_U16_XXX 30 Totalizer 2 Mass units AV 71 DA_U16_XXX 31 Totalizer 2 Standard Volume units AV 72 DA_U16_XXX 32 Totalizer 3 Volume units AV 73 DA_U16_XXX 33 Totalizer 3 Mass units AV 74 DA_U16_XXX 34 Totalizer 3 Standard Volume units AV 75 DA_U16_XXX 35 Pulse width units CH2 AV 76 DA_U16_XXX 36 ...

Страница 52: ...6 DA_U16_XXX 65 Clamp on recommended spacing ideal AI 137 DA_Flt_XXX 70 Recommended spacing AI 138 DA_Flt_XXX 71 Recommended spacing index AI 139 DA_U16_XXX 66 Calculate spacing AV 140 DA_U16_XXX 67 Path 1 Transducer frequency AV 141 DA_Flt_XXX 72 Path 1 Path geometry AV 142 DA_U16_XXX 68 Path 1 Spacing offset AV 143 DA_Flt_XXX 73 Path 1 Path weight AV 144 DA_Flt_XXX 74 Path 2 Transducer frequency...

Страница 53: ...int 14 AI 210 DA_Flt_XXX 126 Calibration value 14 AV 211 DA_Flt_XXX 127 Calibration point 15 AI 212 DA_Flt_XXX 128 Calibration value 15 AV 213 DA_Flt_XXX 129 Calibration point 16 AI 214 DA_Flt_XXX 130 Calibration value 16 AV 215 DA_Flt_XXX 131 Calibration point 17 AI 216 DA_Flt_XXX 132 Calibration value 17 AV 217 DA_Flt_XXX 133 Calibration point 18 AI 218 DA_Flt_XXX 134 Calibration value 18 AV 219...

Страница 54: ... 278 DA_Flt_XXX 194 Standard Viscosity Upper warning limit AV 279 DA_Flt_XXX 195 Standard Viscosity Lower warning limit AV 280 DA_Flt_XXX 196 Standard Viscosity Lower alarm limit AV 281 DA_Flt_XXX 197 Standard Viscosity Hysteresis AV 282 DA_Flt_XXX 198 Pressure Upper alarm limit AV 283 DA_Flt_XXX 199 Pressure Upper warning limit AV 284 DA_Flt_XXX 200 Pressure Lower warning limit AV 285 DA_Flt_XXX ...

Страница 55: ... 346 DA_Flt_XXX 258 Totalizer 3 Process value AV 347 DA_U16_XXX 87 Totalizer 3 Fail safe behavior AV 348 DA_U16_XXX 88 Totalizer 3 Volume upper alarm limit AV 349 DA_Flt_XXX 259 Totalizer 3 Volume upper warning limit AV 350 DA_Flt_XXX 260 Totalizer 3 Volume lower warning limit AV 351 DA_Flt_XXX 261 Totalizer 3 Volume lower alarm limit AV 352 DA_Flt_XXX 262 Totalizer 3 Volume alarm hysteresis AV 35...

Страница 56: ...Upper range value dimensionless AV 417 DA_Flt_XXX 317 Ch 2 Freq Output Lower range value dimensionless AV 418 DA_Flt_XXX 318 Ch 2 Freq Output Upper range value current AV 419 DA_Flt_XXX 319 Ch 2 Freq Output Lower range value current AV 420 DA_Flt_XXX 320 Ch 2 Freq Output Upper range value viscosity AV 421 DA_Flt_XXX 321 Ch 2 Freq Output Lower range value viscosity AV 422 DA_Flt_XXX 322 Ch 2 Freq O...

Страница 57: ...s value AV 491 DA_U16_XXX 119 Ch 3 Freq Output Flow direction AV 492 DA_U16_XXX 120 Ch 3 Freq Output Frequency value high AV 493 DA_Flt_XXX 363 Ch 3 Freq Output Frequency value low AV 494 DA_Flt_XXX 364 Ch 3 Freq Output Upper range value volume flow AV 495 DA_Flt_XXX 365 Ch 3 Freq Output Lower range value volume flow AV 496 DA_Flt_XXX 366 Ch 3 Freq Output Upper range value mass flow AV 497 DA_Flt_...

Страница 58: ...ture AV 560 DA_Flt_XXX 400 Ch 3 Analog Input Lower range value temperature AV 561 DA_Flt_XXX 401 Ch 3 Analog Input Upper range value density AV 562 DA_Flt_XXX 402 Ch 3 Analog Input Lower range value density AV 563 DA_Flt_XXX 403 Ch 3 Analog Input Upper range value viscosity AV 564 DA_Flt_XXX 404 Ch 3 Analog Input Lower range value viscosity AV 565 DA_Flt_XXX 405 Ch 3 Analog Input Fail safe behavio...

Страница 59: ...ut Lower range value pressure AV 626 DA_Flt_XXX 455 Ch 4 Freq Output Upper range value dimensionless AV 627 DA_Flt_XXX 456 Ch 4 Freq Output Lower range value dimensionless AV 628 DA_Flt_XXX 457 Ch 4 Freq Output Upper range value current AV 629 DA_Flt_XXX 458 Ch 4 Freq Output Lower range value current AV 630 DA_Flt_XXX 459 Ch 4 Freq Output Upper range value viscosity AV 631 DA_Flt_XXX 460 Ch 4 Freq...

Страница 60: ...177 Ch 5 6 Upper range value pressure AV 693 DA_Flt_XXX 490 Ch 5 6 Lower range value pressure AV 694 DA_Flt_XXX 491 Ch 5 6 Upper range value density AI 695 DA_Flt_XXX 492 Ch 5 6 Lower range value density AI 696 DA_Flt_XXX 493 Ch 5 6 Upper range value viscosity AV 697 DA_Flt_XXX 494 Ch 5 6 Lower range value viscosity AV 698 DA_Flt_XXX 495 Ch 5 6 Upper range value medium temperature AV 699 DA_Flt_XX...

Страница 61: ...V 767 DA_U16_XXX 221 View 3 Trend scale lower limit AV 768 DA_Flt_XXX 519 View 3 Trend scale upper limit AV 769 DA_Flt_XXX 520 View 4 Enable or disable AV 770 DA_U16_XXX 222 View 4 View AV 771 DA_U16_XXX 223 View 4 1st value AV 772 DA_U16_XXX 224 View 4 2nd value AV 773 DA_U16_XXX 225 View 4 3rd value AV 774 DA_U16_XXX 226 View 4 4th value AV 775 DA_U16_XXX 227 View 4 5th value AV 776 DA_U16_XXX 2...

Страница 62: ...rors 4 AI 837 DA_U32_XXX 53 Medium Temp Current value AI 838 DA_Flt_XXX 527 Transmitter Temp Current value AI 839 DA_Flt_XXX 528 Transmitter Temp Minimum value AI 840 DA_Flt_XXX 529 Transmitter Temp Maximum value AI 841 DA_Flt_XXX 530 PCB temp AI 842 DA_Flt_XXX 531 PCB temp lower alarm limit AV 843 DA_Flt_XXX 532 PCB temp upper alarm limit AV 844 DA_Flt_XXX 533 PCB temp min value AV 845 DA_Flt_XXX...

Страница 63: ...tput Pulse Simulation AV 910 DA_U16_XXX 292 CH 2 Output Pulse Simulated value AV 911 DA_Flt_XXX 558 CH 3 Output Current Simulation AV 912 DA_U16_XXX 293 CH 3 Output Current Simulated value AV 913 DA_Flt_XXX 559 CH 3 Output Stat Simulation AV 914 DA_U16_XXX 294 CH 3 Output Stat Simulated value AV 915 DA_Flt_XXX 560 CH 3 Output Freq Simulation AV 916 DA_U16_XXX 295 CH 3 Output Freq Simulated value A...

Страница 64: ...A_U16_XXX 305 Alarm items 1 AV 959 DA_U32_XXX 60 Alarm items 2 AV 960 DA_U32_XXX 61 Alarm items 4 AV 961 DA_U32_XXX 62 Alarm items 5 AV 962 DA_U32_XXX 63 Alarm items 6 AV 963 DA_U32_XXX 64 Alarm items 7 AV 964 DA_U32_XXX 65 Alarm items 8 AV 965 DA_U32_XXX 66 Alarm items 9 AV 966 DA_U32_XXX 67 Alarm class AV 967 DA_U16_XXX 306 NAMUR status AV 968 DA_U16_XXX 307 Operating time total AI 969 DA_U32_XX...

Страница 65: ...tenna Type SMA Encryption TKIP WPA AES Figure 35 Specifications Appendix D 1 1 Compliance with UL Regulations For UL compliance the following instructions must be met when operating ProtoAir The units shall be powered by listed LPS or Class 2 power supply suited to the expected operating temperature range The interconnecting power connector and power cable shall o Comply with local electrical code...

Страница 66: ...ion or on which original identification marks have been removed or altered This Limited Warranty also will not apply to interconnecting cables or wires consumables or to any damage resulting from battery leakage In all cases Sierra Monitor Corporation s responsibility and liability under this warranty shall be limited to the cost of the equipment The purchaser must obtain shipping instructions for...

Отзывы: