background image

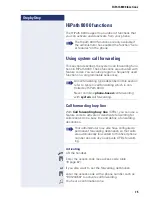
HiPath 8000 functions

81

Step by Step

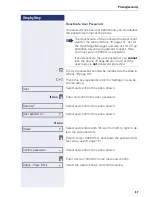
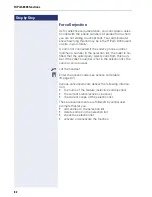
Creating a list for selective calls

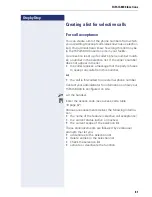
For call acceptance

You can create a list of the phone numbers from which 
you are willing to accept calls (also known as a selection 
list). Your administrator know how long this list may be 
in the HiPath 8000 used on site in your facility.

A connection is set up if a caller’s phone number match-
es a number in the selection list. If the caller’s number 
does not appear in the list:

the caller receives a message that the party refuses 
to accept any calls from this number,

or

the call is forwarded to an external phone number.

Contact your administrator for information on how your 
HiPath 8000 is configured on site.

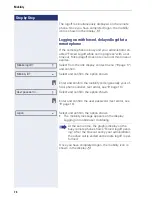
^

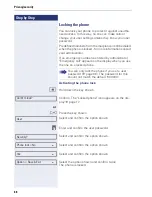
Lift the handset.

j

Enter the access code (see access code table 

Æ

 page 87).

Various announcements deliver the following informa-
tion:

the name of the feature (selective call acceptance)

the current status (active or inactive)

the current scope of the selection list.

These announcements are followed by verbal user 
prompts that let you:

add entries to the selection list

delete entries in the selection list

check the selection list

activate or deactivate the function.
Содержание OpenScape Voice OpenStage 20 E SIP

Страница 1: ...Communication for the open minded Siemens Enterprise Communications www siemens com open Documentation HiPath 8000 OpenStage 20 E OpenStage 20 20 G Operating Manual ...

Страница 2: ...onic products should be disposed of separately from the municipal waste stream via designated collection facilities appointed by the government or the local authorities Proper disposal and separate collection of your old appli ance will help prevent potential damage to the environment and human health It is a prerequisite for reuse and recycling of used electrical and electronic equipment For more...

Страница 3: ...one Do not expose the telephone to direct sunlight or any other source of heat as this is liable to damage the electronic components and the plastic casing Do not operate the telephone in damp environments such as bath rooms Online documentation This and other documentation can be found on the Internet at http www enterprise communications siemens com Products Phones Clients select product Downloa...

Страница 4: ...G user interface 10 Ports on the underside of the phone 11 Using network ports more efficiently 12 Keys 13 Function keys 13 Audio keys 13 3 way navigator 14 Keypad 15 Display 17 Idle mode 17 Records 18 Messages 18 Calls 18 Program Service menu 19 User 19 Basic functions 20 Secure voice transmission 20 Answering a call 20 Answering a call via the handset 20 Answering a call via the loudspeaker spea...

Страница 5: ...ivating call forwarding for all calls 35 Callback 36 Requesting callback 36 Responding to a callback 37 Permitting callback on busy no reply 38 Calling back missed calls 39 Enhanced phone functions 40 Incoming calls 40 Deflecting a call 40 Rejecting a call 41 Configuring call forwarding 42 Placing a call on hold 43 Call waiting second call 46 Transferring a call 49 CTI calls 52 Making calls 54 Dia...

Страница 6: ...with forced delayed logoff at a remote phone 74 HiPath 8000 functions 75 Using system call forwarding 75 Call forwarding busy line 75 Call forwarding don t answer 76 Call forwarding unconditional 77 Call forwarding selective 78 Making anonymous calls 79 Deactivating 79 Activating 79 Temporarily activating anonymous calling for the next call 80 Temporarily deactivating anonymous calling for the nex...

Страница 7: ...isplay format 91 Date display format 92 Audio 93 Volumes 93 Settings 94 Nonsecure voice communication tone and message R4 4 97 Setting the language and country 98 Selecting a language 98 Locality 99 Network information 100 Web interface 101 General 101 Calling up the Web interface 101 Administrator Pages 101 User pages 102 User menu 103 Fixing problems 105 Caring for your telephone 105 Troubleshoo...

Страница 8: ... strictly complied with to avoid operating errors and ensure optimum use of your multifunctional telephone in the network These instructions should be read and followed by every person installing operating or programming an OpenStage phone This user guide is designed to be simple and easy to understand providing clear step by step instructions for operating your OpenStage phone Administrative task...

Страница 9: ...ready when you contact our service depart ment regarding faults or problems with the product Speakerphone quality and display legibility To ensure good speakerphone quality OpenStage 20 20 G only the area in front of the telephone front right should be kept clear The optimum handsfree distance is 20 in 50 cm Proceed as follows to optimize display legibility Turn the phone to tilt the display This ...

Страница 10: ... using the handset 2 The tilt and swivel display provides intuitive support for telephone operation two lines with up to 33 characters each 3 The function keys allow you to call up the most frequently used functions during a call e g Disconnect Æ page 13 4 O mailbox key and N menu key 5 Audio keys are also available allowing you to optimally configure the audio features on your telephone Æ page 13...

Страница 11: ...he phone Properties of your OpenStage 20 E 20 20 G OpenStage 20 E 20 20 G LCD Display 24 x 2 characters Full duplex speakerphone function 10 100 Mbps Ethernet Switch Æ page 12 1000 Mbps Ethernet Switch Æ page 12 Wall mounting Power supply unit PC Network switch Handset ...

Страница 12: ...thernet switch OpenStage 20 G has a built in 1000 Mbps Ethernet switch This means that you can connect a PC to the LAN directly via the phone Using this connection option saves one network port for each switch used and requires fewer or shorter network cables when arranged correctly OpenStage 20 E 20 20 G Network switch PC ...

Страница 13: ...g with red LED key Key Function when key is pressed N Open the phone s main menu with red LED key O Open the menu for voice messages with red LED key Key Function when key is pressed p Activate deactivate the microphone OpenStage 20 20 G only also for speakerphone mode with red LED Set volume lower and contrast brighter n Turn speaker on off with red LED key Set volume louder and contrast darker ...

Страница 14: ... well as its displays Remove the protective film from the ring around the 3 way navigator before using the phone Operation Functions when key is pressed Press the key In idle mode Open the idle menu Æ page 17 In lists and menus Scroll down Press the key In lists and menus Scroll up Press the i key Confirm input Perform action ...

Страница 15: ...dition to the digits and special characters mentioned To do this press the numeri cal keys repeatedly Example To enter the letter h press the number 4 key on the keypad twice When entering text all characters available for the key pressed and the character selected are briefly displayed Character overview depends on the current language setting Key 1x 2x 3x 4x 5x 6x 1 1 2 a b c 2 ä 3 d e f 3 4 g h...

Страница 16: ...tor and confirm each one using i OK Applies changes and closes the editor Delete Deletes characters from right to left Cancel Discards changes and exits the editor Mode here can also be used to switch 123 Digits only ABC Upper case letters only Abc First letter in upper case subsequent letters in lower case abc Lower case letters only Move cursor left Moves the cursor to the left Move cursor right...

Страница 17: ...idle menu You can call up various functions here Entries may vary The idle menu may contain the following entries Redial 1 1234 Ringer off Do not disturb off Mobile logon Cancel call backs Back Icons in the idle display In the first line the time weekday and date are displayed in addition to icons for different situations and switches Icon Explanation The ring tone is deactivated The phone lock is...

Страница 18: ... new missed calls After this you can navigate to the CallLog menu by scrolling up down In the CallLog menu the following calls and call attempts are recorded in the call lists Missed Missed calls Dialled Dialed calls with or without connection Received Answered calls Forwarded Forwarded calls The number of missed calls and unchecked calls is shown on the idle dis play Call lists Each call list may...

Страница 19: ... your personal user password You can use the navigator to navigate through the menus as described on Æ page 14 Once the admin password has been entered the Admin menu is available to the relevant administrator User In the User menu settings options are provided that allow you to adapt the telephone to your individual requirements Select one of the following menus with the navigator Date and time Æ...

Страница 20: ...ne signal set when an incoming call is received The call is also visu ally signaled on the call display If transmitted calling party information name phone number appears on the display Answering a call via the handset The phone is ringing The caller is displayed Lift the handset if nec or Set the call volume Please read carefully the introductory chapter Getting to know your OpenStage phone Æ pag...

Страница 21: ... lights up The speaker phone function is activated if nec or Set the call volume Suggestions for using speakerphone mode Tell the other party that speakerphone mode is ac tive Adjust the call volume while speakerphone mode is active The ideal distance between the user and the phone in speakerphone mode is about 50 cm The handsfree functionality is only available on OpenStage 20 20 G Accept l ...

Страница 22: ...lleague and the function is provided for you in the HiPath 8000 The phone of a colleague rings Select this option from the contect menu and confirm resp Replace the handset oder n Press the key shown Select and confirm j Enter the internal call number of the phone in question and confirm You are connected to the caller either via handset or in speakerphone mode Directed Pickup f Directed Pickup f ...

Страница 23: ...o US you do not have to hold down the loudspeaker key when replacing the handset to switch to speakerphone mode n Press the key shown Replace the handset Proceed with your call or Make note of the two different processes and ac tivate if necessary your preferred setting Æ page 96 The handsfree functionality is only available on OpenStage 20 20 G If voice communication is secure a closed pad lock i...

Страница 24: ...other party know that you have turned on the loudspeaker Prerequisite You are conducting a call via the handset Activating n Press the key shown Deactivating n Press the lit key Switch to speakerphone mode n and Hold down the key and replace the handset Then re lease the key and proceed with your call The handsfree functionality is only available on OpenStage 20 20 G The handsfree functionality is...

Страница 25: ...hearing a conversation for instance with a colleague in the same room Prerequisite You are conducting a call Deactivating the microphone p Press the key shown The key lights up Activating the microphone p Press the lit key Ending a call s Press the key shown or Select and confirm the option shown or If you are conducting a call via the handset Replace the handset or In speakerphone mode n Press th...

Страница 26: ...ing tone The group call can be picked up both by lifting the handset and via the Pickup call menu option The group call be picked up via the Pickup call menu option but not by just lifting the handset A key is programmed for call pickup A group call is waiting and is indicated on the display by Pickup Caller for Party Picking up a group call The pop up menu opens Confirm or Lift the handset only i...

Страница 27: ... navigator Æ page 14 to correct entries as necessary n The speaker key lights up OpenStage 20 20 G only The party you are calling answers via loudspeaker You can also use speakerphone mode En bloc dialing j Enter the station number Use the navigator Æ page 14 to correct entries as necessary Lift the handset or n Press the key shown OpenStage 20 20 G only or Confirm or Wait until the autodial delay...

Страница 28: ...er associated with the list en try is dialed Redialing from the display dialog Lift the handset or n Press the key shown OpenStage 20 20 G only Confirm The last phone number entered is dialed Redialing from the idle menu Select and confirm the option shown The last phone number entered is dialed or Redial 1 l Niels Bohr 31 05 07 06 f Dial l Redial 1 l Redial 1 l If voice communication is secure a ...

Страница 29: ...The call with the first party is resumed Switching to the held party alternating Prerequisite You are conducting a consultation call Select and confirm the option shown In the first display line the phone number or name and the duration of the active connection are displayed Ending an alternate operation Select and confirm the option shown The active call is disconnected and the held call is re st...

Страница 30: ...Replace the handset or if you are in speakerphone mode OpenStage 20 20 G only press the loudspeak er key The other two parties are now connected to one another Allowing call joining z You can also configure this setting via the Web interface Æ page 101 N Press the key shown Confirm if nec j Enter and confirm the User password Select and confirm the option shown Select and confirm the option shown ...

Страница 31: ...he phone is idle The Forwarding key also lights up Forwarded calls can be logged in a call list see Æ page 18 There are three Destination options in the Edit call for warding menu These destination options are assigned to the forwarding types All calls off on Destination Busy off on Destination No reply off on Destination One phone number may already be assigned to each destination The destination...

Страница 32: ... of the following forwarding types All calls Busy No reply Confirm the destination selected Select and confirm the option shown Select and confirm the option shown j Enter and confirm the destination phone number Define additional destination phone numbers for desti nation 2 to 5 as necessary Select the option shown and confirm twice Edit call forwarding f You can also enter the call forwarding se...

Страница 33: ... and confirm twice Defining the ring duration before call forwarding on no reply You can define how often the phone should ring before the No reply form of call forwarding activates z You can also configure this setting via the Web interface Æ page 101 r Press the key shown Within three seconds Select and confirm the option shown Select and confirm the option shown j Enter a value for the duration...

Страница 34: ...grammed Æ page 33 r Press the key shown Within three seconds Select and confirm the option shown Select the appropriate call forwarding type Select and confirm the option shown or Select and confirm the option shown or Select and confirm the option shown Select and confirm On or Off Select the option shown and confirm twice Edit call forwarding f All calls l Busy f No reply f On l Option Save Exit...

Страница 35: ...ina tion programmed Æ page 32 r Press the key shown Wait three seconds or Confirm The r key lights up Call forwarding is acti vated If the phone is idle the call forwarding icon K appears in the second display line with the destination phone number Deactivating call forwarding for all calls r Press the lit key Wait three seconds or Confirm Call forwarding is deactivated Accept l Accept l ...

Страница 36: ...sy or nobody an swers Select and confirm the option shown Deleting callback requests You can delete scheduled callback requests if you no longer need to return a call for example at the end of the working day Prerequisite At least one callback was requested The phone is idle Select and confirm the option shown All callback requests are deleted This option must be activated by your administra tor C...

Страница 37: ...lback icon Accepting a callback Select and confirm the option shown Rejecting a callback Select and confirm the option shown The callback request is deleted The caller hears the busy signal The caller s phone number is added to the missed calls list Forwarding a callback Select and confirm the option shown j Enter and confirm the phone number Accept l Reject f Deflect m ...

Страница 38: ...nfirm if nec j Enter and confirm the user password Select and confirm the option shown Confirm Select and confirm the option shown or Select and confirm the option shown Select and confirm to activate the callback function Select the option shown and confirm twice User Configuration Outgoing calls Callback busy No f Callback no reply No f Yes l Option Save Exit l ...

Страница 39: ...lls are logged in the missed calls list This list provides information on the missed call and lets you call back the number directly call lists Æ page 18 O Press the key shown Select and confirm the option shown Select and confirm the option shown Select and confirm the entry you want Confirm The phone number associated with the entry is dialed Calls m Missed l Niels Bohr 30 05 07 06amm Dial l ...

Страница 40: ...re now prompted to enter a desti nation phone number for call deflection j Enter and confirm the destination phone number The call is deflected Permitting call deflection z You can also configure this setting via the Web interface Æ page 101 N Press the key shown Select and confirm the option shown if nec j Enter and confirm the user password Select and confirm the option shown Select and confirm ...

Страница 41: ... is displayed or signaled Select and confirm the option shown The caller hears a busy signal Default destination f Entering a destination phone number is not man datory when call deflection is active If you want to deflect an incoming call you are prompted to enter a destination phone number if there is none stored Option Save Exit l Reject f If the rejected caller s phone number is transmit ted i...

Страница 42: ... x or higher Select and confirm the option shown For a description of the settings see chapter Call forwarding Æ page 31 Setting alerts V1 R3 x or higher Use the Anrufumleitungswarnungen menu to enable and disable visual and audible alerts for call forwarding not possible with the Forwarding key Select and confirm the option shown Select and confirm the option shown Select and confirm the option s...

Страница 43: ...l Select and confirm the option shown Retrieving a held call Select and confirm the option shown Held call wait status After placing a call on hold you can replace the handset and then decide if the call should be retrieved or discon nected Prerequisite You placed a call on hold and replaced the handset Select and confirm the option shown to resume the call in speakerphone mode or Select and confi...

Страница 44: ...e Use the Hold reminder function to set the time after which you want to receive an automatic reminder about a held call The lowest time value is 1 i e the reminder will alert after 1 minute The maximum value is 99 mi nutes With 0 you can deactivate the reminder z You can also configure this setting via the Web interface Æ page 101 N Press the key shown Select and confirm the option shown if nec j...

Страница 45: ...party z You can also configure this setting via the Web interface Æ page 101 N Press the key shown Select and confirm the option shown if nec j Enter and confirm the user password Select and confirm the option shown Select and confirm the option shown Select and confirm the option shown Select and confirm the option shown Select the option shown and confirm twice Option Save Exit l User Configurat...

Страница 46: ...ing is allowed Æ page 48 Select and confirm the option shown You can talk to the second party The connection to the first party is on hold Select and confirm the option shown The call with the second party is disconnected and the connection to the first party is retrieved During the call with the second party additional func tions are available for selection Alternate see Æ page 29 Complete transf...

Страница 47: ...l deflection j Enter and confirm the destination phone number The second call is deflected to the destination speci fied You are reconnected with the first party Connecting parties Select and confirm the option shown The other two parties are now connected to one another You can now hang up or dial another number for instance or Connect by hanging up Prerequisite Connect by hanging up is activated...

Страница 48: ...and confirm the user password Select and confirm the option shown Select and confirm the option shown Select and confirm the option shown Select and confirm the option shown Select and confirm the option shown Select the option shown and confirm twice If the Call waiting second call function is deacti vated a caller hears the busy signal if you are al ready conducting a call User Configuration Inc...

Страница 49: ... whom you want to transfer the call Confirm or wait until the autodial delay expires Transferring with consultation You can announce a call to a recipient before transfer ring it Prerequisite You are conducting a call The options Al low Call Transfer and Transfer on Ring were selected Æ page 50 Select and confirm the option shown The call is placed on hold j Enter the phone number of the party to ...

Страница 50: ... the party does not answer you will be called back by the first party Allowing call transfer z You can also configure this setting via the Web interface Æ page 101 N Press the key shown Select and confirm the option shown if nec j Enter and confirm the user password Select and confirm the option shown Select and confirm the option shown Select and confirm the option shown Select and confirm the op...

Страница 51: ...via the Web interface Æ page 101 N Press the key shown Select and confirm the option shown if nec j Enter and confirm the user password Select and confirm the option shown Select and confirm the option shown Select and confirm the option shown Confirm the option shown to activate the callback func tion Select the option shown and confirm twice User Configuration Outgoing calls Transfer on ring No ...

Страница 52: ...n incoming call is automatically accepted z You can also configure this setting via the Web interface Æ page 101 Prerequisite The option was programmed by your ad ministrator N Press the key shown Select and confirm the option shown if nec j Enter and confirm the user password Select and confirm the option shown Select and confirm the option shown Select and confirm the option shown Select and con...

Страница 53: ...g via the Web interface Æ page 101 N Press the key shown Select and confirm the option shown if nec j Enter and confirm the user password Select and confirm the option shown Select and confirm the option shown Select and confirm the option shown Select and confirm the option shown Select and confirm the option shown Select and confirm the option shown Select and confirm the option shown Select the...

Страница 54: ...n Select and confirm the option shown Select and confirm the option shown Select and confirm the appropriate list entry Select and confirm the option shown The phone number associated with the list entry is di aled If you have not already lifted the handset conduct the call now in speakerphone mode For a detailed description of the call lists see Æ page 18 Calls m Dialled f Niels Bohr 30 05 07 06a...

Страница 55: ...g the i key This always works lifting the handset This only works if the phone num ber was entered when the phone was idle or if it was entered for a consultation call when the handset was off hook n pressing the loudspeaker key OpenStage 20 20 G only This only works if the phone number was en tered when the phone was idle and the loudspeaker key was not lit or if the phone number was entered for ...

Страница 56: ...ure this setting via the Web interface Æ page 101 N Press the key shown Select and confirm the option shown if nec j Enter and confirm the user password Select and confirm the option shown Select and confirm the option shown Select and confirm the option shown j Enter a value in the input mask and confirm Select the option shown and confirm twice The setting does not affect automatic emergency num...

Страница 57: ...onfigure this setting via the Web interface Æ page 101 N Press the key shown Select and confirm the option shown if nec j Enter and confirm the user password Select and confirm the option shown Select and confirm the option shown Select and confirm the option shown Select and confirm the option shown Select the option shown and confirm twice User Configuration Outgoing calls Busy when dialling No ...

Страница 58: ...o clear down or On the display select and confirm the second connec tion you want to clear down Select and confirm the option shown You are now in volved in a one to one call with the remaining call party or Conference 1 Party f 2 Party m Disconnect l If you already are involved in a secure connection with a party when you initiate a consultation call the original party is placed on hold The new c...

Страница 59: ...nnected from the conference call Disconnecting a party Select and confirm the option shown in the menu Both connections are cleared down the conference is cleared down Allowing a local conference This option allows or blocks the Conference function z You can also configure this setting via the Web interface Æ page 101 N Press the key shown Select and confirm the option shown if nec j Enter and con...

Страница 60: ...onfigure this setting via the Web interface Æ page 101 N Press the key shown Select and confirm the option shown if nec j Enter and confirm the user password Select and confirm the option shown Select and confirm the option shown Select and confirm the option shown Select and confirm the option shown Select the option shown and confirm twice User Configuration Connected calls Join in conferences N...

Страница 61: ...ultation call Select and confirm the option shown in the Confer ence context menu If the party answers you can toggle between the party and the conference connect the consultation call to another called party end the consultation call and return to the confer ence add the consultation call party to the conference Adding a party Prerequisite You are conducting a consultation call and the conference...

Страница 62: ... instance The other par ticipants remain connected or Exit Conf f If using the Centralized Conference option the Conference row contains a closed padlock icon for a secure voice connection and an open pad lock icon for a nonsecure voice connection Æ page 20 The display depends on whether the conference server supports secure voice communication The appropriate display is set by the conference serv...

Страница 63: ...o scroll through the list Select and confirm the appropriate list entry Displaying details Select and confirm the option shown For display and information shown Æ page 18 Delete the entry Select and confirm the entry is deleted Delete all entries O Press the key shown Select and confirm the option shown For instance select and confirm the list of dialed num bers Select and confirm the option shown...

Страница 64: ...isplay The ringer is reactivated or You can also activate the function using the option in the idle menu Æ page 17 Select and confirm the option shown Do not disturb If Do not disturb is activated your telephone will not ring The caller hears the busy signal The Do not dis turb function is activated deactivated via the idle menu Æ page 17 Prerequisite Do not disturb must be allowed Æ page 65 Activ...

Страница 65: ... the option shown if nec j Enter and confirm the user password Select and confirm the option shown Select and confirm the option shown Select and confirm the option shown Select and confirm the option shown Select and confirm the option shown Select the option shown and confirm twice User Configuration Incoming calls Handling f Allow DND No f Yes l Option Save Exit l ...

Страница 66: ... j Enter and confirm the user password Select and confirm the option shown Select and confirm the option shown j Enter a new password at least six characters and con firm text entry see Æ page 15 Select and confirm the option shown j Enter the new password again and confirm with OK Select the option shown and confirm twice The preset password 000000 corresponds to a blank password In other words t...

Страница 67: ... key from left to right to de lete the old password j Enter 6 zeros 000000 to deactivate the password for text entry see Æ page 15 Select and confirm the option shown j Enter 6 zeros 000000 once more and confirm Select the option shown and confirm twice The deactivation of the password request is not valid for the web interface Æ page 101 not for the OpenStage Manager and also not for CTI ap plica...

Страница 68: ... the display when you use the line on a locked phone Activating the phone lock Hold down the key shown Confirm The Locked phone icon appears on the dis play Æ page 17 or N Press the key shown Select and confirm the option shown j Enter and confirm the user password Select and confirm the option shown Select and confirm the option shown Select and confirm the option shown Select the option shown an...

Страница 69: ...Privacy security 69 Step by Step Unlocking the phone Confirm j Enter and confirm the User password The phone is un locked if the password is correct Unlock phone ...

Страница 70: ...us use their personal settings on the telephone that you normally use in Munich Prerequisite Your phone is configured to support mo bility by administrator A DLS server is available in the LAN and its address is entered in the phone Mobility scenarios When you log on to your phone or any other mobility enabled phone the following scenarios are possible Logging on and off at the same phone Log on a...

Страница 71: ...code generally your of ficial phone number text editor see Æ page 16 Select and confirm the option shown j Enter the user password and confirm with OK text ed itor see Æ page 16 Select and confirm the option shown Select and confirm the option shown The following messages appear on the display Logging on mobile user Validating Once you have completed logon the mobility icon is shown in the display...

Страница 72: ... the option shown j Enter user password Attention Do not confirm your entry for a text editor see Æ page 16 Select and confirm the option shown The logoff procedure begins In the display the follow ing messages appear Logging off mobile user After you have logged off the mobility icon is hid den Mobile logoff f Please Enter Password f Please Enter Password f If you enter the password incorrectly t...

Страница 73: ... phone If the user is already logged on at another phone and the remote phone is busy the logon is rejected If however your administrator enabled Forced Logoff while call in progress without setting a time the sys tem does not consider whether or not the remote phone is busy Select from the idle display context menu Æ page 17 and confirm The Mobility logon dialog appears Select and confirm the opt...

Страница 74: ... confirm the option shown j Enter and confirm the mobility code generally your of ficial phone number text editor see Æ page 16 Select and confirm the option shown j Enter and confirm the user password text editor see Æ page 16 Select and confirm the option shown The mobility message appears on the display Logging on mobile user Validating Once you have completed logon the mobility icon is shown i...

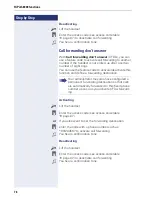
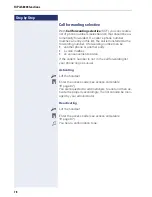
Страница 75: ...ng destination Activating Lift the handset j Enter the access code see access code table Æ page 87 or if you also want to set the forwarding destination j enter the access code with a phone number such as 901234567 to activate call forwarding Z You hear a confirmation tone The Hipath 8000 functions are only available if the administrator has enabled the function Serv er features on the phone All c...

Страница 76: ...ivate this function and define a forwarding destination Activating Lift the handset j Enter the access code see access code table Æ page 87 or if you also want to set the forwarding destination j enter the code with a phone number such as 901234567 to activate call forwarding Z You hear a confirmation tone Deactivating Lift the handset j Enter the access code see access code table Æ page 87 to dea...

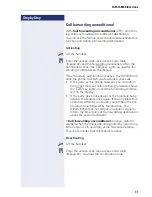
Страница 77: ...is phone answers you can inform him or her that your calls are being forwarded Now the r key lights up and the forwarding is indica ted on the display If the party does not answer or the station is busy activate the feature once again If you complete this operation within two minutes you will hear the con firmation tone followed by the dial tone The HiPath 8000 does not output an acoustic signal t...

Страница 78: ...ng number can be another phone or another party a voice mailbox an announcement service If the caller s number is not in the call forwarding list your phone rings as usual Activating Lift the handset j Enter the access code see access code table Æ page 87 You are requested to add members to a list and then ac tivate the property accordingly The list can also be man aged by your administrator Deact...

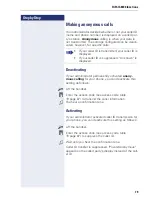
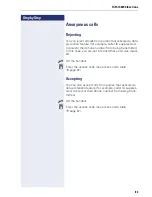
Страница 79: ...lows Lift the handset j Enter the access code see access code table Æ page 87 to transmit the caller information Z You hear a confirmation tone Activating If your administrator activated caller ID transmission for your phone you can deactivate this setting as follows Lift the handset j Enter the access code see access code table Æ page 87 to suppress the caller ID Z Wait until you hear the confirm...

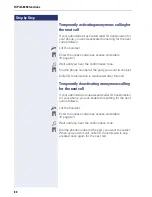
Страница 80: ...he phone number of the party you want to contact Caller ID transmission is reactivated after this call Temporarily deactivating anonymous calling for the next call If your administrator suppressed caller ID transmission for your phone you can enable this setting for the next call as follows Lift the handset j Enter the access code see access code table Æ page 87 Z Wait until you hear the confirmat...

Страница 81: ... a message that the party refuses to accept any calls from this number or the call is forwarded to an external phone number Contact your administrator for information on how your HiPath 8000 is configured on site Lift the handset j Enter the access code see access code table Æ page 87 Various announcements deliver the following informa tion the name of the feature selective call acceptance the cur...

Страница 82: ... is no tified that the called party rejects calls from this num ber If the caller s number is not in the selection list the call is to you as usual Lift the handset j Enter the access code see access code table Æ page 87 Various announcements deliver the following informa tion the name of the feature selective call rejection the current status active or inactive the current scope of the selection ...

Страница 83: ... from being transmitted In this case you are not informed that a call was reject ed Lift the handset j Enter the access code see access code table Æ page 87 Accepting You can also accept calls from parties that activated a data protection feature for example caller ID suppres sion to prevent their phone number from being trans mitted Lift the handset j Enter the access code see access code table Æ...

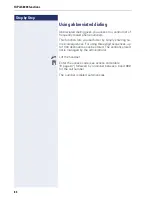
Страница 84: ...nction lets you dial faster by simply entering nu merical sequences For using three digit sequences up to 1000 destinations can be stored The centrally stored list is managed by the administrator Lift the handset j Enter the access code see access code table Æ page 87 followed by a number between 0 and 999 for the call number The number is dialed automatically ...

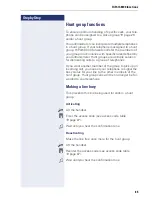
Страница 85: ...buting calls to a group of telephones If you want another member of the group to pick up an incoming call you can set your telephone to signal the busy status for your line to the other members of the hunt group Hunt group calls will then no longer be for warded to your telephone Making a line busy This prevents this line being used for calls in a hunt group Activating Lift the handset j Enter the...

Страница 86: ...ree line in the hunt group chain after it reaches this line Activating Lift the handset j Enter the access code see access code table Æ page 87 Z Wait until you hear the confirmation tone Deactivating Unmark the line as the end of the hunt group chain Lift the handset j Reenter the access code see access code table Æ page 87 Z Wait until you hear the confirmation tone ...

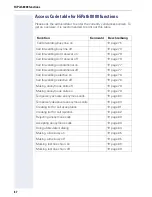
Страница 87: ...age 77 Call forwarding unconditional off Æ page 77 Call forwarding selective on Æ page 78 Call forwarding selective off Æ page 78 Making anonymous calls off Æ page 79 Making anonymous calls on Æ page 79 Temporarily activate anonymous calls Æ page 80 Temporarily deactivate anonymous calls Æ page 80 Creating list for call acceptance Æ page 81 Creating list for call rejection Æ page 82 Rejecting anon...

Страница 88: ... contrast levels that you can set according to your light conditions z You can also configure this setting via the Web interface Æ page 101 N Press the key shown Select and confirm the option shown if nec j Enter and confirm the user password Select and confirm the option shown Select and confirm the option shown Select and confirm the option shown b or d Set and confirm the contrast Select the op...

Страница 89: ...ect and confirm the option shown The time set is displayed j Enter and confirm the time Select the option shown and confirm twice Setting the date N Press the key shown Select and confirm the option shown if nec j Enter and confirm the user password Select and confirm the option shown Select and confirm the option shown The date set is displayed j Enter and confirm the date Select the option shown...

Страница 90: ...between daylight saving and standard time Prerequisite Auto DST is deactivated Æ page 91 Enter the difference to be used for daylight saving time z You can also configure this setting via the Web interface Æ page 101 N Press the key shown Select and confirm the option shown if nec j Enter and confirm the user password Select and confirm the option shown Select and confirm the option shown The diff...

Страница 91: ...option shown Daylight saving time must be manually set if a No is en tered for Auto DST Æ page 90 Time display format z You can also configure this setting via the Web interface Æ page 101 N Press the key shown Select and confirm the option shown if nec j Enter and confirm the user password Select and confirm the option shown Select and confirm the option shown The format set is displayed Select a...

Страница 92: ... the key shown Select and confirm the option shown if nec j Enter and confirm the user password Select and confirm the option shown Select and confirm the option shown The format set is displayed Select and confirm the format you want Select the option shown and confirm twice User Locality Date format dd mm yyy f yyyy mm dd f Option Save Exit l ...

Страница 93: ...this setting via the Web interface Æ page 101 Example Handset N Press the key shown Select and confirm the option shown if nec j Enter and confirm the user password Select and confirm the option shown Select and confirm the option shown Select and confirm the option shown b or d Set and confirm the volume Select the option shown and confirm twice User Audio Volumes Handset f Option Save Exit l ...

Страница 94: ...onfirm the user password Select and confirm the option shown Select and confirm the option shown Select and confirm the room character in the context menu for example Normal Select the option shown and confirm twice Ringer melody z You can also configure this setting via the Web interface Æ page 101 N Press the key shown Select and confirm the option shown if nec j Enter and confirm the user passw...

Страница 95: ...uired ringer tone sequence 1 3 Select the option shown and confirm twice Ringer file If your administrator has loaded suitable files to the phone you can select a realtone file in mp3 or wav format for the ringer tone z You can also configure this setting via the Web interface Æ page 101 N Press the key shown Select and confirm the option shown if nec j Enter and confirm the user password Select a...

Страница 96: ...mode Enter the country setting you prefer for speakerphone mode here see Æ page 23 z You can also configure this setting via the Web interface Æ page 101 N Press the key shown Select and confirm the option shown if nec j Enter and confirm the user password Select and confirm the option shown Select and confirm the option shown Select and confirm the setting you want in the context menu Standard mo...

Страница 97: ...e prefer ence set by your administrator z You can also configure this setting via the Web interface Æ page 101 N Press the key shown Select and confirm the option shown if nec j Enter and confirm the User password Select and confirm the option shown Select and confirm the option shown Select and confirm the option shown Select and confirm the option shown in the context menu Select and confirm the...

Страница 98: ...r password Select and confirm the option shown Select and confirm the option shown The language set is displayed Select and confirm to set the required language in our example English Select the option shown and confirm twice You may choose from the following languages 1 Ceötina 2 Dansk 3 Deutsch 4 English 5 EspaÒol 6 FranÁais 7 Hrvatski 8 Italiano 9 Magyar 10 Nederlands 11 Norsk 12 Polski 13 Port...

Страница 99: ...t the country 1 here US for instance Select the option shown and confirm twice You may choose from the following countries User Locality Country Germany f United States f 1 The phone displays the current setting Option Save Exit l 1 Argentina 20 Luxembourg 2 Australia 21 Mexico 3 Austria 22 Netherlands 4 Belgium 23 New Zealand 5 Brazil 24 Norway 6 Canada 25 Poland 7 China 26 Portugal 8 Chile 27 Ru...

Страница 100: ... of the Web interface This address is specified in the address line of the Internet browser and is used to call the Web interface of the phone in the browser DNS domain The DNS domain that can be assigned to the telephone in addition to the IP address e g http my openStage phone LAN PC RX The network or PC interface data packets received are illustrated dynamically as columns LAN PC TX The network...

Страница 101: ...Administrator Pages This area lets you configure settings for administering your phone and the network environment Access to the Administrator Pages is protected by the admin password For more information contact your administrator or refer to the administration manual For more information on the IP address the Web interface address and how to connect the telephone to the network refer to the sec ...

Страница 102: ...Click a menu entry to open the corresponding form 3 Make the desired changes 4 Click the corresponding button to save or discard your changes Button functions Login Log on to the phone after you have entered the user password Submit Apply changes Reset Reset original values Refresh Update the values Logout Log off the phone User menu User login Phone information User selection Highlighted entry cu...

Страница 103: ...stening V Æ page 96 User Configuration Outgoing calls Autodial delay seconds V Æ page 55 Allow callback busy V Æ page 38 Allow callback no reply V Æ page 38 Allow busy when dialling V Æ page 57 Allow transfer on ring V Æ page 51 Incoming calls Deflecting Allow deflection V Æ page 40 Default deflect destination V Æ page 40 Forwarding Settings Forwarding Favourites Destination 1 to Destination 5 V Æ...

Страница 104: ...transfer V Æ page 50 Allow call joining V Æ page 30 Allow exit conference V Æ page 60 Allow hold reminder V Æ page 44 Hold reminder delay minutes V Æ page 44 Allow music on hold V Æ page 45 Allow conferences V Æ page 59 Allow tone for secure call V Æ page 97 Phone Display settings Contrast V Æ page 88 Locality Country V Æ page 99 V Æ page 98 Date format V Æ page 92 Time format V Æ page 91 Authenti...

Страница 105: ...an the telephone The use of scouring agents is also forbid den Troubleshooting Pressed key does not respond Check if the key is stuck Telephone does not ring Check whether the Do not disturb function is activated on your telephone Æ page 64 If so deactivate it You cannot dial an external number Check whether your telephone is locked Phone locked Enter Password appears on the screen If the phone is...

Страница 106: ...king 2 Conference 58 Connecting parties 30 Connection options 11 Consultation 29 Contrast 88 CTI 52 D Date and time 89 Date format 92 Daylight saving 90 Display contrast 88 Do not disturb 64 F Forced logoff 74 Forwarding 31 Function keys 13 G General information 8 H HiPath 8000 75 accepting anonymous calls 83 call forwarding 75 functions 75 hunt group 85 list for selective calls 81 making anonymou...

Страница 107: ...rivacy 64 Program Service menu 19 Programming call forwarding 32 R Redial 28 Ringer melody 94 Ringer off 64 Ringer tone sequence 95 S Security 64 66 Setting the time 89 Settings 88 Speakerphone distance 3 Speakerphone mode 21 23 T Telephone maintenance 105 Time display format 91 Toggle Connect 29 Troubleshooting 105 U User interface OpenStage 20 10 User password 66 User support 9 Using Ethernet sw...

Страница 108: ... change as a result of further development of the products An obligation to provide the respective characteristics shall only exist if expressly agreed in the terms of contract Subject to availability Right of modification reserved The trademarks used are owned by Siemens Enterprise Communications GmbH Co KG or their re spective owners Siemens Enterprise Communications www siemens com open Communi...

Отзывы: