background image

en 

Before using for the first time

6

Before using for the first time

Configure the settings for initial start-up. Clean the ap-
pliance and accessories.

Basic operation

You can find out everything you need to know about
operating your appliance here.

Switching on the appliance

Requirement:

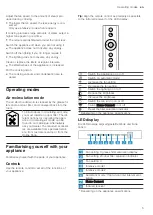
 Align the remote control as precisely as

possible to the infrared receiver for the LED display.

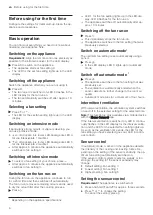
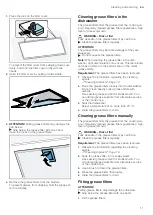
Press ⁠  to switch on the appliance.

a

The appliance starts at fan setting 2.

a

The LED for the set fan setting lights up in the LED
display.

Switching off the appliance

Switch the appliance off when you are not using it.

Press ⁠ .

a

The fan run-on is switched on, LED 6 flashes in the
LED display for the fan run-on.

a

The fan automatically switches off after approx. 10
minutes.

Selecting a fan setting

Press ⁠  or ⁠ .

a

The LED for the set fan setting lights up in the LED
display.

Switching on intensive mode

If particularly strong odours or vapours develop, you
can use intensive mode.

1.

 so oft drücken, bis in der LED-Anzeige die LED 4

für die Intensivstufe 1 leuchtet.

2.

 so oft drücken, bis in der LED-Anzeige die LED 5

für die Intensivstufe 2 leuchtet.

a

After approx. 6 minutes, the appliance automatically
switches to fan setting 3.

Switching off intensive mode

To select a fan setting of your choice, press ⁠ .

a

After approx. 6 minutes, the appliance automatically
switches to fan setting 3.

Switching on the fan run-on

During the fan run-on, the appliance continues to run
for a short time and then switches off automatically.
The fan run-on removes remaining odours and is used
to dry the odour filter after the cooking process.

Press ⁠ .

a

LED 1 for the fan setting lights up in the LED dis-
play. LED 6 flashes for the fan run-on.

a

The appliance switches off automatically after ap-
prox. 10 minutes.

Switching off the fan run-on

Press ⁠ .

a

This immediately stops the fan run-on.

a

The appliance switches to the fan setting that was
previously selected.

Switch on automatic mode

1

The optimum fan setting is set automatically using a
sensor.

Press ⁠ .

a

In the LED display, LED 6 lights up for automatic
mode.

Switch off automatic mode 

1

Press ⁠ .

a

The appliance switches to the fan setting that was
previously set.

a

The ventilation is automatically ended when the
sensor detects no further change in the room air
quality.

a

Automatic mode runs for a maximum of four hours.

Intermittent ventilation

With interval ventilation, the ventilation system switches
on and off in the selected setting for the selected time.

Note: 

This function is only available via a mobile device

with the Home Connect app.

If the interval ventilation is switched on, LED 6 continu-
ously flashes in the LED display for the interval ventila-
tion and the LED for the selected fan setting lights up.
As soon as the ventilation time ends, the LED for the
fan setting you have selected goes out. LED 6 contin-
ues to flash.

Sensor control

In automatic mode, a sensor in the appliance detects
the intensity of the cooking and roasting fumes. De-
pending on the setting of the sensor sensitivity, the op-
timum fan setting automatically switched on.
If the sensor control system reacts too weakly or too
strongly, the setting for the sensor sensitivity may
change.

¡

Default setting: Fan setting 3

¡

Lowest setting: Fan setting 1

¡

Highest setting: Fan setting 5

Setting the sensor control

Requirement:

 The appliance is switched off.

1.

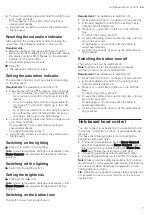
Press and hold ⁠  and ⁠  for approx. three seconds.

2.

Press ⁠  or ⁠  to change the setting.
To cancel the setting, press ⁠ .

1

Depending on the appliance specifications

Содержание LR16RBQ20

Страница 1: ...n system LR16RBQ20 LR16RBQ25 en User manual and assembly instructions Register your product on My Siemens and discover exclusive services and offers siemens home bsh group com welcome The future moving in Siemens Home Appliances ...

Страница 2: ...installer is responsible for en suring that the appliance works perfectly at its installation location Only use this appliance In accordance with these instructions for in stallation and use In private households and in enclosed spaces in a domestic environment Up to an altitude of max 2000 m above sea level Do not use the appliance With an external timer Restriction on user group Avoid risks to c...

Страница 3: ... parts Keep children at a safe distance The appliance will become hot during op eration Allow the appliance to cool down be fore cleaning it WARNING Risk of injury Components inside the appliance may have sharp edges Carefully clean the appliance interior Items placed on the appliance may fall off Do not place any objects on the appli ance Changes to the electrical or mechanical assembly are dange...

Страница 4: ...rrosion damage To prevent condensation from building up switch on the appliance during cooking If moisture gets into the controls this may result in damage Never clean controls with a wet cloth Incorrect cleaning damages the surfaces Follow the cleaning instructions Do not use harsh or abrasive detergents Clean stainless steel surfaces in the direction of the finish only Never clean controls with ...

Страница 5: ...g air mode can be found in our catalogue Alternatively ask your dealer The required accessor ies are available from specialist retail ers from customer service or from the Online Shop Familiarising yourself with your appliance Familiarise yourself with the parts of your appliance Controls Use the remote control to set all of the functions of your appliance Tip Align the remote control as precisely...

Страница 6: ...in the LED dis play LED 6 flashes for the fan run on a The appliance switches off automatically after ap prox 10 minutes Switching off the fan run on Press a This immediately stops the fan run on a The appliance switches to the fan setting that was previously selected Switch on automatic mode1 The optimum fan setting is set automatically using a sensor Press a In the LED display LED 6 lights up fo...

Страница 7: ...ppliance has this function Switching on the button tone The button tones can be switched on Requirement The appliance is switched off 1 Press and hold and for approx three seconds a In the LED display the LED for the setting that is currently selected lights up 2 Press or until LED 1 lights up in the LED dis play To cancel the setting press 3 To save the setting press and hold and for ap prox thre...

Страница 8: ...he display Tips Please consult the documents supplied by Home Connect Please also follow the instructions in the Home Con nect app Notes Please note the safety precautions in this instruction manual and make sure that they are also observed when operating the appliance via the Home Con nect app Safety Page 2 Operating the appliance on the appliance itself al ways takes priority During this time it...

Страница 9: ...ersonal settings in the app software updates can also be set to download automatically We recommend that you install security updates as soon as possible Resetting the connection Saved connections to the home network and to Home Connect can be reset Press and hold and until LED 7 goes out in the LED display a An audible signal sounds Remote diagnostics Customer Service can use Remote Diagnostics t...

Страница 10: ...y water in the direction of the finish 3 Dry with a soft cloth 4 Apply a thin layer of the stainless steel cleaning product with a soft cloth Tip You can obtain stainless steel cleaning products from after sales service or the online shop Cleaning painted surfaces 1 Observe the information regarding the cleaning agents Cleaning products Page 10 2 Clean using a sponge cloth and hot soapy water in t...

Страница 11: ...ve been removed 1 Observe the information regarding the cleaning agents Cleaning products Page 10 2 Place the grease filters loosely into the dishwasher Do not clean heavily soiled grease filters with utensils Use special grease solvent for stubborn dirt You can obtain grease solvents from after sales service or the online shop 3 Start the dishwasher Select a temperature of no more than 70 C 4 All...

Страница 12: ...he reach of children Keep an eye on any children when you are repla cing batteries Batteries may explode Do not charge the batteries Do not short circuit the batteries Do not throw batteries into a fire ATTENTION Improper handling of batteries Do not short circuit the terminals Use the specified type of batteries only Do not use different battery types together Do not use new and used batteries to...

Страница 13: ...nd for approx three seconds LED 1 flashes in the LED display The grease filters are saturated Cleaning grease filters in the dish washer Page 11 Cleaning grease filters manually Page 11 LED 2 flashes in the LED display The odour filters are saturated Change the odour filter Page 12 Customer Service If you have any queries on use are unable to rectify faults on the appliance yourself or if your app...

Страница 14: ... from the mains 2 Cut through the power cord 3 Dispose of the appliance in an environmentally friendly manner This appliance is labelled in accord ance with European Directive 2012 19 EU concerning used elec trical and electronic appliances waste electrical and electronic equip ment WEEE The guideline determines the frame work for the return and recycling of used appliances as applicable throughou...

Страница 15: ...ons Do not make any changes to the electrical or mechanical assembly Risk of falling when working on the appliance Use a stable stepladder Do not lean over the hob Do not step on the hob or the work surface The filter cover may swing out Open the filter cover slowly Take hold of the filter cover after opening until it no longer swings out Close the filter cover slowly Risk of injury when opening a...

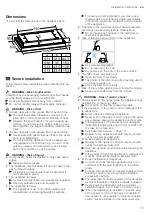
Страница 16: ...installation Ensure that the protection against contact is guaran teed during installation Only a licensed professional may connect appli ances without plugs They are subject to the require ments of the local electricity provider General information The appliance finds it more difficult to draw in the cooking vapours the further away they are from the hob Therefore maintain a distance of at least ...

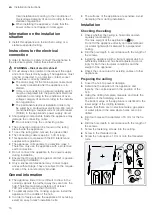
Страница 17: ...inwards and remove them 5 Close the odour filter cartridge Hanging the appliance 1 Lift the appliance by the corners and turn it over 2 Position the cable that is provided on site in the marked area on the appliance 3 Guide the cable that is provided on site through the opening and hook the appliance into the fastening screws on the ceiling 4 Push the appliance as far as it will go into the four k...

Страница 18: ...ring installation 1 Guide the cable that is provided on site through the opening in the appliance Maintain the bending radius of the cable that is provided on site for connecting the appliance The cable must remain doubly insulated You should therefore strip the cable as little as possible up stream of the connecting terminal 2 Insert the on site cable into the terminal plug L N Installing covers ...

Страница 19: ...ge 7 Fit the grease filters To avoid causing damage do not bend the grease filters Fitting the filter cover WARNING Risk of injury Components inside the appliance may have sharp edges Wear protective gloves Risk of injury when opening and closing the hinges Keep your hands away from the hinges 1 Open the hinges on the filter cover 25 2 Mount the filter cover on the designated screws and push it ba...

Страница 20: ...nce two people are required Use only suitable tools and equipment 1 Disconnect the appliance from the power supply 2 Press the lock on the filter cover To prevent the filter cover from swinging down sud denly hold onto the filter cover firmly with two hands 3 Open the filter cover by pulling it downwards 4 Swing down the filter cover Open the filter cover fully and without pulling on it 5 Remove t...

Страница 21: ... screws on the side covers 20 12 Remove the side covers 13 Close the odour filter cartridge 14 Loosen the cable that is provided on site from the terminal clamp L N 15 Carefully loosen the diagonally opposite screws 13 16 Disconnect the appliance from the key hole open ing 17 Slowly take the appliance down ...

Страница 22: ......

Страница 23: ......

Страница 24: ... 9001521334 9001521334 000225 en BSH Hausgeräte GmbH Carl Wery Straße 34 81739 München GERMANY www siemens home bsh group com Manufactured by BSH Hausgeräte GmbH under Trademark License of Siemens AG ...

Отзывы: