background image

Basic operation

 en

7

7.2 Setting the appliance to air extraction
mode

Your appliance is set to air extraction mode by default.
To use it in air extraction mode, you do not need to set
the operating mode.

Requirement:

 The appliance is switched off.

Press and hold   for four seconds.

a

Two audible signals sound.

a

The LEDs for fan speeds 1 and 2 and the LED for
the saturation indicator light up in the LED display.

a

The appliance is set to air extraction mode.

8  Basic operation

8.1 Switching on the appliance

Press   to switch on the appliance.

a

The appliance starts at fan setting 2.

a

The LED for fan setting 2 lights up in the LED dis-
play.

8.2 Selecting a fan setting

Press   or  ⁠.

a

The LED for the set fan setting lights up in the LED
display.

8.3 Switching off the appliance

Press   until the appliance switches off.

8.4 Switching on intensive mode

If particularly strong odours or vapours develop, you
can use intensive mode.

Press   until you hear the appliance switch into in-
tensive mode.

a

The LED for intensive mode flashes in the LED dis-
play.

a

After approx. 4 minutes, the appliance automatically
switches to fan setting 2.

8.5 Switching off intensive mode

To select a fan setting of your choice, press  ⁠.

8.6 Switching on intermittent ventilation

With intermittent ventilation, the appliance switches the
ventilation on and off at regular intervals.

1.

Switch off the appliance and the lighting.

2.

Press  ⁠.

3.

Select a fan setting within 5 seconds.
Fan settings 1–3 must be activated.

4.

Press  ⁠.

a

The appliance switches on the ventilation system for
approx. 10 minutes every hour.

a

The LED for intermittent ventilation and the set fan
setting flash in the LED display for intermittent ventil-
ation.

8.7 Switching off intermittent ventilation

Press  ,  ,   or  ⁠.

8.8 Switching on the fan run-on

During the fan run-on, the appliance continues to run
for a short time and then switches off automatically.

1.

Switch on fan setting 1, 2 or 3.

2.

Press  ⁠.

a

The LED for the fan run-on and the set fan setting
light up in the LED display.

a

The appliance switches off automatically after ap-
prox. 10 minutes.

8.9 Switching off the fan run-on

Press  ⁠.

a

The fan run-on mode is then prematurely ended and
the fan continues at the selected fan setting.

a

The LED for the set fan level lights up in the LED
display, but the LED for the fan run-on no longer
lights up.

8.10 Switching on the lighting

The lighting can be switched on and off independently
of the ventilation system.

Press   to switch on the lighting.

8.11 Setting the brightness

Press and hold  ⁠.

8.12 Switching off the lighting

Switch off the lighting with  ⁠.

Содержание IQ500 LR97CAP21B

Страница 1: ... LR97CAP21B en User manual and installation instructions Register your product on My Siemens and discover exclusive ser vices and offers siemens home bsh group com welcome The future moving in Siemens Home Appliances ...

Страница 2: ...iance may be used by children aged 8 or over and by people who have reduced physical sensory or mental abilities or inad equate experience and or knowledge provided that they are supervised or have been instructed on how to use the appliance safely and have understood the resulting dangers Children must not play with the appliance Children must not perform cleaning or user maintenance unless they ...

Страница 3: ...g oil or fat with wa ter Switch off the cooking zone Extinguish flames carefully using a lid fire blanket or something similar When gas burners are in operation without any cookware placed on them they can build up a lot of heat A ventilation appliance in stalled above the cooker may become dam aged or catch fire Only operate the gas burners with cook ware on them Operating multiple gas hobs at th...

Страница 4: ...n ers to clean the appliance WARNING Risk of explosion Highly caustic alkaline or highly acidic clean ing agents in conjunction with aluminium parts in the interior of the appliance may cause ex plosions Never use highly caustic alkaline or highly acidic cleaning agents In particular do not use commercial or industrial cleaning agents in conjunction with aluminium parts e g grease filter on extrac...

Страница 5: ...ergy Clean or replace the filters at regular intervals The effectiveness of the appliance is increased Put the cooking lid on The cooking vapours and condensation are re duced 4 Operating modes You can use your appliance in air extraction mode or circulating air mode The saturation indicator must be adjusted to the selec ted operating mode and the filters used 4 1 Air extraction mode The air which...

Страница 6: ...ng accessories always quote the exact product number E no of your appliance Page 12 You can find out which accessories are available for your appliance in our catalogue in the online shop or from our after sales service www siemens home bsh group com Accessories Order number Odour filter for the CleanAir recirculation module LZ21JCB11 CleanAir recirculation module stainless steel LZ21JXC51 CleanAi...

Страница 7: ...our choice press 8 6 Switching on intermittent ventilation With intermittent ventilation the appliance switches the ventilation on and off at regular intervals 1 Switch off the appliance and the lighting 2 Press 3 Select a fan setting within 5 seconds Fan settings 1 3 must be activated 4 Press a The appliance switches on the ventilation system for approx 10 minutes every hour a The LED for intermi...

Страница 8: ...and hot soapy water Clean aluminium using a soft cloth and glass cleaner Clean plastic using a soft cloth and glass cleaner Clean glass using a soft cloth and glass cleaner 3 Dry with a soft cloth 4 Apply a thin layer of the stainless steel cleaning product to stainless steel surfaces using a soft cloth You can obtain stainless steel cleaning products from the after sales service or the online sho...

Страница 9: ...he grease filters may become damaged if they are squeezed Do not squeeze the grease filters Note When cleaning the grease filter in the dish washer light discolouration may occur This discoloura tion has no effect on the performance of the metal grease filters Requirement The grease filters have been removed Removing the grease filter Page 8 1 Observe the information regarding the cleaning agents ...

Страница 10: ...lf Read the troubleshooting information before contacting Customer Service This will avoid unnecessary costs WARNING Risk of injury Improper repairs are dangerous Repairs to the appliance should only be carried out by trained specialist staff If the appliance is defective call Customer Service WARNING Risk of electric shock Improper repairs are dangerous Repairs to the appliance should only be car...

Страница 11: ...l Find out here how to dispose of old appliances cor rectly 11 1 Disposing of old appliance Valuable raw materials can be reused by recycling 1 Unplug the appliance from the mains 2 Cut through the power cord 3 Dispose of the appliance in an environmentally friendly manner Information about current disposal methods are available from your specialist dealer or local author ity This appliance is lab...

Страница 12: ... you contact Customer Service you will require the product number E Nr and the production number FD of your appliance The contact details for Customer Service can be found in the enclosed Customer Service directory or on our website 12 1 Product number E Nr and production number FD You can find the product number E Nr and the pro duction number FD on the appliance s rating plate Depending on the m...

Страница 13: ...g ex haust air wall box alone does not ensure compliance with the limit In any case consult your responsible chim ney sweep They are able to assess the house s entire ventilation setup and will suggest the suitable ventilation measures to you Unrestricted operation is possible if the ap pliance is operated exclusively in circulat ing air mode Risk of poisoning from flue gases being drawn back in I...

Страница 14: ...sing the hinges Keep your hands away from the hinges WARNING Risk of electric shock Sharp edged components inside the appli ance may damage the connecting cable Do not kink or trap the connecting cable If the appliance or the power cord is dam aged this is dangerous Never operate a damaged appliance Never pull on the power cord to unplug the appliance Always unplug the appliance at the mains If th...

Страница 15: ...ial accessory parts ob serve the enclosed installation instructions The appliance finds it more difficult to draw in the cooking vapours the further away they are from the hotplate For optimum performance a distance of at least 900 mm for gas hobs and 650 mm for elec trical hobs and a maximum of 1500 mm is recom mended The width of the extractor hood must correspond at least with the width of the ...

Страница 16: ...ogether with two hands take hold of the filter cover and open it 2 Remove the filter cover 3 Remove the grease filters 4 Remove the motor cover 5 Remove the cable cover 6 Loosen both plug connections and release the cables from the cable holders 7 Remove the view frame 8 Remove the motor ...

Страница 17: ...uired compensate for the ceiling thickness by 13 mm by placing wood underneath 3 Remove any shavings Installing the appliance 1 Disconnect the appliance from the power supply Unplug the appliance from the mains or switch off the circuit breaker in the fuse box 2 Insert the motor block in the ceiling 3 Align the motor block mark the drill holes and set the motor block down again 4 Screw in one of t...

Страница 18: ...ew 8 Screw in the remaining four screws loosely do not tighten them fully 9 Loosen the two central screws again 10 Align the motor block and tighten all of the screws 11 Connect the exhaust air pipe 12 Fit the air pipe connector 13 Insert the power cable into the motor 14 Insert the motor into the motor block and screw it in tightly ...

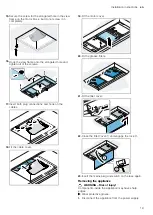
Страница 19: ...s 17 Insert both plug connections and hook on the cables 18 Fit the cable cover 19 Fit the motor cover 20 Fit the grease filters 21 Fit the filter cover 22 Close the filter cover and engage the lock 23 Insert the mains plug and switch on the fuse again Removing the appliance WARNING Risk of injury Components inside the appliance may have sharp edges Wear protective gloves 1 Disconnect the applianc...

Страница 20: ...oid causing damage do not bend the grease filters 5 Remove the motor cover 6 Disconnect the power connections between the view frame and motor 7 Remove the view frame 8 Remove the motor 9 Remove the exhaust pipe from the air pipe con nector 10 Remove the motor block 11 Disconnect the appliance from the power supply ...

Страница 21: ......

Страница 22: ......

Страница 23: ......

Страница 24: ...hen GERMANY www siemens home bsh group com Valid within Great Britain Imported to Great Britain by BSH Home Appliances Ltd Grand Union House Old Wolverton Road Wolverton Milton Keynes MK12 5PT United Kingdom Manufactured by BSH Hausgeräte GmbH under the trademark licence of Siemens AG ...

Отзывы: