Siemens HL9R30020U Скачать руководство пользователя страница 29

How it works

 en

29

In order to prevent damage, wipe away the condensa-

tion.

When you preheat the appliance, you reduce the build-

up of condensation.

26.3 Good to know

Observe this information when preparing food.

¡

The temperature and cooking time depend on the

amount of food and the recipe. Settings ranges are

specified for this reason. Select lower values first

and, if required, select higher values the next time.

Cooking times cannot be reduced by using higher

temperatures. Doing this would mean that the food

would only be cooked on the outside, and would

not be fully cooked in the middle.

¡

The setting values apply to food placed in the cook-

ing compartment while the cooking compartment is

still cold. You can cut your energy use by up to

20%.

It is not usually necessary to preheat the appliance.

If you would like to preheat the oven anyway, you

can reduce the indicated baking times by a few

minutes.

Preheating is required for some types of food. Do

not place accessories into the cooking compart-

ment until it has finished preheating.

¡

Remove any accessories that are not being used

from the cooking compartment. This allows you to

achieve optimal cooking results and save up to 20%

in energy.

¡

Hot air gentle is an intelligent type of heating that al-

lows you to gently cook meat, fish and baked items.

The appliance optimally controls the supply of en-

ergy to the cooking compartment. The food is

cooked in phases using residual heat. This means

that the food remains more succulent and browns

less. Depending on the preparation and food, you

can save energy. If you preheat the appliance or

open the appliance door before the food has fin-

ished cooking, you may not be able to achieve this

result.

The hot air gentle type of heating is used to meas-

ure both the energy consumption in circulating-air

mode and the energy efficiency class.

¡

Only use original accessories.

The original accessory has been tailored to the

cooking compartment and the types of heating.

Ensure that the accessory slides in the right way

round.

Greaseproof paper

Only use greaseproof paper that is suitable for the se-

lected temperature. Always cut the greaseproof paper

to size.

WARNING ‒ Risk of fire!

Opening the appliance door creates a draught.

Greaseproof paper may come into contact with the

heating element and catch fire.

Never place greaseproof paper loosely over ac-

cessories when preheating the appliance and while

cooking.

Always cut greaseproof paper to size and use a

plate or baking tin to hold it down.

26.4 Notes on baking

When baking, use the shelf positions indicated.

Baking on one level

Shelf posi-

tion

Rising pasta/baked goods or tin on the

wire rack

2

Flat pasta/baked items or in the baking

tray

2–3

Baking on two or more levels

Shelf posi-

tion

Universal pan

Baking tray

3

1

Baking tins on the wire rack:

First wire rack

Second wire rack

Shelf posi-

tion

3

1

Baking on three levels

Shelf posi-

tion

Baking trays

Universal pan

Baking trays

5

3

1

Notes

¡

When baking on several layers, use hot air. Different

food that is placed in the oven at the same time will

not necessarily be ready at the same time.

In such cases, you can remove the cooked food

and continue to cook the other baking tray. If neces-

sary, you can change the position and direction of

the baking trays.

¡

Position baking tins/dishes either next to one an-

other or offset on different shelves so that they are

not directly one above the other in the cooking com-

partment. You can cut energy use by cooking differ-

ent items at the same time.

¡

For best results, we recommend using dark-col-

oured metal baking tins.

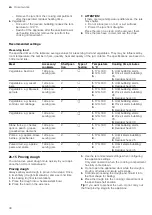
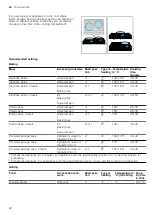
26.5 Cakes and other baked goods

Recommended settings for cakes and baked items

The temperature and baking time depend on the quant-

ity and consistency of the dough. This is why temperat-

ure ranges are given in the tables. Set a short cooking

time first. If required, set a longer cooking time next

time. A lower temperature results in more even brown-

ing.

Baking tips

We have compiled a few tips to help you achieve a

good baking result.

Topic

Tip

You want your cake to

rise evenly.

¡

Only grease the base

of the springform cake

tin.

¡

After baking, use a

knife to carefully

loosen the cake from

the baking tin.

Содержание HL9R30020U

Страница 1: ...ee standing cooker HL9R30020U en User manual Register your product on My Siemens and discover exclusive ser vices and offers siemens home bsh group com welcome The future moving in Siemens Home Appliances ...

Страница 2: ... altitude of max 4000 m above sea level Do not use the appliance On boats or in vehicles as a room heater with an external timer or a remote control You cannot operate the appliance with a timer or remote control If you wear an active implantable medical device e g a pacemaker or defibrillator check with your doctor that it complies with Council Directive 90 385 EEC of 20th June 1990 EN 45502 2 1 ...

Страница 3: ...may switch on unin tentionally at a later point Switch off the fuse in the fuse box Call the customer service WARNING Risk of burns The appliance and its parts that can be touched become hot during use particularly the hob surround if fitted Caution should be exercised here in order to avoid touching heating elements Young children under 8 years of age must be kept away from the appliance Metal ob...

Страница 4: ...must not directly touch the bottom of the water filled pot Only use heat resistant cookware An appliance with a cracked or broken sur face can cause cuts Do not use the appliance if it has a cracked or broken surface WARNING Risk of scalding The accessible parts of the appliance become hot during operation Never touch these hot parts Keep children at a safe distance Hot steam may escape when you o...

Страница 5: ...liance to cool down with the door open will damage the front of neighbouring kitchen units over time Always allow the cooking compartment to cool down with the door closed after cooking at high temperatures Take care not to trap anything in the appliance door Only leave the cooking compartment to dry with the door open if a lot of moisture was produced during operation Fruit juice dripping from th...

Страница 6: ...sing the drawer ATTENTION Do not place hot objects in the plinth drawer The plinth drawer may be damaged Do not place hot objects in the plinth drawer Do not place oven accessories that exceed the height of the drawer into the plinth drawer Otherwise this may damage the appliance Do not place oven accessories that exceed the height of the drawer into the plinth drawer 3 Environmental protection an...

Страница 7: ...base i e it must be attracted by a magnet The base must also match the size of the cooking zone If cookware is not detected on a cooking zone place this on the cooking zone with the next smallest diameter 4 1 Size and characteristics of the cookware To correctly detect the cookware take the size and the material of the cookware into consideration All cook ware bases must be perfectly flat and smoo...

Страница 8: ...n Pull out the power cable directly at the plug and never by pulling the power cable as this may be come damaged Fit the mains plug and socket together The mains plug can be accessed at all times The cross section of the cable is sufficient The mains cable is not kinked crushed modified or severed If required the mains cable must only be replaced by a qualified electrician A replacement mains cabl...

Страница 9: ...ppliance door 5 Plinth drawer1 1 Depending on the appliance specifications 6 2 Control panels You can use the control panel to configure all functions of your appliance and to obtain information about the operating status Controls You can use the controls to configure all functions of your appliance and to obtain information about the op erating status Control Explanation Buttons and display The b...

Страница 10: ...ction is active the corresponding symbol lights up on the display only lights up when you change the time Symbol Function Use Short term timer Set the timer Childproof lock Activate or deactivate the childproof lock Time setting options You can select the time cooking time and the end time To select the individual time setting options press several times Minus Plus Decrease the setting values Incr...

Страница 11: ...ox 240 C after ap prox 10 minutes If your appliance has the top bottom heating or bottom heating types this temperature reduction does not take place Symbol Function Use Zero setting The appliance does not heat up 50 275 Temperature range Set the temperature in the cooking compartment in C 1 2 3 or I II III Grill settings Depending on the appliance type set the grill settings for the grill for the...

Страница 12: ...oking zone is warm 6 3 Cooking compartment The functions in the cooking compartment make your appliance easier to use Rails The rails in the cooking compartment enable you to place accessories at different heights The cooking compartment has five shelf positions The shelf positions are numbered from bottom to top You can remove the rails e g for cleaning Rails Page 22 Lighting The oven light light...

Страница 13: ... our after sales service specialist retailers or online You will find a comprehensive range of products for your appliance in our brochures and online www siemens home bsh group com Accessories vary from one appliance to another When purchasing accessories always quote the exact product number E no of your appliance You can find out which accessories are available for your appliance in our online ...

Страница 14: ...zone or the pot is not suitable the selected power level flashes After a certain period of time the cooking zone switches itself off quickStart If you place cookware on the hob before you switch it on the cookware is detected when you switch on and the corresponding cooking zone is selected automatically Select the power level in the next 20 seconds or the hob switches itself off Changing the powe...

Страница 15: ...ng or deleting the cooking time 1 Select the cooking zone 2 Touch 3 To change the cooking time touch or or set it to 10 2 Timer Enables the activation of a timer of 0 99 minutes This function can be used independently of the cooking zones and other settings It does not automatically switch off the hotplates Setting the kitchen timer 1 Select the hotplate and touch twice a beside lights up 2 Use or...

Страница 16: ...imum power of the hob Time for selecting the cooking zone Unlimited You can adjust the last selected cooking zone without having to select it again 1 Limited You can adjust the last selected cooking zone within 10 seconds after selecting it After this time you must select the cooking zone again before adjusting it Cookware test You can use this function to test the quality of the cookware Not suit...

Страница 17: ...ce Turn the function selector to any position other than the Off position a The appliance is switched on 15 2 Switching off the appliance Turn the function selector to the Off position a The appliance is switched off 15 3 Types of heating and temperature 1 Use the function selector to set the type of heating 2 Use the temperature selector to set the temperature or grill setting a The appliance sta...

Страница 18: ...in the display when the timer duration has elapsed 3 Once the timer duration has elapsed Press any button to switch off the timer Changing the timer The timer duration can be changed at any time Requirement is highlighted in the display Use the or button to change the timer duration a The appliance applies the change after a few seconds Cancelling the timer The timer duration can be cancelled at a...

Страница 19: ...ge and starts heating up The cooking time counts down 17 5 Setting the time Once the appliance has been connected to the mains or after a power cut the time flashes in the display The time starts at 12 00 Set the current time Requirement The function selector must be set to the off position 1 Use or to set the time 2 Press a The time that is set appears in the display 18 Childproof lock Secure the...

Страница 20: ...nels in order to clean them thoroughly Appliance door Page 23 Door panel Made of stainless steel Stainless steel cleaner Made of plastic Hot soapy water Do not use glass cleaner or a glass scraper Tip Remove the upper door panel for thorough cleaning Appliance door Page 23 Door handle Hot soapy water In order to avoid stubborn dirt remove descaling agents from the door handle immediately Door seal...

Страница 21: ... damp dish cloth and dry it with a cloth Dam age Cause Action Stains Limescale and water marks Only clean the hob when it has cooled down sufficiently You can use a cleaning agent suitable for glass ceramic hobs Stains Sugar rice starch or plastic Clean immediately Use a glass scraper 19 5 Cleaning the hob Clean the hob after every use to stop cooking residues from getting burnt on Requirement The...

Страница 22: ...ked cloth Wipe this away with clear water and use a soft cloth to also rub underneath the door seal dry 4 Once the cooking compartment is sufficiently clean In order to cool the cooking compartment leave the appliance door open in the detent position for approx one hour To dry the cooking compartment more quickly heat up the appliance with the door open with 3D hot air and 50 C for approx five min...

Страница 23: ...he hinges are secured The hinges cannot snap shut 22 2 Removing the appliance door 1 Open the oven door fully 2 Open the locking levers on the left and right hand hinges 3 Close the oven door as far as the limit stop Grip the left and right hand sides of the door with both hands Close the door slightly more and remove it 22 3 Removing the door panes The glass panes of the oven door can be removed ...

Страница 24: ... into both openings on the underside The smooth surface of the pane must face out wards 3 Place the cover at the top of the oven door and press it on The mounting brackets must lock in place on both sides 4 Attach the oven door Attaching the appliance door Page 24 Note Only use the oven once the glass panes have been correctly fitted 22 5 Attaching the appliance door Reattach the oven door in the ...

Страница 25: ...d out by trained specialist staff If the appliance is defective call Customer Service WARNING Risk of electric shock Incorrect repairs are dangerous Repairs to the appliance should only be carried out by trained specialist staff Only use genuine spare parts when repairing the appliance If the power cord of this appliance is damaged it must be replaced by the manufacturer the manufac turer s Custom...

Страница 26: ... appliance has not been connected as shown in the circuit diagram Connect the appliance in accordance with the circuit diagram Electronics fault If you are unable to rectify the fault inform the technical after sales service The displays flash The control panel is wet or an object is covering it Dry the control panel or remove the object The display flashes in the cooking zone displays A fault has...

Страница 27: ... from the appliance WARNING Risk of electric shock When changing the bulb the bulb socket contacts are live Before replacing the bulb ensure that the appliance is switched off in order to prevent a potential electric shock Also unplug the appliance from the mains or switch off the circuit breaker in the fuse box Requirements The appliance is disconnected from the power sup ply The cooking compartm...

Страница 28: ...gy effi ciency class G 25 1 Product number E Nr and production number FD You can find the product number E Nr and the pro duction number FD on the appliance s rating plate You will see the rating plate with these numbers if you open the appliance door Make a note of your appliance s details and the Cus tomer Service telephone number to find them again quickly 26 How it works Here you can find the ...

Страница 29: ...ssory slides in the right way round Greaseproof paper Only use greaseproof paper that is suitable for the se lected temperature Always cut the greaseproof paper to size WARNING Risk of fire Opening the appliance door creates a draught Greaseproof paper may come into contact with the heating element and catch fire Never place greaseproof paper loosely over ac cessories when preheating the appliance...

Страница 30: ...delicate Vienna ring tin loaf tin 2 150 170 60 80 Sponge flan base Flan base tin 3 160 180 30 40 Fruit tart or cheesecake with shortcrust pastry base Springform cake tin diameter 26 cm 2 160 180 70 90 Strudel Tart dish or tin 1 200 240 25 50 Pie Springform cake tin Ø 28 cm 2 160 180 25 35 Sponge cake Bundt cake tin 2 150 170 60 80 Sponge flan 3 eggs Springform cake tin diameter 26 cm 2 160 170 30 ...

Страница 31: ... Universal pan Baking tray 3 1 150 170 25 40 Puff pastry Universal pan 3 180 200 20 30 Puff pastry 2 levels Universal pan Baking tray 3 1 180 200 25 35 Puff pastry 3 levels 2x Baking tray Universal pan 5 3 1 170 190 30 45 Choux pastry e g profiteroles eclairs Universal pan 3 190 210 35 50 Choux pastry 2 levels e g profiteroles eclairs Universal pan Baking tray 3 1 190 210 35 45 Biscuits Meal Acces...

Страница 32: ...lly too light in colour Check the shelf posi tion and accessory Increase the baking temperature by 10 C Or Increase the baking time Your cake is too light on top and too dark under neath Place the cake one level higher in the cooking compartment Your cake is too dark on top and too light under neath Place the cake one level lower in the cook ing compartment Reduce the baking temperature and in cre...

Страница 33: ...latbread Universal pan 3 240 250 25 30 Flatbread frozen1 Universal pan 2 200 2202 10 25 Bread rolls sweet fresh Universal pan 3 170 1802 20 30 Bread rolls sweet fresh 2 levels Universal pan Baking tray 3 1 160 1802 15 25 Bread rolls fresh Universal pan 3 200 220 20 30 Toast with topping x 4 Wire rack 3 200 220 15 20 Toast with topping x 12 Wire rack 3 220 240 15 25 1 The cooking process must take ...

Страница 34: ...es and gratins Meal Accessory cookware Shelf posi tion Type of heating Temperature in C Cooking time minutes Bake savoury fresh cooked ingredi ents Ovenproof dish 2 200 220 30 60 Bake sweet Ovenproof dish 2 180 200 50 60 Potato gratin raw ingredients 4 cm deep Ovenproof dish 2 150 170 60 80 Potato gratin raw ingredients 4 cm deep on 2 levels Ovenproof dish 3 1 150 160 70 80 26 9 Poultry meat and f...

Страница 35: ... become dry Only add salt to steaks once they have been grilled Salt draws water from the meat Tips for poultry meat and fish Observe the instructions when preparing poultry meat and fish Poultry For duck or goose pierce the skin on the underside of the wings This allows the fat to drain out If using duck breast score the skin Do not turn duck breasts Poultry will turn out particularly crispy and ...

Страница 36: ...e without lid 2 200 220 60 70 Small chicken portions 250 g each Cookware without lid 3 220 230 30 35 Chicken goujons nuggets frozen Universal pan 3 190 210 20 25 Duck unstuffed 2 kg Cookware without lid 2 190 210 100 110 Duck breast 300 g each medium Cookware without lid 3 240 260 30 40 Goose unstuffed 3 kg Cookware without lid 2 170 190 120 140 Goose legs 350 g each Cookware without lid 3 220 240...

Страница 37: ...osi tion Type of heating Temperature in C grill setting Cooking time in mins Fish grilled whole 300 g e g trout Wire rack 2 2 20 251 Fish grilled whole 1 kg e g gilthead Wire rack 2 180 200 45 501 Fish grilled whole 1 5 kg e g salmon Wire rack 2 170 190 50 601 Fish fillet fish cutlet 2 3 cm thick grilled Wire rack 3 2 20 251 1 Slide the universal pan underneath the wire rack Tips for next time you...

Страница 38: ...ring the appliance settings 8 After making the yoghurt leave it to cool in the refri gerator Recommended settings Yoghurt Meal Accessory cookware Shelf position Type of heating function Temperature in C Cooking time minutes Yoghurt Cup jar Cooking compartment floor 4 5 hours 26 12 Tips for keeping acrylamide levels to a minimum when cooking Acrylamide is harmful to your health and is produced when...

Страница 39: ...0 5 8 hours Herbs stalks removed Wire rack 3 3 1 60 2 5 hours 26 14 Preserving food You can preserve fruit and vegetables by heating them and sealing them in air tight jars Only use heat resistant clean undamaged pre serving jars rubber seals and clips Only use fruit and vegetables which are in perfect condition Only use jars that are the same size and contain the same food WARNING Risk of injury ...

Страница 40: ...les e g beans kohlrabi red cabbage 1 litre pre serving jars 2 1 170 180 2 120 140 3 1 Until bubbling starts 2 Once it starts bubbling 60 3 Residual heat 30 Vegetables e g peas 1 litre pre serving jars 2 1 170 180 2 120 140 3 1 Until bubbling starts 2 Once it starts bubbling 70 3 Residual heat 30 Stone fruit e g cherries apricot peach grapes gooseberries damsons 1 litre pre serving jars 2 1 170 180...

Страница 41: ...est for another 10 to 30 minutes in the appliance after switching it off Recommended settings Defrosting Meal Accessory cookware Shelf position Type of heating Temperature in C Cooking time minutes Baked items cake and bread fruit veget ables meat products Wire rack 2 3 1 26 17 Test dishes These overviews have been produced for test institutes to facilitate appliance testing in accordance with EN ...

Страница 42: ...sal pan 3 1501 25 35 Small cakes Universal pan 3 1501 25 35 Small cakes 2 levels Universal pan Baking tray 3 1 1501 25 35 Small cakes 3 levels 2x Baking tray Universal pan 5 3 1 1401 35 45 Hot water sponge cake Springform cake tin diameter 26 cm 2 160 1702 30 40 Hot water sponge cake Springform cake tin diameter 26 cm 2 170 30 40 Hot water sponge cake 2 levels Springform cake tin diameter 26 cm 3 ...

Страница 43: ......

Страница 44: ...hen GERMANY www siemens home bsh group com Valid within Great Britain Imported to Great Britain by BSH Home Appliances Ltd Grand Union House Old Wolverton Road Wolverton Milton Keynes MK12 5PT United Kingdom Manufactured by BSH Hausgeräte GmbH under the trademark licence of Siemens AG ...

Отзывы: