background image

Appliance door

 en

19

3.

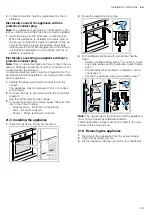
Close the appliance door fully  . Grab hold of the
appliance door with both hands (on the left and
right) and pull it upwards and out  ⁠.

4.

Carefully place the appliance door on a level sur-
face.

16.2 Attaching the appliance door

WARNING ‒ Risk of injury!

The hinges on the appliance door move when the door
is opened and closed, which could trap your fingers.

Keep your hands away from the hinges.

When the hinges are not secured, they can snap shut
with great force.

Make sure that the locking levers are always either
fully closed or (when detaching the oven door) fully
open.

1.

Slide the appliance door straight onto the two
hinges  . Slide the appliance door on as far as it
will go.

2.

Open the appliance door fully.

3.

Close the locking levers on the left- and right-hand
hinges  ⁠.

a

The locking levers are closed. The appliance door is
secured and cannot be detached.

4.

Close the appliance door.

16.3 Removing the door panes

WARNING ‒ Risk of injury!

The hinges on the appliance door move when the door
is opened and closed, which could trap your fingers.

Keep your hands away from the hinges.

Components inside the appliance door may have sharp
edges.

Wear protective gloves.

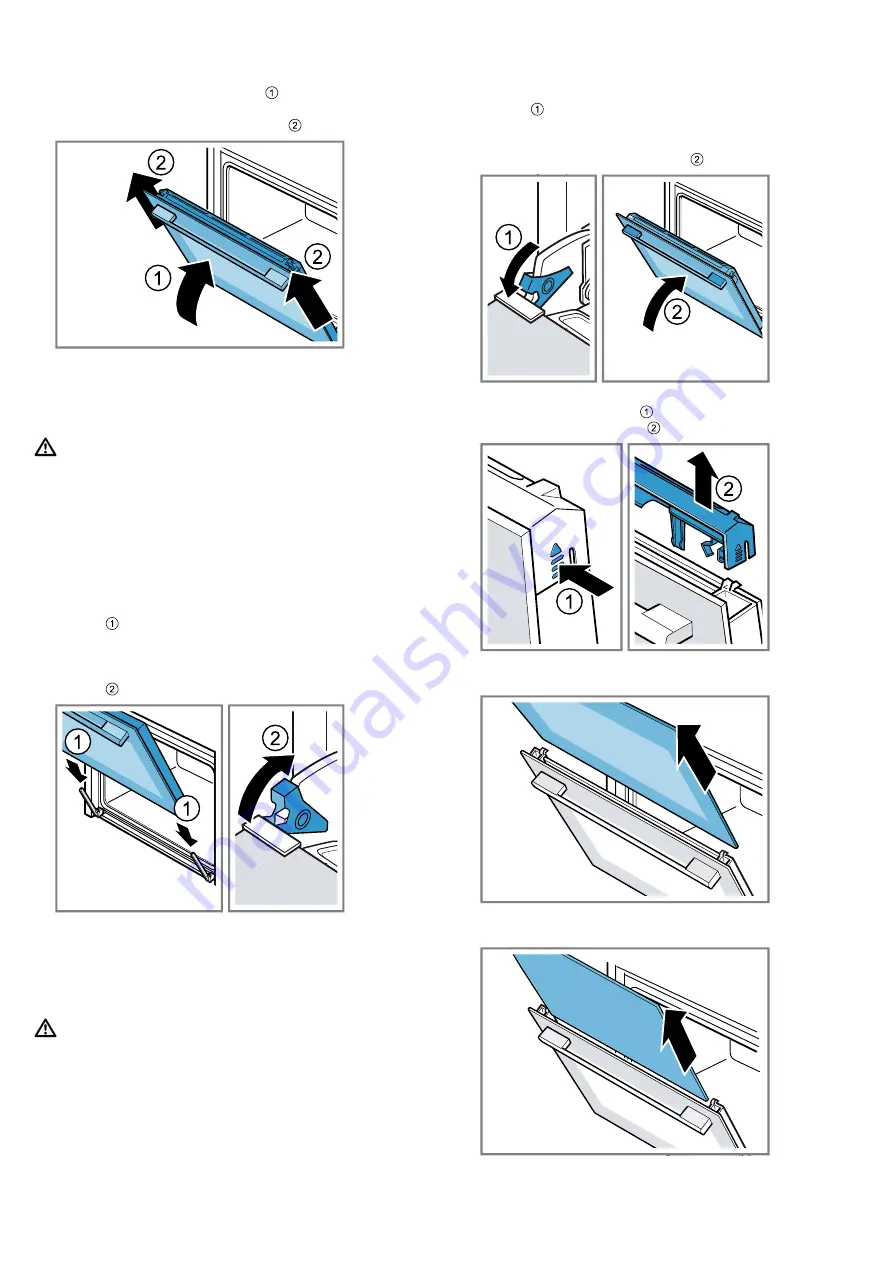
1.

Open the appliance door fully.

2.

Open the locking levers on the left- and right-hand
hinges  .

a

The locking levers are open. The hinges are now se-
cured and cannot snap shut.

3.

Close the appliance door fully  ⁠.

4.

Push on the left- and right-hand side of the door
cover from the outside   until it is released.

5.

Remove the door cover  ⁠.

6.

Lift out the inner pane and set it down carefully on a
flat surface.

7.

Lift out the intermediate pane and set it down care-
fully on a flat surface.

Содержание HB-37 Series

Страница 1: ...7 B Z en User manual and installation instructions Register your product on My Siemens and discover exclusive ser vices and offers siemens home bsh group com welcome The future moving in Siemens Home Appliances ...

Страница 2: ...pliance if it has been damaged in transit 1 2 Intended use This appliance is designed only to be built into kitchen units Read the special installation instructions Only a licensed professional may connect ap pliances without plugs Damage caused by in correct connection is not covered under the warranty Only use this appliance To prepare meals and drinks In private households and in enclosed space...

Страница 3: ...e parts of the appliance become hot during operation Never touch these hot parts Keep children at a safe distance Hot steam may escape when you open the appliance door Steam may not be visible de pending on the temperature Open the appliance door carefully Keep children at a safe distance If there is water in the cooking compartment when it is hot this may create hot steam Never pour water into th...

Страница 4: ...ng compartment is hot any water in side it will create steam The change in temperature may cause damage Never pour water into the cooking compartment when it is still hot Never place cookware containing water on the cooking compartment floor The prolonged presence of moisture in the cooking compartment leads to corrosion Allow the cooking compartment to dry after use Do not keep moist food in the ...

Страница 5: ... be re quired to defrost it Note The appliance requires A maximum of 1 W when the appliance is in opera tion with the display switched on A maximum of 0 5 W when the appliance is in oper ation with the display switched off 4 Familiarising yourself with your appliance 4 1 Controls You can use the control panel to configure all functions of your appliance and to obtain information about the operatin...

Страница 6: ...butes the heat from the ring shaped heating element in the back wall evenly around the cooking compartment The food is cooked in phases us ing residual heat Select a temperature of between 120 C and 230 C Always keep the appliance door closed when cooking This type of heating is used to determine the energy consumption in air recircu lation mode and the energy efficiency class Pizza setting Cook p...

Страница 7: ...ts The shelf supports in the cooking compartment enable you to place accessories at different heights Accessories Page 8 Your appliance has five shelf positions The shelf posi tions are numbered from bottom to top You can remove the shelf supports e g for cleaning Shelf supports Page 17 Self cleaning surfaces The back wall in the cooking compartment is self clean ing The self cleaning surfaces are...

Страница 8: ...nserted into the cooking compartment correctly for the tilt pro tection to work properly 5 2 Sliding accessories into the cooking compartment Always slide accessories into the cooking compartment correctly This is the only way to ensure that accessor ies can be pulled out approximately halfway without tip ping 1 Turn the accessories so that the notch is at the rear and is facing downwards 2 Insert...

Страница 9: ...on a The time that is set appears on the display Tip You can go to the basic settings Page 14 to specify whether or not the time should be shown on the display 6 2 Cleaning the appliance before using it for the first time Clean the cooking compartment and accessories be fore using the appliance to prepare food for the first time 1 Remove any accessories and leftover packaging such as polystyrene p...

Страница 10: ...on select the different time setting op tions Time setting option Use Timer The timer can be set independently of the appliance when it is in opera tion It does not affect the appliance Cooking time If you set a cooking time operation of the appliance stops automatically once this time has elapsed End time For the cooking time you can set the time at which operation ends The appliance starts up au...

Страница 11: ...etting are set A cooking time is set 1 Press the button repeatedly until is highlighted in the display 2 Press the or button a The display shows the calculated end time 3 Use the or button to delay the end time a After a few seconds the appliance applies the set ting and the display shows the set end time a Once the calculated start time has been reached the appliance starts heating up and the coo...

Страница 12: ...ing dish with glass lid Turkey breast weight Cover the bottom of the roasting dish and add up to 250 g ve getables if re quired 2 Do not sear the meat beforehand 03 Vegetable stew Vegetarian Deep roasting dish with lid Total weight As per recipe 2 Cut vegetables that take longer to cook e g carrots into smaller pieces than vegetables that take less time to cook e g tomatoes 04 Goulash Diced beef o...

Страница 13: ...e the function selector to set Programme 2 Use the temperature selector to set Programme 3 Use the or button to set the required pro gramme 4 Press the button 5 Use the or button to set the weight of your food Always set the next higher weight The display shows the calculated cooking time The cooking time cannot be changed For some programmes the button can be used to delay the end Setting the end...

Страница 14: ... button for approximately four seconds a The first basic setting appears in the display e g 2 Use the or button to change the setting 3 Use the button to switch to the next basic setting 4 To save the changes press and hold the button for approx four seconds Note Following a power failure the factory basic set tings are restored 12 3 Discarding changes to the basic settings Turn the function selec...

Страница 15: ...p Remove the door panels in order to clean them thoroughly Appliance door Page 18 Door cover Made of stainless steel Stainless steel cleaner Made of plastic Hot soapy water Do not use glass cleaner or a glass scraper Tip Remove the door cover for thorough cleaning Appliance door Page 18 Door handle Hot soapy water To avoid permanent stains remove descaling agents from the door handle immediately D...

Страница 16: ...aces absorb splashes from baking roasting or grilling and break them down If the self cleaning sur faces no longer clean themselves adequately during operation heat up the cooking compartment specific ally to the right temperature ATTENTION If you do not clean the self cleaning surfaces regularly they may become damaged If dark stains are visible on the self cleaning sur faces heat up the cooking ...

Страница 17: ...corrosion After using the cleaning assistance wipe the cook ing compartment and allow it to dry completely Requirement The cooking compartment has cooled down 1 Open the appliance door and remove the remaining water with an absorbent sponge cloth 2 Clean the smooth surfaces in the cooking compart ment with a dish cloth or a soft brush Remove stub born food remnants using a stainless steel scouring...

Страница 18: ... The hinges on the appliance door move when the door is opened and closed which could trap your fingers Keep your hands away from the hinges 1 Open the appliance door fully 2 WARNING Risk of injury When the hinges are not secured they can snap shut with great force Make sure that the locking levers are always either fully closed or when detaching the oven door fully open Open the locking levers on...

Страница 19: ...y 3 Close the locking levers on the left and right hand hinges a The locking levers are closed The appliance door is secured and cannot be detached 4 Close the appliance door 16 3 Removing the door panes WARNING Risk of injury The hinges on the appliance door move when the door is opened and closed which could trap your fingers Keep your hands away from the hinges Components inside the appliance d...

Страница 20: ...ting the door panes Page 20 16 4 Fitting the door panes WARNING Risk of injury The hinges on the appliance door move when the door is opened and closed which could trap your fingers Keep your hands away from the hinges Components inside the appliance door may have sharp edges Wear protective gloves 1 Open the appliance door fully 2 Place the condensate trough vertically in the re tainer and turn i...

Страница 21: ...ing The appliance is not working The circuit breaker in the fuse box has tripped Check the circuit breaker in the fuse box There has been a power cut Check whether the lighting in your kitchen or other appliances are working The appliance does not switch off fully at the end of a cooking time At the end of a cooking time the appliance stops heating up The oven light and cooling fan do not switch o...

Страница 22: ...r switch off the circuit breaker in the fuse box Requirements The appliance is disconnected from the power sup ply The cooking compartment has cooled down You have a new halogen bulb to replace the old one 1 Place a tea towel in the cooking compartment to prevent damage 2 Turn the glass cover anti clockwise to remove it 3 Pull out the halogen bulb without turning it 4 Insert the new halogen lamp a...

Страница 23: ... from the cooking compartment 20 2 Notes on baking When baking use the shelf positions indicated Baking on one level Height Deep baked goods or tin on wire rack 2 Flat baked goods or goods in a baking tray 3 Baking on two levels Height Universal pan Baking tray 3 1 Baking tins dishes on the wire rack First wire rack Second wire rack Height 3 1 Baking on three levels Height Baking tray Universal pa...

Страница 24: ... tin 2 150 170 60 80 Sponge cake on 2 levels Loaf tin 3 1 140 150 70 85 Fruit tart or cheesecake with shortcrust pastry base Springform cake tin diameter 26 cm 2 170 190 55 80 Sponge flan 6 eggs Springform cake tin Ø 28 cm 2 150 1601 30 40 Swiss roll Baking tray 3 180 2001 10 15 Shortcrust tart with moist topping Universal pan 2 160 180 55 95 Yeast cake with moist topping Universal pan 3 180 200 3...

Страница 25: ...cling film 4 Place the containers on the cooking compartment floor 5 Set the appliance according to the recommended setting 6 After making the yoghurt leave it to cool in the refri gerator Recommended settings for yoghurt Food Accessories cookware Shelf position Type of heating Temperature in C Cooking time in mins Yoghurt Individual moulds Cooking compartment floor 1 2 1 100 2 1 1 2 8 9 hrs 1 Pre...

Страница 26: ...l cakes 2 levels Universal pan Baking tray 3 1 140 1501 25 40 Small cakes 3 levels Universal pan Baking tray 5 3 1 1401 30 40 Hot water sponge cake Springform cake tin diameter 26 cm 2 160 1702 25 35 Hot water sponge cake Springform cake tin diameter 26 cm 2 160 170 30 35 Hot water sponge cake 2 levels Springform cake tin diameter 26 cm 3 1 150 1602 35 50 1 Preheat the appliance for five minutes D...

Страница 27: ...gs Otherwise the correct opera tion of electrical components may be ad versely affected The mains socket for the appliance must either be located in the hatched area or outside of the area where the appliance is installed Any unsecured units must be secured to the wall using a standard bracket Wear protective gloves so that you do not cut yourself Parts that are accessible dur ing installation may...

Страница 28: ...0 cm in the base area To do this trim the base panel or fit a ventilation grille Ensure that air exchange is guaranteed in accord ance with the diagram Only fit appliances up to a height that allows ac cessories to be easily removed 21 6 Corner installation Observe the installation dimensions and the installation instructions when installing in a corner To ensure that the appliance door can be ope...

Страница 29: ...ll ation regulations 1 Identify the phase and neutral conductors in the socket The appliance may be damaged if it is not connec ted correctly 2 Connect the hob in accordance with the connection diagram See the rating plate for the voltage 3 Connect the wires of the mains power cable accord ing to the colour coding Green yellow Protective conductor Blue Neutral conductor Brown Phase external conduc...

Страница 30: ......

Страница 31: ......

Страница 32: ...9001572795 9001572795 011220 en BSH Hausgeräte GmbH Carl Wery Straße 34 81739 München GERMANY www siemens home bsh group com Manufactured by BSH Hausgeräte GmbH under the trademark licence of Siemens AG ...

Отзывы: