background image

42

Accesorios

Gigaset E 1 / español / A31008-S002-B002-1-4U19 / appendix.fm / 01.09.2003

por daños causados por productos defectuosos, y siempre que 

no medie dolo o culpa grave de Siemens. 

La duración de la garantía no se extenderá en virtud de los 

servicios prestados según las condiciones de garantía.

Siemens se reserva el derecho de cobrarle al cliente el 

reemplazo o la reparación en caso de que el defecto no sea 

cubierto por la garantía, siempre que dicho cliente haya sido 

informado previamente de esta circunstancia.

Las normas antes mencionadas no suponen ninguna exigencia 

de inversión de la carga de la prueba en detrimento del cliente.

Para solicitar el cumplimiento de esta garantía, contacte con el 

servicio telefónico de Siemens.

El número correspondiente figura en la guía de usuario adjunta.
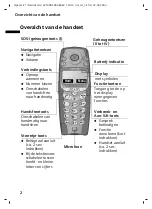
Accesorios

Equipo de auriculares y micrófono

En la interfaz universal de 2,5 mm puede conectar equipos de 

auriculares y micrófono, como por ejemplo, el M110 de 

Plantronics.

Encontrará todos estos accesorios y baterías en comercios 

especializados. O bien pídalos directamente por Internet a la 

tienda en línea my-siemens : www.my-siemens.com.
En ella encontrará la información más reciente sobre nuestros 

productos.

Содержание Gigaset E1

Страница 1: ...Gigaset E 1 deutsch A31008 S002 B002 1 4U19 cover_Innen fm 22 9 03 s Be inspired DEUTSCH ...

Страница 2: ...rei sprechbetrieb Akkuanzeige Funktions Tasten Zugriff auf die im Display dargestell ten Funktionen Mikrofon Zielwahl Tasten II bis IV Abheben Taste Anruf annehmen Wahlvorgang einleiten Umschaltenvon Freisprech auf Hörerbetrieb Steuer Tasten Navigation Lautstärke Stern Taste Klingeltöne ein aus lang drücken BeiderTexteingabe Wechsel zwischen Groß Klein und Ziffernschreibung SOS Zielwahl Taste I Di...

Страница 3: ...usschalten 11 Bedienen des Telefons und Menü Übersicht 12 Steuer Tasten am Mobilteil 12 Funktions Tasten 13 Telefonieren 14 Extern anrufen und Gespräch beenden 14 Anruf annehmen 14 Freisprechen 15 Intern telefonieren 15 Telefonbuch Zielwahl Tasten und weitere Listen nutzen 17 Telefonbuch 17 Zielwahl Tasten 20 Wahlwiederholungsliste 21 Anruferliste 23 Mobilteil einstellen 24 Sprache ändern 24 Datum...

Страница 4: ... ausschalten 31 Profile einstellen 32 Rufnummeransage 33 Mobilteil in den Lieferzustand zurücksetzen 34 Anhang 36 Pflege 36 Kontakt mit Flüssigkeit 36 Kundenservice Customer Care 36 Technische Daten 38 Zeichensatztabelle 39 Garantie Schein Belgien 40 Garantie Schweiz 41 Zubehör 42 Stichwortverzeichnis 43 ...

Страница 5: ...ngsan leitung Symbole sind in den Akkufächern des Mobilteils angebracht Medizinische Geräte können in ihrer Funktion beeinflusst werden Beachten Sie die technischen Bedingungen des jeweiligen Umfeldes z B Arztpraxis Das Mobilteil kann in Hörgeräten einen unangenehmen Brummton verursachen Stellen Sie die Basis nicht in Bädern oder Duschräumen S 36 auf Mobilteil und Basis sind nicht spritzwasserge s...

Страница 6: ...tzliche Funktion Jumbo Zahlen Großschrift Zielwahl Tasten Freisprechen Rufnummernansage nur bei CLIP Freischaltung für eingehende Anrufe Anruferliste Profile für besondere Anforderungen Sehen Hören Eingeben Steuer Tasten zur Lautstärkeregelung Erweiterte Einstellmöglichkeiten für Lautstärke Tonrufmelodie Tastenklicks Tastentöne Anschluss für Sprechgarnitur Sprechgarnitur nicht im Liefer umfang ent...

Страница 7: ...richtig gepolt einlegen siehe linke Abbildung Deckel etwa 3 mm nach unten versetzt auflegen und nach oben schieben bis er einrastet Zum Öffnen des Deckels auf die Riffelung drücken und nach unten schieben W Verwenden Sie nur die von Siemens auf S 38 empfoh lenen aufladbaren Akkus Verwenden Sie auf keinen Fall herkömmliche nicht wieder aufladbare Batterien oder andere Akkutypen da erhebliche Gesund...

Страница 8: ...edisplay angezeigt 3 Lassen Sie jetzt das Mobilteil zum Laden der Akkus in der Lade schale stehen denn die Akkus sind im Lieferzustand nicht ge laden Das Aufladen der Akkus wird im Display oben rechts durch Blinken des Akkusymbols angezeigt Sollte die automatische Anmeldung unterbrochen werden mel den Sie das Mobilteil manuell an wie ab S 9 beschrieben Der Ladezustand der Akkus wird nur nach einem...

Страница 9: ...igt während des Ladens wenn die Akkus leer sind Sind die Akkus fast leer hören Sie den Akkuwarnton falls eingeschaltet S 31 Im Ruhezustand blinkt zusätzlich im Display das Symbol und Akku ist leer Bitte laden wird angezeigt Nach dem ersten Ladevorgang können Sie Ihr Mobilteil nach jedem Gespräch in die Ladeschale zurückstellen Dadurch werden die Akkus schonend geladen Die Akkus erwärmen sich währe...

Страница 10: ...nleitung der Basis nach Gürtelclip befestigen Den Gürtelclip auf der Rückseite des Mobilteils andrücken bis die seitlichen Nasen in die Aussparungen einrasten Zusätzlich kön nen Sie eine Kordel anbringen um das Mobilteil in der Hand oder um den Hals zu tragen _________________________________________ s Mobilteil anmelden OK Auswählen und bestätigen OK System PIN der Basis 0000 eingeben und bestäti...

Страница 11: ...9 03 Mobilteil ein ausschalten Zum Einschalten die Auflegen Taste a drücken Es ertönt ein Bestätigungston aufsteigende Tonfolge Wenn Sie das Mobilteil in die Ladeschale stellen schaltet es sich automatisch ein Zum Ausschalten im Ruhezustand die Auflegen Taste a lang drücken Bestätigungston ...

Страница 12: ...dliche Funktionen der Steuer Taste Steuer Tasten t s Im Ruhezustand und bei Klingeln des Telefons Lautsstärke des Klin geltons erhöhen Lautsstärke des Klin geltons verringern Beim Telefonieren Hörerlautstärke erhöhen Hörerlautstärke ver ringern In Listen und Menüs Nach oben blättern Nach unten blättern In einem Eingabefeld Die Schreibmarke nach links bewegen Die Schreibmarke nach rechts bewe gen I...

Страница 13: ...zlich das Symbol å Beispiel Die verschiedenen Anzeigen haben folgende Bedeutung Funktions Tasten Wahlw MENU Display Symbol Bedeutung bei Tastendruck Abheb Ruf annehmen Ruf aus Klingelton am Mobilteil ausschalten Wahlw Wahlwiederholung Die Liste der letzten 10 Ruf nummern öffnen OK Menüfunktion bestätigen bzw Eingabe durch Bestätigung speichern MENU Im Ruhezustand das Hauptmenü öffnen Beim Telefoni...

Страница 14: ...t der Anruf wird im Display angezeigt und die Taste d am Mobilteil blinkt c oder d drücken um den Ruf anzunehmen Wenn das Mobilteil in der Ladeschale steht und die Funktion Automatische Rufannahme eingeschaltet ist S 26 müssen Sie das Mobilteil nur aus der Ladeschale nehmen um den Anruf anzunehmen c Extern anrufen Rufnummer eingeben und Abheben Taste drücken Die Num mer wird gewählt Oder Sie könne...

Страница 15: ...prechen ein ausschalten einschalten d Freisprech Taste drücken ausschalten c Abheben Taste drücken Sobald Sie Freisprechen beenden wechseln Sie in den Hörerbe trieb und führen das Gespräch am Mobilteil weiter Lautstärke während des Freisprechens ändern Intern telefonieren Interne Anrufe sind kostenlose Gespräche zwischen Mobilteilen die Sie an derselben Basis angemeldet haben Um einen Internruf au...

Страница 16: ...__________________________________________________ Internruf an alle Bestätigen _____________________________________________________________ Intern verbunden Der Internruf wurde von einem ande ren Teilnehmer angenommen i Schaltet sich kein Teilnehmer zu so geht das Mobilteil in den Ruhezustand _____________________________________________________________ Intern verbunden c Ruf annehmen i Wird ein...

Страница 17: ...rn Wie Sie Text korrekt eingeben entnehmen Sie der Zeichensatz tabelle S 39 Rufnummer im Telefonbuch speichern MENU Funktions Taste drücken um das Hauptmenü zu öffnen _________________________________________ Telefonbuch OK Bestätigen Das Telefonbuch wird geöffnet MENU Funktions Taste drücken um das Tele fonbuchmenü zu öffnen _________________________________________ Neuer Eintrag OK Bestätigen OK...

Страница 18: ...nbuch OK Bestätigen Das Telefonbuch wird geöffnet entweder Bis zum Eintrag blättern s Eintrag auswählen c Taste drücken Die Nummer wird gewählt oder Anfangsbuchstaben eingeben Geben Sie den Anfangsbuchstaben des gesuchten Namens ein s Eintrag auswählen c Taste drücken Die Nummer wird gewählt MENU Funktions Taste drücken um das Hauptmenü zu öffnen _________________________________________ Telefonbu...

Страница 19: ...ichert oder Eintrag im Telefonbuch kopieren und ändern s _____________________________________________________________ Kopieren und ändern OK Auswählen und bestätigen oder Einzelnen Eintrag löschen _________________________________________ s Eintrag löschen OK Auswählen und bestätigen Der Eintrag ist gelöscht oder Telefonbuch komplett löschen _________________________________________ s Liste lösch...

Страница 20: ...ern ändern Sie können den Zielwahl Tasten externe Rufnummern oder die Funktion Internruf s S 15 zuordnen MENU Funktions Taste drücken um das Hauptmenü zu öffnen _________________________________________ s Einstellungen OK Auswählen und bestätigen _________________________________________ s Zielwahltasten OK Auswählen und bestätigen _________________________________________ s I kein Eintrag Zielwah...

Страница 21: ...e Nummern erschei nen nur einmal Falls Sie zu diesen Nummern auch Namen im Telefonbuch gespeichert haben werden diese Namen angezeigt Über die Wahlwiederholungsliste können Sie die Rufnummern erneut wählen Rufnummern aus der Wahlwiederholungliste wählen OK Namen eingeben und bestätigen Die Eingabe ist gespeichert oder Internruf programmieren _________________________________________ s Internruf ak...

Страница 22: ...___________________________________________________ Nummer verwenden OK Bestätigen oder Rufnummer ins Telefonbuch über nehmen s _____________________________________________________________ Nummer ins Telefonb OK Auswählen und bestätigen OK Nummer bestätigen OK Namen eingeben und bestätigen Der Eintrag ist gespeichert oder Einzelne Rufnummer löschen _________________________________________ s Eint...

Страница 23: ...1 4U19 Directories fm 22 9 03 Anruferliste Neue Anrufe werden durch das Briefsymbol im Display signa lisiert Drücken Sie die Funktions Taste um die Liste zu öffnen oder Komplette Wahlwiederholungsliste löschen _________________________________________ s Liste löschen OK Auswählen und bestätigen ...

Страница 24: ...ehen eine falsche für Sie unverständliche Sprache eingestellt drücken Sie MENU 4 I Anschließend wählen Sie mit s die richtige Sprache aus und bestätigen sie mit OK MENU Funktions Taste drücken um das Menü zu öffnen _________________________________________ s Einstellungen OK Auswählen und bestätigen _________________________________________ s Sprache OK Auswählen und bestätigen Die aktu elle Sprac...

Страница 25: ... Funktions Taste drücken um das Menü zu öffnen _________________________________________ s Einstellungen OK Auswählen und bestätigen _________________________________________ s Datum Uhrzeit OK Auswählen und bestätigen Datum eingeben OK Tag Monat Jahr eingeben und bestäti gen Beispiel Für den 20 05 2003 geben Sie 2 Q Q 5 Q I ein Uhrzeit eingeben OK Stunden Minuten eingeben und bestä tigen Beispiel...

Страница 26: ...hr die Abheben oder Freisprech Taste drücken Lieferzustand Ein MENU Funktions Taste drücken um das Menü zu öffnen _________________________________________ s Einstellungen OK Auswählen und bestätigen _________________________________________ s Jumbo Zahlen OK Bestätigen um die Funktion aus bzw einzuschalten Ein a Lang drücken zurück in den Ruhezu stand MENU Funktions Taste drücken um das Menü zu ö...

Страница 27: ...h OK Bestätigen um die Funktion aus bzw einzuschalten Ein a Lang drücken zurück in den Ruhezu stand MENU Funktions Taste drücken um das Menü zu öffnen _________________________________________ s Audio OK Auswählen und bestätigen entweder Hörerlautstärke einstellen _________________________________________ Hörerlautstärke OK Bestätigen Sie hören einen Ton in der aktuell eingestellten Lautstärke t s...

Страница 28: ...hgarnitur Wenn Sie die Lautstärkeänderung nicht bestätigen dann gilt die Einstellung nur für das aktuelle Gespräch t s OK Freisprechlautstärke auswählen und bestätigen oder Kopfhörerlautstärke einstellen s _____________________________________________________________ Kopfhörerlautstärke OK Auswählen und bestätigen t s OK Kopfhörerlautstärke auswählen und bestätigen a Lang drücken zurück in den Ruh...

Страница 29: ...entsprechen den klassi schen Klingeltönen Melodie 1 ist der am besten hörbare Klin gelton Klingeltonmelodie ändern MENU Funktions Taste drücken um das Menü zu öffnen _________________________________________ s Audio OK Auswählen und bestätigen _________________________________________ s Klingeltonmelodie OK Auswählen und bestätigen entweder Für externe Anrufe ______________________________________...

Страница 30: ..._________________________________ Klingeltonlautstärke OK Auswählen und bestätigen t s OK Lautstärke auswählen und bestätigen Sie hören den Klingelton in der aktuell eingestellten Lautstärke a Lang drücken zurück in den Ruhezu stand i Sie können die Lautstärke des Klingeltons auch direkt während des Klingelns durch Drücken der t oder s Taste ändern Wollen Sie die Einstellung speichern bestätigen S...

Страница 31: ...der Anruferliste Fehlerton absteigende Tonfolge bei Fehleingaben Menü Endeton beim Blättern am Ende eines Menüs Akkuwarnton Wiederholender Piepton der anzeigt dass die Akkus geladen werden müssen MENU Funktions Taste drücken um das Menü zu öffnen _________________________________________ s Audio OK Auswählen und bestätigen _________________________________________ s Hinweistöne OK Auswählen und be...

Страница 32: ...____ s Quittungstöne OK Auswählen und bestätigen Ein weiter mit a Lang drücken zurück in den Ruhezu stand Profil Einstellungen Sehen Jumbo Zahlen Großschrift Rufnummeransage Mobilteil Rufnummeransage Anrufbeantworter Tastenton Pin Eingabeton Hören Klingeltöne mit max Lautstärke Klingeltöne mit optimierter Frequenz Hörerlautstärke maximal Freisprechlautstärke maximal Kopfsprechgarnitur Lautstärke m...

Страница 33: ..._____________ s Profile OK Auswählen und bestätigen _________________________________________ Sehen OK Bestätigen um das Profil an bzw abzuwählen angewählt _________________________________________ s Hören OK Auswählen und bestätigen um das Profil an bzw abzuwählen ange wählt _________________________________________ s Eingeben OK Auswählen und bestätigen um das Profil an bzw abzuwählen ange wählt...

Страница 34: ...is bleiben erhalten Mit a brechen Sie das Zurücksetzen ab _________________________________________ s Rufnummeransage OK Bestätigen um die Funktion aus bzw einzuschalten Ein a Lang drücken zurück in den Ruhezu stand i Die Rufnummernansage gilt sowohl für ankommende Anrufe als auch für Anrufe in der Anruferliste s S 23 MENU Funktions Taste drücken um das Menü zu öffnen _____________________________...

Страница 35: ... Lieferzust rücksetzen Ja Auswählen und bestätigen a Lang drücken zurück in den Ruhezu stand Hörerlautstärke 1 S 27 Lautstärke für Freisprechen 3 S 27 Kopfhörerlautstärke 3 S 27 Klingeltonlautstärke 5 S 29 Klingeltonmelodie 1 S 29 Automatische Rufannahme eingeschaltet S 26 Akkuton Tastenklick Quittungston eingeschaltet S 31 Display Sprache englisch S 24 Wahlwiederholungsliste leer S 21 ...

Страница 36: ...t in Kontakt gekommen sein auf keinen Fall das Gerät einschalten Sofort alle Akkus entneh men Lassen Sie die Flüssigkeit aus dem Gerät abtropfen und tupfen Sie anschließend alle Teile trocken Lagern Sie das Mobilteil ohne Akkus für mindestens 72 Stunden an einem trockenen warmen Ort Danach ist in vielen Fällen die Inbetriebnahme wieder möglich Kundenservice Customer Care Wir bieten Ihnen schnelle ...

Страница 37: ...angeboten Länderspezifische Besonderheiten sind berücksichtigt Das Mobilteil E1 ist EU weit und in der Schweiz zugelassen Die Übereinstimmung des Gerätes mit den grundlegenden Anfor derungen der R TTE Direktive ist durch das CE Kennzeichen bestätigt Auszug aus der Originalerklärung We Siemens AG declare that the above mentioned product is manufactured according to our Full Quality Assurance System...

Страница 38: ...ne Technische Daten Empfohlene Akkus Nickel Metall Hydrid NiMH Sanyo Twicell 700 Sanyo Twicell 650 Panasonic 700 mAh GP 700 mAh YDT AAA SUPER 700 VARTA PhonePower AAA 700 mAh Betriebszeiten Ladezeiten des Mobilteils Die genannten Betriebs und Ladezeiten gelten nur bei Verwen dung der empfohlenen Akkus Kapazität mAh Bereitschafts zeit Stunden Gesprächszeit Stunden Ladezeit Stunden 700 bis zu 100 bi...

Страница 39: ...Schreibmarke Cursor angefügt Um von Großschreibung 1 Buchstabe groß geschrieben alle weiteren klein geschrieben zur Kleinschreibung zu wechseln drücken Sie vor der Eingabe des Buchstabens P Bei erneutem Drücken von P wechseln Sie von der Kleinschreibung zur Zif fernschreibung Bei weiterem Drücken von der Ziffernschrei bung wieder zur Großschreibung 1x 2x 3x 4x 5x 6x 7x 8x 9x 10x 11x 12x 13x 14x 1 ...

Страница 40: ...dler eine Garantie zu den nachstehenden Bedingungen eingeräumt Wenn das neue Gerät oder Zubehör innerhalb von 24 Monaten nach Ankauf Defekte aufweist infolge von Produktions bzw Materialfehlern hat Siemens die Wahl das Gerät kostenlos zu reparieren oder durch ein anderes dem Stand der Technik ent sprechendes Gerät zu ersetzen Im Falle von Teilen die dem Verschleiß ausgesetzt sind wie Batterien Tas...

Страница 41: ...i 116 B1060 Bruxelles Weitergehende oder andere Ansprüche aus dieser Garantie sind ausgeschlossen ausgenommen soweit die Haftung auf zwingendem Recht beruht wie etwa die gesetzliche Regelung zur Produkthaftung Durch eine erbrachte Garantieleistung verlängert sich der Garantiezeitraum nicht Soweit kein Garantiefall vorliegt behält sich Siemens vor dem Kunden den Austausch oder die Reparatur in Rech...

Страница 42: ...rselle 2 5 mm Schnittstelle handelsüb liche Sprechgarnituren anschließen Z B Hör und Sprechgarnitur M110 von Plantronics Alle Zubehörteile und Akkus können Sie über den Fachhandel bestellen Oder bestellen Sie direkt per Internet über den my sie mens Online Shop www my siemens com Dort erhalten Sie auch aktuelle Produktinformationen ...

Страница 43: ...eenden 14 Gürtelclip 10 H Hinweistöne 31 Hörerbetrieb 2 15 Hörerlautstärke 27 Hörgeräte 5 I Intern telefonieren 15 J Jumbo Zahlen 26 K Klingelton Lautstärke einstellen 29 Melodie einstellen 29 Kundenservice 36 Kurzübersicht Mobilteil 2 Kurzwahlliste 20 L Ladezeiten des Mobilteils 38 Ladezustandsanzeige Akkus 8 Lautstärke Freisprechen 15 27 Hörerlautstärke 27 Klingelton Mobilteil 29 Lautsprecher Mo...

Страница 44: ...ache s Display Sprache ändern Sprachlautstärke 27 Mobilteil 27 Standardschrift Tabelle 39 Steckernetzgerät 5 T Tastenklick 31 Technische Daten 38 Telefon in Betrieb nehmen 7 Telefonbuch Eintrag anzeigen und ändern 18 Eintrag kopieren und ändern 18 Eintrag löschen 18 Rufnummer speichern 17 Telefonieren Anruf annehmen 14 extern 14 intern 15 Ton Akkuton 31 Bestätigung 31 Fehlerton 31 U Uhrzeit einste...

Страница 45: ...s Be inspired Gigaset E 1 English A31008 S002 B002 1 4U19 cover_Innen fm 19 09 2003 ENGLISH ...

Страница 46: ...e mode Battery display Function keys Access to the functions displayed on the screen Microphone Direct dial keys II to IV Talk key Accepting a call Initiate dialling Switch from handsfree to earpiece mode Control keys Navigation Volume Star key Ringer on off long press When entering text toggles between upper lower case and digits SOS direct dial key I Screen with icons Illustration of a handset t...

Страница 47: ...ip 10 Activating deactivating the handset 11 Operating the telephone menu overview 12 Control keys on the handset 12 Function keys 13 Making calls 14 Making external calls and ending a call 14 Answering a call 14 Handsfree 15 Making internal calls 16 Using the directory direct dial keys and other lists 17 Directory 17 Direct dial keys 20 Last number redial list 21 Calls list 22 Handset settings 23...

Страница 48: ...ging the ringer tone 27 Activating deactivating advisory tones 29 Setting profiles 31 Phone number statement 32 Restoring the handset to factory settings 33 Appendix 35 Care 35 Contact with liquid 35 Service Customer Care 35 Specifications 37 Character set chart 38 Warranty Certificate Ireland 39 Accessories 41 Index 42 ...

Страница 49: ...e polarity symbols in the handset s battery compartments The operation of medical appliances may be affected Be aware of the technical conditions within the particular environment e g doctor s practice The handset may cause an intrusive hum in hearing aids Do not install the base in bathrooms or shower rooms page 35 The handset and base are not watertight Do not use the phone in environments subje...

Страница 50: ...creen Additional function Jumbo Font large print Direct dial keys Handsfree Phone number statement only for CLIP activation for Incoming calls Calls list Profiles for special requirements Seeing Hearing Entering Control keys for volume control Extended setting options for Volume Tone melody Key clicks Key tones Connection for microphone set microphone set not included in scope of delivery ...

Страница 51: ... Inserting the batteries Insert the batteries the right way round see illustration left Place the cover on the battery compartment about 3 mm down from the latch and push it up until it clicks into position To open the battery cover press on the chequered area and slide down W Use only the rechargeable batteries recommended by Siemens on page 37 Never use conventional batteries non rechargeable or...

Страница 52: ...the idle screen is displayed 3 Now leave the handset in the charger for the batteries to charge the batteries are supplied uncharged Battery charging is indicated in the top right of the screen by the battery icon flashing Should automatic registration be interrupted register the handset manually as described starting on page 9 The battery charging status is correctly displayed only after uninterr...

Страница 53: ... batteries are empty If the batteries are almost empty you will hear the battery warning tone if activated page 30 In idle status the icon also flashes on screen and Battery warn Please load is displayed Once initial charging is complete you can replace your handset in the charger after each call This ensures that the batteries are charged in a way that maximises their life The batteries heat up d...

Страница 54: ...andset registration on the base Attaching the belt clip Push the belt clip onto the back of the handset until the lugs click into the recesses on either side of the handset You can also attach a strap to carry the handset in your hand or around your neck _________________________________________ s Tab Handset OK Select the menu item and confirm OK Enter the system PIN of the base 0000 and confirm ...

Страница 55: ...ctivating deactivating the handset To activate the handset press the end call key a You will hear a confirmation tone rising tone sequence The handset activates automatically when placed in the charging shell To deactivate the handset press the end call key a in idle status and hold confirmation tone ...

Страница 56: ...ion of the handset Different functions of the control key Control keys t s In idle status and when the telephone is ringing Increase the volume of the ringer Decrease the volume of the ringer When making calls Increase the earpiece volume Decrease the earpiece volume In lists and menus Scroll up Scroll down In an input field Move the cursor to the left Move the cursor to the right In handsfree mod...

Страница 57: ...also appears in the screen å Example The various display symbols have the following meanings Function keys REDIAL MENU Screen icon Meaning when pressed Accept Answer a call Silence Deactivate ringer on handset REDIAL Automatic redial key Open the list of the last 10 numbers you dialled OK Confirm menu function or confirm an input and store MENU Activates the main menu when in standby Open a status...

Страница 58: ...ring a call Your telephone rings the call is displayed on the screen and the d key flashes on the handset Press c or d to take the call If the handset is in the charger and the Auto Answer function is activated page 25 then you just need to lift the handset out of the charger to take the call c Making an external call Enter the phone number and press the talk key The number is dialled Or You can a...

Страница 59: ...call You should inform your caller that you intend to use the handsfree function before you activate it Activating deactivating handsfree To activate press d handsfree key To deactivate press c talk key As soon as you terminate the handsfree mode you switch to earpiece mode and continue the call on the handset Adjusting the volume while in handsfree mode s t Decrease or increase the volume ...

Страница 60: ...any direct dial key programmed for internal calls _____________________________________________________________ Call all Yes _____________________________________________________________ Call all Confirm _____________________________________________________________ Internal Connected The internal call was answered by another user i If no one answers the handset goes into idle status ______________...

Страница 61: ... in the directory Refer to the Character Set Chart page 38 to see how to enter text correctly Storing a telephone number in the directory MENU Press the function key to open the main menu _________________________________________ Directory OK Confirm The directory is opened MENU Press the function key to open the directory menu _________________________________________ New Entry OK Confirm OK Ente...

Страница 62: ...________ Directory OK Confirm The directory is opened either Scroll to the entry s Select entry c Press the key The number is dialled or Enter the first letter Enter the first letter of the name you require s Select entry c Press the key The number is dialled MENU Press the function key to open the main menu _________________________________________ Directory OK Confirm The directory is opened s M...

Страница 63: ...ed or Copy and modify an entry in the directory s _____________________________________________________________ Copy and Modify OK Select and confirm or Delete a single entry _________________________________________ s Delete Entry OK Select the menu item and confirm The entry is deleted or Delete the entire directory _________________________________________ s Delete List OK Select the menu item ...

Страница 64: ...the direct dial keys external phone numbers or the internal call function see page 16 MENU Press the function key to open the main menu _________________________________________ s Settings OK Select the menu item and confirm _________________________________________ s Direct Dial Keys OK Select the menu item and confirm _________________________________________ s I no entry Select the direct dial ...

Страница 65: ... for these numbers in the directory then these names will be displayed You can use the last number redial list to redial the telephone numbers Dialling telephone numbers from the last number redial list Editing deleting or copying phone number to the directory or Program an internal call _________________________________________ s Activate Internal Call OK Select the menu item and confirm The entr...

Страница 66: ... phone number to the directory s _____________________________________________________________ Copy to Directory OK Select and confirm OK Confirm the number OK Enter the name and confirm The entry is stored or Delete a single telephone number _________________________________________ s DeleteEntry OK Select the menu item and confirm a If there still entries on the list press the key and hold back ...

Страница 67: ...et the wrong language in error press MENU 4 I Now select the correct language with s and press OK to confirm your choice MENU Press the function key to open the menu _________________________________________ s Settings OK Select the menu item and confirm _________________________________________ s Language OK Select the menu item and confirm The current language is checked the default setting is E...

Страница 68: ...MENU Press the function key to open the menu _________________________________________ s Settings OK Select the menu item and confirm _________________________________________ s Date Time OK Select the menu item and confirm Enter the date OK Enter day month year and confirm Example For 20 05 2003 enter 2 Q Q 5 Q I Enter the time OK Enter hours minutes and confirm Example For 9 35 enter Q O I 5 MEN...

Страница 69: ... the volume for handsfree talking is on five levels 1 5 you can even do this while an call is in progress _________________________________________ s Jumbo Font OK Confirm to deactivate or activate the function On a Long press back to idle status MENU Press the function key to open the menu _________________________________________ s Settings OK Select the menu item and confirm ___________________...

Страница 70: ...__________ Handset Volume OK Confirm You will hear a tone in the currently volume t s OK Select the earpiece volume and confirm or Set the handsfree volume s _____________________________________________________________ Handsfree Volume OK Select and confirm t s OK Select the handsfree volume and confirm or Set the headphone volume s _____________________________________________________________ He...

Страница 71: ...he ringer tone You can assign internal and external calls with differing ringers A range of options is available Five volume levels 1 5 e g volume level 2 and switch off ringer display screen Ú Ten melodies 1 10 melodies 1 3 are the classic ringer tones Melody 1 is the best ringer to listen to Changing the ringer melody t s Changing the earpiece volume OK Confirm if you want to keep the setting ME...

Страница 72: ...OK Select the menu item and confirm then _________________________________________ Melody 1 OK Confirm melody e g Melody 1 On a Long press back to idle status MENU Press the function key to open the menu _________________________________________ s Audio OK Select the menu item and confirm s _____________________________________________________________ Ringer Volume OK Select and confirm t s OK Sel...

Страница 73: ...onfirmation tone rising tone sequence at the end of an input or setting when the handset is placed in the base and when a new entry arrives in the calls list Error tone a descending tone sequence with incorrect inputs End tone menu when scrolling at the end of a menu i You can also change the volume of the ringer directly while it is ringing by pressing the t or s key If you want to save the setti...

Страница 74: ...______________ s Advisory Tones OK Select the menu item and confirm either Activate cancel key click _________________________________________ Key Tones OK Select the condition Off Beep On and confirm on or Activate cancel battery warning tone _________________________________________ s Battery Warning OK Select condition Off On While Call and confirm e g On ticked or Activate cancel confirmation ...

Страница 75: ...ic Ringer tones with max volume Ringer tones with optimised frequency Maximum earpiece volume Maximum handsfree volume Maximum volume headset Motoric Screen is lighted longer during entries Extended time period for entries in the directory MENU Press the function key to open the menu _________________________________________ s Settings OK Select the menu item and confirm __________________________...

Страница 76: ...________________________________ s Motoric OK Select and confirm to select or deselect the profile selected a Long press back to idle status MENU Press the function key to open the menu _________________________________________ s Settings OK Select the menu item and confirm _________________________________________ s Caller ID Announced OK Confirm to deactivate or activate the function On a Hold d...

Страница 77: ...andset s registration on the base will be retained Press a to cancel the reset MENU Press the function key to open the menu _________________________________________ s Settings OK Select the menu item and confirm _________________________________________ s Handset OK Select the menu item and confirm _________________________________________ s Handset reset OK Select the menu item and confirm s ___...

Страница 78: ...ings of the handset Earpiece volume 1 page 25 Handsfree volume 3 page 25 Headphone volume 3 page 25 Ringer volume 5 page 27 Ringer melody 1 page 27 Auto answer Activated page 25 Battery tone Key click Confirmation tone Activated page 29 Display language English page 23 Last number redial list Empty page 21 ...

Страница 79: ...n Remove all batteries immediately Allow the liquid to drain out of the device and then pat all parts of the device dry Keep the handset with the batteries removed in a warm dry place for at least 72 hours In many cases you will then be able to use it again Service Customer Care Our online support on the Internet If you need any repair work or have a guarantee claim to submit our will give you qui...

Страница 80: ...CE mark certifies conformity of the device with the essential requirements of the R TTE directive Excerpt from the original declaration We Siemens AG declare that the above mentioned product is manufactured according to our Full Quality Assurance System certified by CETECOM ICT Services GmbH with ANNEX V of the R TTE Directive 99 5 EC The presumption of conformity with the essential requirements r...

Страница 81: ...iMH Sanyo Twicell 700 Sanyo Twicell 650 Panasonic 700 mAh GP 700 mAh YDT AAA SUPER 700 VARTA PhonePower AAA 700 mAh Handset operating times charging times These operating and charging times apply only when using the recommended batteries Capacity mAh Standby time hours Calling time hours Charging time hours 700 up to 100 up to 15 approx 5 ...

Страница 82: ...ft of the cursor To switch from upper case first letter upper case all other letters lower case to lower case press P before you key in the letter Pressing P again switches from lower case letters to digits Press again to return to upper case letters The first letter of the name of directory entries is automatically capitalised followed by lower case letters 1x 2x 3x 4x 5x 6x 7x 8x 9x 10x 11x 12x ...

Страница 83: ...ts exhibiting defects resulting from manufacturing and or material faults within 24 months of purchase Siemens shall at its own option and free of charge either replace the device with another device reflecting the current state of the art or repair the said device In respect of parts subject to wear and tear including but not limited to batteries keypads casing this warranty shall be valid for si...

Страница 84: ...onents replaced by and returned to Siemens shall vest in Siemens This Guarantee shall apply to new devices purchased in the European Union For Products sold in the Republic of Ireland the Guarantee is issued by Siemens Ireland Limited Ballymoss Road Sandyford Industrial Estate Dublin 18 The Republic of Ireland Any other claims resulting out of or in connection with the device shall be excluded fro...

Страница 85: ...y available earpiece and microphone set via the universal 2 5 mm interface For example an earpiece and microphone set M110 from Plantronics All accessories and batteries are available from your mobile phone retailer Or you can order direct online from the my siemens Online Shop www my siemens com The Online Shop also has the latest product information ...

Страница 86: ...set 11 Dialling pause 14 Direct dial keys 2 20 Directory Copy and edit an entry 18 Delete an entry 18 Display and edit an entry 18 Storing a number 17 Display font 24 E Earpiece mode 2 15 Earpiece volume 25 End call 14 Error tone 29 F Factory settings of the handset 33 H Handset Activate deactivate 11 Operating and charging times 37 Phone number statement 32 Preparing to use 7 Restore factory sett...

Страница 87: ...ger Set volume 27 Setting a melody 27 S Safety precautions 5 Service 35 Service making handset ready for service 7 Set time by 24 Setting profiles 31 Signal tone see Advisory tones Specifications 37 Speed dial list 20 Standard characters Chart 38 T Telephone number Pick from directory 21 Store directory 17 Tone Battery tone 30 Confirmation 29 Error tone 29 V Volume Earpiece volume 25 Handsfree 15 ...

Страница 88: ...s Be inspired Gigaset E 1 français A31008 S002 B002 1 4U19 cover_Innen fm 28 08 2003 FRANÇAIS ...

Страница 89: ... du mode Ecouteur au mode Mains libres Niveau de charge des batteries Touches écran Accès aux fonctions affichées en regard au bas de l écran Microphone Touches d appel direct II à IV Touche Décrocher Prendre appel Lancer la numérotation Passer du mode Mains libres au mode Ecouteur Touches Navigation xt Volume Touche Etoile Activer désactiver les sonneries appui long Lors de la saisie de texte sél...

Страница 90: ...phone et de son menu 12 Touches de navigation du combiné 12 Touches écran 13 Téléphoner 14 Appels externes 14 Accepter un appel entrant 14 Mains libres 15 Appel interne 15 Répertoire Touches I à IV Autres listes 17 Répertoire 17 Touches d appel direct I à IV 20 Liste des numéros bis 21 Journal des appels 23 Réglage du combiné 24 Changement de langue 24 Réglage de la date et l heure 25 Augmenter la...

Страница 91: ...nce du numéro 34 Réinitialiser les réglages usine 35 Annexe 37 Entretien 37 Contact avec les liquides 37 Service clients Customer Care 38 Caractéristiques techniques 39 Tableau des jeux de caractères 40 Certificat de garantie France 41 Certificat de garantie Belgique 44 Garantie Suisse 45 Accessoires 45 Index 46 ...

Страница 92: ...les figurant dans le compartiment des batteries du combiné Le combiné peut perturber le fonctionnement de certains équipements médicaux Tenir compte des recommandations émises à ce sujet par le corps médical Le combiné peut provoquer un bourdonnement désagréable dans les aides auditives De façon générale ne placez pas d appareil électronique à proximité immédiate du téléphone N utilisez pas le com...

Страница 93: ... appels Profils en cas de déficiences visuelle auditive moteur Touches de navigation pour réglage du volume Options de configuration avancées pour volume mélodie des sonneries clic clavier bips des touches Prise pour kit piéton accessoire non fourni La mise au rebut des batteries ou du téléphone doit se faire en conformité avec les règles de respect de l environnement Ne pas jeter les batteries au...

Страница 94: ...ez le film de protection Mise en place des batteries Placez les batteries en respectant la polarité voir schéma de gauche Positionnez le couvercle décalé d environ 3 mm par rapport au bas du téléphone puis poussez le vers le haut jusqu à ce qu il s enclenche Pour ouvrir appuyez sur la partie striée et poussez vers le bas Attention Les combinés supplémentaires Gigaset E1 sont des produits universel...

Страница 95: ...ut à droite de l écran par le clignotement du témoin de charge En cas d interruption de la procédure de déclaration automatique inscrivez manuellement le combiné comme indiqué p 10 W Utilisez uniquement les batteries rechargeables homologuées par Siemens p 39 N utilisez jamais de piles normales non rechargeables ou d autres types de batteries qui peuvent endommager le combiné représenter un risque...

Страница 96: ... batteries n est affiché que pendant la charge quand les batteries sont vides Un bip d avertissement batterie retentit s il est activé p 32 quand elles sont presque vides A l état de repos les symboles et Batterie vide sont également affichés Une fois la première charge effectuée vous pouvez reposer votre combiné sur le chargeur après une communication La charge est contrôlée électroniquement Cela...

Страница 97: ...iné et sur la base 1 Sur le combiné MENU Appuyer sur la touche écran pour ouvrir le menu _________________________________________ s Réglages combiné OK Sélectionner et valider _________________________________________ s Combiné OK Sélectionner et valider _________________________________________ s Inscrire combiné OK Sélectionner et valider OK Entrer le PIN système de la base 0000 et valider i PI...

Страница 98: ... que les ergots disposés latéralement s enclipsent dans les trous Vous pouvez également installer un cordon pour porter le combiné dans la main ou autour du cou Combiné allumer éteindre Pour allumer le combiné appuyez sur la touche Raccrocher a Un bip de confirmation séquence de tonalités croissantes retentit Lorsque vous placez le combiné sur le chargeur il s allume automatiquement Pour éteindre ...

Страница 99: ...r dans une liste le symbole å s affiche en plus à l écran Touches de navigation t s A l état de repos et quand le téléphone sonne Augmenter le volume de sonnerie Baisser le volume de sonnerie En cours de conversation Augmenter le volume de l écouteur Baisser le volume de l écouteur Dans les listes et les menus Faire défiler vers le haut Faire défiler vers le bas Dans un champ de saisie Déplacer le...

Страница 100: ...fication suivante Touches écran BIS MENU Symbole à l écran Signification Accept Prendre l appel Silence Désactiver la sonnerie sur le combiné BIS Répétition de la numérotation ouvrir la liste des 10 derniers numéros appelés OK Activer la fonction du menu ou enregistrer l entrée en la validant MENU Ouvrir le menu principal au mode repos En cours de communication ouvrir un menu contextuel å Se dépla...

Страница 101: ...appel entrant s affiche à l écran et la touche d clignote sur le combiné Appuyez sur c ou d ou Accept pour prendre l appel Si le combiné se trouve sur la base et que vous avez activé la fonction Décroché automat p 26 il vous suffit de le prendre en main pour décrocher c Appel externe entrez le numéro d appel et appuyez sur la touche Décrocher Le numéro est composé Ou Vous pouvez également appuyer ...

Страница 102: ... touche Mains libres désactiver c Appuyer sur la touche Décrocher Dès que le mode Mains libres est désactivée vous basculez en mode Ecouteur et poursuivez la conversation sur le combiné Régler le volume en mode Mains libres Appel interne L appel interne s effectue principalement entre le combiné et sa base Gigaset E150 ou vice versa Dans le cas ou plusieurs combinés sont inscrits sur la base l app...

Страница 103: ...ui _____________________________________________________________ Interne App général Valider _____________________________________________________________ App interne en cours L appel interne a été pris par un correspondant i Si personne ne décroche le combiné repasse à l état de repos _____________________________________________________________ App interne en cours c Prendre l appel i Lorsqu un ...

Страница 104: ... saisie de texte reportez vous au tableau des caractères p 40 Enregistrer un numéro dans le répertoire MENU Appuyer sur la touche écran pour ouvrir le menu principal _________________________________________ Répertoire OK Valider Le répertoire s ouvre MENU Appuyer sur la touche écran pour ouvrir le menu répertoire _________________________________________ Nouvelle entrée OK Valider OK Entrer le nu...

Страница 105: ...lider Le répertoire s ouvre soit Faire défiler jusqu à l entrée s Sélectionner l entrée c Appuyer sur la touche Le numéro est composé soit Entrer la première lettre Entrer la première lettre du nom recherché s Sélectionner l entrée c Appuyer sur la touche Le numéro est composé MENU Appuyer sur la touche écran pour ouvrir le menu principal _________________________________________ Répertoire OK Val...

Страница 106: ...fier une entrée du répertoire s _____________________________________________________________ Copier et modifier OK Sélectionner et valider soit Effacer une entrée _________________________________________ s Effacer l entrée OK Sélectionner et valider L entrée est effacée soit Effacer toutes les entrées du répertoire _________________________________________ s Effacer la liste OK Sélectionner et v...

Страница 107: ...r les touches d appel direct Vous pouvez associer aux touches d appel direct des numéros d appel externes ou bien les affecter à l appel interne voir p 15 MENU Appuyer sur la touche écran pour ouvrir le menu principal _________________________________________ s Réglages combiné OK Sélectionner et valider _________________________________________ s Touches Num directs OK Sélectionner et valider ___...

Страница 108: ...pparaissent qu une seule fois Dans le cas où des noms sont associés à ces numéros dans le répertoire ces noms sont affichés La liste des numéros bis vous permet de rappeler les numéros enregistrés Composer des numéros à partir de la liste de numéros bis OK Entrer un nom et valider La saisie est enregistrée soit Programmer l appel interne _________________________________________ s Numéro interne O...

Страница 109: ...________________________________________ Afficher le numéro OK Valider soit Enregistrer le numéro dans le répertoire s _____________________________________________________________ Copie dans répertoire OK Sélectionner et valider OK Confirmer le numéro OK Entrer un nom et valider L entrée est enregistrée soit Effacer certains numéros _________________________________________ s Effacer l entrée OK ...

Страница 110: ...nregistre les appels perdus reçus durant votre absence par exemple Les nouveaux appels perdus sont signalés à l écran associés au symbole en forme d enveloppe Appuyez sur la touche écran correspondante pour ouvrir la liste soit Effacer la liste complète des numéros bis _________________________________________ s Effacer la liste OK Sélectionner et valider ...

Страница 111: ...vertance une langue incorrecte que vous ne comprenez pas appuyez sur MENU 4 I Sélectionnez ensuite la langue souhaitée avec s et validez avec OK MENU Appuyer sur la touche écran pour ouvrir le menu _________________________________________ s Réglages combiné OK Sélectionner et valider _________________________________________ s Langue OK Sélectionner et valider La langue en cours est signalée par ...

Страница 112: ...els MENU Appuyer sur la touche écran pour ouvrir le menu _________________________________________ s Réglages combiné OK Sélectionner et valider _________________________________________ s Date et Heure OK Sélectionner et valider Entrer la date OK Entrer le jour le mois l année et valider Exemple Pour le 20 05 2003 entrer 2 Q Q 5 Q I Entrer l heure OK Entrer les heures et les minutes et valider Ex...

Страница 113: ...ssaire d appuyer sur la touche Décrocher ou Mains libres valeur par défaut activé MENU Appuyer sur la touche écran pour ouvrir le menu _________________________________________ s Réglages combiné OK Sélectionner et valider _________________________________________ s Grosseur afficheur OK Valider pour activer désactiver la fonction activé a Appuyer de manière prolongée retour au mode repos MENU App...

Страница 114: ...s _____________________________________________________________ Décroché automat OK Valider pour activer désactiver la fonction activé a Appuyer de manière prolongée retour au mode repos MENU Appuyer sur la touche écran pour ouvrir le menu _________________________________________ s Sons Audio OK Sélectionner et valider soit Régler le volume de l écouteur du combiné _______________________________...

Страница 115: ...unication en cours soit Sélectionner le volume du Mains Libres s _____________________________________________________________ Volume du Mains Libres OK Sélectionner et valider t s OK Sélectionner le volume de la fonction Mains libres et valider soit Sélectionner le volume du casque s _____________________________________________________________ Volume du casque OK Sélectionner et valider t s OK S...

Страница 116: ...ondent aux sonneries classiques La mélodie 1 est la sonnerie la plus audible Modifier la mélodie de la sonnerie MENU Appuyer sur la touche écran pour ouvrir le menu _________________________________________ s Sons Audio OK Sélectionner et valider _________________________________________ s Mélodie de la sonnerie OK Sélectionner et valider soit Pour appels externes _________________________________...

Страница 117: ...____________________________________________________ Volume de la sonnerie OK Sélectionner et valider t s OK Sélectionner le volume et valider La sonnerie retentit avec le volume choisi a Appuyer de manière prolongée retour au mode repos i Vous pouvez également changer le volume de la sonnerie directement pendant la sonnerie en appuyant sur les touches t ou s Si vous souhaitez enregistrer ce régla...

Страница 118: ...ération de saisie en reposant le combiné sur sa base et lors de la réception d une nouvelle entrée dans le journal des appels Tonalité d erreur séquence décroissante de bips en cas d erreur de saisie Bip de fin de menu en naviguant à la fin d un menu Alarme batterie Bip répétitif qui indique que les batteries doivent être rechargées MENU Appuyer sur la touche écran pour ouvrir le menu ____________...

Страница 119: ..._____________________________ s Alarme de batteries OK Sélectionner la condition Arrêt Marche En cours d appel et valider par exemple Marche signalée par soit Activer désactiver les tonalités de confirmation _________________________________________ s Tonalité de confirm OK Sélectionner et valider activé ensuite a Appuyer de manière prolongée retour au mode repos ...

Страница 120: ...tive Sonneries au volume maximum Sonneries avec fréquence optimisée Volume max du combiné Volume max en mode Mains libres Volume max du casque du kit piéton Déficience moteur L écran s allume plus longtemps lors de saisies Temps alloué plus long pour les saisies dans le répertoire MENU Appuyer sur la touche écran pour ouvrir le menu _________________________________________ s Réglages combiné OK S...

Страница 121: ..._______________________ s Déficience moteur OK Sélectionner et valider pour sélectionner désélectionner le profil sélectionné a Appuyer de manière prolongée retour au mode repos MENU Appuyer sur la touche écran pour ouvrir le menu _________________________________________ s Réglages combiné OK Sélectionner et valider _________________________________________ s Annon de l appelant OK Valider pour a...

Страница 122: ...ion du combiné sur la base restent inchangés Pour interrompre la réinitialisation appuyez sur a MENU Appuyer sur la touche écran pour ouvrir le menu _________________________________________ s Réglages combiné OK Sélectionner et valider _________________________________________ s Combiné OK Sélectionner et valider _________________________________________ s Réinitial combiné OK Sélectionner et val...

Страница 123: ...u combiné Volume de l écouteur 1 p 27 Volume pour la fonction Mains libres 3 p 27 Volume du casque 3 p 27 Volume de la sonnerie 5 p 29 Mélodie de la sonnerie 1 p 29 Décroché automatique activé p 26 Bip batterie clic clavier bip de confirmation activé p 31 Langue d affichage anglais p 24 Liste des numéros bis vide p 21 ...

Страница 124: ... entre en contact avec un liquide n allumez en aucun cas l appareil Retirez immédiatement toutes les batteries Laissez s écouler le liquide de l appareil puis essuyez ensuite tous les éléments jusqu à ce qu ils soient secs Placez le combiné sans batteries dans un endroit sec et chaud pendant au moins 72 heures Il est possible ensuite qu il puisse fonctionner à nouveau Si ce n est pas le cas contac...

Страница 125: ... où notre produit n est pas distribué pas des revendeurs autorisés Les spécificités nationales sont prises en compte Le combiné E1 est autorisé dans toute l Union Européenne et en Suisse La conformité de l appareil avec les exigences fondamentales de la directive européenne R TTE 99 05 CEE est confirmée par le label CE Extrait de la déclaration originale We Siemens AG declare that the above mentio...

Страница 126: ...t être mise à disposition par le centre de services de la compagnie Caractéristiques techniques Batteries recommandées Nickel Hydrure métallique NiMH Sanyo Twicell 700 Sanyo Twicell 650 Panasonic 700 mAh GP 700 mAh YDT AAA SUPER 700 VARTA PhonePower AAA 700 mAh Autonomie temps de charge du combiné Les autonomies et temps de charge indiqués ne sont valables que lors de l utilisation des batteries r...

Страница 127: ...avec Effacer L insertion des caractères s effectue à gauche du curseur Pour passer du mode majuscules majuscule initiale et lettres suivantes en minuscules au mode minuscules appuyez sur P avant d entrer la lettre Si vous appuyez de nouveau sur P vous passez des minuscules aux chiffres Si vous appuyez encore une fois sur la touche vous revenez aux majuscules 1x 2x 3x 4x 5x 6x 7x 8x 9x 10x 11x 12x ...

Страница 128: ...cie dans les conditions ci après à l utilisateur final ayant procédé à l acquisition de ce Produit Siemens ci après le Client Pour la France la présente garantie ne limite en rien ni ne supprime les droits du Client issus des articles 1641 et suivants du Code Civil Français relatifs à la garantie légale des vices cachés Si ce Produit Siemens et ses composants présentent des vices de fabrication et...

Страница 129: ...électrique incendie ou tout autre cas de force majeure les Produits Siemens présentant des traces d ouverture ou de réparation et ou modifications effectuées par un tiers non agréé par Siemens et les Produits envoyés en port dû à Siemens ou à son centre agréé La facture ou le ticket de caisse comportant la date d achat par le Client sert de preuve de garantie Une copie de ce document justifiant de...

Страница 130: ...se pour les dommages survenus aux logiciels intégrés dans le Produit Siemens par le Client ou tout tiers à l exception de Siemens La mise en jeu de la présente garantie et l échange ou la réparation concernant le Produit Siemens ne font pas naître une nouvelle période de garantie qui demeure en tout état de cause la durée initiale sauf disposition impérative contraire Siemens se réserve le droit d...

Страница 131: ...ploi Cette garantie ne s applique pas aux services qui sont effectués par des dealers autorisés ou le client lui même tels que installation configuration téléchargement de logiciels Les instructions d utilisation et logiciels éventuels livrés sur des supports d information séparés sont également exclus de cette garantie La preuve d achat datée tient lieu de certificat de garantie Pour être recevab...

Страница 132: ... incombant au client Pour bénéficier de cette garantie veuillez prendre contact téléphoniquement avec Siemens Vous trouverez le numéro de téléphone dans le mode d emploi ci joint Garantie Suisse La garantie est de 12 mois Accessoires Kit piéton Vous pouvez via la prise mini jack 2 5 mm raccorder les kits piéton ou oreillettes du commerce tels que le kit piéton M110 de Plantronics Tous les accessoi...

Страница 133: ...iné activer désactiver 11 annonce du numéro 34 autonomie et temps de charge 39 mettre en service 7 régler 24 réinitialisation des réglages usine 35 Consignes de sécurité 5 Contenu de l emballage 7 Couper une communication 14 Customer Care Service 38 D Décroché automatique 26 Définir des profils 33 E Ecriture standard tableau 40 Entretien du téléphone 37 Equipements médicaux 5 Eteindre le combiné 1...

Страница 134: ... information Sonnerie régler la mélodie 29 régler le volume 29 T Tableau des jeux de caractères 40 Taille des caractères à l écran 26 Téléphoner accepter un appel 14 en externe 14 en interne 15 Témoin de charge batteries 8 Temps de charge du combiné 39 Tonalité bip de batterie 31 confirmation 31 d avertissement voir Bips d information de confirmation 31 tonalité d erreur 31 Touche I 2 Touche Messa...

Страница 135: ...s Be inspired Gigaset E 1 italiano A31008 S002 B002 1 4U19 cover_Innen fm 11 09 2003 ITALIANO ...

Страница 136: ...zione batteria Tasti del display Accesso alle funzioni rappresentate sul display Microfono Tasti di selezione rapida da II a IV Tasto impegno linea Rispondere alla chiamata Avviare la selezione Commutazione tra viva voce e Tasti di controllo Navigazione Volume Tasto asterisco Att disatt suoneria premere a lungo Al momento dell inserimento del testo alternanza tra scrittura maiuscola minuscola in c...

Страница 137: ...e descrizione del menu 13 Tasti di controllo sul portatile 13 Tasti del display 14 Telefonare 15 Telefonare sulla linea esterna e terminare una chiamata 15 Rispondere alla chiamata 15 Viva voce 16 Telefonare sulla linea interna 16 Utilizzare la rubrica i tasti di selezione rapida e altre liste 18 Rubrica 18 Tasti di selezione rapida 21 Lista di ripetizione dei numeri selezionati 22 Lista delle chi...

Страница 138: ...oni di avviso 32 Impostare i profili 33 Annuncio del numero di telefono 34 Ripristinare i parametri iniziali del portatile 35 Appendice 37 Manutenzione 37 Contatto con liquidi 37 Assistenza tecnica 37 Dati tecnici 39 Tabella della serie di caratteri 40 Condizioni di Garanzia 41 Garanzia Svizzera 43 Accessori 43 Indice alfabetico 44 ...

Страница 139: ...presenti istruzioni d uso negli alloggiamenti delle batterie del portatile sono indicati i simboli L apparecchio può creare interferenze con apparecchiature mediche Osservare quindi le indicazioni presenti nell ambiente in cui ci si trova per esempio ambulatori Con apparecchi acustici il portatile può causare fruscii molto fastidiosi Non collocare la base in ambienti umidi come bagni o docce pag 3...

Страница 140: ...6 Istruzioni di sicurezza Gigaset E 1 italiano A31008 S002 B002 1 4U19 starting fm 11 09 2003 i Non tutte le funzioni descritte nelle presenti istruzioni d uso sono disponibili in tutti i paesi ...

Страница 141: ...attere maiuscolo caratteri grandi Tasti di selezione rapida Viva voce Annuncio del numero solo con abilitazione CLIP per le chiamate in entrata lista delle chiamate Profili per esigenze particolari Vedere Ascoltare Inserire Tasti di controllo per la regolazione del volume Possibilità di impostazione ampliate per volume melodia della suoneria acustica tasti toni tasti Collegamento alla cuffia telef...

Страница 142: ...Inserire le batterie secondo la polarità indicata vedere figura a sinistra Appoggiare il coperchio abbassato di circa 3 mm e farlo scorrere verso l alto fino a chiuderlo ad incastro Per aprirlo premere sulla zigrinatura e spingerlo verso il basso W Utilizzare solo le batterie ricaricabili consigliate da Siemens a pag 39 Vale a dire non usare in nessun caso batterie tradizionali non ricaricabili o ...

Страница 143: ...uindi il portatile nella base per caricare le batterie che alla consegna sono scariche Lo stato di caricamento delle batterie è visualizzato sul display in alto a destra dal simbolo della batteria che lampeggia Se la registrazione automatica viene interrotta bisogna registrare il portatile manualmente come descritto a pag 10 L indicazione del livello di carica delle batterie è corretta solo dopo a...

Страница 144: ... di carica delle batterie viene visualizzato solo durante il processo di ricarica quando le batterie sono scariche Se le batterie sono quasi scariche viene emesso in tono di avviso batteria se attivato pag 32 In stand by sul display lampeggia inoltre il simbolo e viene visualizzato Batteria scarica Una volta eseguita la prima carica dopo ogni chiamata si può sempre riporre il portatile nella base ...

Страница 145: ...re la clip da cintura Spingere la clip sul lato posteriore del portatile e incastrare i gancetti laterali negli appositi fori Si può anche applicare un cordoncino per portare il portatile al braccio o al collo _________________________________________ s Portatile OK Scegliere e confermare _________________________________________ s Registra Portatile OK Scegliere e confermare OK Inserire il PIN di...

Страница 146: ...dere spegnere il portatile Per accendere premere il tasto di fine chiamata a Si sente un tono di conferma successione di toni in crescendo Riponendo il portatile nella base il portatile si accende automaticamente Per spegnere premere nuovamente a lungo il tasto di fine chiamata a in stand by tono di conferma ...

Страница 147: ...to di controllo Tasti di controllo t s In stand by e quando il telefono squilla Aumentare il volume della suoneria Diminuire il volume della suoneria Durante una telefonata Aumentare il volume d ascolto del ricevitore Diminuire il volume d ascolto del ricevitore Nelle liste e nei menu Scorrere verso l alto Scorrere verso il basso In un campo di inserimento Spostare il cursore a sinistra Spostare i...

Страница 148: ...oni hanno il seguente significato Tasti del display Ripeti MENU Simboli del display Significato premendo il tasto OK Rispondere alla chiamata Muto Disattivare la suoneria sul portatile Ripeti Ripetizione del numero selezionato aprire la lista degli ultimi 10 numeri selezionati OK Confermare la funzione menu o memorizzare l inserimento mediante conferma MENU Aprire il menu principale in stand by Du...

Страница 149: ...l numero di telefono Rispondere alla chiamata Il telefono squilla la chiamata viene visualizzata sul display e sul portatile lampeggia il tasto d Premere c oppure d per rispondere alla chiamata c Chiamare sulla linea esterna inserire il numero e premere il tasto di impegno linea Il numero viene selezionato Oppure Si può anche premere prima il tasto impegno linea c si sente un suono di linea libera...

Страница 150: ...uesta funzione si consiglia di informare l interlocutore Attivare disattivare il viva voce attivare d premere il tasto viva voce disattivare c premere il tasto impegno linea Appena si disattiva il viva voce si passa al ricevitore e si continua la conversazione sul portatile Modificare il volume durante la conversazione in viva voce Telefonare sulla linea interna Le telefonate interne sono chiamate...

Страница 151: ...lettiva Sì _____________________________________________________________ Chiamata collettiva Confermare _____________________________________________________________ Chiamata interna Un altro utente ha risposto alla chiamata interna i Se nessun utente risponde il portatile torna in stand by _____________________________________________________________ Chiamata interna c Rispondere alla chiamata i ...

Страница 152: ...ni su come inserire correttamente il testo vedere la tabella della serie di caratteri pag 40 Memorizzare un numero di telefono nella rubrica MENU Premere il tasto del display per aprire il menu principale _________________________________________ Rubrica telefonica OK Confermare Si apre la rubrica MENU Premere il tasto del display per aprire il menu della rubrica __________________________________...

Страница 153: ...ica telefonica OK Confermare Si apre la rubrica o Scorrere fino alla voce s Scegliere la voce c Premere il tasto Il numero viene selezionato o Inserire la lettera iniziale Inserire la lettera iniziale del nome cercato s Scegliere la voce c Premere il tasto Il numero viene selezionato MENU Premere il tasto del display per aprire il menu principale _________________________________________ Rubrica t...

Страница 154: ...zata o Copiare una voce nella rubrica e modificarla s _____________________________________________________________ Copia e modifica OK Scegliere e confermare o Cancellare una singola voce _________________________________________ s Cancella voce OK Scegliere e confermare La voce è cancellata o Cancellare tutta la rubrica _________________________________________ s Cancella lista OK Scegliere e co...

Страница 155: ...lla serie di caratteri pag 40 Memorizzare modificare tasti di selezione rapida Ai tasti di selezione rapida si possono assegnare numeri esterni oppure la funzione di chiamata interna v pag 16 MENU Premere il tasto del display per aprire il menu principale _________________________________________ s Impostaz OK Scegliere e confermare _________________________________________ s Tasti a Chiam Dir OK ...

Страница 156: ... elencati una sola volta Nel caso in cui la rubrica contenga i nomi associati a questi numeri vengono visualizzati i nomi Utilizzando la lista dei numeri selezionati è possibile selezionare nuovamente un numero Selezionare numeri dalla lista dei numeri selezionati OK Inserire il numero di telefono e confermare OK Inserire il nome e confermare La voce è memorizzata o Programmare una chiamata intern...

Страница 157: ...i telefono _____________________________________________________________ Utilizza numero OK Confermare o Copiare un numero nella rubrica s _____________________________________________________________ Copia nella Rubrica OK Scegliere e confermare OK Confermare il numero OK Inserire il nome e confermare La voce è memorizzata o Cancellare un singolo numero di telefono _______________________________...

Страница 158: ...9 Directories fm 11 09 2003 Lista delle chiamate Le nuove chiamate vengono segnalate sul display con il simbolo della busta Premere il tasto del display per aprire la lista o Cancellare la lista completa dei numeri selezionati _________________________________________ s Cancella lista OK Scegliere e confermare ...

Страница 159: ...e lingue Se per sbaglio è stata impostata una lingua errata premere MENU 4 I Poi selezionare la lingua corretta con s e confermare con OK MENU Premere il tasto del display per aprire il menu _________________________________________ s Impostaz OK Scegliere e confermare _________________________________________ s Lingua OK Scegliere e confermare La lingua attuale è contrassegnata con impostazione a...

Страница 160: ...ta e l ora MENU Premere il tasto del display per aprire il menu _________________________________________ s Impostaz OK Scegliere e confermare _________________________________________ s Data Ora OK Scegliere e confermare Inserire la data OK Inserire giorno mese anno e confermare Esempio per il 20 05 2003 inserire 2 Q Q 5 Q I Inserire l ora OK Inserire ora minuti e confermare Esempio per le ore 9 ...

Страница 161: ...caso non è necessario premere il tasto impegno linea o viva voce alla consegna On MENU Premere il tasto del display per aprire il menu _________________________________________ s Impostaz OK Scegliere e confermare _________________________________________ s Carattere maiuscolo OK Confermare per disattivare o attivare la funzione On a Premere a lungo si torna in stand by MENU Premere il tasto del d...

Страница 162: ...om OK Confermare per disattivare o attivare la funzione On a Premere a lungo si torna in stand by MENU Premere il tasto del display per aprire il menu _________________________________________ s Audio OK Scegliere e confermare o Impostare il volume del ricevitore _________________________________________ Volume ricevitore OK Confermare Si sente un tono al volume impostato attualmente t s OK Scegli...

Страница 163: ...on si conferma la modifica del volume l impostazione sarà valida solo per la conversazione in corso t s OK Scegliere il volume del viva voce e confermare o Impostare il volume dell auricolare s _____________________________________________________________ Volumecuffia OK Scegliere e confermare t s OK Scegliere il volume dell auricolare e confermare a Premere a lungo si torna in stand by t s Modifi...

Страница 164: ... 1 3 corrispondono alle suonerie classiche La melodia 1 è la suoneria che si sente meglio Modificare la melodia della suoneria MENU Premere il tasto del display per aprire il menu _________________________________________ s Audio OK Scegliere e confermare _________________________________________ s Melodia suoneria OK Scegliere e confermare o Per chiamate esterne __________________________________...

Страница 165: ...________________________________________________________ Volume suoneria OK Scegliere e confermare t s OK Scegliere il volume e confermare Si sente la suoneria al volume impostato attualmente a Premere a lungo si torna in stand by i È possibile modificare il volume della suoneria anche direttamente durante lo squillo premendo il tasto t oppure s Se si desidera memorizzare la modifica confermare co...

Страница 166: ...ile nella base e quando si aggiunge una nuova voce nella lista delle chiamate Tono d errore sequenza decrescente in caso di inserimenti errati Tono fine menu scorrendo quando si arriva alla fine di un menu Tono di avviso batterie scariche Un bip ripetuto indica che le batterie devono essere ricaricate MENU Premere il tasto del display per aprire il menu _________________________________________ s ...

Страница 167: ...isattivare i toni di conferma _________________________________________ s Toni di conferma OK Scegliere e confermare On poi in ogni caso a Premere a lungo si torna in stand by Profilo Impostazioni Ottico Cifre maiuscole caratteri grandi Annuncio numero portatile Annuncio numero segreteria telefonica Tono tasti Tono inserimento PIN Acustico Suoneria al volume massimo Suoneria con frequenza ottimizz...

Страница 168: ...____ s Profili OK Scegliere e confermare _________________________________________ Ottico OK Confermare per selezionare deselezionare il profilo selezionato _________________________________________ s Acustico OK Selezionare e confermare per selezionare deselezionare il profilo selezionato _________________________________________ s Motorio OK Selezionare e confermare per selezionare deselezionare...

Страница 169: ...engono mantenuti Con a si interrompe il ripristino _________________________________________ s Annuncio ID chiam OK Confermare per disattivare o attivare la funzione On a Premere a lungo si torna in stand by i L annuncio del numero vale sia per le chiamate in entrata che per le chiamate nella lista delle chiamate v pag 24 MENU Premere il tasto del display per aprire il menu _______________________...

Страница 170: ...reimp iniziali Sì Scegliere e confermare a Premere a lungo si torna in stand by Volume del ricevitore 1 pag 28 Volume del viva voce 3 pag 28 Volume dell auricolare 3 pag 28 Volume della suoneria 4 pag 30 Melodia della suoneria 1 pag 30 Risposta automatica attivata pag 27 Tono batteria acustica tasti tono di conferma attivato pag 32 Lingua del display english pag 25 Lista dei numeri selezionati vuo...

Страница 171: ...terie Lasciar defluire il liquido dall apparecchio ed asciugare quindi tutte le parti con un panno Lasciare il portatile per almeno 72 ore in un luogo caldo e asciutto A questo punto in molti casi è possibile rimetterlo in funzione Assistenza tecnica Se desiderate porre domande tecniche o relative all uso dell apparecchio potete consultare il nostro sito Internet oppure potete rivolgervi al serviz...

Страница 172: ...aesi Il portatile E1 è ammesso in tutta l UE e in Svizzera La conformità dell apparecchio ai requisiti fondamentali della Direttiva R TTE è confermata dalla presenza del marchio CE Estratto della dichiarazione originale We Siemens AG declare that the above mentioned product is manufactured according to our Full Quality Assurance System certified by CETECOM ICT Services GmbH with ANNEX V of the R T...

Страница 173: ...700 Sanyo Twicell 650 Panasonic 700 mAh GP 700 mAh YDT AAA SUPER 700 VARTA PhonePower AAA 700 mAh Autonomia tempi di ricarica del portatile I tempi di autonomia e ricarica indicati valgono solo se si utilizzano le batterie raccomandate Capacità mAh Autonomia in stand by ore Autonomia in conversazione ore Tempo di ricarica ore 700 fino a 100 fino a 15 ca 5 ...

Страница 174: ...nistra del cursore Per passare dalla scrittura con lettere maiuscole 1a lettera maiuscola successive minuscole alla scrittura con lettere minuscole premere P prima di inserire la lettera Premendo nuovamente P si passa dalla scrittura con lettere minuscole a quella in cifre Premendo nuovamente si passa dalla scrittura in cifre alla scrittura con lettere maiuscole 1x 2x 3x 4x 5x 6x 7x 8x 9x 10x 11x ...

Страница 175: ...cepimento per l Italia n 24 del 02 02 2002 per ciò che riguarda il regime di garanzia legale per i beni di consumo Di seguito si riporta un estratto delle condizioni di garanzia convenzionale Il testo completo e aggiornato delle condizioni di garanzia e l elenco dei centri di assistenza sono comunque a Vostra disposizione consultando il sito http www my siemens it o contattando il servizio Clienti...

Страница 176: ...momento della loro constatazione I dispositivi o i componenti resi a fronte di una sostituzione diventano di proprietà di Siemens La presente garanzia è valida per tutti i dispositivi acquistati all interno dell Unione Europea Garante per i prodotti acquistati in Italia è la Siemens S p A Viale Piero e Alberto Pirelli 10 20126 Milano Si escludono ulteriori responsabilità di Siemens salvo il caso d...

Страница 177: ...lla garanzia è di 12 mesi Accessori Cuffia telefonica L interfaccia universale da 2 5 mm consente di collegare le cuffie telefoniche normalmente reperibili in commercio tra cui la cuffia telefonica Plantronics M110 Tutti gli accessori e le batterie possono essere ordinati presso i negozi specializzati oppure direttamente su Internet nel negozio on line my siemens www my siemens com Qui si possono ...

Страница 178: ...Garanzia 41 Contenuto della confezione 8 D Dati tecnici 39 Dimensione caratteri sul display 27 F Funzionamento con ricevitore 2 Funzionamento con ricevitore 16 G Garanzia 43 I Impostare i profili 33 Impostare l ora 26 Impostare la data 26 Istruzioni di sicurezza 5 L Lingua v Cambiare la lingua del display Lista di selezione rapida 21 Livello di carica batterie 9 M Manutenzione del telefono 37 Melo...

Страница 179: ...re il volume 30 impostare la melodia 30 T Tabella della serie di caratteri 40 Tasti di selezione rapida 2 21 Tasto messaggi 2 Telefonare rispondere alla chiamata 15 sulla linea esterna 15 sulla linea interna 16 Telefonare sulla linea interna 16 Tempi di ricarica del portatile 39 Terminare la chiamata 15 Toni di avviso 32 Toni di conferma 32 Tono conferma 32 tono batteria 32 tono d errore 32 Tono b...

Страница 180: ...s Be inspired Gigaset E 1 español A31008 S002 B002 1 4U19 cover_Innen fm 01 09 2003 ESPAÑOL ...

Страница 181: ...s libres Indicador de carga de las baterías Teclas de función Acceso a las funciones que aparecen en el display Micrófono Teclas de marcación rápida II a IV Tecla de descolgar Aceptar llamada Iniciar marcación Conmutación de la función manos libres al modo de microteléfono Teclas de mando Navegación Volumen Tecla asterisco Activar desactivar tonos del timbre pulsar prolonga damente Al introducir t...

Страница 182: ...ono y esquema del menú 12 Teclas de mando del terminal inalámbrico 12 Teclas de función 13 Realizar llamadas 14 Realizar y finalizar llamadas externas 14 Contestar llamadas 14 Manos libres 15 Realizar llamadas internas 15 Utilizar el listín telefónico las teclas de marcación rápida y otras listas 17 Listín telefónico 17 Teclas de marcación rápida 20 Lista de rellamada 21 Lista de llamantes 23 Ajus...

Страница 183: ...Ajustar perfiles 32 Indicación del número de teléfono 34 Restablecer el terminal al estado de suministro 34 Anexo 36 Cuidados 36 Contacto con líquidos 36 Servicio Técnico Servicio de Atención al Cliente 36 Características técnicas 38 Tabla de caracteres 39 Certificado de garantía 40 Accesorios 42 Índice alfabético 43 ...

Страница 184: ...nes de uso en el compartimento de baterías del terminal inalámbrico encontrará los símbolos correspondientes Puede provocar anomalías en el funcionamiento de equipos médicos Tenga en cuenta las condiciones técnicas del entorno de aplicación p ej consultorios médicos El terminal inalámbrico puede ocasionar un zumbido muy molesto en aparatos auditivos No instale la estación base en el cuarto de baño...

Страница 185: ...os libres Indicación del número de teléfono únicamente con la función CLIP activada para Llamadas entrantes Lista de llamantes Perfiles para requisitos especiales Visual Auditivo Motriz Teclas de mando para regular el volumen Posibilidades avanzadas de ajuste para Volumen Melodía del tono de llamada Pulsación de teclas Tonos de las teclas Conexión para equipo de auriculares y micrófono no incluido...

Страница 186: ...ble de red un clip para el cinturón para el terminal inalámbrico dos baterías y unas instrucciones de manejo Retirar la lámina de protección El display está protegido con una lámina de plástico Retírela Colocar las baterías Coloque las baterías con la polaridad correcta véase la ilustración de la izquierda Haga bajar la tapa unos 3 mm y deslícela hacia arriba hasta que encaje Para abrir pulse sobr...

Страница 187: ...lay parpadea Proc de reg Tras el alta se muestra el display en estado de reposo 3 A continuación deje el terminal inalámbrico en el soporte de carga para que se carguen las baterías pues las baterías vienen vacías en el estado de suministro La carga de las baterías se indica en la parte superior derecha del display mediante el parpadeo del símbolo de batería W Utilice únicamente las baterías recar...

Страница 188: ...n una estación base W Al cargar por primera vez las baterías recomendamos un tiempo ininterrumpido de carga de cinco horas independientemente del nivel del indicador de estado de carga La capacidad de carga de las baterías recargables disminuye por motivos técnicos al cabo de algún tiempo i El estado de carga de las baterías sólo se indica durante la carga cuando las baterías están agotadas Si las...

Страница 189: ...al inalámbrico en la estación base consulte las instrucciones de manejo de ésta Menú Pulsar la tecla de función para abrir el menú _________________________________________ s Ajuste terminal OK Seleccionar y confirmar _________________________________________ s Terminal OK Seleccionar y confirmar _________________________________________ s Registrar terminal OK Seleccionar y confirmar OK Introduci...

Страница 190: ...perforaciones Además puede instalar una correa para llevar el terminal telefónico colgado de la mano o del cuello Encender apagar terminal inalámbrico Para encenderlo pulse la tecla de colgar a Sonará un tono de confirmación secuencia de tonos ascendente Al colocar el terminal inalámbrico en el soporte de carga éste se activa automáticamente Para apagarlo en el estado de reposo vuelva a pulsar pro...

Страница 191: ...as funciones de las teclas de mando Teclas de mando t s En estado de reposo y al sonar el teléfono Aumentar el volumen del timbre Reducir el volumen del timbre Durante una llamada Aumentar el volumen del microteléfono Reducir el volumen del microteléfono En listas y menús Hojear hacia arriba Hojear hacia abajo En un campo de entrada Mover el cursor hacia la izquierda Mover el cursor hacia la derec...

Страница 192: ...nen el siguiente significado Teclas de función Rellam Menú Símbolodel display Significado si se pulsa la tecla OK Responder a una llamada Silenc Desactivar el tono de timbre en el terminal inalámbrico Rellam Rellamada abrir la lista de los últimos 10 números marcados OK Confirmar la función del menú o guardar los datos introducidos mediante confirmación Menú Abrir el menú principal en el estado de...

Страница 193: ...as Su terminal inalámbrico suena la llamada se indica en el display y parpadea la tecla d en el terminal inalámbrico Pulsar c o bien d para responder a la llamada Si el terminal inalámbrico se encuentra en el soporte de carga y está activada la función Aceptación automátic p 26 c Llamada externa introducir el número de teléfono y pulsar la tecla de descolgar Se marca el número de teléfono O bien T...

Страница 194: ...rlocutor Activar desactivar el modo de manos libres activar d Pulsar la tecla de manos libres desactivar c Pulsar la tecla de descolgar Una vez finalizado el modo de manos libres se pasa al modo de microteléfono y la llamada continúa en el terminal inalámbrico Modificar el volumen en el modo de manos libres Realizar llamadas internas Las llamadas internas son llamadas gratuitas entre los terminale...

Страница 195: ..._____________________________________________________ Llam colectiva Confirmar _____________________________________________________________ Conexión interna La llamada interna ha sido contestada por otro usuario i Si no contesta ningún usuario el terminal inalámbrico pasa al estado de reposo _____________________________________________________________ Conexión interna c Responder a una llamada i...

Страница 196: ...léfono Para saber cómo introducir texto correctamente consulte la tabla de caracteres p 39 Guardar el número de teléfono en el listín telefónico Menú Pulsar la tecla de función para abrir el menú principal _________________________________________ Listín telef OK Confirmar Se abre el listín telefónico Menú Pulsar la tecla de función para abrir el listín telefónico _________________________________...

Страница 197: ... telef OK Confirmar Se abre el listín telefónico bien Hojear hasta encontrar el registro buscado s Seleccionar el registro c Pulsar la tecla Se marca el número de teléfono o bien Introducir la letra inicial Introducir las letras iniciales del nombre buscado s Seleccionar el registro c Pulsar la tecla Se marca el número de teléfono Menú Pulsar la tecla de función para abrir el menú principal ______...

Страница 198: ...dado el registro o bien Copiar y modificar un registro en el listín telefónico s _____________________________________________________________ Copiar y modificar OK Seleccionar y confirmar o bien Borrar un registro individual _________________________________________ s Borrar registro OK Seleccionar y confirmar Se ha borrado el registro o bien Borrar todo el listín telefónico _____________________...

Страница 199: ...ar las teclas de marcación rápida Puede asignar a las teclas de marcación rápida números de teléfono externos o la función de llamada interna ver p 15 Menú Pulsar la tecla de función para abrir el menú principal _________________________________________ s Ajuste terminal OK Seleccionar y confirmar _________________________________________ s Teclas marcac dir OK Seleccionar y confirmar ____________...

Страница 200: ...meros marcados varias veces sólo aparecen una vez Si en el listín telefónico figuran los nombres correspondientes a estos números aparecerán estos nombres Con la lista de rellamada puede volver a marcar los números de teléfono Marcar números de la lista de rellamada OK Introducir el nombre y confirmar Se ha guardado el registro o bien Programar la llamada interna __________________________________...

Страница 201: ... _____________________________________________________________ Usar número OK Confirmar o bien Guardar número de teléfono en el listín telefónico s _____________________________________________________________ Copiar al listín OK Seleccionar y confirmar OK Confirmar el número OK Introducir el nombre y confirmar Se ha guardado el registro o bien Borrar el número deseado ____________________________...

Страница 202: ...S002 B002 1 4U19 Directories fm 01 09 2003 Lista de llamantes Las llamadas nuevas se indican en el display mediante el símbolo del sobre Pulse la tecla de función para abrir la lista o bien Borrar toda la lista de rellamada _________________________________________ s Borrar lista OK Seleccionar y confirmar ...

Страница 203: ...error ha seleccionado un idioma incorrecto que usted no comprende pulse Menú 4 I A continuación seleccione con sel idioma adecuado y confirme con OK Menú Pulsar la tecla de función para abrir el menú _________________________________________ s Ajuste terminal OK Seleccionar y confirmar _________________________________________ s Idioma OK Seleccionar y confirmar El idioma actual lleva la marca est...

Страница 204: ...lsar la tecla de función para abrir el menú _________________________________________ s Ajuste terminal OK Seleccionar y confirmar _________________________________________ s Fecha Hora OK Seleccionar y confirmar Introducir la fecha OK Introducir día mes año y confirmar Ejemplo para el 20 de mayo de 2003 introducir 2 Q Q 5 Q I Introducir la hora OK Introducir horas minutos y confirmar Ejemplo para...

Страница 205: ... que pulsar la tecla de descolgar o de manos libres estado de suministro activada Menú Pulsar la tecla de función para abrir el menú _________________________________________ s Ajuste terminal OK Seleccionar y confirmar _________________________________________ s Caracteres grandes OK Confirmar para activar o desactivar la función activado a Pulsar prolongadamente vuelta al estado de reposo Menú P...

Страница 206: ... Confirmar para activar o desactivar la función activado a Pulsar prolongadamente vuelta al estado de reposo Menú Pulsar la tecla de función para abrir el menú _________________________________________ s Ajuste OK Seleccionar y confirmar bien Ajustar volumen del microteléfono _________________________________________ Volumen terminal OK Confirmar Escuchará un tono con el volumen seleccionado actua...

Страница 207: ... micrófono Si no confirma el cambio de volumen el ajuste sólo se aplicará a la llamada en curso t s OK Seleccionar el volumen para manos libres y confirmar o bien Ajustar el volumen de los auriculares s _____________________________________________________________ Volumenauriculares OK Seleccionar y confirmar t s OK Seleccionar el volumen para los auriculares y confirmar a Pulsar prolongadamente v...

Страница 208: ...melodías 1 10 las melodías 1 3 corresponden a los tonos clásicos de llamada La melodía 1 es el tono de timbre más audible Cambiar la melodía Menú Pulsar la tecla de función para abrir el menú _________________________________________ s Ajuste OK Seleccionar y confirmar _________________________________________ s Melodía timbre OK Seleccionar y confirmar bien Para llamadas externas ________________...

Страница 209: ...irmar s _____________________________________________________________ Volumen timbre OK Seleccionar y confirmar t s OK Seleccionar el volumen y confirmar Escuchará el timbre con el volumen seleccionado actualmente a Pulsar prolongadamente vuelta al estado de reposo i También puede modificar el volumen del timbre mientras éste suena pulsando la tecla t o s Si desea guardar el valor seleccionado con...

Страница 210: ...car el terminal inalámbrico en la estación base y al recibir un nuevo registro en la lista de llamantes Tono de error secuencia de tonos descendente al introducir datos erróneos Tono de final de menú al llegar al final de un menú Tono de advertencia de batería tono agudo y repetido que indica que debe cargar las baterías Menú Pulsar la tecla de función para abrir el menú __________________________...

Страница 211: ...Tono aviso batería OK Seleccionar la opción Apagado Encendido Durante la llamada y confirmar p ej Encendido marcada con o bien Activar desactivar los tonos de acuse de recibo _________________________________________ s Tonos confirm OK Seleccionar y confirmar activado entonces a Pulsar prolongadamente vuelta al estado de reposo Perfil Ajustes Visual Números grandes letra grande Indicación del núme...

Страница 212: ...ecla de función para abrir el menú _________________________________________ s Ajuste terminal OK Seleccionar y confirmar _________________________________________ s Perfiles OK Seleccionar y confirmar _________________________________________ Visual OK Confirmar para seleccionar o anular la selección del perfil seleccionado _________________________________________ s Acústico OK Seleccionar y con...

Страница 213: ...ión rápida así como el alta del terminal en la estación base Pulsando a se interrumpe el restablecimiento de valores Menú Pulsar la tecla de función para abrir el menú _________________________________________ s Ajuste terminal OK Seleccionar y confirmar _________________________________________ s Identificac llamante OK Confirmar para activar o desactivar la función activado a Pulsar prolongadame...

Страница 214: ...rmar s _____________________________________________________________ Reponer est Fab Sí Seleccionar y confirmar a Pulsar prolongadamente vuelta al estado de reposo Volumen del microteléfono 1 p 27 Volumen para manos libres 3 p 27 Volumen de los auriculares 3 p 27 Volumen del tono del timbre 5 p 29 Melodía del tono del timbre 1 p 29 Aceptación automática de llamadas activada p 26 Tono de la batería...

Страница 215: ...mediatamente todas las baterías Deje que el líquido escurra fuera del aparato y seque después todas las piezas Coloque el terminal inalámbrico sin baterías durante un mínimo de 72 horas en un lugar seco y caliente En muchos casos después podrá volver a ponerlo en funcionamiento Servicio Técnico Servicio de Atención al Cliente Nuestro Servicio de Asistencia Online en Internet En caso de averías del...

Страница 216: ...Su Gigaset está previsto para el servicio en su país tal y como se especifica en la parte inferior del equipo Se han observado las características específicas del país El sello CE corrobora la conformidad del equipo con los requerimientos básicos de la Directiva R TTE Extracto de la declaración original We Siemens AG declare that the above mentioned product is manufactured according to our Full Qu...

Страница 217: ...wicell 700 Sanyo Twicell 650 Panasonic 700 mAh GP 700 mAh YDT AAA SUPER 700 VARTA PhonePower AAA 700 mAh Tiempos de servicio de carga del terminal Los tiempos de servicio y carga indicados sólo son válidos si se utilizan las baterías recomendadas Capacidad mAh Autonomía horas Tiempo de conversación horas Tiempo de carga horas 700 hasta 100 hasta 15 aprox 5 ...

Страница 218: ...te varias veces o de forma prolongada 1 vez 2 veces 3 veces 4 veces 5 veces 6 veces 7 veces 8 veces 9 veces 10 veces 11 veces 12 veces 13 veces 14 veces 1 Espacios en blanco 1 â 2 a b c 2 ä á à â ã ç I d e f 3 ë é è ê 4 g h i 4 ï í ì î 5 j k l 5 L m n o 6 ö ñ ó ò ô õ M p q r s 7 ß N t u v 8 ü ú ù û O w x y z 9 ÿ ý æ ø å Q 0 _ P Abc abc abc 123 ...

Страница 219: ...l introducir un número en el listín telefónico la primera letra del nombre se escribe automáticamente en mayúsculas y el resto en minúsculas Orden de los registros en el listín telefónico 1 Espacios en blanco indicados aquí con s 2 Cifras 0 9 3 Letras por orden alfabético 4 Otros caracteres Si desea pasar por alto el orden alfabético de los registros inserte un espacio en blanco antes del nombre E...

Страница 220: ...ción de garantía deberá presentarse dentro de un plazo de dos meses tras haber ocurrido el defecto cubierto por la garantía Los terminales o componentes reemplazados y devueltos a Siemens volverán a ser propiedad de Siemens Esta garantía se aplica a nuevos dispositivos adquiridos en la Unión Europea La garantía la concede Siemens S A Ronda de Europa 5 28760 Tres Cantos Se excluirán aquellas reclam...

Страница 221: ...circunstancia Las normas antes mencionadas no suponen ninguna exigencia de inversión de la carga de la prueba en detrimento del cliente Para solicitar el cumplimiento de esta garantía contacte con el servicio telefónico de Siemens El número correspondiente figura en la guía de usuario adjunta Accesorios Equipo de auriculares y micrófono En la interfaz universal de 2 5 mm puede conectar equipos de ...

Страница 222: ...eneral terminal inalámbrico 2 F Finalizar la llamada 14 G Garantía 40 H Hotline 36 I Idioma v modificar el idioma del display Indicación del número de teléfono 34 Indicador de estado de carga baterías 8 Instrucciones de seguridad 5 L Letra del display 26 Lista de marcación rápida 20 Listín telefónico borrar registro 18 copiar y modificar registros 18 guardar número de teléfono 17 mostrar y modific...

Страница 223: ... tiempos de servicio y de carga 38 Terminal inalámbrico en estado de suministro 34 Tiempo de servicio del terminal inalámbrico 38 Tiempos de carga del terminal inalámbrico 38 Tienda en línea 42 Tono confirmación 31 tono de batería 31 tono de error 31 Tono de advertencia v tonos de aviso 31 Tono de batería 31 Tono de confirmación 11 31 Tono de error 31 Tono de señal v tonos de aviso Tono del timbre...

Страница 224: ...s Be inspired Gigaset E 1 Nederlands A31008 S002 B002 1 4U19 cover_Innen fm 22 09 2003 NEDERLANDS ...

Страница 225: ...eetoets Omschakelen van handmatig naar handsfree Batterij indicatie Functietoetsen Toegang tot de op het display weergegeven functies Microfoon Geheugentoetsen II tot IV Verbindingstoets Oproep aannemen Nummer kiezen Omschakelen van handsfree naar handmatig Navigatietoetsen Navigatie Volume Sterretje toets Belsignaal aan uit ca 2 sec indrukken Bij de tekstinvoer schakelen tussen hoofd en kleine le...

Страница 226: ...gclip bevestigen 11 Handset in uitschakelen 11 Bedienen van de telefoon en menu overzicht 12 Navigatietoetsen op de handset 12 Functietoetsen 13 Telefoneren 14 Extern bellen en gesprek beëindigen 14 Oproep aannemen 14 Handsfree telefoneren 15 Intern telefoneren 16 Telefoonboek geheugentoetsen en overige lijsten gebruiken 17 Telefoonboek 17 Geheugentoetsen 20 Nummerherhalingslijst 21 Bellerslijst 2...

Страница 227: ...Attentiesignalen in uitschakelen 31 Profielen instellen 32 NummerWeergave 33 Handset in de standaardinstelling terugzetten 34 Bijlage 36 Onderhoud 36 Contact met vloeistoffen 36 Klantenservice Customer Care 36 Technische gegevens 38 Tekenreekstabel 39 Garantie Nederland 40 Garantiecertificaat België 42 Accessoires 43 Trefwoordenregister 44 ...

Страница 228: ...anwijzing staat vermeld In het batterijvakje van de handset zijn symbolen aangebracht De werking van medische apparatuur kan worden beïnvloed Let op de technische voorwaarden van de betreffende omgeving bijvoorbeeld artsenpraktijk De handset kan bij gehoorapparaten een onaangename bromtoon veroorzaken Plaats het basisstation niet in badkamers of doucheruimtes pagina 36 De handset is niet spatwater...

Страница 229: ...len op het display Extra functie Grote letters grote tekens Geheugentoetsen Handsfree telefoneren Nummerweergave alleen bij CLIP vrijschakeling voor inkomende oproepen bellerslijst Profielen voor speciale situaties Zien Horen Invoeren Navigatietoetsen voor volumeregeling Uitgebreide instelmogelijkheden voor volume belmelodie toetsindrukken toetssignalen Aansluiting voor headset headset niet meegel...

Страница 230: ... is afgedekt met folie U kunt deze nu verwijderen Batterijen plaatsen Plaats de batterijen met de polen in de juiste richting zie linkerafbeelding Klepje ongeveer 3 mm naar beneden verschoven plaatsen en naar boven schuiven totdat het vastklikt Om het klepje te openen drukt u op de ribbels en schuift u het naar beneden W Gebruik enkel de door Siemens op pagina 38 aanbevolen oplaadbare batterijen G...

Страница 231: ...ststand weer 3 Laat nu de handset voor het laden van de batterijen in de lader staan omdat de batterijen bij levering nog niet zijn geladen Het laden van de batterijen wordt op het display rechtsboven door knipperen van het batterijsymbool aangegeven Als de automatische aanmelding wordt onderbroken meldt u de handset handmatig aan zoals op pagina 10 en volgende is beschreven Het laadniveau van de ...

Страница 232: ... de batterijen bijna leeg zijn hoort u het batterijsignaal indien ingeschakeld pagina 31 In ruststand knippert op het display bovendien het symbool en wordt Batterijen zijn leeg weergegeven Na het eerste laadproces kunt u uw handset na elk gesprek in het basisstation terugplaatsen Hierdoor worden de batterijen bij het laden ontzien De batterijen worden warm tijdens het laden Dit is normaal en onge...

Страница 233: ... op de handset en het basisstation uit te voeren 1 Op de handset 2 Op het basisstation Hoe de aanmelding van de handset op het basisstation plaatsvindt leest u in de gebruiksaanwijzing van het basisstation Menu Functietoets indrukken om het menu te openen _________________________________________ s Instellen handset OK Selecteren en bevestigen _________________________________________ s Handset OK...

Страница 234: ...ant in de uitsparingen klikt Bovendien kunt u een koordje aanbrengen om de handset in de hand of om de nek te dragen Handset in uitschakelen Om in te schakelen de verbreektoets a indrukken U hoort dan een bevestigingssignaal stijgende toonreeks Als u de handset in de lader plaatst schakelt deze automatisch in Om de handset uit te schakelen drukt u de verbreektoets a in ruststand lang in u hoort he...

Страница 235: ...illende functies Verschillende functies van de navigatietoets Navigatietoetsen t s In ruststand en als de handset belt Volume van het oproepsignaal verhogen Volume van het oproepsignaal verlagen Tijdens het telefoneren Handsetvolume verhogen Handsetvolume verlagen In lijsten en menu s Naar boven bladeren Naar beneden bladeren In een invoerveld De cursor naar links bewegen De cursor naar rechts bew...

Страница 236: ...symbool å Voorbeeld De verschillende aanduidingen hebben de volgende betekenis Functietoetsen Herh Menu Display symbool Betekenis bij indrukken van toets Accept Oproep aannemen Stil Belsignaal op de handset uitschakelen Herh Nummerherhaling De lijst met de laatste 10 telefoonnummers openen OK Menufunctie bevestigen of invoer door bevestiging opslaan Menu In ruststand het hoofdmenu openen Tijdens h...

Страница 237: ...t over de oproep wordt op het display weergegeven en de toets d op de handset knippert c of d indrukken om de oproep aan te nemen Als de handset op de lader staat en de functie Auto aannemen is ingeschakeld pagina 26 hoeft u de handset alleen maar van de lader te nemen om de oproep aan te nemen c Extern telefoneren telefoonnummer invoeren en op de verbindingstoets drukken Het nummer wordt gekozen ...

Страница 238: ...het gesprek deelnemen Voordat u de functie handsfree telefoneren gebruikt dient u dat uw gesprekspartner te melden Handsfree in uitschakelen inschakelen d handsfreetoets indrukken uitschakelen c verbindingstoets indrukken Zodra u handsfree telefoneren stopt schakelt u over op handmatig en voert u het gesprek verder met de handset Volume regelen tijdens het handsfree telefoneren s t Het volume zach...

Страница 239: ...ie voor interne oproepen is geprogrammeerd _____________________________________________________________ Aan allen Ja _____________________________________________________________ Aan alle handsets Bevestigen _____________________________________________________________ Intern verbonden De interne oproep is door een andere deelnemer aangenomen i Als geen deelnemer reageert gaat de handset in rusts...

Страница 240: ...ers opslaan Hoe u de tekst correct invoert vindt u in de tekenreekstabel pagina 39 Telefoonnummer in telefoonboek opslaan Menu Functietoets indrukken om het hoofdmenu te openen _________________________________________ Telefoonboek OK Bevestigen Het telefoonboek wordt geopend Menu Functietoets indrukken om het telefoonboekmenu te openen _________________________________________ Nieuwe invoer OK Be...

Страница 241: ..._________ Telefoonboek OK Bevestigen Het telefoonboek wordt geopend óf Naar vermelding bladeren s Vermelding selecteren c Toets indrukken Het nummer wordt gekozen óf Beginletter invoeren Voer de beginletter van de gezochte naam in s Vermelding selecteren c Toets indrukken Het nummer wordt gekozen Menu Functietoets indrukken om het hoofdmenu te openen _________________________________________ Telef...

Страница 242: ...r is opgeslagen óf Afzonderlijke vermelding wissen _________________________________________ s Invoer wissen OK Selecteren en bevestigen De vermelding is gewist óf Vermelding in het telefoonboek kopiëren en wijzigen s _____________________________________________________________ Kopiëren en wijzigen OK Selecteren en bevestigen óf Telefoonboek volledig wissen _______________________________________...

Страница 243: ...igen U kunt aan de geheugentoetsen externe telefoonnummers of de functie interne oproep zie pagina 16 toewijzen Menu Functietoets indrukken om het hoofdmenu te openen _________________________________________ s Instellen handset OK Selecteren en bevestigen _________________________________________ s Directe toetsen OK Selecteren en bevestigen _________________________________________ s I geen invo...

Страница 244: ...en Meermalen gekozen nummers komen er maar eenmaal in te staan Als u bij deze nummers ook namen in het telefoonboek heeft ingevoerd worden ook deze namen weergegeven Via de nummerherhalingslijst kunt u de telefoonnummers opnieuw kiezen Telefoonnummers uit de nummerherhalingslijst kiezen OK Naam invoeren en bevestigen De invoer is opgeslagen óf Interne oproep programmeren __________________________...

Страница 245: ..._________________________________________________________ Nummer gebruiken OK Bevestigen óf Telefoonnummer in telefoonboek overnemen s _____________________________________________________________ naar telefoonboek OK Selecteren en bevestigen OK Nummer bevestigen OK Naam invoeren en bevestigen De vermelding is opgeslagen óf Afzonderlijk telefoonnummer wissen _______________________________________...

Страница 246: ...2 B002 1 4U19 Directories fm 22 09 2003 Bellerslijst Als er nieuwe oproepen zijn verschijnt het briefsymbool op het display Druk de functietoets in om de lijst te openen óf Volledige nummerherhalingslijst wissen _________________________________________ s Lijst wissen OK Selecteren en bevestigen ...

Страница 247: ...eluk een verkeerde voor u onbegrijpelijke taal heeft ingesteld druk dan op Menu 4 I Kies vervolgens met s de juiste taal en bevestig deze met OK Menu Functietoets indrukken om het menu te openen _________________________________________ s Instellen handset OK Selecteren en bevestigen _________________________________________ s Taal OK Selecteren en bevestigen De huidige taal is gemarkeerd met stan...

Страница 248: ...nctietoets indrukken om het menu te openen _________________________________________ s Instellen handset OK Selecteren en bevestigen _________________________________________ s Datum Tijd OK Selecteren en bevestigen Datum invoeren OK Dag maand jaar invoeren en bevestigen Voorbeeld voor 20 05 2003 voert u 2 Q Q 5 Q I in Tijd invoeren OK Uren minuten invoeren en bevestigen Voorbeeld voor het tijdsti...

Страница 249: ...erbindings of handsfreetoets in te drukken standaardinstelling ingeschakeld Menu Functietoets indrukken om het menu te openen _________________________________________ s Instellen handset OK Selecteren en bevestigen _________________________________________ s Grote letters OK Bevestig om de functie uit of in te schakelen aan a Lang indrukken terug naar ruststand Menu Functietoets indrukken om het ...

Страница 250: ...men OK Bevestig om de functie uit of in te schakelen aan a Lang indrukken terug naar ruststand Menu Functietoets indrukken om het menu te openen _________________________________________ s Geluidsinstellingen OK Selecteren en bevestigen óf Handsetvolume instellen _________________________________________ Volume luidspreker OK Bevestigen U hoort een toon in het momenteel ingestelde volume t s OK Ha...

Страница 251: ...efoon van de headset Als u de volumewijziging niet bevestigt geldt de instelling alleen voor het huidige gesprek t s OK Handsfree volume selecteren en bevestigen óf Hoofdtelefoonvolume instellen s _____________________________________________________________ VolumeHeadset OK Selecteren en bevestigen t s OK Hoofdtelefoonvolume selecteren en bevestigen a Lang indrukken terug naar ruststand t s Hands...

Страница 252: ...________________________________ s Geluidsinstellingen OK Selecteren en bevestigen s _____________________________________________________________ Volume Belsignaal OK Selecteren en bevestigen t s OK Volume selecteren en bevestigen U hoort het belsignaal in het momenteel ingestelde volume a Lang indrukken terug naar ruststand i U kunt het volume van het belsignaal ook meteen tijdens het bellen wij...

Страница 253: ...igen _________________________________________ s Melodie OK Selecteren en bevestigen óf Voor externe oproepen _________________________________________ Externe oproepen OK Bevestigen óf Voor interne oproepen _________________________________________ s Interne oproepen OK Selecteren en bevestigen vervolgens _________________________________________ Melodie OK Melodie bevestigen bijvoorbeeld Melodie...

Страница 254: ...binnenkomt Fouttoon dalende toonreeks bij onjuiste invoer Menu eindetoon wanneer u het einde van een menu bereikt Batterijtoon herhaaldelijke pieptoon die aangeeft dat de batterijen moeten worden geladen Menu Functietoets indrukken om het menu te openen _________________________________________ s Geluidsinstellingen OK Selecteren en bevestigen _________________________________________ s Attentiesi...

Страница 255: ..._______________ s Bevestig OK Selecteren en bevestigen aan vervolgens a Lang indrukken terug naar ruststand Profiel Instellingen Zien Jumbo cijfers grote tekens Nummermelding handset Nummermelding antwoordapparaat Toetssignaal Invoersignaal PIN code Horen Belsignalen met max volume Belsignalen met geoptimaliseerde frequentie Handsetvolume maximaal Handsfree volume maximaal Headsetvolume maximaal I...

Страница 256: ...n OK Selecteren en bevestigen _________________________________________ Zien OK Bevestig om het profiel te selecteren of te deselecteren geselecteerd _________________________________________ s Horen OK Selecteren en bevestigen om het profiel te selecteren of deselecteren geselecteerd _________________________________________ s Invoeren OK Selecteren en bevestigen om het profiel te selecteren of d...

Страница 257: ...ation blijven behouden Met a annuleert u het resetten _________________________________________ s NummerWeergave OK Bevestig om de functie uit of in te schakelen aan a Lang indrukken terug naar ruststand i De nummermelding geldt zowel voor inkomende oproepen als voor oproepen in de bellerslijst zie pagina 23 Menu Functietoets indrukken om het menu te openen ________________________________________...

Страница 258: ... herstellen Ja Selecteren en bevestigen a Lang indrukken terug naar ruststand Handsetvolume 1 pagina 27 Volume voor handsfree telefoneren 3 pagina 27 Headsetvolume 3 pagina 27 Volume belsignaal 5 pagina 29 Belmelodie 1 pagina 29 Automatisch aannemen ingeschakeld pagina 26 Batterijtoon toetssignaal bevestigingssignaal ingeschakeld pagina 31 Displaytaal Nederlands pagina 24 Nummerherhalingslijst lee...

Страница 259: ...jk alle batterijen Laat de vloeistof uit het toestel lopen en dep vervolgens alle onderdelen droog Leg de handset zonder batterijen gedurende minstens 72 uur op een droge warme plaats Eenmaal droog kan de handset normaal gesproken weer worden gebruikt Klantenservice Customer Care Wij geven u snel en individueel advies Onze on line support op internet In geval van een noodzakelijke reparatie of aan...

Страница 260: ...serland goedgekeurd De overeenstemming van het toestel met de basiseisen van de R TTE richtlijn is door de CE markering bevestigd Uittreksel uit de oorspronkelijke verklaring We Siemens AG declare that the above mentioned product is manufactured according to our Full Quality Assurance System certified by CETECOM ICT Services GmbH in compliance with ANNEX V of the R TTE Directive 99 05 EC The presu...

Страница 261: ... NiMH Sanyo Twicell 700 Sanyo Twicell 650 Panasonic 700 mAh GP 700 mAh YDT AAA SUPER 700 VARTA PhonePower AAA 700 mAh Gebruiks laadduur van de handset De genoemde gebruiks en laadduur gelden uitsluitend bij gebruik van de aanbevolen batterijen Capaciteit mAh Standby tijd uren Gesprekstijd uren Laadduur uren 700 maximaal 100 maximaal 15 circa 5 ...

Страница 262: ...rden links van de cursor toegevoegd Om van hoofdletters 1e letter groot geschreven alle overige klein geschreven naar kleine letters te gaan drukt u voor invoer van de letter op P Door nogmaals op P te drukken gaat u van kleine letters over op cijfers Door nogmaals te drukken gaat u van cijfers weer over op hoofdletters 1x 2x 3x 4x 5x 6x 7x 8x 9x 10x 11x 12x 13x 14x 1 Spatie 1 â 2 a b c 2 ä á à â ...

Страница 263: ...rvoor geldt de aankoopfactuur Binnen de garantietermijn zal Siemens alle gebreken die het gevolg zijn van materiaal en of productiefouten kosteloos repareren of het defecte toestel vervangen In dit geval kan contact worden opgenomen met de Siemens Klantenservice alwaar de reparatie dient te worden aangemeld Bij de Klantenservice worden een zogenaamd RMA nummer Return Material Authorisation en verz...

Страница 264: ...sluiten en of installeren van de goedgekeurde zaken defecten zijn ontstaan ten gevolge van afwijkende omgevingscondities voor zover dergelijke condities zijn aangegeven defecten zijn ontstaan door overige van buitenaf komende oorzaken de verzegeling voorzover aanwezig is verbroken De garantietermijn wordt niet verlengd of vernieuwd door uitvoering van garantiewerkzaamheden met dien verstande dat d...

Страница 265: ...oals vermeld in de gebruiksaanwijzingen Deze garantie geldt niet voor diensten die zijn uitgevoerd door geautoriseerde dealers of de klant zelf zoals installatie configuratie software downloads Gebruiksaanwijzingen en eventueel op aparte informatiedragers meegeleverde software zijn eveneens van deze garantie uitgesloten Als garantiebewijs geldt de aankoopbon met de aankoopdatum Aanspraken die onde...

Страница 266: ... beogen geen verandering in de bewijslast ten nadele van de klant Neem om gebruik te maken van deze garantie telefonisch contact op met Siemens Het telefoonnummer vindt u in de bijgevoegde gebruikshandleiding Accessoires Headset U kunt via de universele 2 5 mm aansluiting alle gangbare headsets aansluiten Bijvoorbeeld headset M110 van Plantronics Alle accessoires en batterijen zijn verkrijgbaar bi...

Страница 267: ...gclip 11 F Fouttoon 31 G Garantie 40 Gebruiksduur handset 38 Geheugentoetsen 2 20 Gehoorapparaten 5 Gesprek beëindigen 14 H Handmatig 2 15 Handset gebruiks en laadduur 38 in gebruik nemen 7 in standaardinstelling terugzetten 34 in uitschakelen 11 instellen 24 nummerweergave 33 Handsetvolume 27 Handsfree telefoneren in uitschakelen 15 volume 15 27 I Indicatie batterijniveau 8 Intern telefoneren 16 ...

Страница 268: ... Tekenreekstabel 39 Telefoneren extern 14 intern 16 oproep aannemen 14 Telefoonboek item weergeven en wijzigen 18 telefoonnummer opslaan 17 vermelding kopiëren en wijzi gen 18 vermelding wissen 18 Telefoonnummer opslaan telefoonboek 17 uit het telefoonboek overnemen 21 Tijd instellen 25 Toestel in gebruik nemen 7 Toetssignaal 31 Toon batterijtoon 31 bevestiging 31 fouttoon 31 U Uitschakelen handse...

Страница 269: ...9 98 Indonesia 0 21 46 82 60 81 Ireland 18 50 77 72 77 Italy 02 243 64400 Ivory Coast 80 00 03 33 Jordan 0 64 39 86 42 Kenya 2 72 37 17 Kuwait 2 45 41 78 Latvia 7 50 11 14 Lebanon 01 44 30 43 Libya 02 13 50 28 82 Lithuania 8 22 74 20 10 Luxembourg 43 84 33 99 Macedonia 02 13 14 84 Malaysia 03 21 63 11 18 Malta 00 35 32 14 94 06 32 Mauritius 2 11 62 13 Mexico 01 80 07 11 00 03 Morocco 22 66 92 09 N...

Отзывы: