background image

Basic settings

 en

11

12 

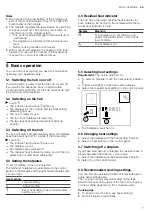
Basic settings

You can configure the appliance to meet your needs.

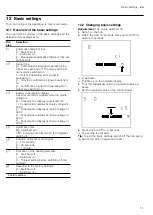
12.1 Overview of the basic settings

You can find an overview of the basic settings and the
default factory settings here.

Dis-
play

Selection

Automatic childproof lock

 – Switched off

1

 – Switched on

 – Manual and automatic childproof lock are

switched off.


Signal tone

 – Confirmation signal and operating error

signal are switched off. The main switch sig-
nal remains switched on.

 – Only the operating error signal is

switched on.

 – Only the confirmation signal is switched

on.

 – Confirmation signal and operating error

signal are switched on.

1

⁠  ⁠

Energy consumption display
Ask your electricity supplier what the mains
voltage is.

 – Consumption display is switched off.

1

 – Consumption display at mains voltage of

230 V.

 – Consumption display at mains voltage of

400 V.

 – Consumption display at mains voltage of

220 V.

 – Consumption display at mains voltage of

240 V.


Automatic timer

 - Switched off.

1

⁠-

 - Cooking time after which the hotplates

switch off.


Duration of the timer end signal

 – 10 seconds.

1

 – 30 seconds.

 – 1 minute.

⁠  ⁠

Activation of the heating elements

 – Switched off

 – Switched on

 – The last setting before switching off the

hotplate.

1

Resetting to the factory settings

 – Switched off.

1

 – Switched on.

1

Factory setting

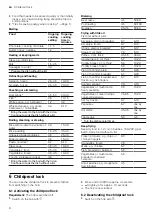
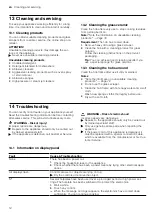
12.2 Changing basic settings

Requirement:

 The hob is switched off.

1.

Switch on the hob.

2.

Within the next 10 seconds press and hold   for
approx. 4 seconds.

a

 appears.

a

 lights up on the hotplate display.

3.

Touch   repeatedly until the required display ap-
pears.

4.

Set the required value on the control panel.

5.

Press and hold   for 4 seconds.

a

The setting is activated.

Tip: 

To exit the basic settings, switch off the hob using

. Switch the hob on again and reset.

Содержание ET8..LCP1

Страница 1: ...Hob ET8 LCP1 en User manual Register your product on My Siemens and discover exclusive services and offers siemens home bsh group com welcome The future moving in Siemens Home Appliances ...

Страница 2: ...Ø cm 2 ET8 LCP1 Ø 21 14 5 Ø 35 14 5 Ø 20 14 5 Ø 23 18 Ø 14 5 ...

Страница 3: ...ended when cooking for short periods In private households and in enclosed spaces in a domestic environment Up to an altitude of max 2000 m above sea level 1 3 Restriction on user group Avoid risks to children and vulnerable per sons This appliance may be used by children aged 8 or over and by people who have reduced physical sensory or mental abilities or inad equate experience and or knowledge p...

Страница 4: ...epairs to the appliance should only be carried out by trained specialist staff An ingress of moisture can cause an electric shock Do not use steam or high pressure clean ers to clean the appliance The insulation on cables of electrical appli ances may melt if it touches hot parts of the appliance Never bring electrical appliance cables into contact with hot parts of the appliance WARNING Risk of i...

Страница 5: ...ose base diameter is the same dia meter as the hotplate Tip Cookware manufacturers often give the upper diameter of the saucepan It is often larger than the base diameter Unsuitable cookware or incompletely covered cook ing zones consume a lot of energy Cover saucepans with suitable lids Cooking without a lid consumes far more energy Lift lids as infrequently as possible When you lift a lid a lot ...

Страница 6: ...he operating condition of the hob the touch fields that can currently be selected light up brightly or dimmed If you touch one of these fields the relevant function is activated Touch fields which cannot currently be selected do not light up The settings of the hotplates currently selected light up brightly Always keep the control panel dry Moisture impairs the function Do not pull pans close to t...

Страница 7: ...two rear heat setting indicators light up brightly 5 3 Switching off the hob The hob will switch off automatically when all hotplates have been switched off for a while 10 60 seconds Touch a The indicator lamp above goes out a The displays go out a All hotplates are switched off a The residual heat indicator remains on until the hot plates have cooled down sufficiently 5 4 Setting the hotplates To...

Страница 8: ... 4 5 60 100 Goulash 2 5 3 5 50 60 Frying with little oil Fry food without a lid Escalope plain or breaded 6 7 6 10 Escalope frozen 6 7 8 12 Chops plain or breaded1 6 7 8 12 Steak 3 cm thick 7 8 8 12 Patties 3 cm thick1 4 5 5 5 30 40 Hamburgers 2 cm thick1 6 7 10 20 Poultry breast 2 cm thick1 5 6 10 20 Poultry breast frozen1 5 6 10 20 Fish or fish fillet plain 5 6 8 20 Fish or fish fillet breaded 6...

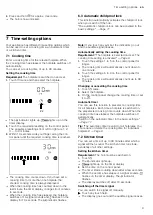
Страница 9: ...ndicators go out and the audible signal ceases Automatically setting the cooking time Requirement The hotplate is selected and set The cooking time setting is activated Page 9 1 Touch the settings 1 to 5 on the control panel for longer a The cooking time will automatically count down to one minute 2 Touch the settings 6 to 9 on the control panel for longer a The cooking time will automatically cou...

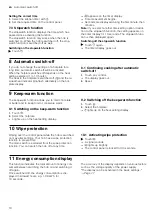
Страница 10: ...t indicator flash alternately on the hot plate display 8 1 Continuing cooking after automatic switch off 1 Touch any control a The display goes out 2 Reset 9 Keep warm function The keep warm function allows you to melt chocolate or butter and to keep food or cookware warm 9 1 Switching on the keep warm function 1 Touch 2 Select the hotplate a lights up on the heat setting display 9 2 Switching off...

Страница 11: ...lay at mains voltage of 230 V Consumption display at mains voltage of 400 V Consumption display at mains voltage of 220 V Consumption display at mains voltage of 240 V Automatic timer Switched off 1 Cooking time after which the hotplates switch off Duration of the timer end signal 10 seconds 1 30 seconds 1 minute Activation of the heating elements Switched off Switched on The last setting before s...

Страница 12: ...1 Clean the hob frame with hot soapy water and a soft cloth Wash new sponge cloths thoroughly before use 2 Dry with a soft cloth 14 Troubleshooting You can rectify minor faults on your appliance yourself Read the troubleshooting information before contacting after sales service This will avoid unnecessary costs WARNING Risk of injury Improper repairs are dangerous Repairs to the appliance should o...

Страница 13: ...d appliances cor rectly 15 1 Disposing of old appliance Valuable raw materials can be reused by recycling 1 Unplug the appliance from the mains 2 Cut through the power cord 3 Dispose of the appliance in an environmentally friendly manner Information about current disposal methods are available from your specialist dealer or local author ity This appliance is labelled in accord ance with European D...

Страница 14: ...uction number FD of your appliance The contact details for Customer Service can be found in the enclosed Customer Service directory or on our website 16 1 Product number E Nr and production number FD You can find the product number E Nr and the pro duction number FD on the appliance s rating plate The rating plate is located on the appliance certificate Make a note of your appliance s details and ...

Страница 15: ......

Страница 16: ...9001564949 9001564949 000831 en BSH Hausgeräte GmbH Carl Wery Straße 34 81739 München GERMANY www siemens home bsh group com Manufactured by BSH Hausgeräte GmbH under the trademark licence of Siemens AG ...

Отзывы: