background image

7

Operation

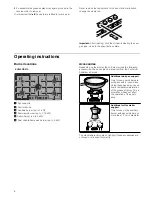
There are indications to show which burner each control knob 

operates.

It is essential to ensure that all the burner parts and pan 

supports are correctly installed for the appliance to work 

correctly. Do not swap the burner caps around.

Switching on automatically

If your hob can be switched on automatically (ignition 

sparkers):

1.

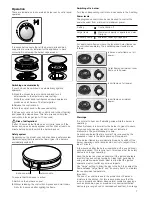
Press the chosen burner control knob and turn it 

anticlockwise to the maximum power setting.
While the control knob is still pressed down, sparks are 

produced on all burners. The flame ignites.

2.

Release the control knob.

3.

Turn the control knob to the required setting.

If it does not come on, turn the control knob to the off setting 

and repeat the steps above. This time, press and hold the 

control knob for longer (up to 10 seconds).

Risk of deflagration!

If after 15 seconds the flame does not ignite, switch off the 
burner and open a nearby window or door. Wait at least one 
minute before trying to switch the burner back on.

Safety system

Depending on the model, your hob may have a safety system 

(thermocouple) that prevents the flow of gas if the burners 

accidentally switch off.

To ensure that this device is active:

1.

Switch on the burner as usual.

2.

Without releasing the control knob, press and hold it down 

firmly for 4 seconds after lighting the flame.

Switching off a burner

Turn the corresponding control knob clockwise to the 0 setting.

Power levels

The progressive control knobs can be used to control the 

power needed, from minimum to maximum power.

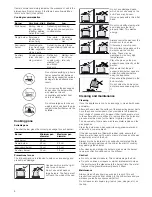
For dual double-flame burners, the inner and outer flames can 

be controlled separately. The available power levels are as 

follows:

Warnings

It is normal to hear a soft whistling noise while the burner is 

operating.
When first used, it is normal for the burner to give off odours. 

This does not pose any risk and does not indicate a 

malfunction. They will disappear in time.
An orange-coloured flame is normal. This is caused by the 

presence of dust in the atmosphere, spilt liquids, etc.
If the burner flames are accidentally blown out, switch off the 

burner operating control knob and do not try to relight it for at 

least 1 minute.
A few seconds after the burner is switched off, a sound (thud) 

will be produced. This is not a fault - this means that the safety 

device is no longer operating.
Keep the burner as clean as possible. If the ignition sparkers 

are dirty they will not light properly. Clean them periodically 

using a small non-wire brush. Bear in mind that the ignition 

sparkers must not suffer any serious impacts.
Use “Large” setting to bring the pan to the boil, then adjust the 

flame between “Large flame” and “Economy flame” to maintain 

the required pan temperature.
Important: 

The use of a cooktop leads to the production of heat and 

moisture in the kitchen. For this reason make sure that the 

room is properly ventilated. Keep natural ventilation openings, 

such as windows, open or provide a mechanical ventilation 

device (e.g. a range hood or overhead exhaust fan). An orangy 

LJQLWLRQVSDUNHU

WKHUPRFRXSOH

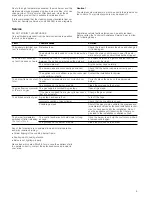
Setting

Ú

Control knob off

Large flame

Maximum capacity or aperture and elec-

tricity on

Economy flame

š

Minimum capacity or aperture

Inner and outer flame on full 

power.

Outer flame on minimum, inner 

flame on full power.

Inner flame on full power.

Inner flame on minimum 

power.

Содержание EC945RB91A

Страница 1: ...86 5 16758 7 216 167 7 21 16758 7 216 0 17 1 1 16758 7 216 7KLV FRRNWRS LV IRU XVH ZLWK 1DWXUDO DV DQG 8QLYHUVDO 3 HDYH WKHVH LQVWUXFWLRQV ZLWK WKH RZQHU 5 GMK10047 ...

Страница 2: ...minimum clearance of 650 mm 24 The gas pressure regulator supplied with the appliance must be installed in line with the gas pipe N G only For pressure testing in excess of 3 5 kPa 1 2 psig the appliance and its individual shutoff valve must be disconnected from the gas supply piping system Important When using a very large pot leave a gap of at least 50 mm 2 to avoid damaging any parts in bench t...

Страница 3: ...al conditions imposed by local suppliers utilities The specifications of this cooktop are stated on the data label located on the bottom of the cooktop base A duplicate data label is supplied for adhesion to an accessible location near the hotplate if the data label on the base of the hotplate cannot be accessed when the hotplate is installed Clearances A range hood fitted above the top must be in...

Страница 4: ...iance is connected to the mains 240 VAC by means of the connecting lead which must be fixed to the kitchen unit to prevent it from coming into contact with hot parts of the cooktop or an oven installed underneath and remain accessible after installation of the cooktop When making this connection make sure that the lead cannot come into contact with hot parts of the cooktop This appliance must be e...

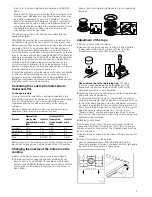
Страница 5: ...low for sizes Before conversion the cooktop must be disconnected from the electricity and gas valves must be turned to the OFF position Changing the nozzles of the burners on the cooktop 1 Remove the pan supports burner covers and diffusers 2 Change the nozzles using the spanner provided by our Service Centre code 340847 for double and triple flame burners code 340808 taking special care to ensure...

Страница 6: ...W Rapid burner up to 3 kW Dual double flame wok burner up to 5 kW Accessories Depending on the model the hob may include the following accessories These can also be acquired from the Technical Assistance Service The manufacturer accepts no liability if these accessories are not used or are used incorrectly 5 2 1 Additional wok pan support Only for use on wok burners with pans with a round base Usi...

Страница 7: ...er and outer flames can be controlled separately The available power levels are as follows Warnings It is normal to hear a soft whistling noise while the burner is operating When first used it is normal for the burner to give off odours This does not pose any risk and does not indicate a malfunction They will disappear in time An orange coloured flame is normal This is caused by the presence of du...

Страница 8: ... leave acidic liquids e g lemon juice vinegar etc on the hob Burner Very high High Medium Low Wok burner Boiling steam ing griddling toasting paellas Asian food wok Reheating and keeping things hot cooked and pre cooked dishes Rapid burner Escalopes steaks ome lettes frying Rice white sauce ragout Steaming fish vegeta bles Semi rapid burner Steamed pota toes fresh vege tables vegetable stews pasta...

Страница 9: ... or circuit breaker has tripped The automatic switching on function does not work There may be food or cleaning products stuck between the ignition sparkers and the burners The space between the ignition sparker and the burner must be clean The burners are wet Dry the burner caps carefully The burner caps are not correctly positioned Check that the burner caps are correctly posi tioned The applian...

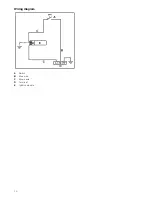
Страница 10: ...10 Wiring diagram A Switch B Blue wire C Brown wire D Terminal E Ignition module ...

Страница 11: ...BSH Hausgeräte GmbH Carl Wery Straße 34 81739 München GERMANY 9000803399 9000803399 E Manufactured by BSH Hausgeräte GmbH under Trademark License of Siemens AG ...

Отзывы: