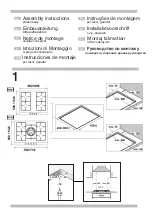
Figure 2a
Figure 2b
Figure 2c
A- Minimum 6” (152 mm)
B- Minimum 6” (152 mm)
C- Minimum 30” (762 mm)
D- Minimum 2” (51 mm)
F- Minimum 18” (458 mm)
19
1
/
4
”
min. 6”
min. 2
/16
”
”
Requirements for the cabinet
A
D
E
C
B
F
Figure 1a
Appliance installation
IMPORTANT INFORMATION
Figure 1b
1
/
”
1
3
/
4
”
1
1
/
16
”
19
1
/
4
”
1
/
”
1
”
Maximum depth of cabinets installed above
cooktop: 13" (330 mm.)
E- Minimum 30” (762 mm)
9
22
16
min. 10
22
16
The seal ensures that the entire work
seepage.
If this item has not been fitted in the factory,
remove the pan supports and the gas burner
covers and diffusers from your cooking hob,
adhesive
appliance
hob,
Depending on the model, the clips and the
may already be fitted; if this is the case, do not
remove them under any circumstance.
and turn it upside down.Now fit the
surface
will be watertight, and prevents water
seal
supplied with the
onto the lower edge
of the cooking
Fig. 2a,remove the clips from
the attached accessories bag and screw them
into the lower points designed for this purpose,
Fig. 2 b.
3 -
watertight seal (lower edge of the cooktop)
Place the cooktop in the middle of the
opening where it is to be inserted into the kitchen
unit.
Once the hob is fitted you should turn the clip
and tighten the screw as shown in Fig. 2b. For
disassembly, unscrew the clip and proceed in the
reverse manner.
If the oven is not installed under the cooktop,
place a separator of non-flammable material to
prevent access to the lower part of the cooktop.
To install the cooktop over an oven, check the
dimensions given in the installation manual.
17
Содержание Cooktop
Страница 2: ......


