background image

13

/20

Assembly instructions

Electro-mechanical systems

A-opener 2.2

13

/20

09.2019

H39.ELEKS011EN-00

Functional test

In order to check the functionality, the door and the door frame 

must be positioned vertically.

If stiffness is determined during the functionality test, observe 

the following points:

• 

Check the tightening torque of the fixing screws on the handle 

set and/or the profile cylinder lock.

• 

Screws must not be screwed in too tightly or over tightened. 

• 

Screws should also not be screwed in at an angle. This is to 

avoid the screw head blocking the drive rod behind it.

6.1 

Functional test when the door is open

6.1.1 

Checking the functioning of the lever handle:


f

Press the lever handle down fully.

The lever handle must return to its original position by 

itself.

6.1.2 

Checking the functioning of the profile cylin

-

der


f

Turn the key in the cylinder lock in the locking direc

-

tion.

It must be possible to disengage the main deadbolt 

fully and easily.


f

Remove the key when the main deadbolt is dis

-

engaged (child-proof lock active, lever handle 

blocked).


f

Turn the key in the cylinder lock in the unlocking 

direction.

All locking elements must extend completely and 

smoothly.


f

Remove the key while the locking elements are 

retracted.

6.1.3 

Mechanical test of the multi-point lock with 

A-opener 2.2

Check the functioning of the locking elements with 

the lever handle


f

Turn the key in the locking direction until the main 

deadbolt extends.

The lever handle is blocked, the child-proof lock is 

active.


f

Turn the key in the unlocking direction until the 

main deadbolt retracts.


f

Push down the lever handle completely, the latch 

must be able to retract with ease.

The latch must extend completely again after the lever 

handle is released.


f

For the automatic multi-point locking system, the 

locking elements of the top and bottom auxiliary 

box must trigger mechanically.


f

Push down the lever handle completely, all locking 

elements must retract completely.

The latch must extend completely again after the lever 

handle is released.

Check the functioning of the locking elements with 

the key


f

Turn the key in the locking direction until the main 

deadbolt extends.


f

Turn the key in the unlocking direction.

All locking elements must retract.


f

The latch must extend completely again after the 

key is released.

6.2 

Functional test when the door is closed


f

Close the door.


f

Repeat the test step "Functional test when the door 

is open".


f

All locking elements must extend and retract freely 

in the frame parts.

6.3 

Electromechanical test


f

Switch on the supply voltage.


f

Close the door.


f

Check the external unlocking (e.g. button or inter

-

com system).


f

Check the function of the optional access control 

system.

If an optional access control system (e.g. a fingerprint 

scanner) is to be installed in combination with an au

-

tomatic multi-point locking system with A-opener 2.2, 

refer to the relevant instructions for information about 

commissioning and testing.

Содержание KFV A-Opener 2.2

Страница 1: ...ASSEMBLY INSTRUCTIONS KFV A opener 2 2 Electro mechanical systems Comfort systems Door systems Window systems...

Страница 2: ......

Страница 3: ...Connections and operating elements 7 4 2 Cable and wiring diagram 8 5 INSTALLATION 10 5 1 Installing the A opener 10 5 2 Milling the door leaf 10 5 3 Routing and connecting cables 11 5 3 1 Via the SI...

Страница 4: ...ks with a rigid catch in which the catch is locked in a key withdrawal position inside the range of 30 to 30 with cylinder locks with a non restrictive catch in which the catch can always be freely tu...

Страница 5: ...n designates warning notices that warn of personal injury The type and source of the hazard defines the cause of the hazard The potential consequences of non obser vation of warning notices are e g da...

Страница 6: ...onditions must be observed before and during installation Observe the specified positions and sizes for all milling and drilling dimensions within the defined tolerances Install the A opener 2 2 in ac...

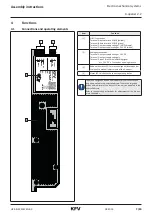
Страница 7: ...e 24 V DC white 2 Analogue connection Terminal 2 output supply voltage 24 V DC Terminal 3 output supply voltage Terminal 4 input for external unlocking signal at 24 V DC 1 seconds opening process 3 Bu...

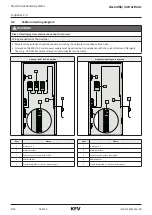
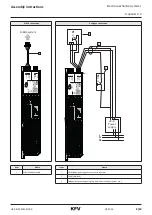
Страница 8: ...e 230 V AC mains power supply must be carried out in compliance with the current German VDE regula tions e g VDE 0100 and any relevant country specific requirements A opener via SI BUS connection A op...

Страница 9: ...2 2 SN R1 R2 R3 24V DC GND 24V DC GND Input B C D 2 3 4 SI BUS system 1 1s 1s V L N PE V A SI Bus Siemensstr 10 D 42551 Velbert A OPENER 2 2 SN R1 R2 R3 24V DC GND 24V DC GND Input B C D 2 3 4 1 2 3...

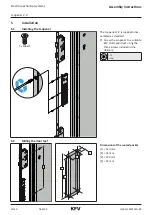
Страница 10: ...1 Installing the A opener 3 x M4x11 The A opener 2 2 is supplied unas sembled as standard f f Screw the A opener to a suitable KFV multi point lock using the three screws included in the delivery T 1...

Страница 11: ...urr all holes for the cable routing Do not route cables over sharp edges File or line any sharp edges Route cables without kinking A SI Bus Siemensstr 10 D 42551 Velbert A OPENER 2 2 SN R1 R2 R3 24V D...

Страница 12: ...l unlocking signal 7 Violet Pink Red White 2 24VDC Operating voltage 24 V DC Blue Brown 3 GND Operating voltage White Blue 4 1 2 4 f f Establish a plug connection with the cable type F or E 1 and the...

Страница 13: ...he key in the locking direction until the main deadbolt extends The lever handle is blocked the child proof lock is active f f Turn the key in the unlocking direction until the main deadbolt retracts...

Страница 14: ...rrectly seated If the lever handle does not return to its original posi tion by itself the multi point lock must be checked by KFV 6 4 2 Functional disorder of the profile cylinder f f If you cannot r...

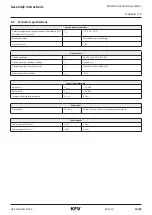
Страница 15: ...P 40 Electrical data Operating voltage UB 24 V DC 19 V DC to 32 V DC Operating current standby standby IST Type 30 mA Operating current for motor control IB Type 500 mA max 1000 mA Reverse polarity pr...

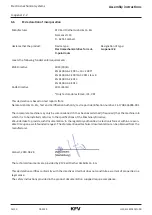
Страница 16: ...t and Certification Authority test report identification number FS 1708 336996 001 The incomplete machine may only be commissioned if it has been ascertained if required that the machine into which it...

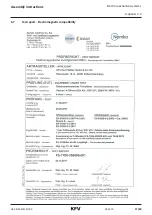
Страница 17: ...17 20 Assembly instructions Electro mechanical systems A opener 2 2 17 20 09 2019 H39 ELEKS011EN 00 6 7 Test report Electromagnetic compatibility...

Страница 18: ...Electro mechanical systems Assembly instructions A opener 2 2 09 2019 18 20 H39 ELEKS011EN 00...

Страница 19: ......

Страница 20: ...www siegenia com H39 ELEKS011EN 00...

Отзывы: