background image

WLL180T Photoelectric sensors for fiber-optic cables

  2 0 1 0 - 0 8 - 0 2  

S I C K    

7


S u b j e c t   t o   c h a n g e   w i t h o u t   n o t i c e

Exact adjustment of the switching threshold to object and ambient 
conditions, in any order.
1st step: Teach-in with object

2. Operating 

mode 

Teach-in active

3.  In the basic menu, select 

 required mode by pressing 
the arrow keys

4.    2-point Teach-in is shown on 

the display

9.     Teach-in  successful,  set  switch-

ing threshold blinks 3x and the 
display returns to the main dis-
play

Teach-in

+

6.  Press Teach-in key

5.   1st point: adjust diffuse type 

fiber with object present

8.  Press Teach-in key

7.   2nd point: adjust diffuse type 

fiber to the background with-
out object

2nd step: Teach-in without object

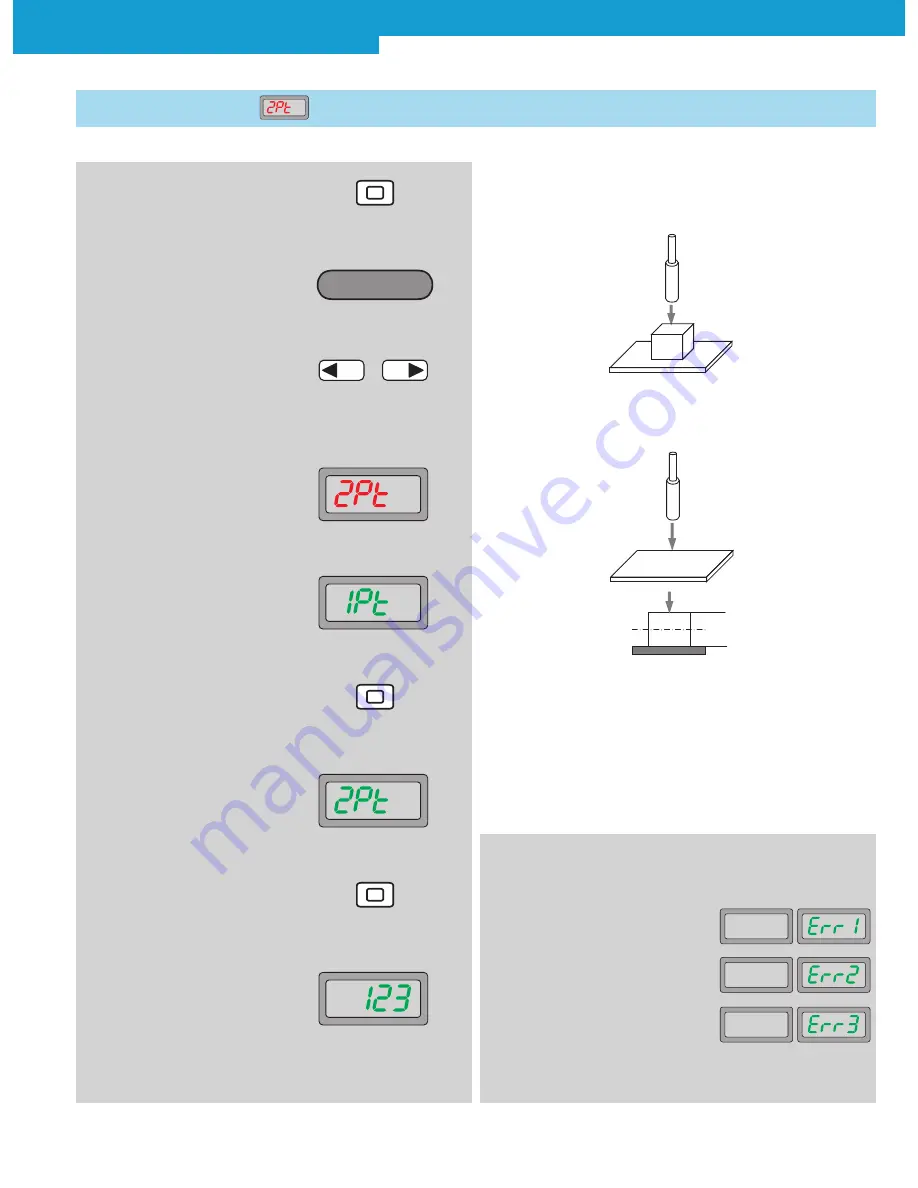
The switching threshold is defined between the 1st and 2nd point.

1.2 2-point 

Teach-in

Typical applications:

Exact switching point, 
switching threshold is adapted to the object and ambient 
conditions, create low system reserves.

1.  Press Teach-in key for 2 s 

In case of faulty input during Teach-in, 
the following messages are shown:

Sensing level is too low

Sensing level is saturated

Difference of sensing level between
two points is too small

Switching threshold

1.

2.

Содержание WLL180T

Страница 1: ...WLL180T Sensor Configuration for Individual Applications M A N U A L ...

Страница 2: ...in This so called window technology learns the object within a definable bandwidth of the switching threshold Ideal for the detection of marks or simultaneous foreground and background suppression Teach in of transparent objects Teach in with minimum sensitivity reli ably detecting glass films or small objects Universal or individual application solutions Fast and reliable programming menu driven ...

Страница 3: ...u detailed settings 2 5 Reset End back to operating mode 3 1 Set display value to zero 3 2 Display settings 3 3 Energy saving mode 3 4 Reverse display 3 5 Hysteresis setting 3 6 External input configuration 3 7 Copy mode 3 8 Master Teach in 3 9 ASC setting 3 10 Power setting of the sender LED 3 11 Keylock End back to Expert menu P 6 P 7 P 8 P 9 P 10 P 11 P 12 P 13 P 14 P 15 P 16 P 17 P 18 P 19 P 2...

Страница 4: ...specially suited to detecting very small objects objects in front of reflective backgrounds and transparent and moving objects Fiber optic cables are ideal for use in installations where space is restricted Locking fiber optic cable Status LED for switching output Numeric display for nominal value green and actual value red Mode Enter key Teach in key Arrow keys 2 SICK 201 0 0 8 0 2 S ub jec t to ...

Страница 5: ...ction of fast processes is an easy task for the worlds fastest photoelectric fiber optic sensor With a response time of only 16 μs objects can be detected precisely A small jitter contributes to the accuracy of the detection Smallest changes in the level of the received light are already sufficient for a reliable detection HIGH RESOLUTION SIGNAL PROCESSING The power of the sender LED can be adjust...

Страница 6: ...lay Manual adjustment of the switching threshold Manual step by step modification of the switching thresholds by operating the arrow keys After a few seconds the display automatically jumps to the operating mode 1 Locking fiber optic cable 2 Display LED orange lights when the switching output is active 3 Display numeric 4 digit green switching threshold operating mode red current reception value T...

Страница 7: ...uration Level I Level II Adjustment options Switching mode 2 1 Page 11 Response time 2 2 Page 12 Time delay setting 2 3 Page 13 Expert menu detailed settings Set display value to zero 3 1 Page 16 Display settings 3 2 Page 17 Energy saving mode 3 3 Page 18 Reverse display 3 4 Page 19 Hysteresis setting 3 5 Page 20 External input configuration 3 6 Page 21 Bus versions Copy mode 3 7 Page 22 Master Te...

Страница 8: ...nt Teach in is shown on the display 5 Adjust diffuse type fiber to the background without object and press Teach in key 6 Teach in successful set switch ing threshold blinks 3x and the display returns to the main dis play Teach in Adjusts the switching threshold with 10 according to the light received Typical applications Standard applications no spurious effects expected max system reserve Thresh...

Страница 9: ...Teach in 6 Press Teach in key 5 1st point adjust diffuse type fiber with object present 8 Press Teach in key 7 2nd point adjust diffuse type fiber to the background with out object 2nd step Teach in without object The switching threshold is defined between the 1st and 2nd point 1 2 2 point Teach in Typical applications Exact switching point switching threshold is adapted to the object and ambient ...

Страница 10: ...Teach in 6 Start 7 To stop press Teach in key 8 Stop 2nd step stop Teach in procedure Allow one object or even better for several objects to pass 1 3 Auto Teach in 9 Teach in successful set switch ing threshold blinks 3x and the display returns to the main dis play Typical applications When objects can only be learned during the ongoing process e g ejection control 1 Press Teach in key for 2 s In ...

Страница 11: ...ess Teach in key for 2 s Optionally the switching thresholds for close and far ranges can be readjusted via the arrow keys 9 Press arrow key in main display 10 Range FAr or nEAr can be selected with arrow keys 11 Select far FAr or near nEAr range by pressing the mode key 12 The value of the received light red display then appears and the threshold value green display flashes for about 5 seconds Du...

Страница 12: ...switching threshold to 90 of the light received Through beam system Perform Teach in without object Adjusts the switching threshold to 90 of the light received 1 5 Teach in of transparent objects Typical applications Detection of objects with low attenuation such as glass clear film or very small objects 1 Press Teach in key for 2 s 6 Teach in successful set switch ing threshold blinks 3x and the ...

Страница 13: ...guring active 4 Switching mode is shown on the display Configuring 1 Press Mode key for 2 s 6 Select between light switch ing L on and dark switching d on by pressing the arrow keys 2 1 Switching mode 7 Finish selection with Mode key 5 Press Mode key setting option flashes 8 Select ending the adjustment End 9 Finish selection with Mode key 3 In the basic menu select required mode by pressing the a...

Страница 14: ...me 2 Operating mode Configuring active 3 In the basic menu select required mode by pressing the arrow keys 4 In the basic menu select required mode by pressing the arrow keys 5 Response time is shown on the display 6 Select between high preci sion setting LonG stand ard setting Stnd fastest set ting FASt high speed setting HiGh and super long setting SuPr by pressing the arrow keys 7 Finish select...

Страница 15: ...no time delay activated factory setting oFdY OFF delay release delay ondY ON delay on delay SHot One Shot output active for set time window regardless if object is present onoF ON and OFF delay on and release delay onSh ON delay One Shot set time window One Shot is active after response time ON delay Time delay selectable from 0 1 9999 0 1 ms 9999 ms Typical application Ignoring small variations o...

Страница 16: ...enu detailed settings 2 Operating mode Configuring active 3 In the basic menu select required mode by pressing the arrow keys 4 Detail adjustment is shown on the display 5 Press Mode key Description of Expert menu from page 16 6 Select ending the adjustment End 7 Finish selection with Mode key 1 Press Mode key for 2 s Configuring ...

Страница 17: ... Energy saving mode Off Reverse Display Off Hysteresis setting Standard 5 Input setting Teach in input ASC setting Off Power of the sender LED Standard highest power Keylock Level 1 2 Operating mode Configuring active 4 In the basic menu select required mode by pressing the arrow keys 5 Reset is shown on the display 6 Press Mode key 7 Select between no and YES by pressing the arrow keys 8 Finish s...

Страница 18: ... menu select Expert mode by pressing the arrow keys 4 Expert mode is shown on the display Configuring 9 Select between on and oFF by pressing the arrow keys 3 1 Set display value to zero 5 Press Mode key 10 Finish selection with Mode key 8 Press Mode key 6 In Expert mode select Set to zero by pressing the arrow keys 7 Set to zero is shown on the display 11 Close Expert mode with arrow key 12 Finis...

Страница 19: ...elect display settings by pressing the arrow keys 6 Press Mode key 8 Display settings are shown 10 Select between numeric display diG bar display bAr and percentage display Pct using arrow keys 11 Finish selection with Mode key 12 Close Expert mode with arrow key 9 Press Mode key 3 Press Mode key diG Numeric display factory setting bAr bar display Pct Percentage display 13 Finish selection with Mo...

Страница 20: ...y key will activate the display 14 Finish selection with Mode key 13 Select ending the adjustment End 11 Close Expert mode with arrow key 12 Finish selection with Mode key 2 Operating mode Configuring active 6 In Expert mode select required mode by pressing the arrow keys 7 Eco is shown on the display 8 Press Mode key 9 Select between oFF and on by pressing the arrow keys 10 Finish selection with ...

Страница 21: ...ct ending the adjustment End 11 Close Expert mode with arrow key 12 Finish selection with Mode key 2 Operating mode Configuring active 6 In Expert mode select required mode by pressing the arrow keys 7 Turn is shown on the display 8 Press Mode key 9 Select between oFF and on by pressing the arrow keys 10 Finish selection with Mode key 5 Press Mode key 1 Press Mode key for 2 s 3 In the basic menu s...

Страница 22: ...lect Hysteresis by pressing the arrow keys 8 Hysteresis setting is shown on the display 11 Finish selection with Mode key Setting of hysteresis in percent of the switching threshold nominal value Value range 1 40 10 Hysteresis setting by pressing the arrow keys 3 5 Hysteresis setting 9 Press Mode key 3 Press Mode key 1 Press Mode key for 2 s 12 Close Expert mode with arrow key 13 Finish selection ...

Страница 23: ...s synchronized on an external input signal Atch Teach in for all amplifiers in bus mode according to the set teach mode 10 Select with arrow keys external teach in rtch test input tESt synchronization SYnc or bus teach in Atch 3 6 External input configuration 9 Press Mode key 3 Press Mode key 1 Press Mode key for 2 s 11 Finish selection with Mode key 12 Close Expert mode with arrow key 13 Finish s...

Страница 24: ... No copy function YES Copy function all settings of the base unit are copied to the connected expansion units During the copy operation the green display shows the number of the actually copied extension unit Note In locked expansion units LocL no data of the base unit is copied The copy function is not available when response time HiGh is selected 9 Select between no and YES by pressing the arrow...

Страница 25: ... is shown on the display 9 Select between no and YES by pressing the arrow keys 3 8 Master Teach in Bus operation only Teaching of all connected extension units only available in bus mode no Does not perform teach in YES Performs teach in for all connected extension units see page 6 according to the set teach in mode Note Locked LocL extension units are not taught 3 Press Mode key 1 Press Mode key...

Страница 26: ...elect ASC setting by pressing the arrow keys 8 ASC setting is shown on the display on automatically adapting switching threshold to environment oFF switch off ASC factory setting 10 Select between on and oFF by pressing the arrow keys 3 9 ASC setting 9 Press Mode key 3 Press Mode key 1 Press Mode key for 2 s 12 Close Expert mode with arrow key 13 Finish selection with Mode key 14 Select ending the...

Страница 27: ...h low strength The power of the sender LED can be set in three stages satura tion e g for highly reflective objects is prevented and the life of the sender LED is extended 10 Select between standard setting medium strength setting and low strength setting by pressing the arrow keys 3 10 Power setting of the sender LED 9 Press Mode key 3 Press Mode key Typical applications highly reflective objects...

Страница 28: ...uring active 3 In the basic menu select Expert mode by pressing the arrow keys 4 Expert mode is shown on the display Configuring 9 Select between Level 1 L 1 and Level 2 L 2 by pressing the arrow keys 5 Press Mode key 10 Finish selection with Mode key 8 Press Mode key 6 In Expert mode select Lock Level by pressing the arrow keys 7 LocL is shown on the display 11 Close Expert mode with arrow key 12...

Страница 29: ...WLL180T Photoelectric sensors for fiber optic cables 2010 08 02 S I C K 2 7 Subject to change without notice Notes ...

Страница 30: ... 1341 E Mail support sick jp Nederlands Phone 31 0 30 229 25 44 E Mail info sick nl Norge Phone 47 67 81 50 00 E Mail austefjord sick no Österreich Phone 43 0 22 36 62 28 8 0 E Mail office sick at Polska Phone 48 22 837 40 50 E Mail info sick pl Republic of Korea Phone 82 2 786 6321 4 E Mail info sickkorea net Republika Slovenija Phone 386 0 1 47 69 990 E Mail office sick si România Phone 40 356 1...

Отзывы: