EN
Dear Client,
thank you for choosing VOYAGER HP 7-8-9-10, a new generation of
stream pumps, extremely reliable though requiring minimum maintenance.
With their attractive design, VOYAGER HP pumps guarantee high
performances, a powerful water flow that can be adjusted using the included diffuser,
and a rotor made of materials extremely resistant to wear.
VOYAGER HP pumps can be rotated 360° and turned both upwards and downwards.
The special magnetic support guarantees perfect stability, even on thickness (up to 20
mm) and dirty glass, making VOYAGER HP the ideal product for water recirculation in
marine and fresh water aquariums.
Thanks to an electronic sensor, in case of abnormal conditions or if the rotor
accidentally blocks, the pump automatically turns the pump off, avoiding the
pump to overheat.
To turn the pump on again, just unplug and than plug the device to
the power socket. In order to fully appreciate VOYAGER HP uniqueness and qualities,
please read and carefully follow the instructions hereunder.
GENERAL SAFETY INSTRUCTIONS:
VOYAGER HP range are made in conformity with the national and international
security laws.
1) Always isolate the pump from the mains electricity before installing or carrying out
any maintenance. Power to the pump must be supplied through a Residual Current
Device (RCD) with a rated residual operating current not exceeding 30mA.
2) This pump is designed to be used indoors and is not suitable for any outdoor
applications.
3) Before connecting the pump to the electricity supply, check there are any damages
on cord or plug.
4) The pump has a type Z cable link. The cable and the plug cannot be substituted or
repaired; in case of damages replace the entire pump.
5)
ATTENTION:
do not operate any appliance if it has a damaged cord or plug, if it is
malfunctioning, or if it has been dropped or damaged in any way.
6) Never operate the pump without water inside the impeller chamber or with liquids at
a temperature higher than 35° C / 95° F.
7) Do not use the pump with corrosive and abrasive liquids.
8) Do not use the pump for uses different (i.e. in bathroom or other applications) to
those for which it has been designed.
9) The pump cannot be used by people with handicaps or by children if they are not
supervised by a person responsible for their safety.
10) Avoid closeness with blades, sharp objects or other magnets to prevent accidental injuries
as the magnets of the support attract metal objects and other magnets with high force.
11) The magnets can provoke permanent damages to electronic devices and to other
objects that are sensitive to magnetic field such as pacemakers, credit cards and keys:
always keep them at least 30 cm (12 inches) distance.
12) The magnets could loose partially or completely their attracting power if exposed
to temperature higher than 50° C / 122° F.
13) Always leave a drip-loop in the pump cable to prevent water running down the
cable and reaching the power source
(Pic. A)
.
14) Avoid taking the pump by the cord during the installation or maintenance.
15) Do not try to attach directly the two magnets holder because the magnetic
attraction is very high. Hold them only on the external sides paying attention not to put
your hands or fingers in between.
16) When using the flow diffuser, always make sure it is correctly inserted in the front
cover. If not, it could hit the rotor and break it .
17) In case you want to control the pump with an electronic controller , we advise you
to use cycle regulators. In time, the continuous use of simple on-off switches with very
brief cycling times could harm the rotor.
PUMP INSTALLATION: USE AND REGULATION
To install VOYAGER HP, proceed as described below:
ATTENTION: before using the product, make sure that all parts are undamaged.
1) To connect the magnetic support to the pump, insert the pump into the staple
overlapping the holes
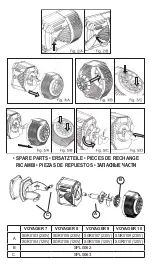
(Pic. 2/A)
. Insert the handles in the staple in the holes
(Pic.
2/B)
, screwing them in so to keep the pump in place.
2) To increase water flow, use the diffuser that comes with the pump
(Pic. B)
. To insert
the diffuser, before placing the pump in the tank, take off the front cover
(Pic. 3/A)
and
place the diffuser inside, where the grill is. Make sure that the joints are well inserted
(Pic. 3/B - 3/C)
, so that, once reassembled the front cover, the diffuser does not touch


