Shuttle HOT-137 Скачать руководство пользователя страница 23

23

IGA1680 PCI VGA

Installing AutoCAD Drivers

Driver File:

RCP_IGS.EXP          To install the driver:

Step 1.

Insert the "IGA1680 Utilities & Drivers Diskette" in drive A:

Step 2.

Go to drive A:

Step 3.

Type 

A:\SETUPDOS

 <Enter>

Step 4.

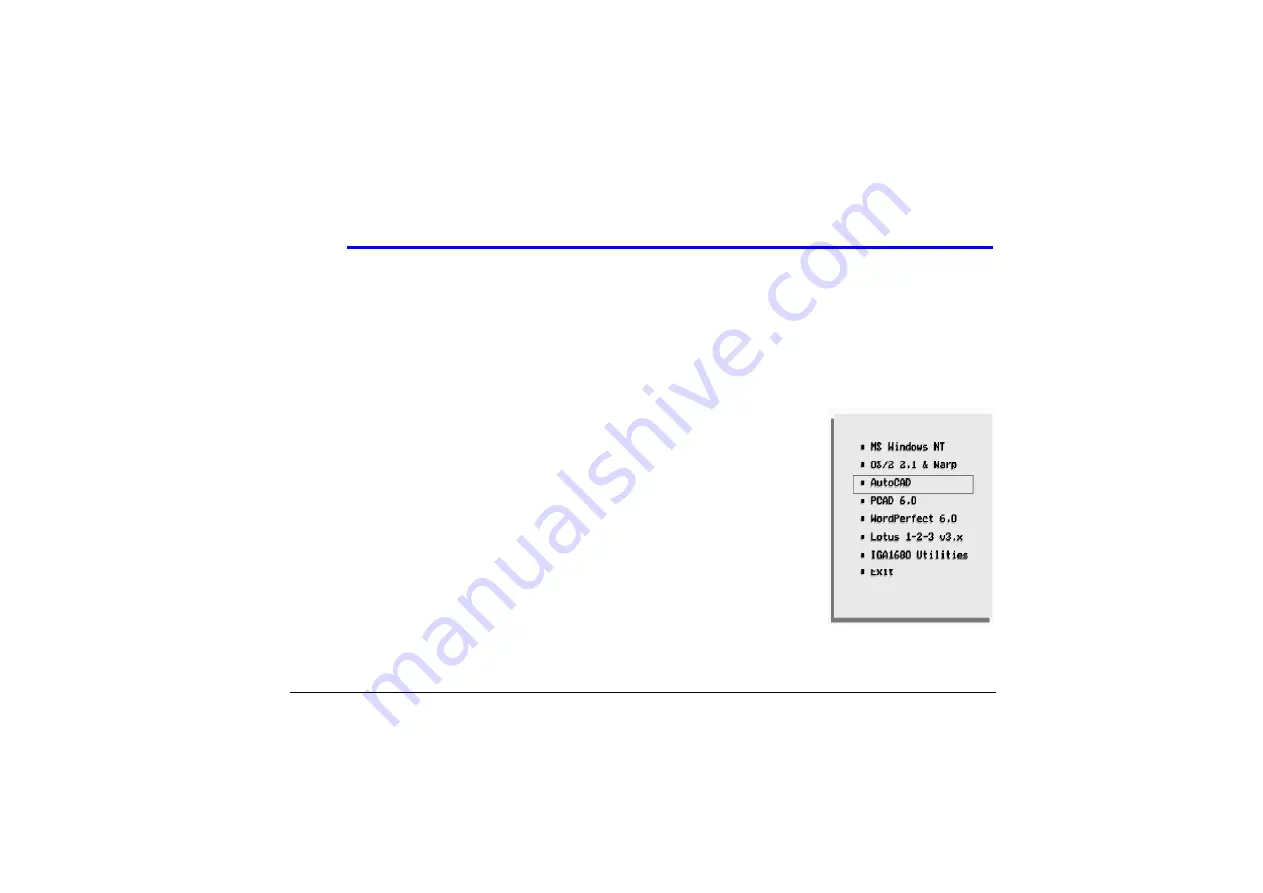
The IGS installation menu will be displayed on screen
Select "AutoCAD", and double click.

Step 5.

After you've done with step 4.  The installation program will ask
you if all the utilities will be O. K. to install in C:\ACAD direc-
tory.  To continue by pressing <Enter> key.

Step 6.

Copy RCP_IGS.EXP to main AutoCAD directory.

Note:

For AutoCAD R13, the directory is C:\ACADR13\DOS\DRV.
For AutoCAD R12, the directory is C:\ACADR12\DRV.

Step 7.

Run AutoCAD.

Step 8.

Issue AutoCAD’s CONFIG command, then change display driver and  select a desired IGA1680
driver from the list of drivers.

Содержание HOT-137

Страница 1: ...1 IGA1680 PCI VGA HOT 137 HOT 139 IGA1680 PCI Bus VGA Card User s Manual...

Страница 2: ...ich may appear in this document nor does it make a commitment to update the information contained herein TRADEMARKS IGS is a registered trademark of InteGraphic System Inc PC AT is a registered tradem...

Страница 3: ...Card Layout 10 Chapter 2 Hardware Installation Hardware Installation 11 Installing the Hardware 12 Hardware Troubleshooting 14 Chapter 3 Software Installation Software Installation 15 Software Driver...

Страница 4: ...D Drivers 26 Installing WordPerfect 6 0 Drivers 28 Installing IGA 1680 Utilities 30 Chapter 4 Windows Drivers Setup Windows Drivers Setup 31 IGA Windows Drivers Setup 31 Normal Setup 32 Configure Virt...

Страница 5: ...at resolutions up to 1600 x 1280 and screen refresh rates up to 75Hz The HOT 137 HOT 139 are true 64 bit PCI accelerators It incorporates IGS s IGA1680 graphics and multimedia single chip to perform h...

Страница 6: ...up to 75Hz Provide Flicker Free environment for health eyes High resolution modes include 1024 x 768 x 64K colors in 75Hz and 1600 x 1200 x 256 colors in 60Hz 100 VGA compatible in both hardware and s...

Страница 7: ...include drivers and utilities This user s manual What you ll need Computer System Intel 486 Pentium or compatible Expansion Slot Require at least one PCI bus slot Operating System DOS 5 0 or higher W...

Страница 8: ...SETUPWIN to run the HOT 137 139 installation program italic A variable parameter You substitute it with an appropriate value or text CAPS An item or a label e g IGA1680 Utilities is a menu item in the...

Страница 9: ...9 IGA1680PCIVGA HOT 137CardLayout...

Страница 10: ...1 0 IGA1680PCIVGA HOT 139CardLayout...

Страница 11: ...esolution and refresh rate your monitor can support Check the specifications of your monitor for signal compatibility with this card and find an optimum setting to suit your applications WARNING Stati...

Страница 12: ...he HOT 137 HOT 139 has one jumper to determine the IRQ9 setting The jumper is preset at the factory and in most cases you will not need to change it The jumper at location J6 enables or disables IRQ9...

Страница 13: ...ge and carefully seat it firmly into the slot Fasten the retaining bracket with a screw 5 Reinstall the computer cover 6 Connect the monitor cable to the Video Output connector of the PCI VGA card WAR...

Страница 14: ...tem and take out the card Check on back of the card solder side To see if there is any small piece of metal attached on the card and cause the short 3 Check BIOS at location U2 Make sure all the pin a...

Страница 15: ...llation Diskette supplies drivers for the following operating systems and programs Windows 3 1 Windows NT AutoCAD PCAD 6 0 WordPerfect Lotus 1 2 3 V3 x Windows 95 available in the future Making Backup...

Страница 16: ...tallation process for the Windows 3 1 Windows NT OS 2 2 1 Warp AutoCAD PCAD WordPerfect Lotus 1 2 3 V3 x and IGA1680 Utilities If you are installing drivers for Windows 3 1 Windows NT Windows 95 and O...

Страница 17: ...s Step 1 Start Windows using the standard VGA driver Step 2 Insert IGA1680 Windows 3 1 Drivers Diskette From the File Manager or using the File Run pull down command to execute the SETUPWIN program fr...

Страница 18: ...Step 2 Run Windows NT SETUP program in MAIN window Step 3 Select Changing System Settings from OPTIONS pop up menu Step 4 Click on the down arrow of Display and select Other Step 5 Follow the instruct...

Страница 19: ...2 Double Click on DISPLAY icon in Control Panel Step 3 Select Changing Display Type Step 4 Select Change Step 5 Select Other Step 6 Follow the instructions to select an InteGraphics IGA1680 display d...

Страница 20: ...into driver A and run the installation program inside the full screen DOS session by typing A SETUPDOS Step 4 Select OS 2 2 1 Warp to extract OS 2 driver files into your hard drive default under the...

Страница 21: ...s a very important procedure to follow for installing from a directory instead of a diskette Step11 After the installation completed perform a shutdown and restart the system so that the changes can t...

Страница 22: ...ing the above procedure to select a higher refresh rate But remember to run the command svga on dos immediately following the utility program setFreq exe By doing this the svga exe will record the cha...

Страница 23: ...double click Step 5 After you ve done with step 4 The installation program will ask you if all the utilities will be O K to install in C ACAD direc tory To continue by pressing Enter key Step 6 Copy...

Страница 24: ...VGA831CC VBD b VGA843CC VBD for 800x600x4 c VGA875CC VBD d VGA140CC VBD e VGA154CC VBD for 1024x768x4 f VGA196CC VBD To install the drivers Step 1 Insert the IGA1680 Utilities Drivers Diskette in driv...

Страница 25: ...LIGS800 VRS and VBD configuration files into Lotus123 directory Step 7 Run Install from Lotus123 Directory Step 8 Select First time installation or Change selected equipment Step 9 Select modify curr...

Страница 26: ...ep 3 Type A SETUPDOS Enter Step 4 The IGA installation menu will be displayed on screen Select PCAD and double click Step 5 After you ve done with step 4 The installation program will ask you if all t...

Страница 27: ...g at c Use any text editor to change the following two lines PDISPLAYC PCAD DRV DIBMVGA REX DISPLAYC PCAD DRV DTEXT DRV to one line below DISPLAYC PCAD DRV PVGA1024 DRV Note The above change is for 1...

Страница 28: ...vers TIGS VRS IGS 80x60 16 colors IGS 132x25 16 colors IGS 132x43 16 colors IGS 132x50 16 colors IGS 132x60 16 colors To install the drivers Step 1 Insert the IGA1680 Utilities Drivers Diskette in dri...

Страница 29: ...o WordPerfect 6 0 directory Step 7 Run WP WordPerfect 6 0 Step 8 Hit Alt F then select setup Another way to run WordPerfect at high resolution mode is to run WordPerfect 6 0 Installation utility and s...

Страница 30: ...REQ EXE Refresh rate read back utility IRQ2 EXE IRQ2 enable and disable How To Install IGA1680 Utilities Step 1 Insert the IGA1680 Utilities Drivers Diskette in drive A Step 2 Go to drive A Step 3 Typ...

Страница 31: ...dvantage of all those features unless you install and setup IGA Windows Accelerated Drivers properly The IGA Accelerated Windows Driver supports virtual desktop This new feature allows users to furthe...

Страница 32: ...rge font But some combinations are not available because they are either not feasible or due to hardware limitations such as video memory size The Setup Program works hard to help you It has already e...

Страница 33: ...Step 4 Use the combo box Refresh Rate to choose a refresh frequency for your monitor Nor mally higher the refresh rate will give better display result But the refresh rate setting can not go beyond yo...

Страница 34: ...a Virtual Desktop environment you can see only a portion of the Windows desktop at one time You can either use the mouse to move the viewpoint your monitor screen or you can freeze your viewpoint and...

Страница 35: ...e for defining your own Viewport modes Step 4 Use the combo box Color Depth to choose a color depth For most software or applica tions 256 colors will be a good choice If you need to display real life...

Страница 36: ...les should already be copied to your system by the installation program If you are running virtual desktop you can use the setup program to switch your Viewport from one resolution to another on the f...

Страница 37: ...n a mode for your Viewport on the right list box Then click the button Remove To make sure that your monitor works for a specific mode you can click a mode either in Available Modes or in Your Viewpor...

Страница 38: ...adjust your monitor every time you switch resolutions To move the screen you can click on either arrow buttons Clicking the center button will bring the screen back to the starting position before you...

Страница 39: ...ktop In contract with regular way of using mouse to move the Viewport this will provide more stabilized screens and an easy rapid solution to move your screen viewport If you click on the system menu...

Страница 40: ...Each row describes a single screen configuration When discussing color depth 8 bits per pixel 8bpp is the same as 256 colors 16 bits per pixel 16bpp is the same as 65 000colors and 24 bits per pixel...

Страница 41: ...106 1280 x 1024 16 60 1MB 43 106 1280 x 1024 16 87 I 1MB 44 104 1024 x 768 16 60 512KB 44 104 1024 x 768 16 72 512KB 44 104 1024 x 768 16 75 512KB 44 104 1024 x 768 16 87 I 512KB 45 102 800 x 600 16...

Страница 42: ...49 107 1280 x 1024 256 87 I 2MB 4A NA 1600 x 1200 256 47 2MB 4A NA 1600 x 1200 256 87 I 2MB 50 111 640 x 480 64K 60 1MB 50 111 640 x 480 64K 72 1MB 50 111 640 x 480 64K 75 1MB 51 114 800 x 600 64K 60...

Страница 43: ...round 6 Red Return ground 7 Green Return ground 8 Blue Return ground 9 Key no pin 10 Sync Return ground 11 Monitor ID not used 12 SDA DDC support note2 13 Horizontal Sync 14 Vertical Sync 15 SCL DDC s...

Отзывы: