background image


17 


Ordercode: 43550 

Spectral M1000 Tour Q4 MKII 

2. Built-in programs 

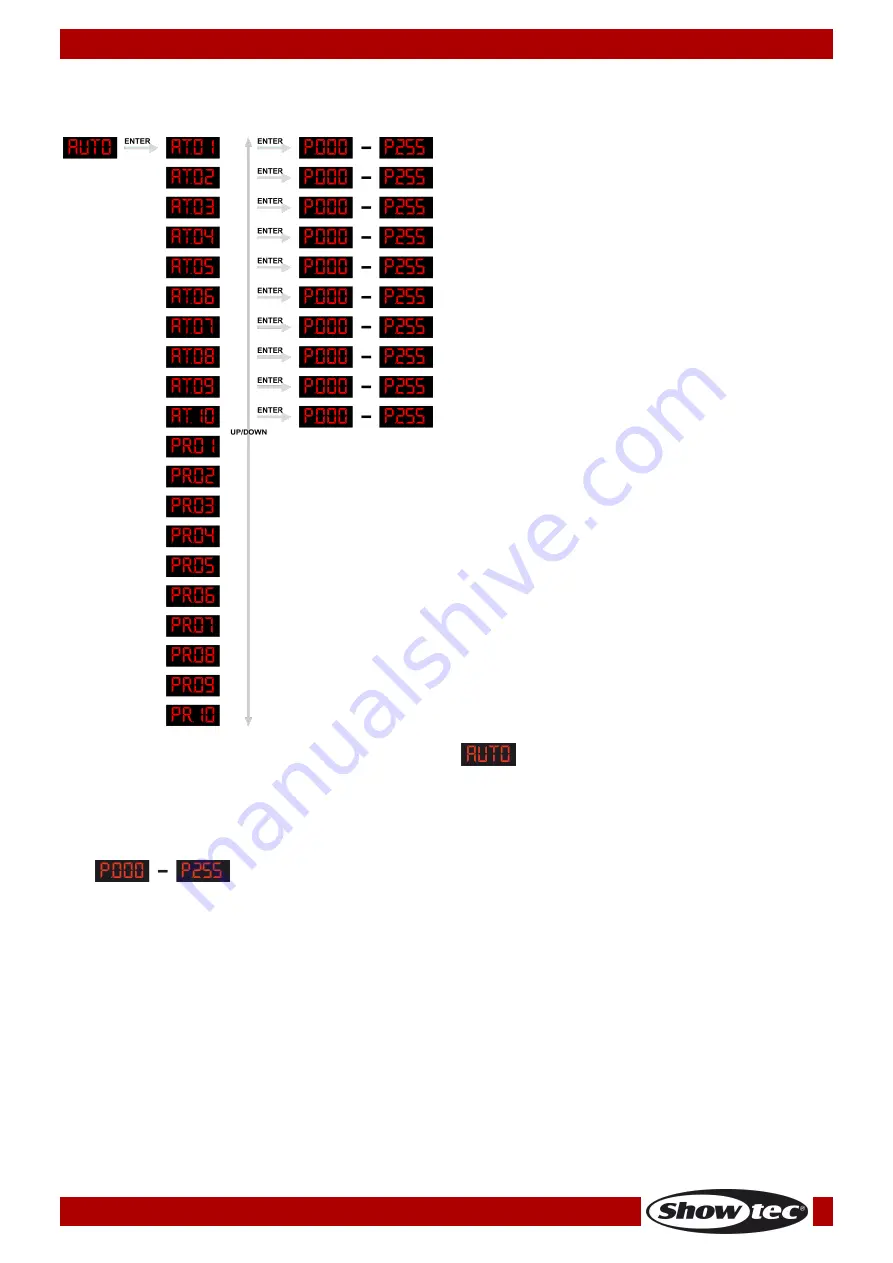
With this menu, you can set the built-in programs. 


01)


Press the 

UP/DOWN

 buttons until the display shows 

 and press the 

ENTER 

button to open the 

menu.


02)


Press the 

UP/DOWN

 buttons to choose one of the 10 built-in programs (AT01-AT10)

.


03)


Once you have chosen the desired built-in program, press the 

ENTER 

button to open the program 

speed settings.


04)


Press the 

UP/DOWN

 buttons to increase/decrease the speed. The adjustment range is between 

, from slow to fast.


05)


You can also choose one of the 10 custom programs (PR01-PR10).


Содержание Spectral M1000 Tour Q4 MKII

Страница 1: ...Spectral M1000 Tour Q4 MKII V1 Highlite International B V Vestastraat 2 6468 EX Kerkrade the Netherlands Ordercode 43550 MANUAL ENGLISH ...

Страница 2: ...Control Panel 13 Control Mode 13 DMX Addressing 13 Menu Overview 14 Main Menu Options 16 1 Static Colors 16 2 Built in programs 17 3 Master Slave Mode 18 4 DMX 512 Mode 18 5 DMX channel modes 18 6 Edit Mode 19 How to make your own custom program 19 7 Settings 20 7 1 Password 20 7 2 Upload 20 7 3 Reset 20 7 4 Color 20 7 5 Dimmer 21 7 6 Curve 21 7 7 DMX Error 21 7 8 Settings menu lock 21 8 White set...

Страница 3: ...2 Ordercode 43550 Spectral M1000 Tour Q4 MKII Maintenance 33 Troubleshooting 33 No Light 33 No Response to DMX 34 Product Specifications 35 Dimensions 36 Notes 37 ...

Страница 4: ...includes Showtec Spectral M1000 Tour Q4 MKII Powercon power cable 1 5 m User manual LED Expected Lifespan LEDs gradually decline in brightness over time HEAT is the dominant factor that leads to the acceleration of this decline Packaged in clusters LEDs exhibit higher operating temperatures than in ideal or singular optimum conditions For this reason when all color LEDs are used at their fullest i...

Страница 5: ...oid brute force when installing or operating the device Only use the device indoors avoid contact with water or other liquids Only operate the fixture after having checked if the housing is firmly closed and all screws are tightly fastened Only operate the device after having familiarized with its functions Avoid flames and do not put close to flammable liquids or gases Always keep the case closed...

Страница 6: ...st never be exceeded The relative humidity must not exceed 50 with an ambient temperature of 40 C If this device is operated in any other way than the one described in this manual the product may suffer damages and the warranty becomes void Any other operation may lead to dangers like short circuit burns electric shock crash etc You endanger your own safety and the safety of others Rigging Please ...

Страница 7: ...with the mains Connect the device to the mains with the power plug Always check if the right color cable is connected to the right place International EU Cable UK Cable US Cable Pin L BROWN RED YELLOW COPPER PHASE N BLUE BLACK SILVER NEUTRAL YELLOW GREEN GREEN GREEN PROTECTIVE GROUND Make sure that the device is always properly connected to the earth Improper installation can cause serious injurie...

Страница 8: ...hone number 04 A brief description of the symptoms Claims The client has the obligation to check the delivered goods immediately upon delivery for any short comings and or visible defects or perform this check after our announcement that the goods are at their disposal Damage incurred in shipping is the responsibility of the shipper therefore the damage must be reported to the carrier upon receipt...

Страница 9: ...0 Control protocol DMX 512 DMX channels 3 3 4 4 5 6 6 8 10 15 23 channels 16 bit dimming 4 digit LED display Refresh rate 400 Hz Dimmer 0 100 Strobe 0 20Hz Beam Angle 11 5 Control Static Colors Auto Master Slave DMX 512 Housing Die cast aluminum Connections Neutrik Powercon IN OUT 3 5 pin XLR IN OUT Cooling Convection cooling IP Rating IP 20 Dimensions 235 x 230 x 370 mm LxWxH Weight 5 7 kg Fronts...

Страница 10: ...if all foam and plastic padding is removed Connect all cables Do not supply power before the whole system is set up and connected properly Always disconnect from electric mains power supply before cleaning or servicing Damages caused by non observance are not subject to warranty Set Up and Operation Follow the directions below as they pertain to your preferred operation mode Before plugging the un...

Страница 11: ... power cord into a proper electric power supply socket 06 When the Spectral is not connected with a DMX cable it functions as a stand alone device Please see page 17 for more information about the built in programs Multiple Spectrals Master Slave control 01 Fasten the effect light onto firm trussing Leave at least 0 5 meter on all sides for air circulation 02 Use a 3 pin XLR cable to connect the S...

Страница 12: ... 04 Connect the first unit s DMX out socket with the second unit s in socket using a DMX signal cable Repeat this process to link the second third and fourth units 05 Supply electric power Plug electric mains power cords into each unit s IEC socket then plug the other end of the mains power cord into proper electric power supply sockets starting with the first unit Do not supply power before the w...

Страница 13: ...together you must obtain data cables You can purchase DAP Audio certified DMX cables directly from a dealer distributor or construct your own cable If you choose to create your own cable please use data grade cables that can carry a high quality signal and are less prone to electromagnetic interference DAP Audio DMX Data Cables DAP Audio Basic microphone cable for allround use bal XLR M 3 pin XLR ...

Страница 14: ...address of the first Spectral should be 1 001 the DMX address of the second Spectral should be 1 23 24 024 the DMX address of the third Spectral should be 24 23 47 047 etc Please be sure that you do not have any overlapping channels in order to control each Spectral correctly If two or more Spectrals are addressed similarly they will work similarly Controlling After having addressed all Spectral f...

Страница 15: ...14 Ordercode 43550 Spectral M1000 Tour Q4 MKII Menu Overview ...

Страница 16: ...15 Ordercode 43550 Spectral M1000 Tour Q4 MKII ...

Страница 17: ...u 03 Press the UP DOWN buttons to toggle through the static colors 04 Once you have chosen the desired color press the ENTER button to open the menu 05 Press the UP DOWN buttons to adjust the static colors Red Green Blue White The adjustment range is between 0 255 from dark to brightest 06 When the display shows press the ENTER button to open the menu 07 Press the UP DOWN buttons to increase decre...

Страница 18: ... button to open the menu 02 Press the UP DOWN buttons to choose one of the 10 built in programs AT01 AT10 03 Once you have chosen the desired built in program press the ENTER button to open the program speed settings 04 Press the UP DOWN buttons to increase decrease the speed The adjustment range is between from slow to fast 05 You can also choose one of the 10 custom programs PR01 PR10 ...

Страница 19: ... device 4 DMX 512 Mode With this menu you can set the DMX address 01 Press the UP DOWN buttons until the display shows 02 Press the ENTER button to open the menu 03 Press the UP DOWN buttons to choose the desired DMX address There are 512 DMX addresses available 5 DMX channel modes With this menu you can set the desired DMX channel mode 01 Press the UP DOWN buttons until the display shows 02 Press...

Страница 20: ...ram has 30 steps which can be edited 05 Each step allows to create a scene using RED GREEN BLUE WHITE STROBE STEP TIME FADE options How to make your own custom program 01 First start with PR 01 and add the desired settings in scene 1 then scene 2 etc 02 In this way you can add a maximum of 30 scenes 03 After that you can start with PR 02 and create a maximum of 30 scenes again 04 You can repeat th...

Страница 21: ...s will light up yellow 08 If there are any problems with exporting the master and the slave devices will light up red 09 If the operation was completed successfully the master and the slave devices will light up green 7 3 Reset With this menu you can reset the custom programs 01 Press the UP DOWN buttons until the display shows 02 Press the ENTER button to open the menu 03 Insert the password UP D...

Страница 22: ...ns to choose the desired dimming curve CV1 CV3 OFF from fast to slow and OFF 7 7 DMX Error With this menu you can determine the device s behaviour in case of a DMX signal error 01 Press the UP DOWN buttons until the display shows 02 Press the UP and DOWN buttons to toggle between the 2 options Blackout DMX data save 03 If the display shows the Spectral will black the output out in case of a DMX si...

Страница 23: ...ess the UP DOWN buttons to toggle between RED GREEN BLUE and WHITE 09 Press the ENTER button to open the desired color s settings 10 Press the UP DOWN buttons to increase decrease the intensity of the color The adjustment range of each color is between 000 255 from OFF to FULL ON 11 When the display shows press the ENTER button to open the menu 12 Now you can adjust the intensity of the RGB Press ...

Страница 24: ...e 0 31 50 Red Down Green 100 Blue 0 51 70 Red 0 Green 100 Blue Up 71 90 Red 0 Green Down Blue 100 91 110 Red Up Green 0 Blue 100 111 130 Red 100 Green 0 Blue Down 131 150 Red 100 Green Up Blue Up 151 170 Red Down Green Down Blue 100 171 200 Red 100 Green 100 Blue 100 White 100 201 205 White 1 3200K 206 210 White 2 3400K 211 215 White 3 4200K 216 220 White 4 4900K 221 225 White 5 5600K 226 230 Whit...

Страница 25: ... Linear dimmer 30 69 Non linear dimmer 1 fastest 70 129 Non linear dimmer 2 130 189 Non linear dimmer 3 190 255 Non linear dimmer 4 slowest 3 channels ARC1 Channel 1 Red 0 255 Gradual adjustment Red from 0 100 Channel 2 Green 0 255 Gradual adjustment Green from 0 100 Channel 3 Blue 0 255 Gradual adjustment Blue from 0 100 4 channels AR1 D Channel 1 Dimmer intensity 0 255 Gradual adjustment from da...

Страница 26: ...255 Gradual adjustment Green from 0 100 Channel 4 Blue Dimmer must be open 0 255 Gradual adjustment Blue from 0 100 Channel 5 White Dimmer must be open 0 255 Gradual adjustment White from 0 100 6 channels AR2 S Channel 1 Dimmer intensity 0 255 Gradual adjustment from dark to brightest 0 100 Channel 2 Red Dimmer must be open 0 255 Gradual adjustment Red from 0 100 Channel 3 Green Dimmer must be ope...

Страница 27: ...m dark to brightest 0 100 Channel 3 Red center point Dimmer must be open 0 255 Gradual adjustment Red from 0 100 Channel 4 Red fine center point Dimmer must be open 0 255 Fine adjustment Red from 0 100 Channel 5 Green center point Dimmer must be open 0 255 Gradual adjustment Red from 0 100 Channel 6 Green fine center point Dimmer must be open 0 255 Fine adjustment Green from 0 100 Channel 7 Blue c...

Страница 28: ...Blue outer circle Dimmer must be open 0 255 Gradual adjustment Blue from 0 100 Channel 16 Blue fine outer circle Dimmer must be open 0 255 Fine adjustment Blue from 0 100 Channel 17 White outer circle Dimmer must be open 0 255 Gradual adjustment White from 0 100 Channel 18 White fine outer circle Dimmer must be open 0 255 Fine adjustment White from 0 100 Channel 19 Macros Dimmer must be open 0 10 ...

Страница 29: ...ram 4 center Red outer circle Blue 200 204 Static program 5 center Green outer circle Blue 205 209 Static program 6 center White outer circle Blue 210 214 Static program 7 center Red outer circle Green 215 219 Static program 8 center Blue outer circle Green 220 224 Static program 9 center White outer circle Green 225 229 Static program 10 center Red outer circle Blue 230 234 Static program 11 cent...

Страница 30: ... Blue from 0 100 Channel 8 Fine Blue Dimmer must be open 0 255 Fine adjustment Blue from 0 100 Channel 9 White Dimmer must be open 0 255 Gradual adjustment White from 0 100 Channel 10 Fine White Dimmer must be open 0 255 Fine adjustment White from 0 100 Channel 11 Macros Dimmer must be open 0 10 Not functional 11 30 Red 100 Green Up Blue 0 31 50 Red Down Green 100 Blue 0 51 70 Red 0 Green 100 Blue...

Страница 31: ...Static program 6 center White outer circle Blue 210 214 Static program 7 center Red outer circle Green 215 219 Static program 8 center Blue outer circle Green 220 224 Static program 9 center White outer circle Green 225 229 Static program 10 center Red outer circle Blue 230 234 Static program 11 center Green outer circle Blue 235 239 Static program 12 center White outer circle Blue 240 244 Static ...

Страница 32: ...l 2 Green center point 0 255 Gradual adjustment Red from 0 100 Channel 3 Blue center point 0 255 Gradual adjustment Blue from 0 100 Channel 4 Red outer circle 0 255 Gradual adjustment Red from 0 100 Channel 5 Green outer circle 0 255 Gradual adjustment Green from 0 100 Channel 6 Blue outer circle 0 255 Gradual adjustment Blue from 0 100 ...

Страница 33: ... adjustment Red from 0 100 Channel 3 Blue center point 0 255 Gradual adjustment Blue from 0 100 Channel 4 White center point 0 255 Gradual adjustment White from 0 100 Channel 5 Red outer circle 0 255 Gradual adjustment Red from 0 100 Channel 6 Green outer circle 0 255 Gradual adjustment Green from 0 100 Channel 7 Blue outer circle 0 255 Gradual adjustment Blue from 0 100 ...

Страница 34: ...a damp cloth Do not immerse in liquid Wipe lens clean with glass cleaner and a soft cloth Do not use alcohol or solvents The front lens will require weekly cleaning as smoke fluid tends to build up residues reducing the light output very quickly Please clean internal components once a year with a light brush and vacuum cleaner Keep connections clean Disconnect electric power and then wipe the DMX ...

Страница 35: ...erratically or not at all to the controller Poor data quality Check data quality If much lower than 100 percent the problem may be a bad data link connection poor quality or broken cables missing termination plug or a defective fixture disturbing the link Bad data link connection Inspect connections and cables Correct poor connections Repair or replace damaged cables Data link not terminated with ...

Страница 36: ... x 4 in 1 12W RGBW LED Light output Lux 5m 1050 lux Lumen 3000 Color mixing RGBW Beam angle 11 5 Dimmer 0 100 Strobe 0 20Hz Housing Metal Flame retardant plastic DMX control via standard DMX controller On Board 4 digit LED display for easy setup Control Static Colors Auto Master Slave DMX 512 Connections Dedicated Schuko to Powercon Data connector Cooling Internal fan Max ambient temperature ta 40...

Страница 37: ...36 Ordercode 43550 Spectral M1000 Tour Q4 MKII Dimensions ...

Страница 38: ...37 Ordercode 43550 Spectral M1000 Tour Q4 MKII Notes ...

Страница 39: ...38 Ordercode 43550 Spectral M1000 Tour Q4 MKII ...

Страница 40: ... 2015 Showtec ...

Отзывы: