background image


11 


Ordercode: 40070 

Phantom 65 

The Phantom 65 can be operated with a controller in control mode or without the controller in stand-
alone mode.


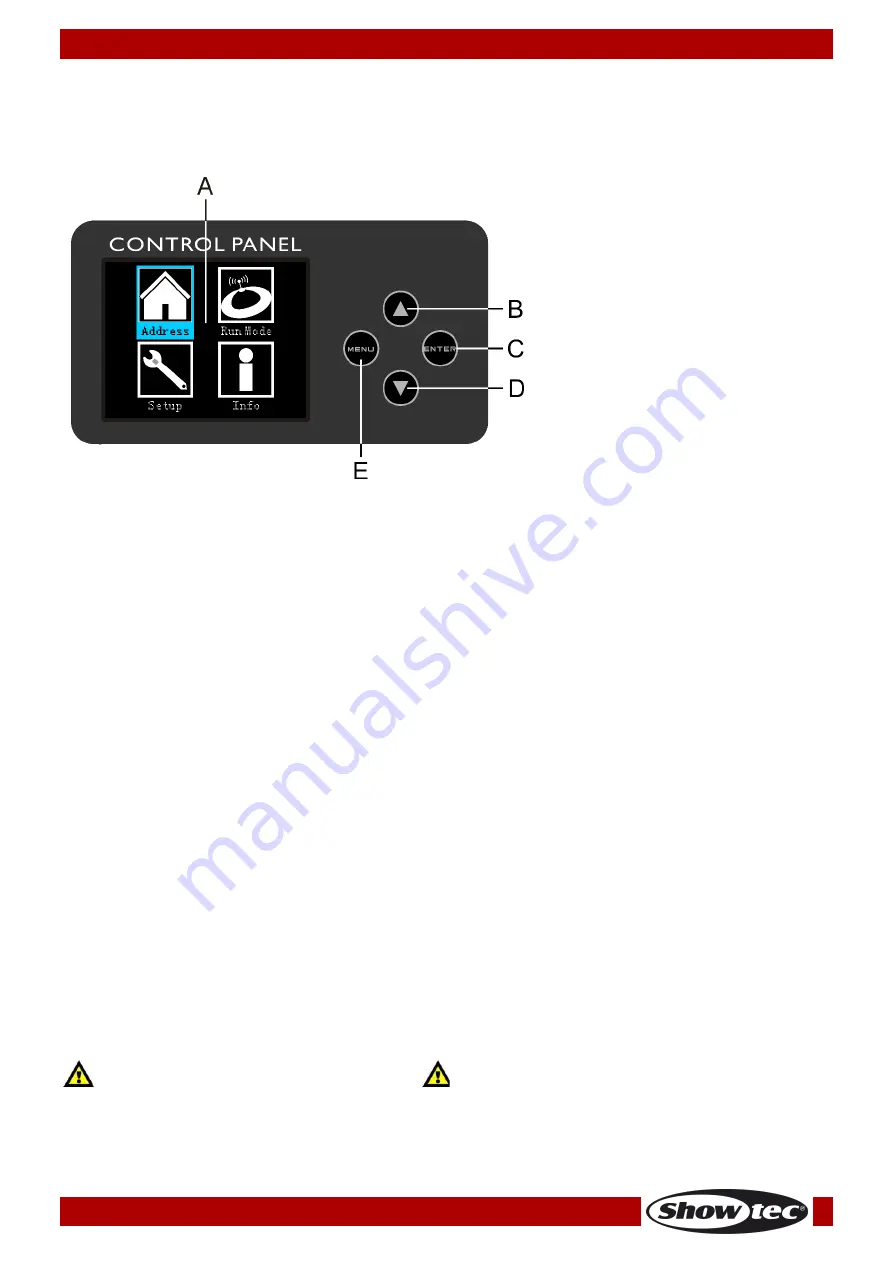
Control Panel 


Fig. 05 

A)  LCD display 
B)  UP button 
C)  ENTER button 
D)  DOWN button 
E)   MENU button 


Control Mode 

The fixtures are individually addressed on a data-link and connected to the controller.  
The fixtures respond to the DMX signal from the controller. (When you select the DMX address and save it, 
the controller will display the saved DMX address, next time.) 
 

DMX Addressing 

The control panel on the front side of the base allows you to assign DMX fixture addresses, which is the first 
channel with which the Phantom will respond to the controller. 
Please note, when you use the controller, the unit has 13 channels. 
When using multiple Phantoms, make sure you set the DMX addresses right. 
Therefore, the DMX address of the first Phantom should be 1(001); the DMX address of the second 
Phantom should be 1+13=14 (014); the DMX address of the third Phantom should be 14+13=27 (027), etc. 
Please, be sure that you do not have any overlapping channels in order to control each Phantom 
correctly. If two or more Phantoms are addressed similarly, they will work similarly. 
 

Controlling: 

After having addressed all Phantom fixtures, you may now start operating these via your lighting 
controller. 
Note:
 After switching on, the Phantom will automatically detect whether DMX 512 data is received or 
not. If there is no data received at the DMX-input, the “LED “ on the control panel will not flash. 
If not, the problem may be: 


The XLR cable from the controller is not connected with the input of the Phantom 65. 


The controller is switched off or defective, the cable or connector is detective, or the signal wires are 
swapped in the input connector. 

 
Note: It is necessary to insert an XLR termination plug (with 120 Ohm) in the last fixture in order to ensure 
proper transmission on the DMX data link.  


Display Off after 35 seconds


When no button is pressed for 35 seconds, the display will turn off. 
To light up the display, you have to press the MENU or ENTER button. 
Once you have pressed the button, the display will light up. 


Содержание PHANTOM 65 V1

Страница 1: ...Phantom 65 V1 Highlite International B V Vestastraat 2 6468 EX Kerkrade the Netherlands Ordercode 40070 MANUAL ENGLISH ...

Страница 2: ...MX Control 9 Fixture Linking 10 Data Cabling 10 Control Panel 11 Control Mode 11 DMX Addressing 11 Menu Overview 12 Main Menu Options 13 DMX Addressing 13 Built in Programs Mode 14 1 DMX Mode 14 2 Slave Mode 14 3 Auto Mode 14 4 Sound controlled Mode 14 5 Manual Mode 15 Advanced Settings 16 System Information 16 DMX Channels 17 8 Channels 17 13 Channels 19 Maintenance 21 Replacing the Fuse 21 Repla...

Страница 3: ...ting temperatures than in ideal or singular optimum conditions For this reason when all color LEDs are used at their fullest intensity life of the LEDs is significantly reduced If improving the lifespan is of higher priority place care in providing for lower operational temperatures This may include climatic environmental and the reduction of overall projection intensity Safety Instructions Every ...

Страница 4: ...entilation Always disconnect power from the mains when device is not used or before cleaning Only handle the power cord holding it by the plug Never pull out the plug by tugging the power cord Make sure that the device is not exposed to extreme heat moisture or dust Make sure that the available voltage is not higher than stated on the rear panel Make sure that the power cord is never crimped or da...

Страница 5: ...g Please follow the European and national guidelines concerning rigging trussing and all other safety issues Do not attempt the installation yourself Always let the installation be carried out by an authorized dealer Procedure If the Phantom is lowered from the ceiling or high joists professional trussing systems have to be used Use a clamp to mount the Phantom with the mounting bracket to the tru...

Страница 6: ... UPS packing or double boxing is always a safe method to use Note If you are given an RMA number please include the following information on a piece of paper inside the box 01 Your name 02 Your address 03 Your phone number 04 A brief description of the symptoms Claims The client has the obligation to check the delivered goods immediately upon delivery for any short comings and or visible defects o...

Страница 7: ...grams Reverse Pan Tilt movement Special Pan Tilt movement blackout Pan 0º 540º Tilt 0º 270º Pan Tilt resolution 16 bit Control Stand alone Manual Sound controlled Master Slave DMX 512 Color wheel 8 dichroic colors white Rotating gobo wheel 6 metal gobos 1 glass gobo Color functions Split colors Rainbow flow effect Gobo functions Gobo flow effect Gobo shake Rotation Bi directional Prism 3 facet pri...

Страница 8: ...nect all cables Do not supply power before the whole system is set up and connected properly Always disconnect from electric mains power supply before cleaning or servicing Damages caused by non observance are not subject to warranty Set Up and Operation Follow the directions below as they pertain to your preferred operation mode Before plugging the unit in always make sure that the power supply m...

Страница 9: ...supply socket 03 Turn on the music If the device is set to sound control then the Phantom will react to the beat of the music Please see page 14 for more information about the sound control options Multiple Phantoms Master Slave control 01 Fasten the effect light onto firm trussing Leave at least 0 5 meter on all sides for air circulation 02 Use a 3 pin XLR cable to connect the Phantom The pins 01...

Страница 10: ...the first unit s DMX out socket with the second unit s in socket using a DMX signal cable Repeat this process to link the second third and fourth units 05 Supply electric power Plug electric mains power cords into each unit s Pro power socket then plug the other end of the mains power cord into proper electric power supply sockets starting with the first unit Do not supply power before the whole s...

Страница 11: ...on a power link 230V 15 fixtures Data Cabling To link fixtures together you must obtain data cables You can purchase DAP Audio certified DMX cables directly from a dealer distributor or construct your own cable If you choose to create your own cable please use data grade cables that can carry a high quality signal and are less prone to electromagnetic interference DAP Audio DMX Data Cables DAP Aud...

Страница 12: ...ess of the third Phantom should be 14 13 27 027 etc Please be sure that you do not have any overlapping channels in order to control each Phantom correctly If two or more Phantoms are addressed similarly they will work similarly Controlling After having addressed all Phantom fixtures you may now start operating these via your lighting controller Note After switching on the Phantom will automatical...

Страница 13: ...12 Ordercode 40070 Phantom 65 Menu Overview ...

Страница 14: ...ill show its currently active mode as well as the information concerning Pan and Tilt Press the MENU or ENTER buttons to enter the main menu DMX Addressing With this menu you can set the DMX address 01 Press the UP DOWN buttons until the display shows 02 Press the ENTER button to confirm You can choose 512 different DMX addresses 03 Press the UP DOWN buttons to select the required address from 001...

Страница 15: ... Press the ENTER button to open the menu 03 Press the UP DOWN buttons to set the device as the first second third or fourth slave device Slave1 Slave4 04 Press the ENTER button to save changes 05 The device is now operating in the slave mode It means that it will react the same as the master device You can connect up to 4 slave devices to one master device 3 Auto Mode 01 Press the UP DOWN buttons ...

Страница 16: ...position 0 540 Tilt Tilt position 0 270 Color 0 255 Gobo 0 255 Gobo Rotate 0 255 clockwise counterclockwise gobo bounce Prism 0 255 Dimmer 0 255 from dark to brightest Shutter 0 255 05 Press the ENTER button to edit the desired option The adjustment range for each option is between 0 255 06 Press the UP DOWN buttons to set the value 07 Press the ENTER button to save changes 08 The options correspo...

Страница 17: ...ed Fast Smooth Sensitivity 001 100 from low to high sound sensitivity Reset Pan Tilt reset Factory Reset Full reset restores factory settings 05 Press the ENTER button to edit the desired option 06 Press the UP DOWN buttons to set the value 07 Press the ENTER button to save changes System Information In this menu you can see the currently active mode the DMX starting address the current software v...

Страница 18: ...obe from low to high frequency 168 203 Slow close fast open strobe from low to high frequency 204 239 Pulse strobe from low to high frequency 240 250 Random strobe effect from low to high frequency 251 255 Open Channel 5 Color wheel Linear color change following the movement of the slider Between 196 224 and 227 255 the color wheel rotates continuously so called Rainbow effect 0 6 Open White 7 13 ...

Страница 19: ...from slow to fast 96 103 Gobo Shake 3 from slow to fast 104 111 Gobo Shake 2 from slow to fast 112 119 Gobo Shake 1 from slow to fast 120 127 Open White 128 191 Clockwise rotation CW rainbow effect from slow to fast 192 255 Counterclockwise rotation CCW rainbow effect from slow to fast Channel 7 Gobo rotation 0 7 No function 8 119 Clockwise rotation CW from slow to fast 120 231 Counterclockwise ro...

Страница 20: ...ow to high frequency 132 167 Fast close slow open strobe from low to high frequency 168 203 Slow close fast open strobe from low to high frequency 204 239 Pulse strobe from low to high frequency 240 250 Random strobe effect from low to high frequency 251 255 Open Channel 8 Color wheel Linear color change following the movement of the slider Between 196 224 and 227 255 the color wheel rotates conti...

Страница 21: ...o bouncing from quick short bounce to longer rotation bounce Channel 11 Prism 0 15 Not functional 16 255 Prism Channel 12 Channel Functions 0 7 Not functional 8 27 Blackout during Pan Tilt movement 28 47 Blackout during gobo wheel movement 48 67 Blackout during Pan Tilt gobo wheel movement 68 107 Blackout during color wheel movement 108 127 Blackout during color wheel gobo wheel movement 128 147 B...

Страница 22: ...icantly reduced Disconnect the mains power supply and then wipe the cover with a damp cloth Do not immerse in liquid Wipe lens clean with glass cleaner and a soft cloth Do not use alcohol or solvents The front lens will require weekly cleaning as smoke fluid tends to build up residues reducing the light output very quickly The cooling fans color wheel the gobo wheel the gobos and the internal lens...

Страница 23: ...t the small metal housing can slide out more easily 05 Turn the gobo wheel with the gobo you want to remove to the upside 06 Gently lift up the gobo holder by 10º and then gently pull out the gobo from its position Fig 08 07 Very carefully take the gobo out of the gobo holder with a pair of pliers 08 Place the new gobo in the gobo holder Carefully put the pinchcock back You can use a pair of plier...

Страница 24: ...en combining rotating gobos When an object is held up to the coated side there is no space between the object and its reflection The back edge of the gobo cannot be seen when looking through the coated side When an object is held up to the uncoated side there is a space between the object and its reflection The back edge of the gobo can be seen when looking through the uncoated side Rotating Gobo ...

Страница 25: ...cing the fuse 04 If all of the above appears to be O K plug the unit in again 05 If you are unable to determine the cause of the problem do not open the Phantom as this may damage the unit and the warranty will become void 06 Return the device to your Showtec dealer No Response to DMX Suspect the DMX cable or connectors a controller malfunction a light effect DMX card malfunction 01 Check the DMX ...

Страница 26: ... cables Data link not terminated with 120 Ohm termination plug Insert termination plug in output jack of the last fixture on the link Incorrect addressing of the fixtures Check address setting One of the fixtures is defective and disturbs data transmission on the link Bypass one fixture at a time until normal operation is regained unplug both connectors and connect them directly together Have the ...

Страница 27: ...tup User selectable Pan range 540 360 180 User selectable Tilt range 270 180 90 Special Pan Tilt movement blackout Reverse Pan Tilt movement Pan Tilt resolution 16 bit Color wheel 8 dichroic colors white Color functions Rainbow flow effect split colors bi directional rotation Rotating gobo wheel 6 metal gobos 1 glass gobo Gobo functions Gobo flow effect Gobo shake Control Stand alone Manual Sound ...

Страница 28: ...27 Ordercode 40070 Phantom 65 Dimensions ...

Страница 29: ...28 Ordercode 40070 Phantom 65 Notes ...

Страница 30: ...29 Ordercode 40070 Phantom 65 ...

Страница 31: ...30 Ordercode 40070 Phantom 65 ...

Страница 32: ... 2017 Showtec ...

Отзывы: