background image


11 

Master/Slave Mode 

Only one fixture can be set as master device and the rest are slave devices. 
 

IMPORTANT: 

Before using Master/Slave mode, fixtures must be disconnected from DMX controller.  

         Data collisions may occur if the devices are not disconnected. 

1)

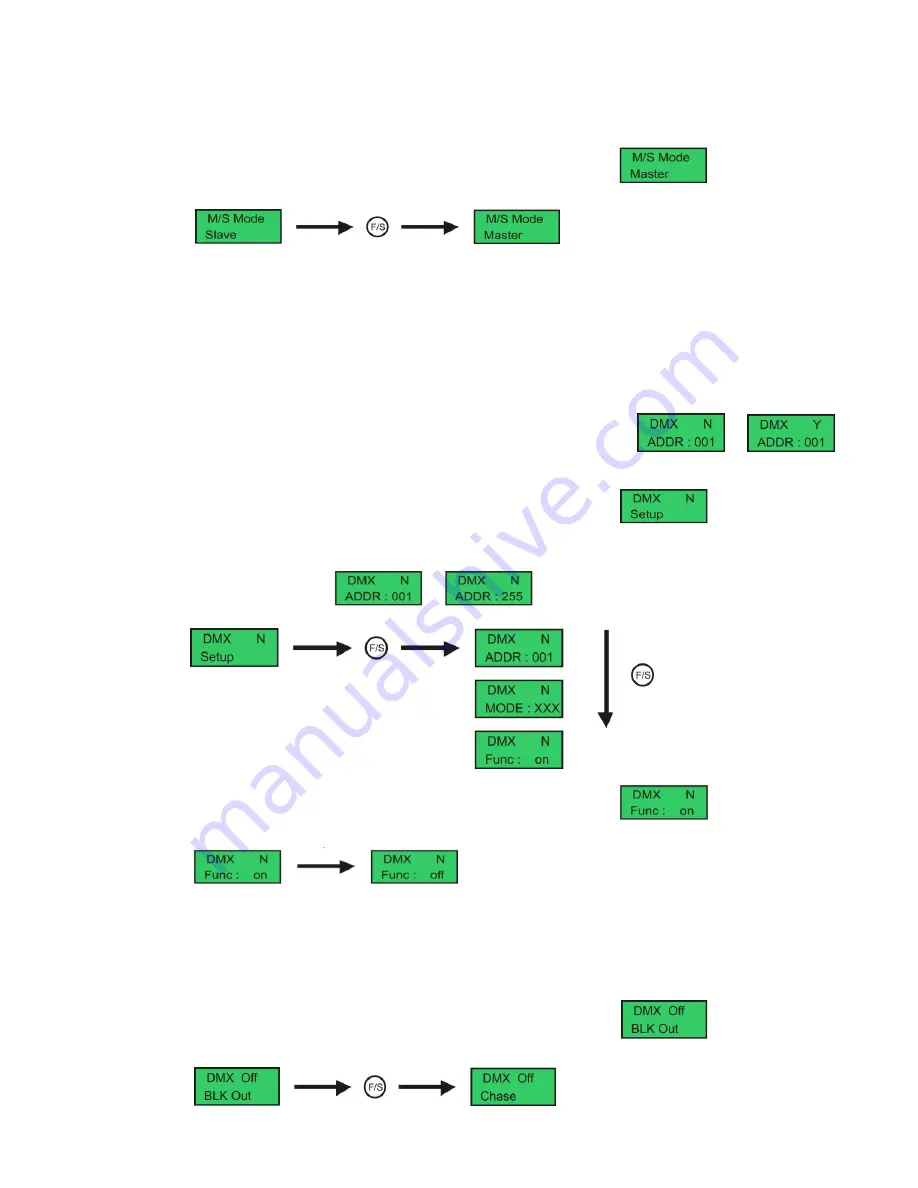
 Press the MODE button to scroll though the menu until the display shows 

2)

 use the UP/ DOWN buttons to change the settings from master to slave. 


Note:

 When the device is in master Mode, the blue LED on the back will light. 


DMX Operation 

The LED Pixel Track Pro’s built-in controller will automatically detect the presence of a DMX signal. 
When you put the DMX cable in the device, the display will change from N to Y. 
In order to receive a DMX signal, the built-in controller must be attached to a DMX controller by a 3-pin DMX 
cable and the DMX controller must be turned on.


When you press the DMX cable in the LED Versatrack the display switches from 

 to 


Addressing the Fixture 
1)

 Press the MODE button to scroll though the menu until the display shows 

2)

 Press the F/S button to scroll through submenu and use the UP/ DOWN buttons to change the settings .    

3)

 Press the F/S button again to store your setting. 


4)

 You can change the address from                        - 


Using a standard or Full Function DMX Control Channel 
1)

 Press the MODE button to scroll though the menu until the display shows 

2)

 Use the UP/ DOWN buttons to change the settings .           


Note

: The Factory Default setting is FULL Function 


DMX Signal-OFF Setting


When the DMX signal is lost or fails, you can determine whether the unit is set to black out or run a chase.


1)

 Press the MODE button to scroll though the menu until the display shows 

2)

 Use the UP/ DOWN buttons to change the settings .           


Содержание LED Versatrack

Страница 1: ...LED Versatrack ORDERCODE 42210...

Страница 2: ...on Showtec for more excellent lighting products We design and manufacture professional light equipment for the entertainment industry New products are being launched regularly We work hard to keep you...

Страница 3: ...ation Set Up and Operation Fixing Batten Bracket accessory for Versatrack 42211 Blinder Frame accessory for Versatrack 42212 Hinge Kit accessory for Versatrack 42213 U Shape Acrylic Cover accessory fo...

Страница 4: ...and all connections with the mains with particular caution Never remove warning or informative labels from the unit Never leave any cables lying around Do not insert objects into air vents Do not open...

Страница 5: ...dren Never leave the unit running unattended For replacement use fuses of same type and rating only Repairs servicing and electric connection must be carried out by a qualified technician WARRANTY Til...

Страница 6: ...unt Refer to below diagram for floor mounting instruction Connection with the mains Connect the device to the mains with the power plug Always pay attention that the right color cable is connected to...

Страница 7: ...ors Low power consumption Low heat design great for long time operation Lifetime 100 000 hours Available Accessories 42211 Batten bracket for Versatrack 42212 Blinder bracket for Versatrack 42213 Hing...

Страница 8: ...t the power supply matches the product specification voltage Do not attempt to operate a 120V specification product on 230V power or vice versa Note Link all cables before connecting electric power Yo...

Страница 9: ...the hanging bracket Hinge Kit accessory for Versatrack 42213 The hinge kit has 3 standard angles 60 72 and 90 It can also be adjusted manually from minimum 55 up to maximum 90 Follow diagram below to...

Страница 10: ...the fixtures together using the hinge kit until it is finished The hinge kit can also use as internal angle simply remove the locking screw and install on the other side U Shape Acrylic Cover accessor...

Страница 11: ...9 Menu Functions Using the Control Panel MODE Browse through main menu or esc from current view F S Browse through sub menu UP DOWN Make adjustment or activate function...

Страница 12: ...r setting 4 Use the UP DOWN buttons to change the Color intensity from 0 255 You can combine all 3 colors to mix your own desired color Red Green Blue 000 255 000 255 000 255 Auto Chase Mode 1 Press t...

Страница 13: ...ached to a DMX controller by a 3 pin DMX cable and the DMX controller must be turned on When you press the DMX cable in the LED Versatrack the display switches from to Addressing the Fixture 1 Press t...

Страница 14: ...when in Func OFF Mode Func ON Select the desired Mode by pressing the MODE button you can choose 23 Channels 14 Channels 11 Channels 8 Channels 4 sections 3 sections 2 sections 1 section 23 CH 14 CH...

Страница 15: ...CH 8 CH 5 CH Red A Red A B Red A B C Red ABCDEF Green A Green A B Green A B C Green ABCDEF Blue A Blue A B Blue A B C Blue ABCDEF Red B Red C D Red D E F Dimmer Green B Green C D Green D E F Strobe Bl...

Страница 16: ...rn and Push The fuse will come out 3 Remove the broken fuse If brown or unclear it is burned out 4 Insert the replacement fuse into the holder where the old fuse was Reinsert the fuse cover Be sure to...

Страница 17: ...s 5 8 11 14 20 23 Control Options DMX Master Slave Manual color mix Auto chase Connections Power Neutrik Powercon Data XLR 5 PIN Software update XLR 5 PIN Dimensions and Weight Length 344mm Width 212m...

Страница 18: ...2007 Showtec...

Отзывы: