background image


Ordercode: 42468 

Par 64 Short Q4-18 

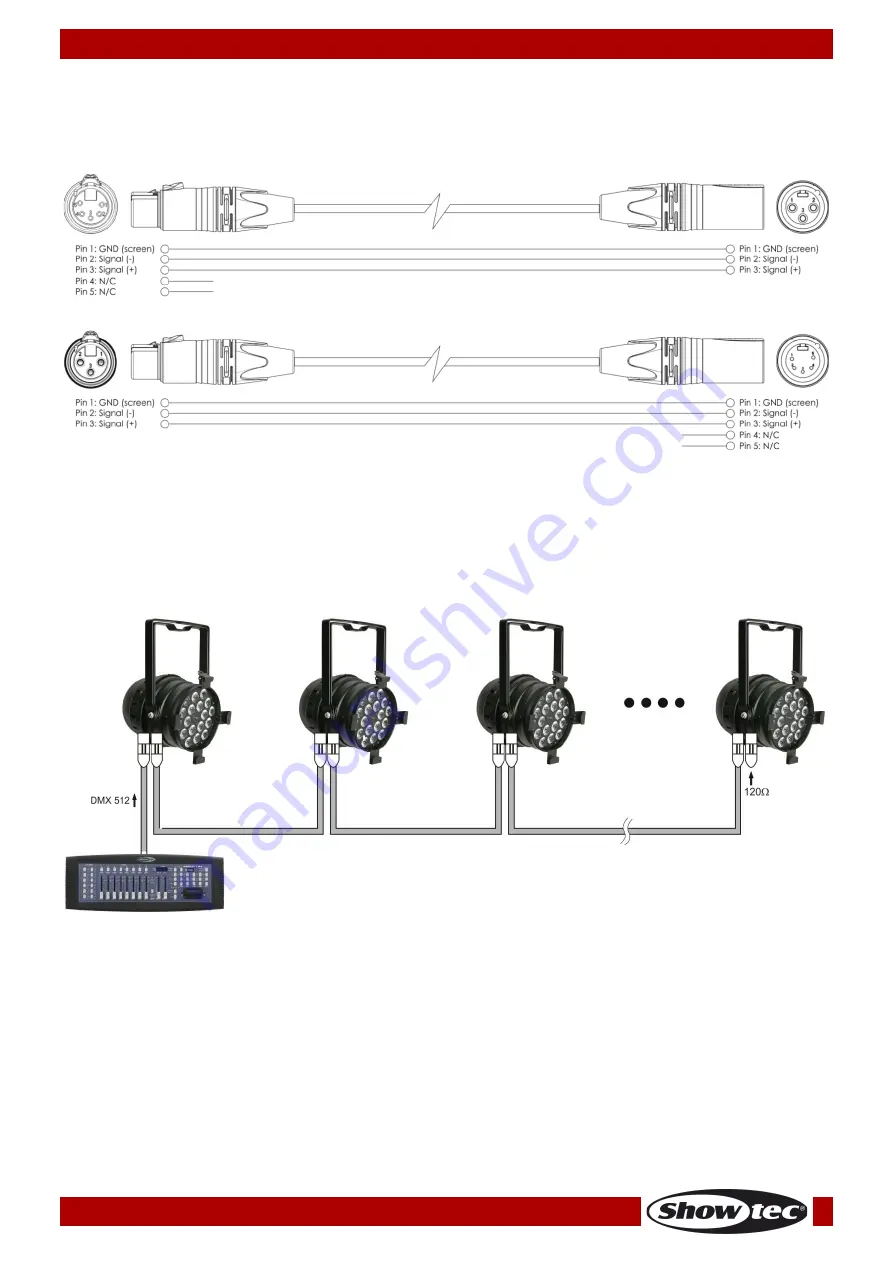
Multiple Pars (DMX Control) 
01)


Fasten the effect light to a firm trussing. Leave at least 0,5 meter on all sides for air circulation. 

02)


Always use a safety cable (ordercode 70140 / 70141). 

03)


Use a 3-pin XLR cable to connect the Pars and other devices.  


04)


Link the units as shown in Fig. 04. Connect the first unit's DMX "out" socket with the second unit's "in" 
socket, using a DMX-signal cable. Repeat this process to link the second, third, and fourth units. 

05)


Supply electric power: Plug the mains power cords into proper electric power supply sockets, 
starting with the first unit. Do not supply power before the whole system is set up and connected 
properly. 

 
Multiple Pars DMX Setup 


Fig. 04 

Note : Link all cables before connecting electric power 


Содержание 42468

Страница 1: ...Par 64 Short Q4 18 V3 Highlite International B V Vestastraat 2 6468 EX Kerkrade the Netherlands Ordercode 42468 MANUAL ENGLISH ...

Страница 2: ...e Par Auto Mode and Built in programs 8 One Par Sound controlled 8 Multiple Pars Master Slave control 8 Multiple Pars DMX Control 9 Fixture Linking 10 Data Cabling 10 Control Panel 11 Control Mode 11 DMX Addressing 11 Menu Overview 12 Main Menu Options 13 1 Auto Run Program 13 2 DMX Mode 13 3 Slave Mode 13 4 Sound controlled 13 DMX Channels 15 4 channels 15 5 channels 15 8 channels 16 Maintenance ...

Страница 3: ...des Showtec Par 64 Short Q4 18 with a power cable 1 5 m Filter frame User manual LED Expected Lifespan LEDs gradually decline in brightness over time HEAT is the dominant factor that leads to the acceleration of this decline Packaged in clusters LEDs exhibit higher operating temperatures than in ideal or singular optimum conditions For this reason when all color LEDs are used at their fullest inte...

Страница 4: ...having checked if the housing is firmly closed and all screws are tightly fastened Only operate the device after having familiarized with its functions Avoid flames and do not put close to flammable liquids or gases Always keep the case closed while operating Always allow a free air space of at least 50 cm around the unit for ventilation Always disconnect power from the mains when device is not us...

Страница 5: ... other operation may lead to dangers like short circuit burns electric shock crash etc You endanger your own safety and the safety of others Rigging Please follow the European and national guidelines concerning rigging trussing and all other safety issues Do not attempt the installation yourself Always let the installation be carried out by an authorized dealer Procedure If the device is lowered f...

Страница 6: ...oper UPS packing or double boxing is always a safe method to use Note If you are given an RMA number please include the following information on a piece of paper inside the box 01 Your name 02 Your address 03 Your phone number 04 A brief description of the symptoms Claims The client has the obligation to check the delivered goods immediately upon delivery for any short comings and or visible defec...

Страница 7: ...8 x 4 in 1 LEDs Drive Current 450 mA Refresh rate 7 8 kHz Dimmer 0 100 Strobe 0 20 Hz Beam Angle 40 Lux 3790 2 m Max Distance 30 m Onboard 4 digit LED display DMX Modes 4 5 or 8 channels Control protocol DMX 512 Cooling Forced cooling fan Housing Die cast aluminum powder coated finish Connections 3 pin DMX IN OUT Control Auto Sound Master Slave DMX Fuse 2A 250V Dimensions 290 x 230 x 230 mm LxWxH ...

Страница 8: ...adding is removed Connect all cables Always disconnect from electric mains power supply before cleaning or servicing Damages caused by non observance are not subject to warranty Setup and Operation Follow the directions below as they pertain to your preferred operation mode Before plugging the unit in always make sure that the power supply matches the product specification voltage Do not attempt t...

Страница 9: ...electric power supply socket 03 Turn on the music If the device is set to sound control then the Par will react to the beat of the music 04 Please see page 13 for more information about the sound control options Multiple Pars Master Slave control 01 Fasten the effect light onto firm trussing Leave at least 0 5 meter on all sides for air circulation 02 Use a 3 pin XLR cable to connect the Par The p...

Страница 10: ... 04 Link the units as shown in Fig 04 Connect the first unit s DMX out socket with the second unit s in socket using a DMX signal cable Repeat this process to link the second third and fourth units 05 Supply electric power Plug the mains power cords into proper electric power supply sockets starting with the first unit Do not supply power before the whole system is set up and connected properly Mu...

Страница 11: ...ed splitter may result in deterioration of the digital DMX signal Maximum recommended DMX data link distance 100 meters Maximum recommended number of fixtures on a DMX data link 30 fixtures Data Cabling To link fixtures together you must obtain data cables You can purchase DAP Audio certified DMX cables directly from a dealer distributor or construct your own cable If you choose to create your own...

Страница 12: ...right Therefore the DMX address of the first Par should be 1 001 the DMX address of the second Par should be 1 8 9 009 the DMX address of the third Part should be 9 8 17 017 etc Please be sure that you do not have any overlapping channels in order to control each Par correctly If two or more Pars are addressed similarly they will work similarly Controlling After having addressed all Pars you may n...

Страница 13: ...12 Ordercode 42468 Par 64 Short Q4 18 Menu Overview ...

Страница 14: ...TUP button one more time to set the ID of the Par only in 8CH Mode 3 Slave Mode 01 When the display shows the device functions a slave device It will now react the same as its master 4 Sound controlled 01 Press the MODE button until the display shows Turn on the music and the Par will react to the beat of the music 02 You can set the sensitivity from low to high SU 00 31 5 Built in programs 01 Pre...

Страница 15: ...m 00 99 Red from 000 255 Blue from 000 255 Flash Frequency from 00 99 Red from 000 255 Green from 000 255 Blue from 000 255 Flash Frequency from 00 99 Cool White from 000 255 Flash Frequency from 00 99 Red from 000 255 Green from 000 255 Blue from 000 255 Cool White from 000 255 Flash Frequency from 00 99 Red White Flash from 00 99 Green White Flash from 00 99 Blue White Flash from 00 99 Yellow Wh...

Страница 16: ... 255 Gradual adjustment Cool White from 0 100 5 channels Channel 1 Dimmer intensity 0 255 Gradual adjustment from dark to brightest 0 100 Channel 2 Red Dimmer must be open 0 255 Gradual adjustment Red from 0 100 Channel 3 Green Dimmer must be open 0 255 Gradual adjustment Green from 0 100 Channel 4 Blue Dimmer must be open 0 255 Gradual adjustment Blue from 0 100 Channel 5 Cool White Dimmer must b...

Страница 17: ... 72 77 Macro Color 13 78 83 Macro Color 14 84 89 Macro Color 15 90 95 Macro Color 16 96 101 Macro Color 17 102 107 Macro Color 18 108 113 Macro Color 19 114 119 Macro Color 20 120 125 Macro Color 21 126 131 Macro Color 22 132 137 Macro Color 23 138 143 Macro Color 24 144 149 Macro Color 25 150 155 Macro Color 26 156 161 Macro Color 27 162 167 Macro Color 28 168 173 Macro Color 29 174 179 Macro Col...

Страница 18: ...lash frequency from slow to fast 0 20 flashes sec Channel 7 Color Programs 0 No Function 1 22 43 static color program Mode via Channel 2 23 45 Program 1 gradual change 46 68 Program 2 gradual change 69 91 Program 3 color switch 92 114 Program 4 color switch 115 137 Program 5 fantasy change 1 138 160 Program 6 fantasy change 2 161 183 Program 7 red gradual change 184 206 Program 8 green gradual cha...

Страница 19: ...30 39 ID3 40 49 ID4 50 59 ID5 60 69 ID6 70 79 ID7 80 89 ID8 90 99 ID9 100 109 ID10 110 119 ID11 120 129 ID12 130 139 ID13 140 149 ID14 150 159 ID15 160 169 ID16 170 179 ID17 180 189 ID18 190 199 ID19 200 209 ID20 210 ID21 211 ID22 212 ID23 213 ID24 251 ID62 252 ID63 253 ID64 254 ID65 255 ID66 ...

Страница 20: ... electrical power supply may cause a fuse to burn out If the fuse burns out the product will not function whatsoever 01 Unplug the unit from electric power source 02 Insert a screwdriver into the slot in the fuse cover Turn the screwdriver to the left at the same time gently push a bit Turn and Push The fuse will come out 03 Remove the used fuse If brown or unclear it is burned out 04 Insert the r...

Страница 21: ...Correct poor connections Repair or replace damaged cables Data link not terminated with 120 Ohm termination plug Insert termination plug in output jack of the last fixture on the link Incorrect addressing of the fixtures Check address setting One of the fixtures is defective and disturbs data transmission on the link Bypass one fixture at a time until normal operation is restored unplug both conne...

Страница 22: ... DMX Modes 4 5 or 8 channels Control protocol DMX 512 Cooling Forced cooling fan Housing Die cast aluminum powder coated finish Connections 3 pin DMX IN OUT Control Auto Sound Master Slave DMX Fuse 2A 250V Dimensions 290 x 230 x 230 mm LxWxH excl bracket Weight 3 3 kg Minimum distance Minimum distance from flammable surfaces 0 5 m Minimum distance to lighted object 1 3 m Design and product specifi...

Страница 23: ...22 Ordercode 42468 Par 64 Short Q4 18 ...

Страница 24: ... 2021 Showtec ...

Отзывы: