SHOWTEC 41370 Micro Spot Скачать руководство пользователя страница 21

19 


Product Specification 

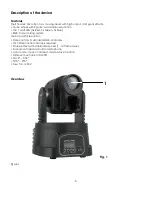
Model: Showtec Micro Spot 
Voltage: 240V-50Hz (CE) 
Power: 50W 
Fuse: 1A / 250V 
Dimensions: 175x175x225mm (LxWxH) 
Weight: 3,74 kg 


Operation and Programming 

Signal pin OUT: pin 1 earth, pin 2 (-), pin 3 (+)  
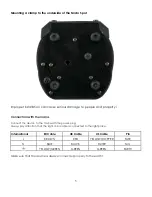
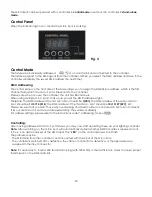
Set Up and Addressing: LED control panel 
DMX Channels: 5 / 13 
Signal input 3-pin XLR male 
Signal output 3-pin XLR female 


Electro-mechanical effects 

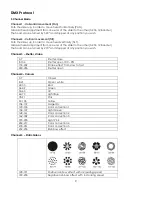
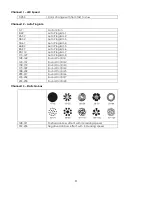
Static Gobos: 9 metal gobos and open 
All lenses are anti-reflection coated 
High luminous-efficiency parabolic system 
Strobe-effect with variable speed (1 flash -- 10 flashes/sec.) 
DMX-control via standard DMX-controller 
Sound-controlled via built-in microphone 
Pan 0º -- 540º 
Tilt 0º -- 270º 


Gobos 

Glass gobo: heat-resistant and intensify glass; dichroic glas coating 
Max. ambient temperature 

t

a

: 40°C; Max. housing temperature 

t

B

: 80°C 


Minimum distance: 

Minimum distance from flammable surfaces: 0.5m 
Minimum distance to lighted object: 1.3m 


Design and product specifications are subject to change without prior notice. 


Website: 

www.Highlite.nl


Email: 

[email protected]


Содержание 41370 Micro Spot

Страница 1: ...Micro Spot ORDERCODE 41370...

Страница 2: ...Showtec for more excellent lighting products We design and manufacture professional light equipment for the entertainment industry New products are being launched regularly We work hard to keep you o...

Страница 3: ...atures and Overview Backside Set Up and Operation One Micro Spot Multiple Micro Spots DMX Protocol 5 Channel Mode 13 Channel Mode Control Panel Control Mode DMX addressing Functions control panel Stan...

Страница 4: ...ins with particular caution Never remove warning or informative labels from the unit Never use anything to cover the ground contact Never run the device without lamp Never ignite the lamp if the objec...

Страница 5: ...t has reached room temperature If your Showtec device fails to work properly discontinue use immediately Pack the unit securely preferably in the original packing material and return it to your Showte...

Страница 6: ...have to be used Use a clamp to mount the projector with the mounting bracket to the trussing system The projector must never be fixed swinging freely in the room The installation must always be secure...

Страница 7: ...the mains Connect the device to the mains with the power plug Always pay attention that the right color cable is connected to the right place International EU Cable UK Cable US Cable Pin L BROWN RED Y...

Страница 8: ...Red 5x Green 5x Blue RGB Colour mixing system 16 bit pan tilt resolution DMX control via standard DMX controller 13 5 DMX control channels required Strobe effect with adjustable speed 1 10 flashes se...

Страница 9: ...7 Backside Fig 2 2 3 4 5 2 IEC Connector Fuse 1A 250V 3 DMX signal connector IN 4 Remote control 5 DMX signal connector OUT...

Страница 10: ...ten the effect light onto firm trussing Use a 30 kg rated or stronger C clamp fastened onto the Micro Spot Leave at least 1 meter on all sides for air circulation 2 Use a 3 p XLR cable to connect the...

Страница 11: ...can be turned by 270 and stopped at any position you wish Channel 3 Shutter strobe 0 7 Shutter close 8 134 Shutter open 100 0 135 239 Strobe effect from slow to fast 240 255 Shutter open Channel 4 Co...

Страница 12: ...at any position you wish Channel 4 Tilt fine 16 bit Channel 5 Pan Tilt Speed 0 255 Pan Tilt controllable speed with decreasing Channel 6 Shutter strobe 0 7 Shutter close 8 134 Shutter open 100 0 135 2...

Страница 13: ...Program 7 113 127 Auto Program 8 128 142 Sound Control 1 143 157 Sound Control 2 158 172 Sound Control 3 173 187 Sound Control 4 188 202 Sound Control 5 203 217 Sound Control 6 218 232 Sound Control...

Страница 14: ...s of the second Micro Spot should be 1 13 14 014 the DMX address of the third Micro Spot should be 14 13 27 027 etc Please be sure that you don t have any overlapping channels in order to control each...

Страница 15: ...lay will shows DMX or master slave mode that you selected before Pan mode Positive Pan mode Negative MODE 4 Press the MODE ESC button until the display shows and set the desired function via UP DOWN b...

Страница 16: ...scan angle for TILT just for Master Slave and sound control Press the MODE ESC button until the display shows Select the desired function using the UP DOWN buttons Press the ENTER button confirm the f...

Страница 17: ...slave address only one fixture can be connected To the fixture as the master or slave see Addressing menu If the master fixture resets or runs a test program all slaves will execute these acts too Yo...

Страница 18: ...r supply cables must not show any damages or material fatigue The Showtec Micro Spot requires almost no maintenance However you should keep the unit clean Otherwise the fixture s light output will be...

Страница 19: ...the steps below in sequence until a solution is found Once the unit operates properly do not carry out following steps If the light effect does not operate properly refer servicing to a technician Re...

Страница 20: ...g in output jack of the last fixture on the link Incorrect addressing of the fixtures Check address setting One of the fixtures is defective and disturbs data transmission on the link Bypass one fixtu...

Страница 21: ...are anti reflection coated High luminous efficiency parabolic system Strobe effect with variable speed 1 flash 10 flashes sec DMX control via standard DMX controller Sound controlled via built in micr...

Страница 22: ...2007 Showtec...

Отзывы: