Manual: ShowNET - Network Interface
Manual: ShowNET - Network Interface
page 14 / 63
page 15 / 63
(2a) Professional Mode - Setup-and-Store - Global Settings via Admin Tool
Since firmware 202002xx it is possible to adjust e.g. a projection zone, a safety zone, color
balancing, geometric corrections, etc. with the Admin Tool or directly via DMX and store
these settings to the ShowNET mainboard.
This procedure describes the adjustment of the global settings wih the
Admin Tool
.
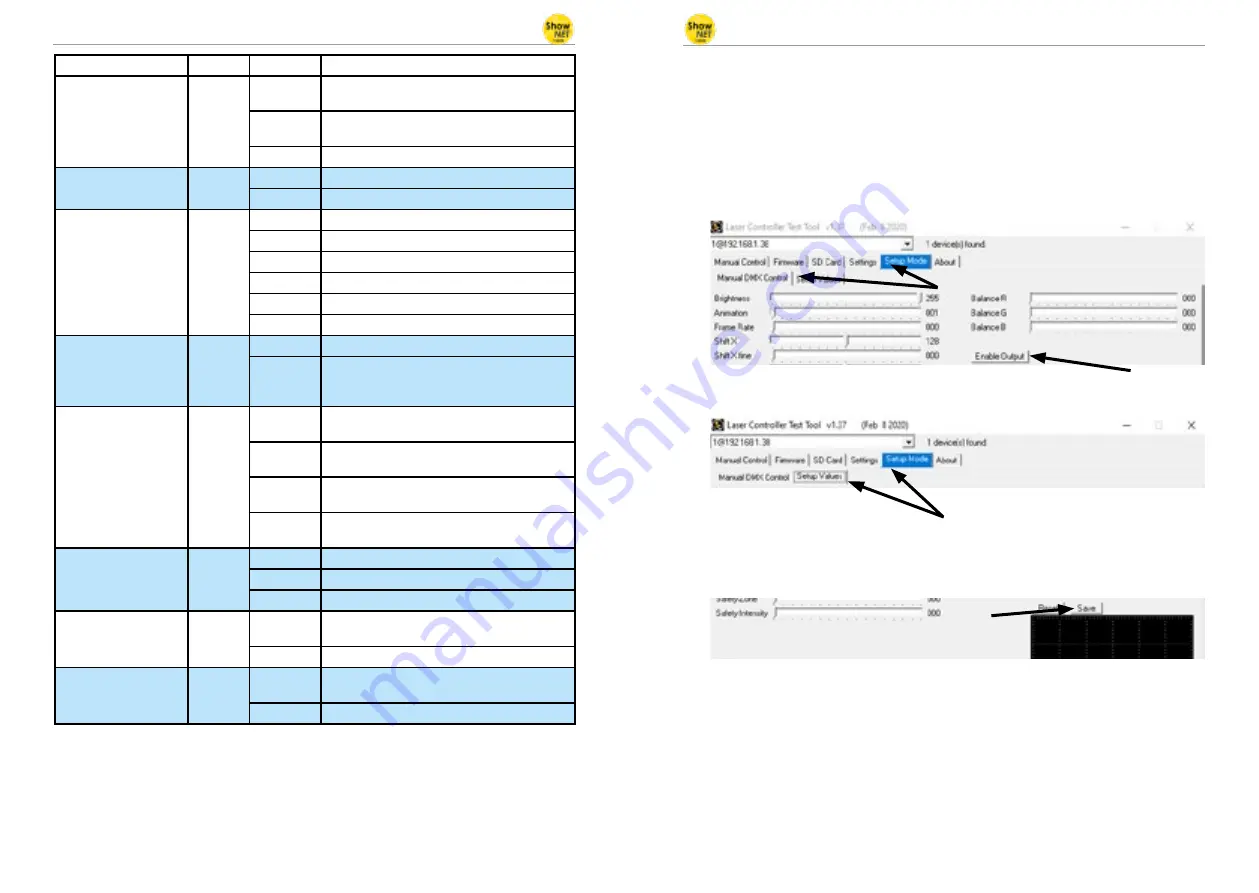
To do so, enable the laser output first. Switch to the tab ‚Setup Mode‘ -> ‚Manual DMX
Control‘ and then click on ‚Enable Output‘. The laser output will flash every few seconds
to indicate that the test mode of the admin tool is active.
Select the tab ‚Setup Mode‘ -> ‚Setup Values‘ as shown in the picture below:
Adjust the settings (besides the laser output, the little window in the bottom right of
the ‚Setup Value‘ tab will display the changes, too) and then store them to the ShowNET
mainboard with a click on ‚Save‘. The laser output will flash three times to confirm that the
changes have been saved.
The settings will be saved until either the ‚dmxconf‘ data gets deleted from the SD Card,
the settings will be resetted with a click on ‚Reset‘ on the Setup Values tab, or new settings
will be saved with a click on ‚Save‘ on the ‚Setup Values‘ tab.
It is also possible to save, change and reset settings directly via DMX. See the next chapter
for details on how to do this.
As the settings via DMX are the same as the settings in the ‚Setup Values‘ tab, please refer
to the following DMX chart for detailled explanation of the specific global adjustments.
Channel
Mode
Value
Function
12 Color effects
extended
DJ
0 - 127
Smooth color fade effect to the re-color effect
Value of channel 11 must be >15!
128 - 192
Blocking color effect to the re-color effect
Value of channel 11 must be >15!
193 - 255
Automatic change of color fade effects
13 Strobe
DJ
0 - 15
None
16 - 255
Increasing strobe effect
14 Operation mode
DJ
0 - 19
DMX
20 - 83
Automatic position X & Y-axis
84 - 147
Automatic position X-axis
148 - 211
Automatic position Y-axis
212 - 233
Demonstration mode
234 - 255
Sound-to-light
15 Scan speed
DJ
0 - 31
Default
32 - 255
Increasing scan speed (from 5 kpps to 30 kpps)
ATTENTION
: If you‘re unsure about the maxi-
mum scan speed, stay with the default setting!
16 Safety zone size
DJ
0 - 63
Size of horizontal safety zone
Safety zone is the bottom side
64 - 127
Size of horizontal safety zone
Safety zone is the upper side
128 - 191
Size of vertical safety zone
Safety zone is the left side
192 - 255
Size of the vertical safety zone
Safety zone is the right side
17 Safety zone intensity
DJ
0
No reduction
1 - 128
Decrease brightness up to half brightness
129 - 255
Decrease brightness up to blackout
18 Blanking
DJ
0 - 192
Manual select how much of the laser pattern
shall be blanked
193 - 255
Automatic blanking (increasing speed)
19 Blankshift
DJ
0 - 192
Manual select the pattern part the blanking of
channel 18 shall be applied to
193 - 255
Automatic blank shift (increasing speed)


