~9~
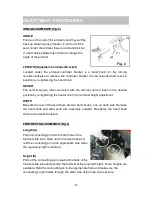
ARM ADJUSTMENTS (Fig.2)
ANGLE
Pull up on the end of the armrests and they will flip
back up allowing easy transfer in and out of the
seat. Under the armrest, there is a bolt and lock nut
(1) that can be adjusted up or down to change the
angle of the armrest.
LENGTH (Adjustable Controller Bracket)
Located under the armrest controller bracket is a hand knob (2). By turning
counter-clockwise to release, the controller bracket can be extended and reset in
position by re-tightening the hand knob.
HEIGHT
The vertical square tube connected with the armrest can be reset to the desired
position by re-tightening the hand knob (3) for armrest height adjustment.
WIDTH
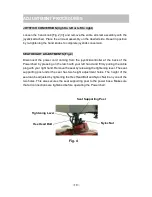
Beneath the rear of the seat there are two hand knobs, one on each side. Release
the hand knob and slide each arm assembly outward. Re-tighten the hand knob
when in the desired position.
FOOTREST ADJUSTMENTS (Fig.3)
Length (A)
Pull out connecting pin from the first hole in the
footrest slide tube. Slide out the footrest tube and
refit the connecting pin in the appropriate hole when
the required length is reached.
Height (B)
Pull out the connecting pin located at the back of the
footrest slide tube and position the footrest at the required height. Three heights are
available. Refit the connecting pin in the appropriate hole and make sure the
connecting pin protrudes through the other side of the tube and is secure.
ADJUSTMENT PROCEDURES
(3)
(2)
(1)
Fig. 2
Содержание UL8-W12 COMO
Страница 24: ...24...


