background image


14 

 
EXTRA GUIDELINES IN THE CONTROL OF YOUR SCOOTER 


Ramps


The stability of your scooter is governed by several factors such as the seating position, the 

angle of the slope and your height and weight. When approaching an incline, do so directly and 

not at an angle and whenever possible avoid making turns. When going down a ramp or slope


keep the 

speed settings to slow. This will ensure there is a safe controlled descent.  When the 

finger levers are released the scooter will slowly stop. 


Safe Climbing Angle 

Always follow the guidelines of the safe climbing angle shown as shown in figure 6.  


Caution - Do not turn off the control key while the unit is in motion 


Grass and Gravel


Please follow the guidelines given previously and your scooter will perform admirably over 

many surfaces. Avoid long grass, loose gravel and sand. 


NOTE: You should not operate your scooter in wet weather or on wet surfaces. This may 

cause the motor to sort out.


Angles and weights shown here for this scooter indicate the safe working angles for the user 

and equipment. Any scooter used outside these parameters may be unsafe and or cause future 

problems with the electrical systems 


(Single user) 

(Fig. 6) 

Содержание 889DXD

Страница 1: ...Owner s Manual ATTENTION Please read your owner s manual before driving your scooter 889DXD ...

Страница 2: ...ADJUSTMENTS 8 SCOOTER TILLER CONTROLS 10 FREE WHEEL OPERATION 12 STARTING TO DRIVE YOUR SCOOTER 13 EXTRA GUIDELINES IN THE CONTROL OF YOUR SCOOTER 14 BATTERIES AND BATTERY CHARGER 15 MAINTENANCE 16 TROUBLE SHOOTING GUIDE 17 TECHNICAL SPECIFICATIONS 18 NOTES 19 DISCLAIMER 20 ...

Страница 3: ...e transaxles and electromagnetic brakes give a safe and efficient ride This Shoprider scooter is designed for persons with limited mobility Please read this manual carefully and thoroughly before using your scooter and make sure you understand all the instructions FEATURE GUIDE 1 Tiller Handle Bar 2 Detachable Seat 3 Armrests 4 Pneumatic Gray Tire 5 Footrest Pad 6 Headlight 7 Detachable Basket 8 I...

Страница 4: ...ng so could cause personal injury and invalidate the warranty Always keep your feet on the scooter when moving Please make sure that you are physically fit to operate this unit Consult your dealer doctor for advice Always slow down and proceed carefully when traveling over rough or uneven ground For individuals with balance problems practice getting on the scooter with the assistance of a qualifie...

Страница 5: ... 5 kg cm together with Loctite 271 adhesive or equivalent Charge batteries daily after use Charging plug has to be removed from the scooter after charging Battery cables must be securely fastened onto battery terminals by the authorized dealers before using the unit Batteries must be tied down correctly and securely Any loose cable can not be allowed when the unit is driving Must check the battery...

Страница 6: ...n police cars fire trucks ambulances and taxis These usually have the antenna mounted on the outside of the vehicle 3 Long range transmitters and transceivers such as commercial broadcast transmitters radio and TV broadcast antenna towers and amateur HAM radios NOTE Other types of hand held devices such as cordless phones laptop computers AM FM radios TV sets CD players and cassette players and sm...

Страница 7: ...e scooter may make it more susceptible to EMI NOTE There is no easy way to evaluate the overall immunity of the scooter 5 Report all incidents of unintended movement or braking to your Shoprider dealer and note whether there are sources of EMI nearby WARNING Theoriginalmanufacturerandtheimporterofthescooterisnotresponsible for damage or injury incurred due to improper and unsafe use of our scooter...

Страница 8: ...elect the required tiller angle Refit the pin into one of the five location holes Seat Removal Fig 2 Fold down the back of the seat Loosen the hand knob fig 2 and carefully lift seat off Hand Knob Hand Knob Fig 2 ...

Страница 9: ... to the adjustable bolt and lock nut unscrew the lock nut and screw the bolt in or out to increase or decrease the angle Re tighten the lock nut Your scooter is dispatched from the factory with the armrests set parallel to the floor Length Fig 5 Located under the armrest bracket is a hand knob By turning counter clockwise to release the armrest can be extended and reset in position by re tightenin...

Страница 10: ...l Indicator The number of LED bars lit shows the amount of charge left in your batteries The amount of charge will only show at its true level when the scooter is in drive Caution Do not allow the LED bars go out completely as complete discharge of the batteries could cause irreversible damage 3 Lights A blue colored button at the rear of the tiller operates the lights 4 Horn A yellow button at th...

Страница 11: ...applied 6 On Off Key Switch Insert the key in the right side of the tiller Turn the key and the LED bars will light up There isadelaybeforethethumb fingerlevercontrolcanbeoperated whilethecontrollerischecking the circuits 7 Indicator Switch Operates turn indicator lights 8 Hazard Warning Switch A red button operates all indicator flashers Electromagnetic Brake The brake is automatically operated w...

Страница 12: ...ers thescootercannowbepushed Tore engagethemotor push down on the levers WARNING Always re engage the free wheeling device after use Failure to do so may result in injury Theoriginalmanufacturerandtheimporterofthescooterisnotresponsiblefordamage or injury incurred due to improper or misuse of the scooter Circuit Breaker Freewheel Release Lever ...

Страница 13: ...will be applied Steering Steering the scooter is light and easy Ensure when starting off you give a wide clearance when turning so that the rear wheels clear any obstacle that you are passing When steering through limited spaces such as a doorway or when turning around turn the tiller handles where you want to go and apply power gently The scooter will turn very tightly but will still move with co...

Страница 14: ...ly stop Safe Climbing Angle Always follow the guidelines of the safe climbing angle shown as shown in figure 6 Caution Do not turn off the control key while the unit is in motion Grass and Gravel Please follow the guidelines given previously and your scooter will perform admirably over many surfaces Avoid long grass loose gravel and sand NOTE You should not operate your scooter inwet weather or on...

Страница 15: ...uld void the warranty All the information of battery charger and its operation instruction shall be referred to the user manual attached with the charger in its packaging paper box First Time Use Prior to using your Portable scooter for the first time you must charge the batteries fully refer to Battery Charging Procedures Charging may take up to 12 hours Charging the batteries completely prior to...

Страница 16: ...ls of your scooter have split rims This allows any punctures to be repaired easily To change the wheels remove the center 13 mm bolt and slide the wheel off its axles Take care not to lose the drive key on the rear wheels When changing a tire you must deflate the tire first Remove the four bolts to split the rim if required Ensure that when refitting the wheel the retaining bolt is fitted with a l...

Страница 17: ...rcuit breaker can be found under the rear chassis cover accessible through a port hole under the seat Check List If your scooter fails to operate please check the following Unit is switched on All plugs and connectors are firmly fixed Battery level shows full charge Freewheeling device is in the drive position If the free wheel device has been operated with the scooter left switched on then the sc...

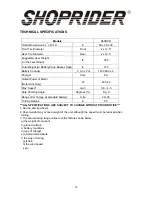
Страница 18: ...Only W 400 x 2 Max Speed2 mph 3 8 4 5 Safe Climbing Angle Degrees Fig 6 Range3 Per charge w standard battery mile 28 30 Turning Radius in 85 ALL SPECIFICATIONS ARE SUBJECT TO CHANGE WITHOUT PRIOR NOTICE 1 Not the anti tip wheels 2 Driver weight may exceed weight of the unit although the speed must be reduced when turning 3 The actual driving range varies with the factors shown below a the weight o...

Страница 19: ...19 NOTES ...

Страница 20: ...oducts Warranty is only valid when genuine Shoprider parts are used All modifications on the Scooter unless approved and authorized by Shoprider will automatically invalidate the warranties Standard warranty does not extend to consumable items and parties other than the original user The preceding guidance is intended to assist you in the safe operation of this Scooter If you should have any quest...

Отзывы: