


Shining Technology CitiDISK HDV Quick Usage Guide v11.0 Shining Technology CitiDISK HDV Quick Usage Guide v11.0
Updating the CitiDISK HDV Firmware
Proceed following steps with caution and do not un-plug
the CitiDISK HDV’s power while in operation, neither
exiting the program prematurely; otherwise the firmware
could be damaged.
1) Uninstall the previous version of Uploader and install the latest
“Firmware Uploader”. The firmware uploader can be found in the
CD included or downloaded from http://www.shining.com,
“Download & Support” page, “CitiDISK HDV/DV” section.
2) Connect the CitiDISK HDV to your computer (Windows System only)
with the FireWire cable.
3) Turn on the CitiDISK HDV. Wait for about 20 seconds.
4) Click on the “Safe to remove” icon at the bottom right corner of the
tool bar. Select the disk drive that you wish to eject.
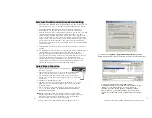
The message illustrated below will appear; click on “OK” to continue.
5) Do NOT disconnect the FireWire cable from the system. Leave the
CitiDISK HDV power on. Wait for another 20 seconds till the CitiDISK
HDV re-synchronizes itself to the system - the “
GREEN
” light is on and
not blinking.
6) Double-click the “CitiDISK HDV firmware uploader” icon on the
desktop to launch the program. The first window of the Firmware
Upload will pop up. The top text window displays the Uploader version
number, e.g. “v1.93x”. Current installed firmware date code and the
HW Rev is “FW1256H R1” will be both displayed in the bottom text
window.
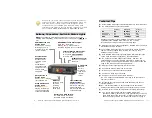
Quick Play Last Captured Clip
Play All Captured Clips
P12
•
Set the camera to “VCR” mode.
•
Toggle the middle “
QPLAY
” button once to play the last captured
clip; subsequently, the
“QPLAY”
light turns solid
ORANGE
when
playing.
•
Toggle “
QPLAY
” button once to stop playing immediately or wait
till the clip is played to the end.
•
The
“QPLAY”
light turns off.
Note:
As the time of this Quick Usage Guide released, the CitiDISK
HDV does not support the QPLAY neither the PLAYALL functions to
viewfinder for HDV. User will be able to download the Firmware
Uploader and firmware to update when released.
•
Set the camera to “VCR” mode.
•
Press and hold the middle “
QPLAY”
button for over 3 seconds
and the
ORANGE
light will start to blink.
The last captured clip will play first; then it loop play from the
first recorded clip of the “Media” folder. Additional clips will play
in the sequence they were captured.
You can reverse the order of the playback sequence by toggling
the “
REC
” button once. The “
RED
” light blinks if reverse
direction is selected. Press the “
REC
” button again to reset to
the normal order.
•
Toggle the middle
ORANGE
button once to abort playing the
current clip and to jump forward to the next clip (Only if “
RED
”
light is off). It jumps backward if ”
RED
” light is blinking.
•
Press and hold the middle
ORANGE
button for over 3 seconds to
stop the “PlayAll” function.
Note:
Each camera implements different length of buffer while
playing back the clip to viewfinder, jumping in “forward” clip or
in “backward” clip may take 4-5 seconds to be effective.
Jump Forward
Jump Backward
P9