ShenPaz Sintra PRO 120zrf Скачать руководство пользователя страница 30

Ver 

3

 -01/08/2020 


30


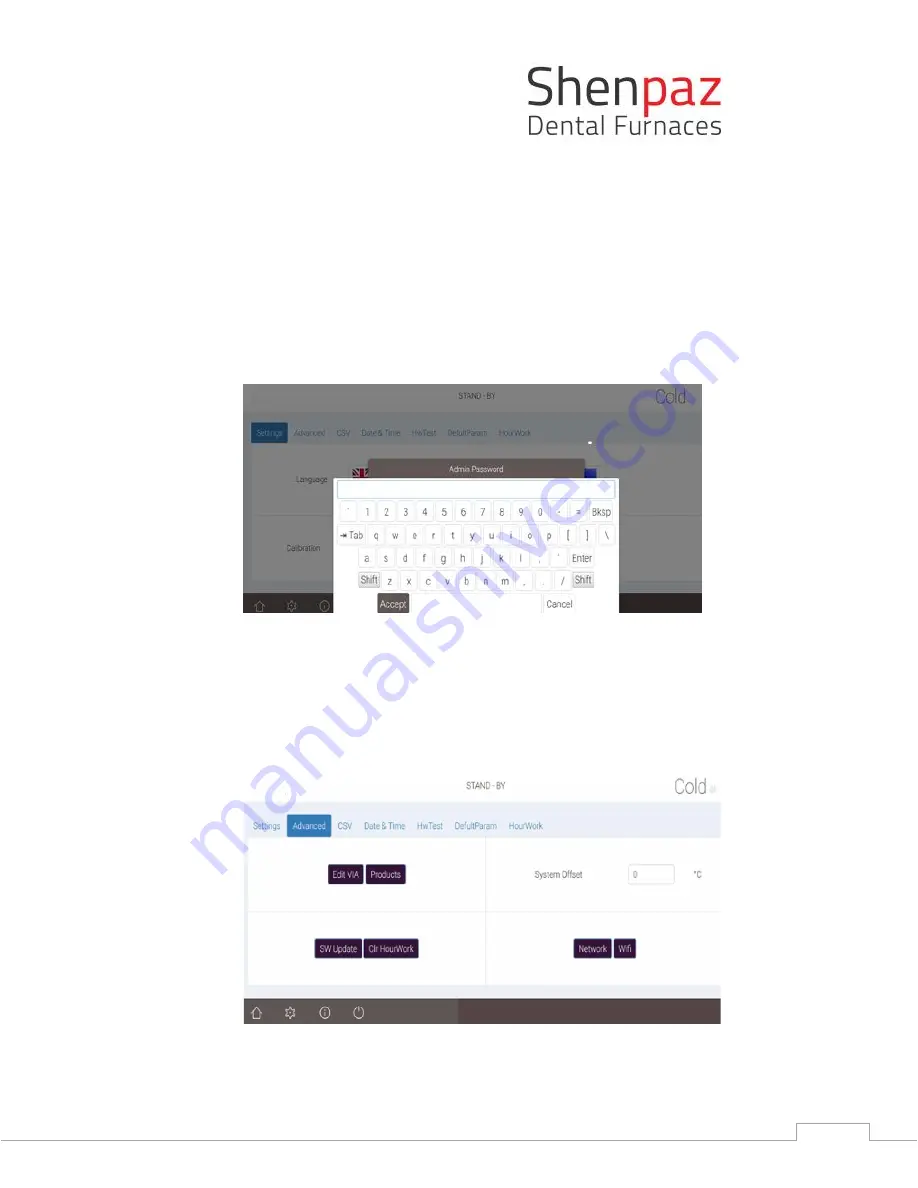
All functions performed from this screen is password protected. 

To access to advanced section, you will need to use the password: admin   

Once the password is accepted, the “Advanced” screen will open. 

From this screen which appears on the PC or other chosen device after pairing, you can do the 
following: 


1.


In Admin password pop-up screen, place cursor into empty field. 

2.


Keyboard will appear, type password, press Accept. 

3.


Admin password screen will appear with hidden password, press OK. 

4.


Advanced setting is opened for editing. 


Figure 

22

 -  Advanced Screen 

Figure 21 - Enter password screen and press OK


Содержание Sintra PRO 120zrf

Страница 1: ...Ver 3 01 08 2020 1...

Страница 2: ...lation of the refractory table 13 4 3 Electric Connection 14 5 Start a sintering program 15 6 Intended Use 16 7 User interface 16 7 1 Display screens overview and programming possibility 17 7 2 Naviga...

Страница 3: ...Ver 3 01 08 2020 3 10 Warranty and service 39 11 Disclaimer 40 12 Appendices preset programs list 41...

Страница 4: ...hazards for humans or property damage are marked with the icon aside and are also boxed Indications d avertissement Les avertissements dans le texte sont signal s par un triangle color et sont encadr...

Страница 5: ...chine may only be carried out by trained specialized personnel Warning ATTENTION DANGER This product does not comply with the Directive Do not use in explosive atmospheres Do not operate with explosiv...

Страница 6: ...on the top of the table During use the area around the furnace table is very hot approach and contact with the door and top of the furnace Take out the tray only when the furnace is cold Dental work...

Страница 7: ...t en tenant le bas du four avec une main et le c t sup rieur avec l autre main Ne tirez pas le four par son support pour viter des dommages ATTENTION VEUILLEZ LIRE ATTENTIVEMENT LES INSTRUCTIONS AVANT...

Страница 8: ...hez le cordon d alimentation de la prise de courant 2 Utilisez uniquement un cordon d alimentation autoris avec la tension appropri e 230 V 115V 50Hz 60 Hz fournir avec le four ATTENTION 2 1 Location...

Страница 9: ...a prise lectrique doit tre inf rieure 2 m tres 2 2 Rating Fuses 230V 115v 50Hz 60Hz Circuit breaker 16A 230V or 20A 115V Circuit breaker 25A fast 230V 115v 50Hz 60Hz Disjoncteur 16 A 230V ou 20A 1 15V...

Страница 10: ...her than domestic and those directly connected to a low voltage power supply network which supplies buildings used for domestic purposes D claration de conformit CE Ce produit a t con u et fabriqu sur...

Страница 11: ...h temperature furnace model name SINTRA PRO 90 Zr or SINTRA PRO 120 Zrf 1 Mains cable 1 5 meters 1 Sintering tray lid 1 High temperature sintering table 100 gr zirconia beads only with SINTRA PRO 120...

Страница 12: ...O 90 Zr SINTRA PRO 120 Zrf incl connections Width 1 4 m 0 8 m for non flammable materials Depth 0 9 m Height 1 0 m The set up surface must be level The net weight of the machine is 67kg The set up sur...

Страница 13: ...d original power cable and plug Usage of unauthorized cables is dangerous Connect Ethernet cable to allow networking Connect Mains Power Plug 4 2 Installation of the refractory table Remove any remain...

Страница 14: ...act providing 220 240 V 110 115 V and 50 60 Hz The electrical socket outlet must be located close to the furnace and be easily accessible NOTE When using an extension cord or a multiple socket outlet...

Страница 15: ...aph screen press to start the program From this point you will be able to follow the cycle on the graph screen and see the remaining time of the cycle TIP Insufficient sintering results may be due to...

Страница 16: ...he processing of other products than those intended for as well as the handling of hazardous substances or materials hazardous to one s health does not apply as under the intended use As to the materi...

Страница 17: ...he temperature is below the default value Figure 2 Lift start Figure 3 Lift stop 7 1 Display screens overview and programming possibility The display is an intuitive touch screen For editable fields p...

Страница 18: ...and graph screens Exit button to shut down the furnace it is recommended to use this button Next screen Previous screen Deletes step program value Edit program or view a program in graph before start...

Страница 19: ...PAZ will appear for few seconds followed by the main screen There are 3 options to begin operating the furnace and run a cycle Add a new program VIA SIMPLE SINTERING Wizard Select from existing preset...

Страница 20: ...pre listed brands assign a new name If an existing program number is chosen by default the furnace will assign to you the next free slot in the furnace NOTE If the new ZrO2 brand is not listed please...

Страница 21: ...ning distance This programmable step loop will be operating until the door will be fully open Note the fast opening will take place instead of the original cooling of the cycle or in combination FAST...

Страница 22: ...ement of the ZR manufacturer or user need Figure 11 Create and modifying a program Figure 12 editing parameters In case of error the field will appear in reddish color thus indicating to the user that...

Страница 23: ...t b To add a new brand open the advanced setting sheet c Under password admin d Press on the product button in Advanced screen Figure 13 Advanced setting 1 Select Products 2 In the below screen Figure...

Страница 24: ...e Copy button c The system will automatically assign a next available program number d Once the program is created the parameters and name can be modified 3 Using the VIA SIMPLE SINTERING WIZARD By se...

Страница 25: ...ype of COOLING selected the value may not be accepted and a recommended program will not be available The VIA recommended program will appear in the Program Number field see figure 15 To review the pr...

Страница 26: ...program you wish to run Figure 16 CHOOSING PROGRAM FROM LIST Highlight the chosen program press the icon pencil and the program parameters will appear on the next screen TIP Only on editable cycle th...

Страница 27: ...lay In the same way it is possible to delete an unwanted row by pressing on the trash can on the right of the row If you want natural cooling only the first row is mandatory to create a program Missin...

Страница 28: ...the top of the screen SETTINGS SCREEN The Settings screen allows the user to change the settings of the furnace Figure 19 Settings screen LANGUAGE a drop box is opened with a list of languages By choo...

Страница 29: ...hoose a set of colors for his screen A drop box will show and allow the user to modified colors DATE TIME Figure 20 time setting ADVANCED This section will give you access to Edit VIA programs Product...

Страница 30: ...ill open From this screen which appears on the PC or other chosen device after pairing you can do the following 1 In Admin password pop up screen place cursor into empty field 2 Keyboard will appear t...

Страница 31: ...Ver 3 01 08 2020 31 Figure 23 Advanced Screen Automatic and Hardware tests Figure 24 Advanced Screen Setup limits Figure 25 EDIT VIA SCREEN...

Страница 32: ...ng screen Product list By pressing the icon add a new brand product to the list By pressing the trash can the product select will be delete 7 3 Connecting Pairing furnace to a device via Network Conne...

Страница 33: ...Ver 3 01 08 2020 33 Choose and open Ethernet connection Press internet protocol version 4 TCPIP V4 then press on Proprieties and set detail as follow Type in your PC the set IP address 10 0 0 186...

Страница 34: ...nace If the address is changed by the user please keep it in a safe place for future use and as it will be required by the to support team if needed You are now connected to your furnace and you can s...

Страница 35: ...creen image By pressing on your PC or other pairing device on CSV icon you can load or download a CSV file The new program will be uploading to the furnace by pressing the icon above The PC will confi...

Страница 36: ...om your dealers Press the upload button under the upload SW button upload the furnace will reboot automatically with the new software In case of error the following error screen will appear and a soun...

Страница 37: ...ithout delay limitation in time If you wish to stop the recovery press on the stop button on the bottom of the graph screen Note the door will open only below the limit define in the setting of openin...

Страница 38: ...insert can be exchanged and not the entire table While using the fast cycle the insert is used as a fast cycle table and beads can be place into it and the restoration is placed on the insert directly...

Страница 39: ...nace from the main switch located on the rear panel b Disconnect the furnace from the electricity In case the furnace s surface is hot leave it unplugged until the furnace cools down completely c Clea...

Страница 40: ...for brands listed But these products change and upgrade all the time The dental laboratory technician is entirely responsible for checking the cycles parameters before launching a program Disclaimer...

Страница 41: ...rgen HT Long cycle 299 Argen HT Short Cycle 300 Pritidenta Single fast 10 301 Pritidenta 50 no color 302 Pritidenta 20 no color 303 Pritidenta Bridge 20 304 Pritidenta 20 50 colored 305 Pritidenta Bri...

Страница 42: ...333 Lava 20 334 Lava Single 50 335 Lava Bridge 50 colored 336 Katana STML ultra fast 337 Katana STML colored 338 Katana STML no color 20 339 Katana STML no color 50 340 Katana UTML FAST 341 Katana UT...

Страница 43: ...n zirkonia Bridge colored 50 370 Kingch Zirconia single speed 10 371 Kingch Zirconia colored 20 372 Kingch Zirconia 50 373 Kingch Zirconia 50 374 Kingch Zirkonia colored 10 375 Kingch Zirkonia Bridge...

Страница 44: ...Aidite Zirconia 50 406 Aidite Zirkonia colored 10 407 Aidite Zirkonia Bridge colored 20 409 Aidite zirkonia Bridge colored 50 410 Straumann Zirconia single speed 10 411 Straumann Zirconia colored 20...

Отзывы: