background image

05-22544-22545-22546-22547

-22548-22549-22589-0A

Page 3

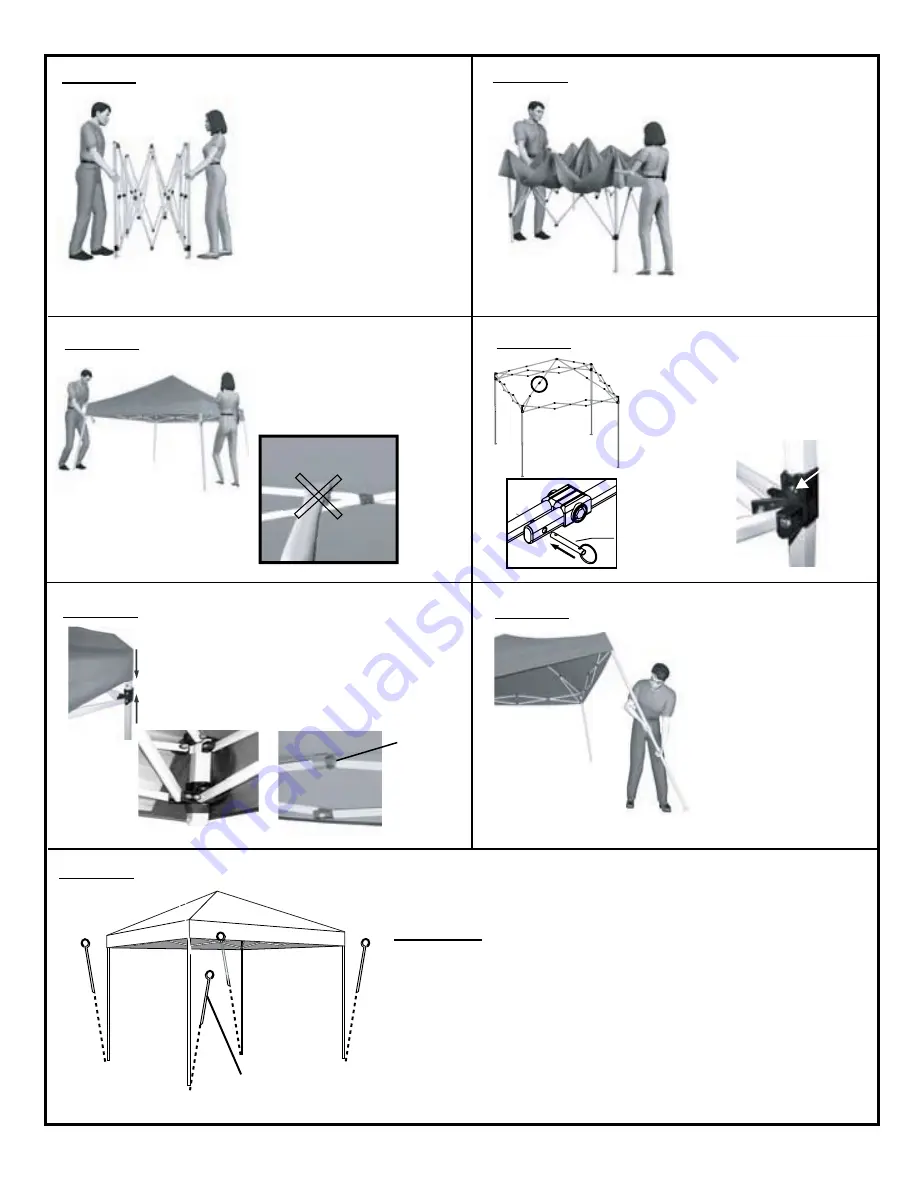
Step 1:

Remove assembly  

from portable, wheeled  

storage bag. Grab corner 

legs in each hand. Lift 

frame slightly off ground. 

Stepping backwards, pull 

frame apart until your 

arms are fully extended.

Step 2:

Unfold cover. Place 

cover over frame. 

Align corner pockets 

of cover over frame 

legs.

Step 3:

Do not place hands 

between frame tubes. 

Push up until canopy is 

fully opened.

Step 5:

Pull corners down snug, 

attaching hook and loop 

fasteners. Secure cover 

fasteners around top 

roof frame.

Step 4:

Slide corner brackets 

up until button snaps 

into place. Align roof 

supports at joint and 

insert stabilizer pins.

Step 6:

Step 7:

For temporary anchoring of canopy on grass, dirt or packed 

soil, insert temporary spike anchors through corner feet.

CAUTION:

 Temporary spike anchors are NOT designed  

for permanent installation. Never leave canopy unattended.

For all PRO SERIES

 straight leg Pop-Ups, legs should be 

square and straight when temporary spike anchors are  

inserted through corner feet.

For assembly questions, Please call Customer Support: 

1-800-524-9970

 or in CANADA: 

1-800-559-6175

Shown 

without 

cover 

for 

clarity

corner of 

Shelter

cover 

faStener

pin

anchor

Slide legs to desired 

height, making sure 

buttons snap into place.  

Содержание 22544

Страница 1: ...Canada Description Model 12 x12 Slant Leg Pop Up White 22544 12 x12 Slant Leg Pop Up Red 22545 12 x12 Slant Leg Pop Up Blue 22546 12 x12 Slant Leg Pop Up Black 22547 12 x12 Slant Leg Pop Up Desert Br...

Страница 2: ...questions please call the consumer support number 2 This product is classified as a temporary portable shade product and is intended to provide basic shade and protection from environmental elements...

Страница 3: ...Step 4 Slide corner brackets up until button snaps into place Align roof supports at joint and insert stabilizer pins Step 6 Step 7 For temporary anchoring of canopy on grass dirt or packed soil inser...

Страница 4: ...22604 SLIDING CONNECTOR KIT 6 15397 Replacement Cover Green 6 800801 Replacement Cover White 6 800802 Replacement Cover Red 6 800803 Replacement Cover Blue 6 800804 Replacement Cover Black 6 800805 R...

Страница 5: ...prend environ 15 min 3 7 x 3 7 m Tente d pliante avec Jambes Obliques Les Traductions Fran aises D instruction D assemblage Description Mod le n 3 7 x 3 7 m Jambes Obliques Blanc 22544 3 7 x 3 7 m Jam...

Страница 6: ...de monter Appeler le num ro de service client le pour toutes questions 2 Ce produit est class comme un produit temporaire portable pour faire de l ombre et il est pr vu pour fournir de l ombre et pour...

Страница 7: ...haut jusqu ce que le bouton s enclenche en place Aligner les supports du toit la jonction et ins rer les bro ches de stabilisation tape 6 tape 7 Pour ancrer l abri temporairement dans l herbe la terre...

Страница 8: ...393 Assemblement du tube glisser 4 22603 Kit de cr te sup rieure 5 22604 Kit du connecteur glisser 6 15397 Toile de remplacement Vert 6 800801 Toile de remplacement Blanc 6 800802 Toile de remplacemen...

Страница 9: ...rna inclinada Instrucciones de ensamblaje en espa ol 150 Callender Road Watertown CT 06795 www shelterlogic com DescripCi n Modelo 3 7 x 3 7 m Pierna Inclinada Blanco 22544 3 7 x 3 7 m Pierna Inclinad...

Страница 10: ...ensamblar Si tiene preguntas por favor llame al n mero de asistencia al consumidor 2 Este producto est clasificado como producto port til para brindar sombra temporal y est dise ado para proporcionar...

Страница 11: ...tes de esqui na hacia arriba hasta que el bot n encaje a presi n en su sitio Alinee los soportes del techo en las uniones e inserte los pernos para estabilizar Paso 6 Paso 7 Se ilustra sin la cubi ert...

Страница 12: ...asamblea de tubo 4 22603 Juego Superior de la Cresta 5 22604 Desplazamiento Del Juego Del Conectador 6 15397 Cubierta del reemplazo Verde 6 800801 Cubierta del reemplazo Blanco 6 800802 Cubierta del r...

Отзывы: