
The Embedded Web Interface
Even without the mobile app Shelly can be set and con-
trolled through a browser and connection of a mobile phone
or tablet.
Abbreviations used:
Shelly-ID
– consists of 6 or more characters. It may include
numbers and letters, for example
35FA58
.
SSID
– the name of the WiFi network, created by the device,
for example
ShellyFlood-35FA58
.
Access Point (AP)
– in this mode in Shelly creates its own
WiFi network.
Client Mode (CM)
– in this mode in Shelly connects to an-
other WiFi network.
Installation/Initial inclusion
Step 1
Place Shelly in the room where you want to use it. Open it
and press the Button. The LED should flash slowly.
To open the device, twist the top and bottom part of the
case counter clockwise.
CAUTION!
If the LED does not flash slowly, press and
hold the Button for 10 seconds. Upon successful factory
reset, the LED will flash slowly.
Step 2
When the LED is flashing slowly, Shelly has created a WiFi net
-
work, with name such as
ShellyFlood-35FA58
. Connect to it.
Step 3
Type
192.168.33.1
into the address field of your browser to
load the web interface of Shelly.
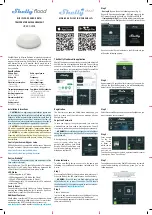
General - Home Page
This is the home page of the em-
bedded web interface. Here you
will see information about:
• Current Temperature
• Current Flood detection status
• Current battery percentage
• Connection to Cloud
• Present time
• Settings
Sensor Settings
Temperature Units
: Setting for change of the temperature units.
• Celsius
• Fahrenheit
Temperature Threshold:
Define the temperature Threshold
in which Shelly Flood will “wake up” and send status. The
value can be from 1° up to 5° or you can disable it.
Internet/Security
WiFi Mode-Client:
Allows the device to connect to an available
WiFi network. After typing the details in the fields, press
Connect
.
WiFi Mode-Acess Point:
Configure Shelly to create a Wi-Fi
Access point. After typing the details in the fields, press
Create Access Point
.
Restrict Login
: Restrict the web interface of Shely with a
Username and Password. After typing the details in the re-
spective fields, press Restrict Shelly.
SNTP Server
: You can change the default SNTP server. En
-
ter the address, and click Save.
Advanced Developer Settings
: Here you can change the
action execution:
• Via CoAP (CoIOT)
•
Via MQTT
Cloud:
You can Activate/Deactivate the connection to Shelly
Cloud.
ATTENTION:
To reset the device, press and hold the But-
ton for at least 10 seconds. Upon successful factory reset,
the LED will flash slowly.
Settings
Time Zone and Geo-location
: Enable or Disable the auto-
matic detection of Time Zone and Geo-location. If Disabled
you can define it manually.
Firmware Upgrade:
Shows present firmware version. If a
newer version is available, you can update your Shelly by
clicking Upload to install it.
Factory reset:
Return Shelly to its factory settings.
Device Reboot:
Reboots the device.
Device Info:
Shows your device ID.
In Client Mode shows also your WiFi network name and WiFi
signal strength.
Shelly Devices Settings
After your Shelly de-
vice is included in the
app, you can control
it, change its settings
and automate the
way it works. To enter
the details menu of
the device, click on
it’s name.
From there you may
control the device, as
well as edit its appearance and settings.
Sensor settings
Temperature Units:
Setting for change of the
temperature units.
• Celsius
• Fahrenheit
Temperature
Threshold:
You can define the tem
-
perature Threshold in which
Shelly Flood will “wake up”
and send status. The value
can be from 0.5° up to 10°,
or you can disable it.
Mute:
Use this to mute the sound,
when Shelly Flood detects
leakage.
Internet/Security
WiFi Mode - Client:
Allows the device to connect to an avail-
able WiFi network. After typing the details in the respective
fields, press Connect.
WiFi Mode - Access Point:
Configure Shelly to create a Wi-
Fi Access point. After typing the details in the respective
fields, press Create Access Point.
Restrict Login:
Restrict the web interface (IP in the Wi-Fi
network) of Shely with a Username and Password. After typ-
ing the details in the respective fields, press
Restrict Login
.
Settings
Firmware Update
Update the firmware of Shelly, when a new version is re
-
leased.
Time Zone and Geo-location
Enable or Disable the automatic detection of Time Zone and
Geo-location.
Factory Reset
Return Shelly to its factory default settings.
Device Information
Here you can see the:
• Device ID - Unique ID of Shelly
•
Device IP - The IP of Shelly in your Wi-Fi network
• Device Type – The type of your Shelly device
•
WiFi Name – The name of the WiFi network to which Shelly
is connected
•
WiFi Signal – The signal strength of the WiFi network to
which Shelly is connected
Edit Device
From here you can edit:
•
Device Name
• Device Room
• Device Picture
When you are done, press
Save Device.
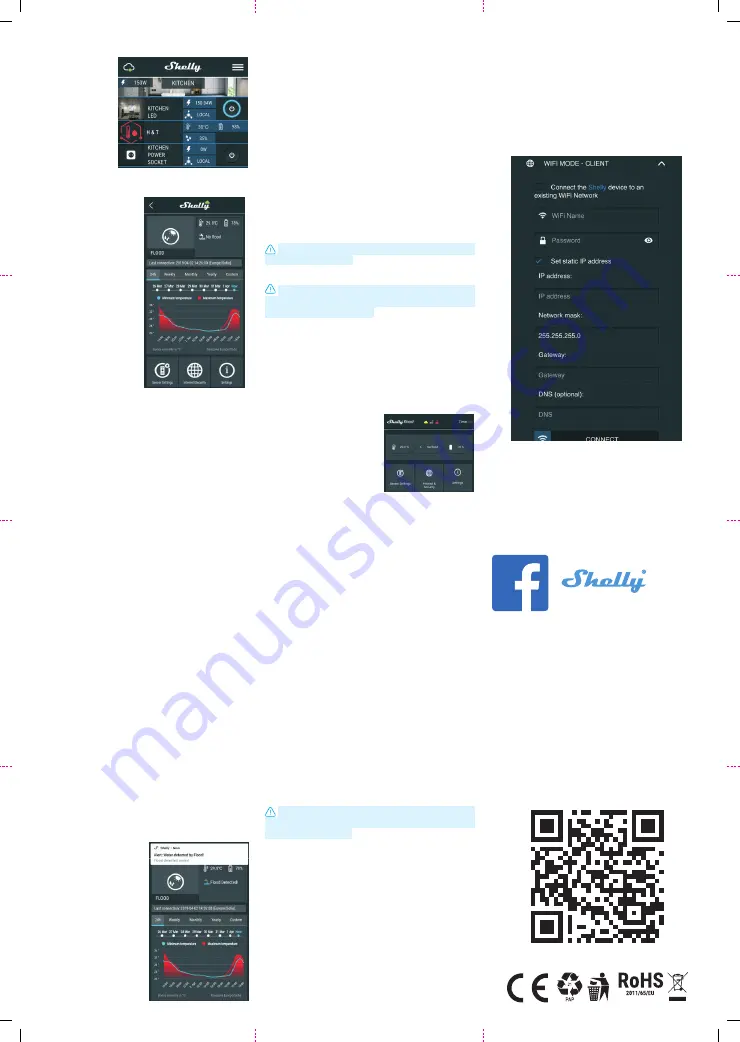
Modes:
•
Alarm mode
* - In this mode,
Shelly Flood will activate the
sound alarm when it detects
any leakage, and will send
notification every 5 minutes.
•
Rain Mode
- In this mode,
Shelly Flood will only send
notification once leakage is
detected, and second time
when the leakage is not
present.
*This is the default mode of Shelly
Flood.
Battery Life Recommendations
For the best battery life we recommend you the following
settings for Shelly Flood:
Sensor settings
• Temperature Threshold: 1°
Set a static IP address in the Wi-Fi network for Shelly from
the ebmedded web interface. Go to
Internet/Security
->
Sensor settings
and press on
Set static IP address
. After
typing the details in the respective fields, press
Connect
.
Keep Shelly at the best distance possible to the Wi-Fi router.
H&T
Developers support
Our Facebook support group:
https://www.facebook.com/groups/ShellyIoT
-
CommunitySupport/
Our support e-mail:
Our website:
www.shelly.cloud
You can find the latest PDF version of this user
guide here:
(
R
o
HSII Di
rective)


