

Step 6:
Enter a name for the Device (in the Device Name
field). Choose a Room, in which the Device has to be
positioned. You can choose an icon or add a picture
to make it easier to recognize. Press “Save Device”.
Step 7:
To enable connection to the Shelly Cloud service for
remote control and monitoring of the Device, press
“YES” on the following pop-up.
Shelly Device Settings
After your Shelly device is included in the app, you
can control it, change its settings and automate the
way it works. To enter at the details menu of the re-
spective Device, simply click on it’s name. From the
details menu you may control the Device, as well as
edit its appearance and settings.
Internet/Security
WiFi Mode - Client:
Allows the device to connect to
an available WiFi network. After typing the details in
the respective fields, press Connect.
WiFi Client Backup:
Allows the device to connect to
an available WiFi network, as a secondary (backup),
if your primary WiFi network becomes unavailable.
After typing the details in the respective fields, press
Set
.
WiFi Mode - Acess Point:
Configure Shelly to create
a Wi-Fi Access point. After typing the details in the
respective fields, press Create Access Point.
Cloud:
Enable or Disable connection to the Cloud
service.
Restrict Login:
Restrict the web interface of Shely
with a Username and Password. After typing the
details in the respective fields, press Restrict Shelly.
Actions
Shelly Button1 may send commands for control of
other Shelly devices, by using a set of URL endpoints.
All URL actions can be found at:
https://shelly-api-
docs.shelly.cloud/
•
Button Short Press: To send a command to an URL,
when the button is pressed once.
•
Button Long Press: To send a command to an URL,
when the button is pressed and hold.
•
Button 2x Short Press: To send a command to an
URL, when the button is pressed two times.
•
Button 3x Short Press: To send a command to an
URL, when the button is pressed three times.
Settings
Longpush Duration
•
Max - the maximum time, that the button is pressed
and hold, in order to triger Longpush command.
Range for max (in ms): 800-2000
Multipush
The maximum time, between pushes, when triggering
a multipush action. Range: 200-2000
Firmware Update
Update the firmware of Shelly, when a new version
is released.
Time Zone and Geo-location
Enable or Disable the automatic detection of Time
Zone and Geo-location.
Factory Reset
Return Shelly to its factory default settings.
Device Reboot
Reboots the Device
Device Information
•
Device ID - Unique ID of Shelly
•
Device IP - The IP of Shelly in your Wi-Fi network
Edit Device
•
Device Name
•
Device Room
•
Device Picture
When you are done, press
Save Device.
The Embedded Web Interface
Еven without the mobile app, Shelly can be set and
controlled through a browser and WiFi connection of
a mobile phone, tablet or PC.
Abbreviations Used:
•
Shelly-ID
– the unique name of the Device. It con-
sists of 6 or more characters. It may include numbers
and letters, for example 35FA58.
•
SSID
– the name of the WiFi network, created by
the Device, for example shellybutton1-35FA58.
•
Access Point (AP)
– the mode in which the Device
creates its own WiFi connection point with the re-
spective name (SSID).
•
Client Mode (CM)
– the mode in which the Device
is connected to another WiFi network.
Installation/Initial inclusion
Step 1
Install Shelly to the power grid following the schemes
described above and place it into the console. After
turning the power on Shelly will create its own WiFi
network (AP).
WARNING!
In case the Device has not created its’ own
AP WiFi network with SSID like
shellyix3-35FA58
,
please check if the Device is connected according-
ly to the Instalation Instructions. If you still do not
see an active WiFi network with SSID like
shelly-
ix3-35FA58
or you want to add the Device to another
Wi-Fi network, reset the Device. You will need to have
physicall access to the Device. Press and hold the re-
set button, for 10 seconds. After 5 seconds, the LED
should start blinking fast, after 10 seconds it should
blink faster. Release the button. Shelly should return
to AP mode. If not, please repeat or contact our cus-
tomer support at:
Step 2
When Shelly has created an own WiFi network
(own AP), with name (SSID) such as
shellybut-
ton1-35FA58
. Connect to it with your phone, tablet
or PC.
Step 3
Type 192.168.33.1 into the address field of your
browser to load the web interface of Shelly.
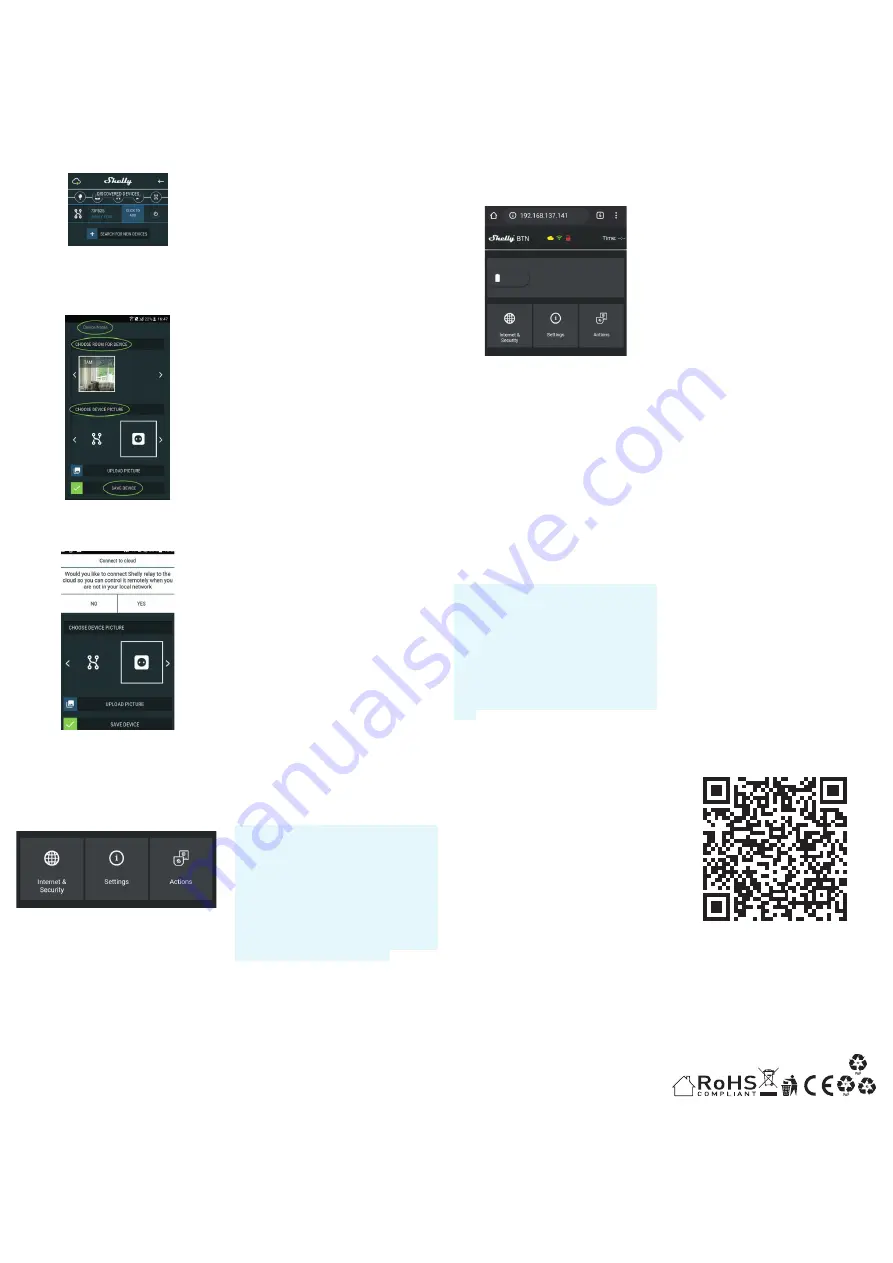
General - Home Page
This is the home page of the embedded web inter-
face. Here you will see information about:
•
Battery percentage
•
Connection to Cloud
•
Present time
•
Settings
Internet/Security
WiFi Mode - Client:
Allows the device to connect to
an available WiFi network. After typing the details in
the respective fields, press
Connect
.
WiFi Client Backup:
Allows the device to connect to
an available WiFi network, as a secondary (backup),
if your primary WiFi network becomes unavailable.
After typing the details in the respective fields, press
Set.
WiFi Mode - Acess Point:
Configure Shelly to create
a Wi-Fi Access point. After typing the details in the
respective fields, press Create Access Point.
Cloud:
Enable or Disable connection to the Cloud
service.
Restrict Login:
Restrict the web interface of Shely
with a Username and Password. After typing the
details in the respective fields, press Restrict Shelly.
SNTP Server:
You can change the default SNTP serv-
er. Enter the address, and click Save.
Advanced - Developer Settings:
Here you can change
the action execution via CoAP (CoIOT) or via MQTT.
WARNING!
In case the Device has not created its’
own AP Wi-Fi network with SSID like
shellybut-
ton1-35FA58
, please check if the Device is connect-
ed accordingly to the Installation Instructions. If you
still do not see an active Wi-Fi network with SSID like
shellybutton1-35FA58
or you want to add the Device
to another Wi-Fi network, reset the Device. You will
need to remove the back cover of the Device. The
reset button is below the battery. Carefully move the
battery and hold the reset button for 10 seconds.
Shelly should return to AP mode. If not, please repeat
or contact our customer support at
support@Shelly.
cloud
Settings
Longpush Duration
•
Max
- the maximum time, that the button is pressed
and hold, in order to triger Longpush command.
Range for max (in ms): 800-2000.
Multipush
The maximum time (in ms), between pushes, when
triggering a multipush action. Range: 200-2000.
Firmware Update
Update the firmware of Shelly, when a new version
is released.
Time Zone and Geo-location
Enable or Disable the automatic detection of Time
Zone and Geo-location.
Factory Reset
Return Shelly to its factory default settings.
Device Reboot
Reboots the Device.
Device Information
•
Device ID - Unique ID of Shelly
•
Device IP - The IP of Shelly in your Wi-Fi network
Actions
Shelly Button1 may send commands for control of
other Shelly devices, by using a set of URL endpoints.
All URL actions can be found at:
https://shelly-api-
docs.shelly.cloud/
•
Button Short Press: To send a command to an URL,
when the button is pressed once.
•
Button Long Press: To send a command to an URL,
when the button is pressed and hold.
•
Button 2x Short Press: To send a command to an
URL, when the button is pressed two time.
•
Button 3x Short Press: To send a command to an
URL, when the button is pressed three times.
•
Allterco Robotics EOOD, Sofia, 1407, 103 Cherni vrah Blvd.
+359 2 988 7435,
[email protected], www.shelly.cloud
The Declaration of Conformity is available at
www.shelly.cloud/dec-
laration-of-conformity
Changes in the contact data are published by the Manufacturer at the
official website of the Device
www.shelly.cloud
The User is obliged to stay informed for any amendments of these
warranty terms before exercising his/her rights against the Manu-
facturer.
All rights to trademarks She® and Shelly® , and other intellectual
rights associated with this Device belong to Allterco Robotics EOOD.
You can see the latest version of this User Guide in
.PDF by scanning the QR code or you can find it in the
User manual section of our website:
https://shelly.
cloud/support/user-manuals/
Additional Information
The device is battery powered, with a
“wake”
and
“sleep”
mode.
The majority of the time Shelly Button will be in
“sleep”
mode when on battery power, to provide a lon-
ger battery life. When you press the button, it
“wakes
up”
, sends the command you need and it goes in
“sleep”
mode, to preserve power.
When the device is constantly connected to a char-
ger, it sends the command immediately.
•
When on battery power - the average latency is
around
2 seconds
.
•
When on USB power - the device is always connect-
ed, and there is no latency.
The reaction times of the device are dependent on
internet connection and signal strength.


