background image

8

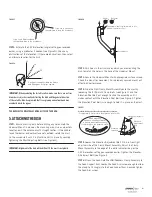
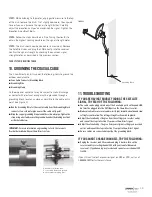
To access this menu for on Advanced model receivers:

1.  Using the remote, press options
2. press 6: System Setup (if available)
3. press 4: System Settings
4. press 3: installation Settings
5. press 1: tune in Satellite Signal

Step 5:

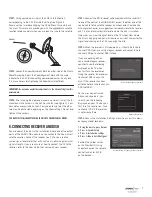
 Standing behind the dish, using both hands, grasp the dish 

on each side and slowly move the dish in very small increments to 
the east or west (several degrees) while your assistant observes the 
TV installation menu for increases in signal strength.

Step 6:

 As you start to get an indication of increasing signal, make 

a second reference mark on the dish clamp and pipe mast to serve 
as a point where signal strength increased.

Step 8: 

Tighten the dish clamp screws.

Step 9:

 Now make small adjustments to the elevation of the dish to 

see if you can further improve on the signal strength. Loosen the 
Elevation Adjustment Bolts and make slight adjustments (1/2 degree 
increments) in the elevation, finding the maximum signal strength. 
When you’ve located the maximum signal strength possible, securely 
tighten all bolts.

Step 10:

 As a last step, adjust the skew of the dish according to the 

skew setting you recorded for the location where you are installing 
the dish. Again, make small adjustments as your assistant monitors 
the signal strength. When you have reached maximum signal 
strength tighten the screw to lock down the skew setting.

note: do not be discouraged if you do not acquire signal on your first attempt. 
Be patient and try again. recheck the pipe mast for true vertical 90 degrees. 
once you acquire signal, you may need to make very small adjustments to the 
dish compass heading (azimuth), elevation and skew settings to maximize signal 
strength to between 80 and 90%.

SiGnaL veriFication

The front panel of the satellite receiver will indicate if the correct 
Shaw Direct signal is being received. On the receiver, observe the 
LED signal status indicator light. Once this light is no longer red, it 
indicates the receiver is tuned to a valid channel and has acquired 
the Shaw Direct signal.

You are ready to proceed to the next step.

If this LED light is RED it indicates NO SIGNAL is being received 
by the receiver. The dish is not properly aligned to receive the Shaw 
Direct satellite signal.

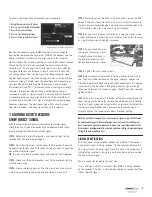
Position the yellow cusor on EMM Provider ID (using navigator  
keys on the remote control) and enter 4128 on the keypad. Use the  
above illustrated installer menu to align the dish for maximum 
signal strength. You should have the assistance of a second person 
to monitor the TV while you complete the adjustments to the 
satellite dish. As you align the dish for optimum signal strength, 
the signal level bar will increase in length from left to right and 
will change colour from red (no signal) to yellow (marginal signal) 
to green (good signal). Continue to align the dish until you achieve 
maximum strength. Under clear sky conditions and depending on 
your location, you should be able to achieve a signal strength  
of between 80 and 90%. In addition to the visual signal strength 
indicator, the receiver also emits an audio beeping that will 
increase in speed as signal strength increases and will become 
a monotone once you have aligned the dish to the satellite and 
achieved approximately 50% signal strength. When audio beep 
becomes monotone, the front panel signal LED should change  
from Red to Green, indicating signal lock on the satellite.

7. aLiGninG diSh to acQUire 

ShaW direct SiGnaL

With the receiver on and your assistant ready to monitor signal 
strength on the TV, you are now ready to make adjustments to the  
dish to acquire the Shaw Direct satellite signal.

Step 1:

 Refer to the azimuth, elevation and skew settings for the 

location that you recorded on Page 5.

Step 2:

 For initial alignment, set the skew to 90 degrees. Skew will 

be readjusted to your specific location setting once you acquire the 
Shaw Direct satellite signal.

tip:

 It is easier to locate satellite signal with skew set to 90 degrees.

Step 3:

 Check that the dish elevation is set to the elevation setting 

listed for your area.

Step 4:

 Draw a reference mark on the dish clamp and pipe mast as 

a starting point before you make any adjustments to the dish.

Installer menu for Advanced receivers.

Step 7:

 As you move dish past 

the point of maximum signal 
strength, move dish back in 
the opposite direction until 
you achieve maximum signal.

Содержание Shawdirect

Страница 1: ...24 7 365Service mULtipLe aWard WinninG ShaWdirect diGitaL SateLLite tv dual Satellite installation manual ...

Страница 2: ...one plus great reception rain or shine extenSive Free previeWS Over 30 000 hours of previews per year so you can sample before you buy SimpLe SateLLite WarrantY A lifetime warranty on external equipment no LonG term contractS You don t have to worry about a big commitment We also offer accessories to enhance your experience like ShaW direct S WireLeSS eaSY jacK Turn any electrical outlet into a ph...

Страница 3: ... or gas lines are close to the installation area Route coaxial cable through walls and under floors Use a compass protractor and carpenter s level Use a ladder to climb structures Know your local provincial and national grounding codes If you do not have the experience to perform these tasks contact Shaw Direct for assistance You will need the following tools 1 Philips screwdriver 7 16 hex wrench ...

Страница 4: ...ember when choosing a mounting location The mounting surface should be flat even and in good condition If you install the dish on the roof or side of your house be sure to attach the bolts into a building stud rafter or other solid surface When mounting on the roof of your house use an adequate approved sealant for your type of roofing material around the holes where the base of the universal moun...

Страница 5: ...te SAT B will be located at 111 1 west longitude IMPORTANT For dual satellite elliptical dish installation use the SAT B Azimuth Elevation and Skew listings in the Dual Satellite Locator Chart at the back of this manual for the city nearest your location Write them here Azimuth Elevation Skew SAT A _________ SAT A _________ SAT A _________ SAT B _________ SAT B _________ SAT B _________ Step 2 Use...

Страница 6: ... the Dish Clamp Mount Assembly onto the mast by loosening the 2 Azimuth Clamp Bolts see Figure C and the Elevation Pivot Bolt just enough to slide the assembly until it makes contact with the Elevation Pivot Bolt see Figure I Tighten the Elevation Pivot Bolt just enough to hold it in place on the mast Step 5 Loosen the Elevation Adjustment Bolt 1 3 turn from tight on either side of the Clamp Mount...

Страница 7: ... with your receiver Step 1 Connect the RG 6 coaxial cable provided with the install kit to one of the ports of the QUAD LNB Connect the other end of the coaxial cable to the satellite receiver input connector To make the dish alignment easier we suggest you temporarily locate the receiver and TV at an electrical outlet close to where the dish is installed Unless you can view the signal level on th...

Страница 8: ...If this LED light is RED it indicates NO SIGNAL is being received by the receiver The dish is not properly aligned to receive the Shaw Direct satellite signal Position the yellow cusor on EMM Provider ID using navigator keys on the remote control and enter 4128 on the keypad Use the above illustrated installer menu to align the dish for maximum signal strength You should have the assistance of a s...

Страница 9: ... make slight adjustments 1 2 degree increments in the elevation finding the maximum signal strength as you did in the azimuth tuning process Step 6 Exit the Installation Settings menu and tune to the second reference channel provided Go back into the Installation Settings menu and repeat steps 3 5 to maximize signal strength from the second satellite Step 7 When you ve located the highest signal p...

Страница 10: ...nd the cold water pipe Tighten the strap using a bolt and secure the ground wire under the binding post nut as illustrated below IMPORTANT For more information on grounding refer to the receiver s User Guide included with your Shaw Direct system Figure L Grounding Block Ground block shown with 2 coax cable feeds and ground wire secured to binding post 11 Troubleshooting if you are having trouble f...

Страница 11: ... 22 9 121 Asbestos 242 26 9 120 246 24 9 122 Beattyville 232 26 9 114 237 25 2 116 Cap de la Madeleine 241 26 8 119 245 24 7 121 Charlesbourg 243 25 7 119 247 23 7 121 Chibougamau 238 24 9 115 242 23 1 117 Chicoutimi 243 24 4 118 247 22 5 120 Cowansville 240 27 8 120 244 25 7 122 Dolbeau 241 24 7 117 245 22 8 119 Donnacona 242 26 1 119 246 24 1 121 Dosquet 242 26 2 119 246 24 1 121 Drummondville 2...

Страница 12: ...Geraldton 212 29 8 107 216 28 5 109 Gilmour 231 30 6 117 236 28 7 119 Goderich 223 33 4 115 228 31 6 117 Satellite A Satellite B Town City Compass Azimuth Dish Elevation Dish Skew Compass Azimuth Dish Elevation Dish Skew Gogama 223 29 9 112 228 28 3 114 Gravenhurst 229 31 1 116 233 29 3 118 Guelph 226 32 9 116 231 31 119 Haliburton 231 30 6 116 235 28 7 119 Hamilton 227 33 116 232 31 1 119 Hanover...

Страница 13: ... 95 Nokomis 171 31 92 176 30 8 95 North Battleford 164 29 7 89 169 29 6 92 Regina 172 32 1 92 177 31 8 95 Rosetown 165 31 90 170 30 9 93 Satellite A Satellite B Town City Compass Azimuth Dish Elevation Dish Skew Compass Azimuth Dish Elevation Dish Skew Rosthern 168 29 8 91 173 29 6 94 Saskatoon 167 30 3 91 172 30 2 94 Shaunavon 165 33 89 169 33 92 Sherridon 178 24 8 94 183 24 4 97 Stanley 170 26 4...

Страница 14: ... 94 230 7 7 95 Southampton Is 230 14 9 101 234 14 2 102 Spence Bay 212 11 4 95 216 11 97 Tavani 200 18 9 97 204 18 3 99 Wager Bay 213 14 7 97 217 14 1 99 Whale Cove 201 18 3 97 206 17 8 99 Satellite A Satellite B Town City Compass Azimuth Dish Elevation Dish Skew Compass Azimuth Dish Elevation Dish Skew northwest territory Arctic RedRiver 120 11 6 79 124 12 3 81 Banks Is 126 7 9 86 130 8 2 87 Fort...

Отзывы: