background image

Useful Features

30

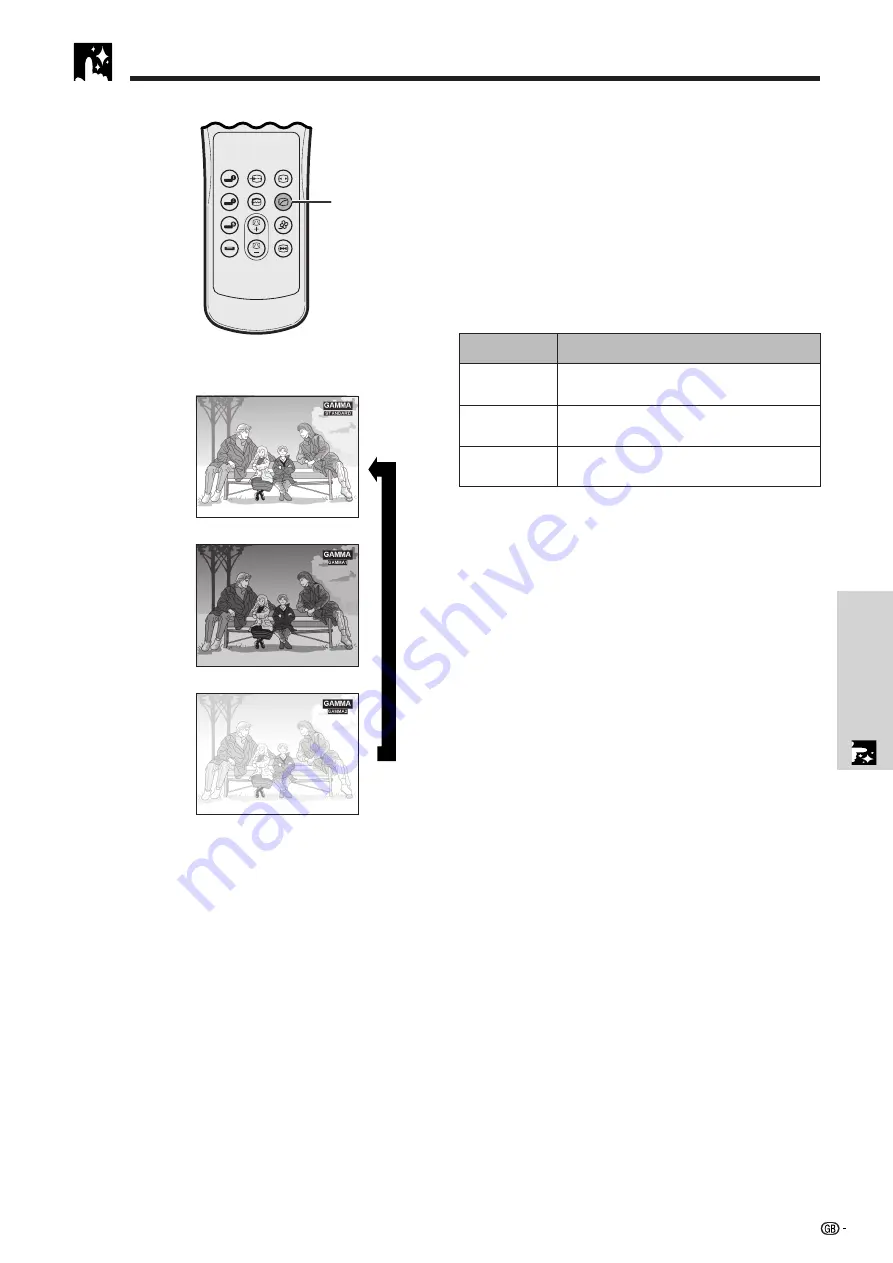
• Gamma is an image quality enhancement function

that offers a richer image by brightening the darker
portions of the image without altering the brightness
of the brighter portions.

• Three gamma settings are available to allow for

differences in the images displayed and in the
brightness of the room.

• When you are displaying images with frequent, dark

scenes, such as a film or concert, or when you are
displaying images in a bright room, this feature makes
the dark scenes easier to see and gives the impres-
sion of greater depth in the image.

Gamma Modes

Remote control

On-screen Display

ss

STANDARD

GAMMA 1

GAMMA 2

Gamma Correction

RGB/

COMPONENT

INPUT 1

PICT MODE

AUTO SYNC

INPUT 2

GAMMA

KEYSTONE

VIDEO

FREEZE

S-VIDEO

CLR TEMP

1

1

Press 

GAMMA

 on the remote control. Each time

GAMMA

 is pressed, the gamma level toggles as

shown on the left.

Gamma mode

Selected Mode

For a highly defined image emphasising  high
contrast and colour reproduction.

For a  warm and moist image controlling
contrast and brightness.

Most suitable when viewing images in a brightly
lit room.

STANDARD

GAMMA 1

GAMMA 2

Содержание XV-Z7000E

Страница 1: ...Accessories on page 10 Before using the LCD projector please read this operation manual carefully OPERATION MANUAL ENGLISH Model No XV Z7000E Serial No ENGLISH WARNING Intense light source Do not look into the beam or view it directly Be especially careful that children do not look directly into the beam WARNING To reduce the risk of fire or electric shock do not expose this appliance to liquids C...

Страница 2: ...OL BEFORE REPLACING THE LAMP REPLACE WITH SAME SHARP LAMP UNIT TYPE BQC PGC20X 1 ONLY UV RADIATION CAN CAUSE EYE DAMAGE TURN OFF LAMP BEFORE SERVICING MEDIUM PRESSURE LAMP RISK OF EXPLOSION POTENTIAL HAZARD OF GLASS PARTICLES IF LAMP HAS RUPTURED HANDLE WITH CARE SEE OPERATION MANUAL REMPLACEMENT DE LA LAMPE USER SERVICE SCREW VIS POUR ENTRETIEN PAR L UTILISATEUR PRECAUTIONS A OBSERVER LORS DU DEB...

Страница 3: ...aners or aerosol cleaners Use a damp cloth for cleaning 3 Do not use attachments not recommended by the LCD Projector manufacturer as they may cause hazards 4 Do not use the LCD Projector near water for example near a bathtub washbowl kitchen sink laundry tub in a wet basement near a swimming pool etc Never spill liquid into the projector 5 Do not place the LCD Projector on an unstable cart stand ...

Страница 4: ... progressive format Page 25 7 ANALOG COMPONENT VIDEO INPUT Utilises a component video input signal Y CB CR The video signal is input as separate components to provide superior colour and image quality 8 ACTIVE DIGITAL KEYSTONE CORRECTION Corrects keystone distortion caused when the projected image is not perpendicular to the screen This method provides not only horizontal correction but vertical a...

Страница 5: ...verse Invert Image Function 34 Special Mode Adjustment 34 Attaching the Lens Cap 41 Connection Pin Assignments 42 RS 232C Port Specifications 43 Computer Compatibility Chart 45 Specifications 46 Dimensions 47 Glossary 48 Setup Connections Supplied Accessories 10 Connecting the Projector 11 Basic Operations 15 Setting up the Screen 17 Using the GUI Graphical User Interface Menu Screens 20 Selecting...

Страница 6: ...projector is regularly cleaned use in these environments will not reduce the overall operation life of the unit Internal cleaning should only be performed by a Sharp Authorised LCD Projector Dealer or Service Centre Do not expose the projector to extreme heat or cold Operating temperature Ⳮ5 C to Ⳮ35 C Storage temperature ⳮ20 C to Ⳮ60 C The mark shown on the left calls the user s attention to a pa...

Страница 7: ...n Side and Rear View Speaker Foot releases S VIDEO INPUT terminal 4 pin Mini DIN VIDEO INPUT terminal RCA AUDIO INPUT S VIDEO VIDEO INPUT terminals RCA Kensington Security Standard connector AC socket Remote control sensor VIDEO INPUT S VIDEO INPUT AUDIO INPUT S VIDEO VIDEO INPUT L R RS 232C INPUT 1 INPUT 2 COMPONENT AUDIO INPUT RGB COMPONENT CR CB Y INPUT 1 2 14 12 12 12 11 11 11 40 9 11 INPUT 1 ...

Страница 8: ...E button CLR TEMP button Remote control signal transmitter Inserting the Batteries 1 3 Slide in the direction of the arrow to remove the battery cover 2 Insert two AAA size batteries making sure their polarities match the ⴐ and ⴑ marks inside the battery compartment Insert the side tabs of the battery cover into their slots and press the cover in until it is properly seated If the remote control g...

Страница 9: ...g over a flat surface Positioning the Remote Control The remote control can be used to control the projector within the ranges shown below The signal from the remote control can be reflected off a screen for easy operation However the effective distance of the signal may differ due to the screen material 30 45 30 7 m 45 30 Remote control Remote control ...

Страница 10: ...ore Rubber leg tips for remote control The configuration of wall outlets differs from country to country Use the power cord that corresponds to the wall outlet in your country Two LCD projector operation manuals For Europe only Computer RGB cable Lens cap Extra air filter Lens cap strap The RGB cable and 21 pin conversion adaptor are only supplied with European models A V cable DIN D sub RS 232C c...

Страница 11: ...t terminal use the composite video output terminal Connecting the Projector to Audiovisual Equipment You can connect your projector to a VCR laser disc player DVD player DTV decoder and other audiovisual equipment CAUTION Always turn off the projector while connecting to audiovisual equipment in order to protect both the projector and the equipment being connected Connecting a video source VCR las...

Страница 12: ...output terminals Projector Connecting an audiovisual source DTV decoder or DVD player using the 15 pin video and audio input DTV decoder or DVD player To analog component output terminals D sub RCA cable sold separately Projector Audio cable sold separately To audio output terminals When connecting this projector to a DVD player or a DTV decoder select Component by using RGB COMPONENT on the remot...

Страница 13: ... for projection of full color computer images Connecting a computer using the standard 15 pin video and audio input 1 Connect one end of the computer RGB cable to the INPUT 2 RGB COMPONENT port on the projector Secure the connector by tightening the thumb screws 2 Connect the other end to the Monitor output port on the computer Secure the connector by tightening the thumb screws 3 To use the built...

Страница 14: ...ately to the other end of DIN D sub RS 232C cable and to the serial port on the computer Connecting the Projector CAUTION Do not connect or disconnect an RS 232C cable to or from the computer while it is on This may damage your computer The RS 232C function may not operate if your computer port is not correctly set up Please refer to the operation manual of the computer for details on setting up A...

Страница 15: ...ely turned on again it may take a short while before the lamp turns on After the projector is unpacked and turned on for the first time a slight odour may be emitted from the exhaust vent This odour will soon disappear with use Do not press any buttons before the startup image disappears Before Adjusting The Image appears only ON OFF or POWER is available ON OFF POWER LAMP TEMP KEYSTONE INPUT BACK...

Страница 16: ...r one second or POWER on the remote control Press ON OFF or POWER again while the message is displayed If you accidentally pressed ON OFF or POWER and do not want to turn off the power wait until the power off screen disappears When ON OFF or POWER is pressed twice the POWER indicator will light up red and the cooling fan will run for about 90 seconds The projector will then enter standby mode Wai...

Страница 17: ... m 2 3 m 1 6 m Projection distance L FULL Mode 4 3 Picture size diag x 635 cm 250 508 cm 200 381 cm 150 254 cm 100 213 cm 84 183 cm 72 152 cm 60 102 cm 40 WIDE Mode 16 9 ⳮ9 3 cm ⳮ8 3 cm ⳮ6 2 cm ⳮ5 5 cm ⳮ4 4 cm ⳮ4 2 cm ⳮ3 8 cm ⳮ3 5 cm ⳮ3 0 cm ⳮ2 5 cm ⳮ1 7 cm Distance from the lens centre to the bottom of the image H Maximum 10 0 m 10 0 m 7 8 m 6 9 m 5 5 m 5 2 m 4 8 m 4 4 m 3 7 m 3 1 m 2 0 m Minimum...

Страница 18: ...lens Project the normal image onto the mirror The image reflected from the mirror is projected onto the translucent screen Rear projection Place a translucent screen between the projector and the audience Use the projector s menu system to reverse the projected image See page 34 for use of this function CAUTION When using a mirror be sure to carefully position both the projector and the mirror so ...

Страница 19: ... and then press ENTER 4 Press ƒ to move the mark to the desired setting 5 To exit from the GUI press MENU To reset the keystone setting press BACK Straight lines and the edges of the displayed image may appear jagged when adjusting the keystone setting Projector Remote control ON OFF POWER LAMP TEMP KEYSTONE INPUT BACK ENTER MENU PICT MODE RGB COMPONENT INPUT 1 PICT MODE AUTO SYNC INPUT 2 GAMMA KE...

Страница 20: ...CK ENTER MENU PICT MODE VOL POWER MUTE BACK MENU ENTER 2 4 6 3 5 7 1 8 GUI On screen Display INPUT 1 or 2 COMPONENT mode s S VIDEO or VIDEO mode 1 Press MENU to display the main menu 2 Press ƒ to select an adjustment item in the main menu 3 Press ENTER to display the sub menu 4 Press ƒ to select an adjustment item in the sub menu 5 Press ENTER to activate the selected adjustment item 6 Press ƒ to ...

Страница 21: ...lue Reset Special Modes 480P 640 480 Ⳮ30 ⳮ30 Ⳮ30 ⳮ30 Ⳮ30 ⳮ30 Ⳮ30 ⳮ30 Signal Type 1 Component RGB Options Signal Info Lamp Timer Keystone Auto Power Off Background Color Picture2 Tint Sharp Progressive 2 Reset Theater Mode 3D Progressive 2D Progressive Film Mode 1 Film Mode 2 ON OFF OFF Blue None Ⳮ127 ⳮ127 Ⳮ30 ⳮ30 Ⳮ30 ⳮ30 ON 7 0 Fine Sync Options Signal Info Lamp Timer Language English PRJ Mode Cei...

Страница 22: ...guage English PRJ Mode CeilingⳭFront CeilingⳭRear Deutsch Español Nederlands Français Italiano Svenska Português Front Rear Keystone Auto Power Off Background Contrast Picture1 Bright Red Color Picture2 Tint 3 Sharp Progressive Reset Blue Reset Theater Mode Video System Auto PAL NTSC3 58 SECAM NTSC4 43 PAL M PAL N PAL 60Hz 3D Progressive 2D Progressive Film Mode 1 Film Mode 2 ON OFF OFF Blue None ...

Страница 23: ...o input system mode is preset to Auto however it can be changed to a specific system mode if the selected system mode is not compatible with the connected audiovisual equipment 1 Press MENU 2 Press ƒ to select Video System and then press ENTER 3 Press ƒ to select the desired video system mode 4 Press ENTER to save the setting 5 To exit from the GUI press MENU When the system mode is set to Auto yo...

Страница 24: ...hen receiving a 480i signal in the INPUT 2 COMPONENT mode Color Tint and Sharp do not appear in the INPUT 2 RGB mode Tint does not appear when receiving PAL SECAM PAL M PAL N or PAL 60Hz in the S VIDEO or VIDEO mode 1 Press MENU 2 Press ƒ to select Picture1 or Picture2 in INPUT 1 or 2 COMPONENT S VIDEO or VIDEO mode or to select Picture in INPUT 2 RGB mode and then press ENTER 3 Press ƒ to select ...

Страница 25: ... progressive display 5 Press ENTER to save the setting 6 To exit from the GUI press MENU ON OFF POWER LAMP TEMP KEYSTONE INPUT BACK ENTER MENU PICT MODE VOL POWER MUTE BACK MENU ENTER 2 3 4 2 3 5 1 6 ON OFF POWER LAMP TEMP KEYSTONE INPUT BACK ENTER MENU PICT MODE VOL POWER MUTE BACK MENU ENTER 2 3 4 2 3 5 1 6 Description of Progressive Modes 2D Progressive Useful for displaying fast moving images ...

Страница 26: ...r the input selection is changed 1 Press AUTO SYNC on the remote control Remote control On screen Display During Auto Sync adjustment Adjusting The Image is displayed as shown on the left Auto Sync adjustment may take some time to complete depending on the image of the computer connected to the projector When the optimum image cannot be achieved with Auto Sync adjustment use manual adjustments See...

Страница 27: ... screen image by moving it to the left or right Centres the on screen image by moving it up or down Clock Phase H Pos V Pos Description of Adjustment Items Select the desired computer input mode with INPUT on the projector or INPUT 2 on the remote control 1 Press MENU 2 Press ƒ to select Fine Sync and then press ENTER 3 Press ƒ to select a specific adjustment item and then press ENTER 4 Press ƒ to...

Страница 28: ...display a still image from a computer or video giving you more time to explain the image to the audience 1 Press FREEZE on the remote control to freeze the image 2 Press FREEZE again to return to the moving image Remote control On screen Display RGB COMPONENT INPUT 1 PICT MODE AUTO SYNC INPUT 2 GAMMA KEYSTONE VIDEO FREEZE S VIDEO CLR TEMP 1 2 ...

Страница 29: ...uish images for a brighter picture Description of Colour Temperature 1 Press CLRTEMP on the remote control Each time CLRTEMP is pressed colour temperature toggles as shown below Increases colour temperature for cooler bluish florescent like images High colour temperature Decreases colour temperature for warmer reddish incandescent like images Low colour temperature Red Blue 1 2 3 4 1 2 3 4 On scre...

Страница 30: ...m this feature makes the dark scenes easier to see and gives the impres sion of greater depth in the image Gamma Modes Remote control On screen Display s s STANDARD GAMMA 1 GAMMA 2 Gamma Correction RGB COMPONENT INPUT 1 PICT MODE AUTO SYNC INPUT 2 GAMMA KEYSTONE VIDEO FREEZE S VIDEO CLR TEMP 1 1 Press GAMMA on the remote control Each time GAMMA is pressed the gamma level toggles as shown on the le...

Страница 31: ...screen image Input Signal FULL WIDE NORMAL 4 3 aspect ratio Letterbox Squeeze 16 9 aspect ratio VGA SVGA XGA SXGA Output screen image Input Signal FULL 4 3 aspect ratio PICT MODE NORMAL PICT MODE NORMAL PICT MODE NORMAL PICT MODE WIDE PICT MODE WIDE PICT MODE WIDE PICT MODE WIDE PICT MODE FULL PICT MODE FULL PICT MODE FULL PICT MODE FULL FULL WIDE NORMAL 4 3 720P 1080i 800 600 800 600 800 600 800 ...

Страница 32: ...tion of Automatic Power Shutoff 1 Press MENU 2 Press ƒ to select Options and then press ENTER 3 Press ƒ to select Auto Power Off and then press ENTER 4 Press ƒ to select ON or OFF 5 To exit from the GUI press MENU Auto Power Off is factory preset to ON Power OFF in 5 min will appear five minutes before the power is automatically turned off Power automatically shuts off after 15 minutes without a s...

Страница 33: ... 1 5 1 Theatre Mode Function Projector Remote control ON OFF POWER LAMP TEMP KEYSTONE INPUT BACK ENTER MENU PICT MODE VOL POWER MUTE BACK MENU ENTER 2 3 4 2 3 1 5 GUI On screen Display Function with toggle switch to control the quantity of projected light Select ON or OFF to decrease or increase brightness power consumption and fan noise Description of Theatre Modes 1 Press MENU 2 Press ƒ to selec...

Страница 34: ...ode and then press ENTER 4 To exit from the GUI press MENU This function is used for the reversed image and ceiling mount setups See page 18 for these setups Ordinarily the type of input signal is detected and the correct resolution mode is automatically selected However since the projector cannot distinguish 640 480 signal resolution on computers or 480P on DTVs select an appropriate mode on Spec...

Страница 35: ...arp Authorised LCD Projector Dealer or Service Centre exchange the filter PFILD0123CEZZ when it is no longer possible to clean it Cleaning the air filter 1 Disconnect the power cord Unplug the power cord from the AC socket 3 4 Clean the air filter Replace the filter cover Insert the tab on the end of the filter cover into the filter cover opening and press the filter cover into position Clean the ...

Страница 36: ...eplacing the air filter Tab Disconnect the power cord Unplug the power cord from the AC socket 5 Replace the filter cover Insert the tab on the end of the filter cover into the filter cover opening and press the filter cover into position Tab 4 Replace the air filter 1 Put the new air filter into position 2 Put the air filter stopper back into position Be sure the filter cover is securely installe...

Страница 37: ... the lamp be replaced after 900 cumulative hours of use or when you notice a significant deterioration of the picture and colour quality The lamp usage timer can be checked with the On screen Display See page 32 CAUTION Intense light hazard Do not attempt to look into the aperture and lens while the projector is operating As the usage environment can vary significantly the projector lamp may not o...

Страница 38: ... lamp cage directly after operation of the projector The lamp may be extremely hot Wait at least one hour after the power cord is disconnected to allow the surface of the lamp cage to fully cool before removing the lamp cage 1 3 Turn off the power 2 Disconnect the power cord Remove the filter cover First Change Filter Steps 3 6 Be sure to remove the lamp cage by the handle Be sure not to touch the...

Страница 39: ...isplayed indicating that the lamp timer is reset INPUT BACK ENTER MENU PICT MODE 1 3 2 7 Remove the lamp cage cover Turn over the projector and loosen the user service screw that secures the lamp cage cover Then lift open the cover in the direction of the arrow 9 10 Insert the new lamp cage Attach the lamp cage cover Slide the lamp cage cover in the direction of the arrow Then tighten the user ser...

Страница 40: ...age 24 Color and Tint adjustments are not correct See page 24 Adjust the focus See page 15 Projection distance is too long or too short to allow for proper focus See page 17 Cables incorrectly connected to side and rear panels of the projector See pages 11 14 Volume is set to minimum See page 16 If the picture is normal the sound is due to cabinet shrinkage caused by temperature changes This will ...

Страница 41: ...s cap 1 Attach the lens cap strap to the lens cap 2 Attach the lens cap strap to the projector 3 Attach the lens cap to the projector with the lens cap eyelet facing up CAUTION Do not lift or carry the projector by the lens or the lens cap as this may damage the lens You can also use the end of a mechanical pencil or other pointed object to feed the lens cap strap through the openings ...

Страница 42: ...eceive Data Input Connected to internal circuit 3 SD Send Data Output Connected to internal circuit 4 Not connected 5 SG Signal Ground Connected to internal circuit 6 Not connected 7 Not connected 8 Not connected 9 Not connected Pin No Signal Name I O Reference 1 Not connected 2 RD Receive Data Input Connected to internal circuit 3 SD Send Data Output Connected to internal circuit 4 Not connected ...

Страница 43: ...ort Specifications Return code 0DH C1 C2 C3 C4 P1 P2 P3 P4 Response code format Normal response O K Return code 0DH Problem response Failure due to incorrect command parameter or the other communication errors E R R Return code 0DH Command 4 digits Parameter 4 digits Command format When more than one code is being sent send each command only after the OK response code for the previous command from...

Страница 44: ...PERATURE ADJUSTMENT COMPONENT IMAGE ADJUSTMENT 1 CONTROL ITEM COMMAND C1 R R R R R R R R R I I V M M I I I I I I I I I I R R R R R R R R R G G G G G G A A A A B B B B B M M O U U M M M M M M M M B B A A A B B B A A A A A A A A A C T S R P B R B R B B L T T R R I I I I I I S S S S S S S S S S S M M M M M M O I H E I R D E E G G A E E E E N N P P P P I I R R R R R R V V V V V V R R R _ _ _ _ _ _ _ _...

Страница 45: ...e from Mac 16 832 624 cannot be displayed in FULL mode PC MAC WS Horizontal Frequency kHz Vertical Frequency Hz VGA PC PC SVGA XGA VESA Standard Resolution 640 350 1 152 864 1 152 882 1 280 1 024 720 350 640 400 720 400 640 480 800 600 1 024 768 Display Upscale Intelligent Compression True 27 0 60 27 0 60 27 0 60 60 31 5 70 31 5 70 31 5 70 31 5 60 34 7 70 37 9 72 37 5 75 43 3 85 31 3 50 35 1 56 37...

Страница 46: ...YNC SIGNAL TTL level positive negative or composite sync Apple only VERTICAL SYNC SIGNAL Same as above 12 108 MHz 43 85 Hz 15 80 kHz 9 pin Mini DIN female connector RS 232C port 2 8 cm 1 7 64 round AC 100 240 V 2 6 A 50 60 Hz 230 W Selecting OFF in the Theater Mode 200 W Selecting ON in the Theater Mode 5 C to 35 C 20 C to 60 C Plastic 38 kHz 260 74 207 mm W H D main body only 260 82 207 mm W H D ...

Страница 47: ...T C R C B Y INPUT 1 2 100 240V ON OFF POWER LAMP TEMP KEYSTONE INPUT BACK ENTER MENU PICT MODE VIDEO INPUT S VIDEO INPUT AUDIO INPUT S VIDEO VIDEO INPUT L R FOCUS ZOOM 169 5 82 207 42 32 260 58 118 8 Units mm Top View Rear View Dimensions Side View Front View Bottom View ...

Страница 48: ...ast correction according to image and room brightness Three gamma settings are available GUI Graphical User Interface User interface with graphics that allow easier operation Intelligent compression and expansion High quality resizing of lower and higher resolution images to fit the projector s native resolution Phase Phase shift is a timing shift between isomorphic signals with the same resolutio...

Отзывы: