background image

E-11

Advanced CD or MP3/WMA disc playback (continued)

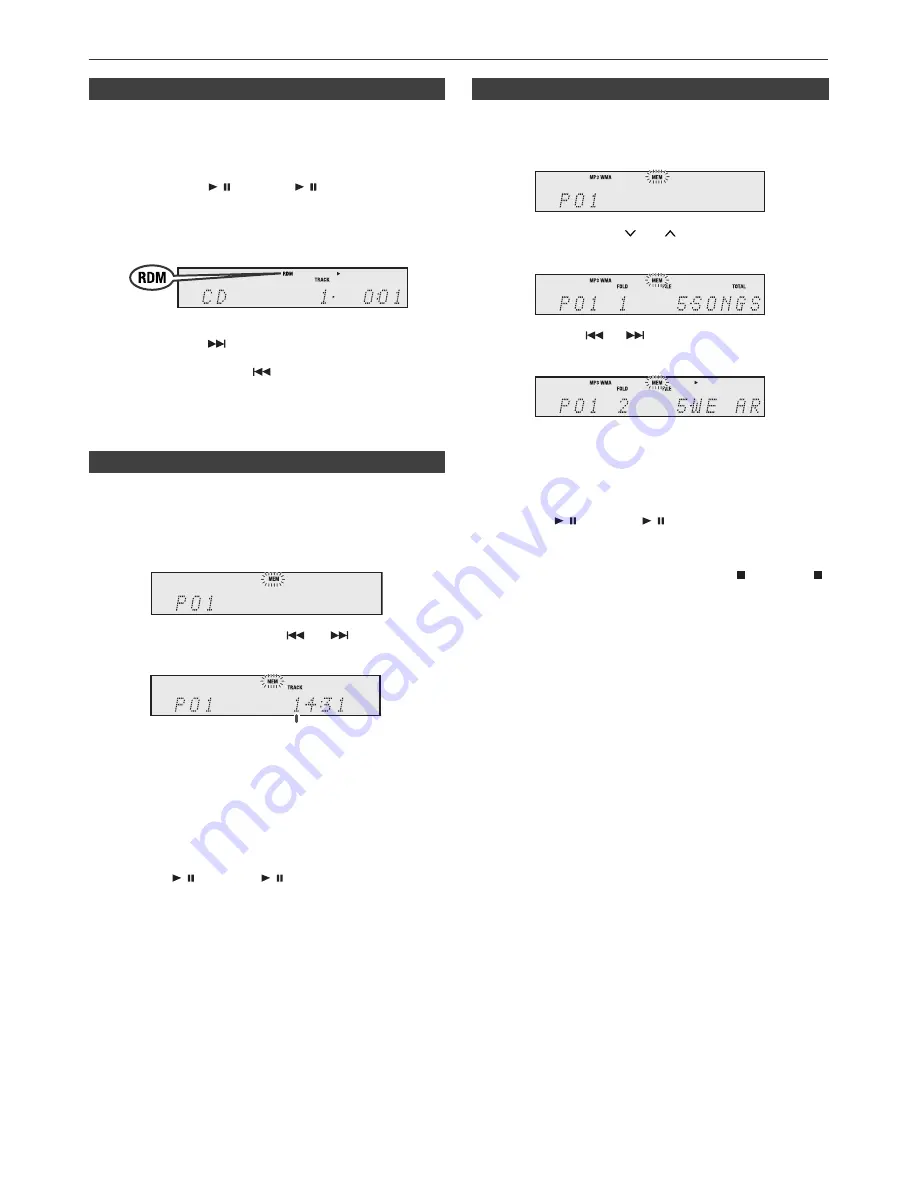
The tracks on the disc can be played in random order
automatically.

To random play all tracks:

Press RANDOM button on the remote control until “Random”
appears. Press the   /  (CD/USB  / ) button.

To cancel random play:

Press the RANDOM button again. “RDM” indicator will
disappear.

Notes:

If you press the 

 button during random play, you can

move to the track selected next by the random operation.
On the other hand, the  

 button does not allow you to

move to the previous track. The beginning of the track
being played will be located.

In random play, the unit will select and play tracks
automatically. (You cannot select the order of the tracks.)

You can choose up to 32 selections for playback in the order
you like.

To cancel the programmed play mode:

During programmed stop mode, press the   (CD/USB  )
button. The display will show “Memory Clear” and all the
programmed contents will be cleared.

Adding tracks to the programme:

If a programme has been previously stored, the “MEM”
indicator will be displayed. Press the MEMORY button.
Then follow steps 2 - 3 to add tracks.

Notes:

When a disc is ejected, the programme is automatically
cancelled.

If you press the ON/STAND-BY button to enter the
stand-by mode or change the function from CD to
another, the programmed selections will be cleared.

During the programme operation, random play is not
possible.

Random play

Programmed play (CD)

1

Whilst in the stop mode, press the MEMORY button on the
remote control to enter the programming save mode.

2

Press the numeric button or 

 or 

 buttons on the

remote control to select the desired track.

3

Press the MEMORY button to save the track number.

4

Repeat steps 2 - 3 for other tracks. Up to 32 tracks can be
programmed. If you want to check the programmed tracks,
press the MEMORY button repeatedly. If you make a
mistake, the programmed tracks can be cleared by
pressing the CLEAR button.

5

Press the   /  (CD/USB  / ) button to start playback.  

Selected track number

Programmed play (MP3/WMA)

1

Whilst in the stop mode, press the MEMORY button to
enter the programming save mode.

2

Press the PRESET (

 or 

) button on the remote

control to select the desired folder.

Then press the 

 or 

  button on the remote control

to select the desired tracks.

3

Press the MEMORY button to save the folder and track
number.

4

Repeat steps 2 – 3 for other folder/tracks. Up to 32
tracks can be programmed.

5

Press the   /  (CD/USB  / ) button to start playback.  

Содержание XL-HF301PH(S)

Страница 1: ...t license for such use is required For details please visit http mp3licensing com MPEG Layer 3 audio coding technology licensed from Fraunhofer IIS and Thomson Accessories The following accessories are included The illustrations printed in this operation manual are for the model XL HF301PH S Page General Information Precautions 2 Controls and indicators 2 3 Preparation for Use System connections 4...

Страница 2: ...al aspects of battery disposal This unit should only be used within the range of 5 C 35 C 41 F 95 F The apparatus is designed for use in moderate climates Warning The voltage used must be the same as that specified on this unit Using this product with a higher voltage other than that which is specified is dangerous and may result in a fire or other type of accident causing damage SHARP will not be...

Страница 3: ... CD USB Stop Button 9 10 13 35 RDS Display Button 15 36 RDS PTY Button 15 Page 1 USB Indicator 13 2 iPod Indicators 8 3 CD Indicator 10 4 MP3 Indicator 11 5 WMA Indicator 11 6 RDM Random Indicator 11 7 MEM Memory Indicator 11 8 Repeat Indicator 10 9 Play Pause Indicator 10 10 Tuning FM Indicator 15 11 FM Stereo Mode Indicator 15 12 Stereo Station Indicator 15 13 RDS Indicator 15 14 PTY Indicator 1...

Страница 4: ...t iPod unit to either NTSC or PAL to match your TV signal Please visit Apple s homepage for further information After checking all the connections have been made correctly plug the AC power lead of this unit into the wall socket Note Unplug the AC power lead from the wall socket if the unit will not be in use for a prolonged period of time Make sure to unplug the AC power lead before making any co...

Страница 5: ...Purchase an AA size battery UM SUM 3 R6 HP 7 or similar Periodically clean the transmitter on the remote control and the sensor on the unit with a soft cloth Exposing the sensor on the unit to strong light may interfere with operation Change the lighting or the direction of the unit if this occurs Keep the remote control away from moisture heat shock and vibrations Check the remote control after c...

Страница 6: ...ds press the VOLUME or button to adjust the bass 1 Press the BASS TREBLE button to select Treble 2 Within 5 seconds press the VOLUME or button to adjust the treble When the FUNCTION button on main unit is pressed the current function will change to different mode Press the FUNCTION button repeatedly to select desired function Note The backup function will protect the memorised function mode for a ...

Страница 7: ...ed You may also experience brief audio interference during incoming calls The headphone output is switched off during inserting iPod iPhone and iPad unit This is an Apple product specification Note USB terminal does not support VIDEO out 1 Press the ON STAND BY button to turn the power on 2 Press the USB button on the remote control or FUNCTION button repeatedly on the main unit to select USB func...

Страница 8: ...t toggle video out display between iPod and TV Caution Unplug all accessories for the iPod or iPhone before inserting it into the docking station Stop button at main unit is invalid during iPod function iPod and iPhone connection Dock only Adaptor No iPhone Description Capacity 12 iPhone 4GB 8GB 16GB 15 iPhone 3G 8GB 16GB 15 iPhone 3GS 16GB 32GB 19 iPhone 4 16GB 32GB To insert adaptor for iPod or ...

Страница 9: ...WMA WMA files are Advanced System Format files that include audio files which are compressed with Windows Media Audio codec WMA is developed by Microsoft as an audio format file for Windows Media Player MP3 and WMA indicator will light up after the unit reads information on an MP3 or WMA disc Bitrate which is supported by WMA is 64 160 kbps Navigating the iPod iPhone or iPad menus 1 Press the MENU...

Страница 10: ...not possible To stop playback Press the CD USB button Repeat play can play one track all tracks or a programmed sequence continuously To repeat one track Press the REPEAT button repeatedly until Repeat One appears Press the CD USB button To repeat all tracks Press the REPEAT button repeatedly until Repeat All appears Press the CD USB button To repeat desired tracks Perform steps 1 5 in Programmed ...

Страница 11: ...disc is ejected the programme is automatically cancelled If you press the ON STAND BY button to enter the stand by mode or change the function from CD to another the programmed selections will be cleared During the programme operation random play is not possible Random play Programmed play CD 1 Whilst in the stop mode press the MEMORY button on the remote control to enter the programming save mode...

Страница 12: ...ed it means Copyright protected WMA file or Not supported playback file is selected About folder playback order 1 ROOT folder is set as folder 1 2 As for folders inside ROOT folder Folder A and Folder B the folder which is recorded earlier on the disc will be set as folder 2 and folder 6 3 As for folder inside Folder A Folder C and Folder D the folder which is recorded earlier on the disc will be ...

Страница 13: ...s unforeseen reasons from some devices Should this happen turn off the unit and then turn it on again During CD function MP3 player will not be charging To play back USB MP3 player with folder mode off 1 Press the USB button on the remote control or FUNCTION button repeatedly on main unit to select USB function Connect the USB memory device that has MP3 WMA format files on the unit When the USB me...

Страница 14: ...mode WMA meta tag also supports title artist and album name which are recorded in WMA files Copyright protected WMA files cannot be played back Listening to the radio Notes When radio interference occurs auto scan tuning may stop automatically at that point Auto scan tuning will skip weak signal stations To stop the auto tuning press the TUNING or button again When an RDS Radio Data System station...

Страница 15: ...lay will switch as follows Memorising a station 1 Perform steps 1 3 in Tuning 2 Press the MEMORY button 3 Within 30 seconds press the PRESET or button to select the preset channel number Store the stations in memory in order starting with preset channel 1 4 Within 30 seconds press the MEMORY button to store that station in memory If the MEMORY and preset number indicators disappear before the stat...

Страница 16: ...yed To specify programmed types and select stations PTY search You can search a station by specifying the programme type news sports traffic programme etc see page 17 from the stations in memory Notes If the display has stopped flashing start again from step 2 If the unit finds a desired programme type the corresponding channel number will lit for about 8 seconds and then the station name will rem...

Страница 17: ...ggae are examples WEATHER Weather reports and forecasts and meteorological information FINANCE Stock Market reports commerce trading etc CHILDREN For programmes targeted at a young audience primarily for entertainment and interest rather than where the objective is to educate SOCIAL Programmes about people and things that influence them individually or in groups Includes sociology history geograph...

Страница 18: ... CLOCK TIMER button 3 Within 10 seconds press the or button to select Once or Daily and press the ENTER button 4 Within 10 seconds press the or button to select Timer Set and press the ENTER button 5 To select the timer playback source CD TUNER USB iPod AUDIO IN LINE IN press the or button Press the ENTER button When you select the tuner select a station by pressing the or button and then press th...

Страница 19: ...tton 2 Within 10 seconds press the or button to select Once or Daily and press the ENTER button 3 Within 10 seconds press the or button to select Timer Call and press the ENTER button 1 Turn the power on and press and hold down the CLOCK TIMER button 2 Within 10 seconds press the or button to select Once or Daily and press the ENTER button 3 Within 10 seconds press the or button to select Timer Of...

Страница 20: ...ent If volume level of the connected device is too high sound distortion may occur Should this happen lower the volume of the connected device If volume level is too low increase the volume of the connected device Headphones Audio cable not supplied Portable audio player etc General Symptom Possible cause The clock is not set to the correct time Did a power failure occur Reset the clock Refer page...

Страница 21: ...e CDs can cause noise or mistracking If a CD is dirty or does not play properly clean it with a soft dry cloth wiping straight out from the centre along the radius Maintenance Periodically wipe the cabinet with a soft cloth and a diluted soap solution then with a dry cloth Caution Do not use chemicals for cleaning petrol paint thinner etc It may damage the cabinet Do not apply oil to the inside of...

Страница 22: ...act disc player Signal readout Non contact 3 beam semiconductor laser pickup D A converter Multi bit D A converter Frequency response 20 20 000 Hz Dynamic range 90 dB 1 kHz USB MP3 WMA USB host interface Complies with USB 1 1 Full Speed 2 0 Mass Storage Class Support Bulk only and CBI protocol Support file MPEG 1 Layer 3 WMA Non DRM Bitrate support MP3 32 320 kbps WMA 64 160 kbps Other Maximum tot...

Отзывы:

Похожие инструкции для XL-HF301PH(S)