background image

6

2. 

While pushing the catch, open the battery cover.

3. 

Fit two batteries observing po,- as shown.When replacing 
the batteries, use only the same type of battery supplied. 

4. 

Re-fi t the battery cover and clip it in place.

Preparation for use

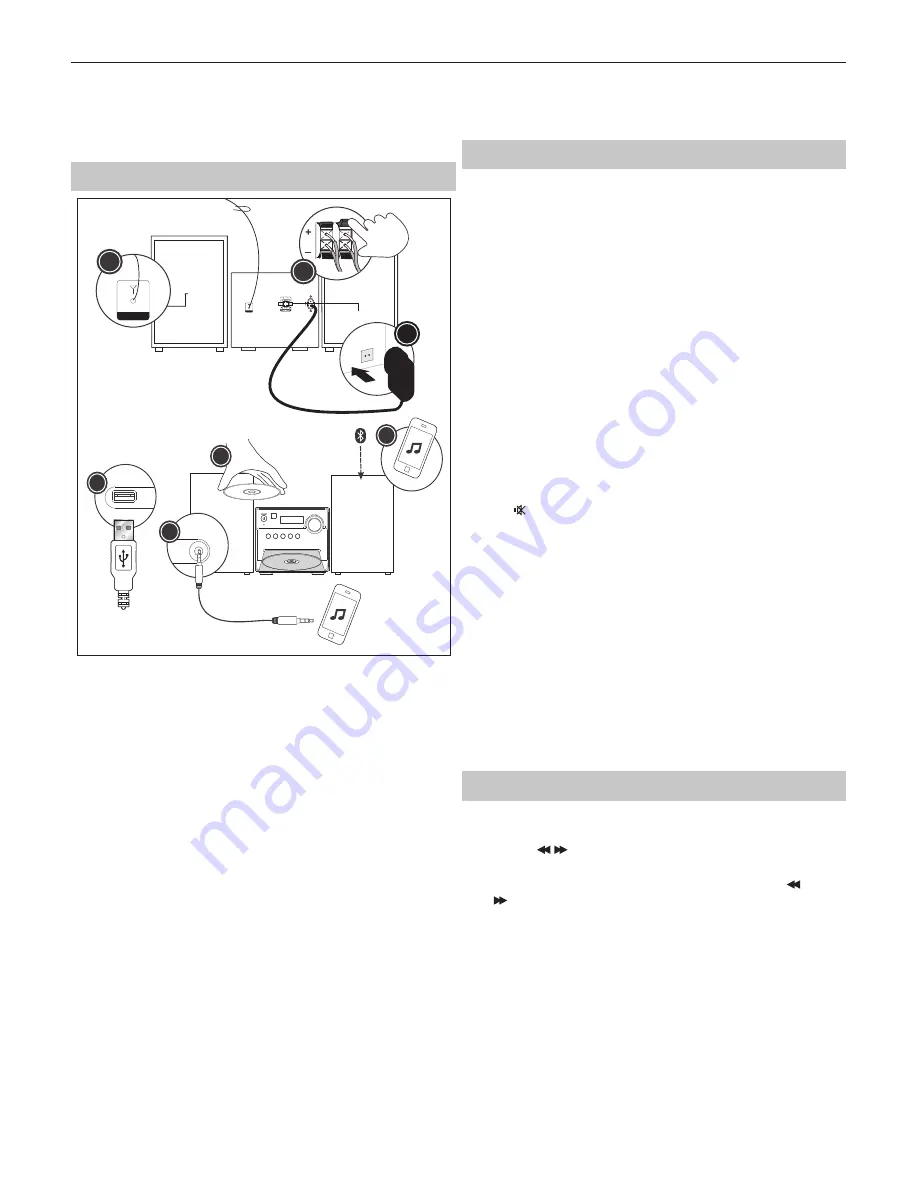
1. 

ANTENNA

1


2

3


AUDIO IN

SOURCE PLAY/PAUSE

PREV

NEXT

EJECT

AUX IN

4


5

6

7

USB

Place a speaker on either side of the main unit, preferably at the same 
height and with at least 150mm space between each speaker to the 
main unit. 
Connect the speaker plugs to the rear of the unit. Take care to match 
the speaker placed to the LEFT to the LEFT output on the rear of the 
unit. Repeat for the RIGHT speaker.
The LEFT RED cable connects to the LEFT RED terminal, the RIGHT RED 
cable to the RIGHT RED terminal. Both BLACK cables connect to the 
corresponding BLACK terminals.

2. 

Please ensure that the voltage marked on the rating label, 
located on the rear panel, is the same as the voltage in your 
area. Choose a suitable Power Cord, insert the end of the 
cord into the Power Socket on the rear panel of the unit. Then 
plug the other end of the cable in to the wall socket.

3. 

Press the STANDBY button on the main unit to turn ON the unit.
Extend the ANTENNA to get the best reception. Press the SOURCE 
button to enter the DAB or FM mode. Follow the detailed 
operations to control playback in DAB or in FM mode.

4. 

Press the SOURCE button to enter the CD mode. Press the EJECT 
button to open the disc drawer and insert a disc. Press the EJECT 
button again to close. The CD will begin playing from the fi rst track.

5. 

Press the SOURCE button to enter the Aux In (Audio) mode. 
Connect your audio device to the AUX IN socket via a 3.5mm aux 
in cable. Control playback via your connected audio device.

6. 

Press the SOURCE button to enter the Bluetooth mode. 
Activate the Bluetooth enabled device and select the “

Sharp 

XL-B515D

”. Select the song you want and press to play.

7. 

Press the SOURCE button to enter the USB mode. Plug 
the USB device to USB port on the front panel of the unit, 
and it will read the USB and play automatically.

BASIC FUNCTIONS

Switching modes 

To switch between the modes:DAB+, FM, CD, Bluetooth, USB and AUX IN. 
Press 

SOURCE

 button on the unit or the remote control to switch modes.

Volume control

1. 

Rotate the VOLUME control clockwise or press the 
“+” button to increase the volume level. 

2. 

Rotate the VOLUME control anti-clockwise or press 
the “ - “ button to decrease the volume level.

DSP eff ects

Press the 

DSP

 button repeatedly to cyclethrough a set of equalizer presets 

to alter the sound. Choose from CLASSIC, ROCK, POP, JAZZ, DANCE, LIVE 
and Off .

Loudness function

This function will increase the level of bass at low volume levels. Press the 

LOUD

 button on remote to enable the eff ect. Press again to disable the 

eff ect.

Mute function 

Press the   button at any time to mute the sound output. Press again to 
unmute.

Tone controls 

Adjust the bass and treble tone controls if required. 
Press the 

BASS

 or 

TREBLE

 button on remote control directly to select bass 

or treble, then use the“+”or “ - “ buttons to adjust.

Standby mode

Press the 

STANDBY

 button on the unit or the remote to put the system 

into standby mode. To resume normal operation, press this button again.

NOTE: This unit is designed to enter STANDBY mode automatically, after about 
10 minutes (approximately) of inactivity. Press STANDBY button to wake the 
unit. 

NOTE: When you power on the unit from standby, the last used mode will 
resume.

FM radio operation

1. 

Press the 

SOURCE

 button on the panel or the 

remote control to switch to the FM mode.

2. 

Press the 

/

buttons on remote control to decrease 

or increase the frequency in 

0.05MHz

 increments.

3. 

Press and hold the 

PREV/NEXT

 buttons on the panel or the 

/

 buttons on remote control to scan through the frequency 

range quickly. The scan will stop once it has found a station.

4. 

Press and hold one of the NUMBER buttons 0-9 to store the 
station under that number. Directly press the required number 
button to select a preset and activate the stored station.

5. 

Press the 

INFO

 button on remote control to cycle through 

the information provided by the broadcasting stations: 


Radio text:

 broadcasting text about the program; 


Program type:

 the style or genre of music; 


Time:

 the time can be updated automatically if the system 

detects the RDS signal. If the RDS (radio data system) is 
not strong enough, the time cannot be auto updated.

6.  Enter the MENU Setting Interface
• 

Press the 

STOP/MENU

 button on remote control to view the sub menu.

Содержание XL-B515D

Страница 1: ...er Verpackung kann vom Inhalt abweichend sein Las imágenes del producto son para fi nes ilustrativos solamente Le immagini dei prodotti sono solo ai fi ni illustrativi Les images du produit sont présentées à titre d illustration uniquement Zdjęcie produktu jest tylko w celach ilustracyjnych Produkt może się różnić EN ES DE IT FR PL ...

Страница 2: ......

Страница 3: ... risk of fire electric shock or damage to this product do not expose it to direct sunlight dust rain and moisture Never expose it to dripping or splashing and do not place objects filled with liquids on or near the product Do not place objects filled with liquids such as vases on the apparatus Do not install near any heat sources such as radiators heat registers stoves or other apparatus including...

Страница 4: ...ies for used equipment and batteries CAUTION Appliances with built in CD player are marked with this caution label THIS UNIT IS A CLASS 1 LASER PRODUCT THIS UNIT USES A VISIBLE LASER BEAM WHICH COULD CAUSE HAZARDOUS RADIATION EXPOSURE IF DIRECTED BE SURE TO OPERATE THE PLAYER CORRECTLY AS INSTRUCTED WHEN THIS UNIT IS PLUGGED INTO THE WALL OUTLET DO NOT PLACE YOUR EYES CLOSE TO THE OPENINGS TO LOOK...

Страница 5: ...rn on the unit or enter Standby mode 2 STOP MENU Press this to stop the music or enter the menu 3 PLAY PAUSE ENTER Start Pause playback or confirm your choices 4 FAST REWIND Pressthis to fast rewind the track that is currently playing 5 TREBLE Press this button to adjust the treble use the or buttons to increase decrease the treble 6 VOLUME Press this to decrease volume 7 PROGRAM Use this to progr...

Страница 6: ...luetooth USB and AUX IN Press SOURCE button on the unit or the remote control to switch modes Volume control 1 Rotate the VOLUME control clockwise or press the button to increase the volume level 2 Rotate the VOLUME control anti clockwise or press the button to decrease the volume level DSP effects Press the DSP button repeatedly to cyclethrough a set of equalizer presets to alter the sound Choose...

Страница 7: ... the INFO button on remote control to cycle through the station information DLS text signal strength program type ensemble name channel frequency signal error and bit rate CD operations 1 Press the SOURCE button on the panel or the remote control to enter the CD mode Press the EJECT button to pop out the disc drawer put a CD on then press the EJECT button again 2 Press the button to pause or play ...

Страница 8: ... the compatibility In some case reading may be as long as 60 seconds this is not a malfunction Depending on the amount of data and media speed it may take longer for the unit to read the USB device The maximum USB memory size is 64GB USB memory device must be formatted in FAT FAT16 or FAT32 Troubleshooting No Power Reason Power cable not connected to wall socket Power socket is not switched on Sol...

Страница 9: ... Power Consumption 40 W Output Power 2 x 7 W RMS Impedance 2 x 8 Ω Frequency Response 60Hz 20KHz Bluetooth Version V 2 1 EDR Maximum power transmitted 20 dbm Frequency bands 2402 MHz 2480 MHz CD player Disc format CD CD R CD RW MP3 WMA Remote Control Battery Type 2x AAA 1 5V 220mm 1 75 kg 0 95 kg 170mm 150mm 220mm 145mm 177mm ...

Страница 10: ......

Страница 11: ...tropisches Klima Stellen Sie das Produkt auf eine flache stabile Oberfläche die keinen Erschütterungen ausgesetzt ist Das Produkt und dessen Teile dürfen nicht über die Kante delelte tragen den Möbelstücks hinausragen Um das Risiko eines Feuers Stromschlags oder Schäden an diesem Produkt zu reduzieren sollten Sie es nicht direktem Sonnenlicht Staub Regen oder Feuchtigkeit aussetzen Setzen Sie es n...

Страница 12: ...ondere Gesetze und Vorschriften Weitere Informationen erhalten Sie von Ihrem Händler oder den örtlichen Behörden Der oben aufgeführte Text erscheint auf elektrischen und elektronischen Geräten und Batterien oder der Verpack ung um Nutzer entsprechend zu erinnern Wenn unter dem Symbol Hg oder Pb erscheint bedeutet dies dass die Batterie jeweils Spuren von Quecksilber Hg oder Blei Pb enthält Nutzer ...

Страница 13: ...DSP MENU INFO BASS REPEAT REP AB 15 13 17 16 10 11 20 19 18 12 14 21 22 1 2 3 4 9 5 6 7 8 _ STAND BY Gerät einschalten oder in den Stand by Modus schalten 2 STOP MENÜ Wiedergabe anhalten oder Menü öffnen 3 WIEDERGABE PAUSE EINGABE Wiedergabe starten unterbrechen oder Auswahl bestätigen 4 SCHNELLER RÜCKLAUF Derzeit gespielten Titel schnell zurückspulen 5 HÖHEN Höhen anpassen Höhen mit den Tasten od...

Страница 14: ...mm Aux in Kabel am AUX IN Anschluss an Steuern Sie die Wiedergabe über Ihr verbundenes Audiogerät 6 Drücken Sie die Taste SOURCE um in den Bluetooth Modus zu gelangen Aktivieren Sie das Bluetooth Gerät und wählen Sie Sharp XL B515D aus Wählen Sie den Titel aus den Sie abspielen möchten und drücken Sie auf WIEDERGABE 7 Drücken Sie die Taste SOURCE um in den USB Modus zu gelangen Stecken Sie das USB...

Страница 15: ...auptmenü drücken Sie um Prune Station Sender bereinigen zu finden und aufzurufen dann befolgen Sie die Befehle um Press ENTER to Prune Station EINGABE drücken um Sender zu bereinigen und drücken Sie die Taste 4 Reihenfolge der Sender Öffnen Sie das Menü und rufen Sie Reihenfolge der Sender auf drücken Sie die Taste und dann die Taste um eine der Reihenfolgen für die Sender auszuwählen Multiplex Al...

Страница 16: ...deaktivieren Sie die Funktion auf Ihrem Bluetooth Gerät Andere Audiogeräte verbinden Über Audio können Sie Ihr Gerät rasch und einfach mit einem MP3 Player oder anderen externen Quellen verbinden 1 Schließen Sie Ihr externes Audiogerät mit einem 3 5 mm Audiokabel am AUX IN Anschluss an der Vorderseite an 2 Stecken Sie den Netzstecker der Mikroanlage in die Steckdose 3 Drücken Sie die Taste SOURCE ...

Страница 17: ... 10 Minuten Inaktivität aus Ursache Automatischer Stand by Modus Lösung Dieses Gerät wurde entwickelt um nach etwa 10 Minuten Inaktivität automatisch in den STAND BY Modus zu wechseln Drücken Sie die Taste STAND BY um das Gerät einzuschalten Technische Angaben Modell XL B515D Radiosignal 87 5 108MHz DAB Signal 174 928 239 200MHz Stromversorgung AC 220 240V 50Hz Stromverbrauch 40 W Ausgangsstrom 2 ...

Страница 18: ......

Страница 19: ...cales Coloque el producto en una superficie plana estable y no expuesta a vibraciones Asegúrese de que el producto y sus partes no sobresalen de los bordes del mueble sobre el que se coloca Para reducir el riesgo de incendio descarga eléctrica o daño en el producto no lo exponga directamente a la luz del sol polvo lluvia o humedad No exponga nunca este producto a gotas o derramamientos y no coloqu...

Страница 20: ... los usuarios que utilicen las instalaciones de devolución existentes para equipos usados ADVERTENCIA PRODUCTO DE CLASE 1 Los aparatos con reproductor de CD integrado se marcan con esta etiqueta de precaución Esta etiqueta de advertencia se ubica en el panel posterior de la unidad ESTA UNIDAD ES UN PRODUCTO LÁSER DE CLASE 1 ESTA UNIDAD UTILIZA UN RAYO LÁSER VISIBLE QUE PODRÍA CAUSAR UNA RADIACIÓN ...

Страница 21: ...EPEAT REP AB 15 13 17 16 10 11 20 19 18 12 14 21 22 1 2 3 4 9 5 6 7 8 _ STANDBY Pulse este botón para encender la unidad o entrar en el modo en espera 2 STOP MENU Pulse este botón para detener la música o entrar en el menú 3 PLAY PAUSE ENTER Iniciar poner en pausa la reproducción o confirmar las opciones 4 FAST REWIND Pulse este botón para rebobinar en modo rápido la pista que se esté reproduciend...

Страница 22: ...e el botón SOURCE para entrar en modo Aux IN audio Conecte el dispositivo de audio a la toma AUX IN mediante un cable auxiliar de 3 5 mm Controle la reproducción mediante el dispositivo de audio conectado 6 Pulse el botón SOURCE para entrar en modo Bluetooth Active el dispositivo habilitado con Bluetooth y seleccione Sharp XL B515D Seleccione la canción correspondiente y pulse para reproducir 7 Pu...

Страница 23: ...ccionar unas de las opciones de organización de las emisoras Multiplex Alphanumeric Active 6 DRC Dynamic range control Esta función permite reducir el rango dinámico de la señal de audio Entre en el menú y busque DRC utilice el botón para seleccionar DRC OFF o ON y pulse el botón para confirmar 7 Restablecer valores de fábrica Para restablecer el ajuste original entre en la interfaz de restablecim...

Страница 24: ...oducción 5 Para conseguir unos niveles de volumen óptimos ajuste el volumen en el dispositivo de audio externo Funcionamiento de la función USB Se puede escuchar música mediante la interfaz del dispositivo USB de la unidad Conexión con un dispositivo USB 1 Encienda la unidad y seleccione el modo USB pulsando el botón SOURCE 2 Conecte el dispositivo USB a la conexión USB del panel frontal de la uni...

Страница 25: ...odo de espera automática mente después de 10 minutos de inactividad Pulse el botón STANDBY para activar la unidad Especificación técnica Modelo XL B515D Señal de radio 87 5 108MHz Señal DAB 174 928 239 200MHz Fuente de alimentación AC 220 240V 50Hz Consumo de electricidad 40 W Potencia de salida 2 x 7 W RMS Impedancia 2 x 8 Ω Respuesta de frecuencia 60Hz 20KHz Bluetooth Versión V 2 1 EDR Potencia ...

Страница 26: ......

Страница 27: ...k elettrici o danni al prodotto non esporlo direttamente a luce del sole polvere pioggia o umidità Non esporlo mai a gocciolamenti e schizzi d acqua e non collocare oggetti contenenti liquidi sopra o vicino a esso Non collocare oggetti pieni di liquidi come vasi sull apparecchio Non installarlo vicino a fonti di calore come termosifoni griglie di ventilazione stufe o altri apparecchi inclusi ampli...

Страница 28: ...IONE PRODOTTO LASER CLASSE 1 Gli apparecchi con lettore CD incorpo rato sono contrassegnati con questa etichetta di avvertenza Questa etichetta di avvertenza è situata sul pannello posteriore dell unità QUESTA UNITÀ È UN PRODOTTO LASER CLASSE 1 QUESTA UNITÀ USA UN RAGGIO LASER VISIBILE CHE POTREBBE CAUSARE RADIAZIONI PERICOLOSE IN CASO DI ESPOSIZIONE ACCERTARSI DI UTILIZZARE CORRETTAMENTE IL LETTO...

Страница 29: ...UFFLE PROGRAM LOUD DSP MENU INFO BASS REPEAT REP AB 15 13 17 16 10 11 20 19 18 12 14 21 22 1 2 3 4 9 5 6 7 8 _ STANDBY Premere per accendere l unità o passare alla modalità standby 2 STOP MENU Premere per arrestare la musica o passare al menu 3 RIPRODUCI PAUSA INVIO Avvio pausa riproduzione o conferma selezione 4 RIAVVOLGIMENTO RAPIDO Premere per riavvolgere rapidamente la traccia in riproduzione ...

Страница 30: ...3 5 mm Regolare la riproduzione usando il dispositivo audio connesso 6 Premere il pulsante SORGENTE per passare alla modalità Bluetooth Attivare il dispositivo con funzionalità Bluetooth e selezionare Sharp XL B515D Selezionare la canzone desiderata e premere play 7 Premere il pulsante SORGENTE per passare alla modalità USB Collegare il dispositivo USB alla porta USB sul pannello anteriore dell un...

Страница 31: ...DRC usare il pulsante per selezionare DRC OFF o ON premere il pulsante per confermare 6 Ripristino di fabbrica Per impostare l unità alle impostazioni originali entrare nell interfaccia di ripristino di fabbrica seguire le indicazioni per Premere INVIO per sfrondare le stazioni quindi premere il pulsante e L unità verrà riavviata 7 Versione SW Informazioni sulla versione software del sistema 8 Mem...

Страница 32: ...sitivo audio esterno Azionare l USB È possibile ascoltare la musica utilizzando l interfaccia del dispositivo USB dell unità Connettersi a un dispositivo USB 1 Attivare l unità e selezionare la modalità USB premendo il pulsante SORGENTE 2 Connettere il dispositivo USB alla presa di connessione USB sul pannello anteriore dell unità 3 La radio riprodurre ora canzoni salvate sul dispositivo USB Nota ...

Страница 33: ...sante STANDBY per riattivare l unità Specifiche tecniche Modello XL B515D Segnale radio 87 5 108MHz Segnale DAB 174 928 239 200MHz Alimentazione AC 220 240V 50Hz Consumo energetico 40 W Corrente in uscita 2 x 7 W RMS Impedenza 2 x 8 Ω Risposta di frequenza 60Hz 20KHz Bluetooth Versione V 2 1 EDR Potenza massima trasmessa 20 dbm Bande di frequenza 2402 MHz 2480 MHz Del reproductor de CD Formato de ...

Страница 34: ......

Страница 35: ...s Assurez vous que le produit ou ses pièces ne dépassent pas du bord du meuble le supportant Pour réduire les risques d incendie d électrocution ou de dommages à ce produit veuillez ne pas l exposer à la lumière directe du soleil à la poussière à la pluie et à l humidité Ne l exposez jamais aux éclaboussu res ou égouttements et ne placez pas d objets remplis d eau sur ou près du produit Ne placez ...

Страница 36: ...tient des traces de mercure Hg ou de plomb Pb respectivement Les utilisateur doivent utiliser les centres de ramassage d équipements et de piles existants ATTENTION PRODUIT LASER CLASSE 1 Les appareils avec lecteur CD intégré sont marqués avec cette étiquette d avertissement Cette étiquette d avertissement est située sur le panneau arrière de l unité CE PRODUIT EST CLASSÉ COMME PRODUIT LASER CLASS...

Страница 37: ...ation Télécommande 1 EJECT SHUFFLE PROGRAM LOUD DSP MENU INFO BASS REPEAT REP AB 15 13 17 16 10 11 20 19 18 12 14 21 22 1 2 3 4 9 5 6 7 8 _ STANDBY Appuyez pour allumer l appareil ou le mettre en veille 2 STOP MENU Appuyez pour arrêter la musique ou entrer dans le menu 3 PLAY PAUSE ENTER Pour démarrer mettre en pause la lecture ou confirmer vos choix 4 FAST REWIND Appuyez pour faire un retour rapi...

Страница 38: ...lecture du CD commencera avec la première piste 5 Appuyez sur la touche SOURCE pour entrer en mode Aux In audio Connectez votre appareil audio à la prise AUX IN via un câble auxiliaire de 3 5 mm Contrôlez la lecture via votre appareil audio connecté 6 Appuyez sur la touche SOURCE pour entrer en mode Bluetooth Activez l appareil compatible Bluetooth et sélectionnez Sharp XL B515D Sélectionnez la pi...

Страница 39: ...a direction vers Appuyer sur ENTER pour élaguer la station et appuyez sur la touche 4 Ordre des stations Accédez au menu Station Order Ordre des stations appuyez sur la touche puis sur pour choisir un ordre pour les stations Multiplex Alphanumeric Alphanumérique Active 5 DRC contrôle de plage dynamique Cette fonction permet de réduire la plage dynamique du signal audio Accédez au menu et trouvez D...

Страница 40: ... alimentation du microsystème à une prise secteur 3 Appuyez sur la touche SOURCE pour basculer sur le mode AUDIO 4 Vous devrez peut être utiliser l appareil audio externe directement pour les fonctions de lecture 5 Pour des niveaux de volume optimaux réglez le volume sur l appareil audio externe Fonctionnement USB Il est possible d écouter de la musique avec l interface d appareil USB de l apparei...

Страница 41: ...ivé Solution Cet appareil est conçu pour entrer en mode veille automatiquement après 10 minutes d inactivité Appuyez sur la touche STANDBY pour réveiller l appareil Spécification technique Modèle XL B515D Signal radio 87 5 108MHz Signal DAB 174 928 239 200MHz Alimentation électrique AC 220 240V 50Hz Consommation électrique 40 W Puissance de sortie 2 x 7 W RMS Impédance 2 x 8 Ω Réponse en fréquence...

Страница 42: ......

Страница 43: ...narażona na wibracje Dopilnuj by urządzenie nie wystawało za krawędź mebla na którym stoi Aby zmniejszyć ryzyko pożaru porażenia prądem i uszkodzenia pro duktu nie wystawiaj go na bezpośrednie działanie światła słonecznego kurzu deszczu czy wilgoci Nigdy nie narażaj urządzenia na zamoczenie lub zachlapanie i nie stawiaj na nim ani w jego pobliżu zbiorników wypełnionych cieczą Nie stawiaj żadnych p...

Страница 44: ...ści rtęci Hg lub ołowiu PB Użytkownicy powinni zgłaszać się do wyznaczonych punktów odbioru zużytych urządzeń i baterii OSTRZEŻENIE PRODUKT LASEROWY KLASY 1 LASER Urządzenia z wbudowanym odtwarzac zem CD są oznaczone taką etykietą Ta etykieta z ostrzeżeniem jest umieszc zona na panelu tylnym urządzenia TEN PRODUKT JEST URZĄDZENIEM LASEROWYM KLASY 1 TO URZĄDZENIE WYKORZYSTUJE WIDZIALNĄ WIĄZKĘ LASER...

Страница 45: ... AB 15 13 17 16 10 11 20 19 18 12 14 21 22 1 2 3 4 9 5 6 7 8 _ STANDBY Naciśnij ten przycisk by włączyć urządzenie lub przełączyć je w tryb czuwania 2 STOP MENU Naciśnij ten przycisk by zatrzymać odtwarzanie lub wejść w menu 3 ODTWARZANIE PAUZA ZATWIERDŹ Rozpoczęcie odtwarzania pauza lub zatwierdzenie wyboru wybór 4 FAST REWIND Naciśnij ten przycisk by szybko przewinąć do tyłu odtwarzany utwór 5 T...

Страница 46: ...x 3 5 mm Steruj odtwarzaniem z podłączonego urządzenia audio 6 Naciśnij przycisk SOURCE by włączyć tryb Bluetooth Aktywuj urządzenie z funkcją Bluetooth i wybierz Sharp XL B515D Wybierz piosenkę i włącz odtwarzanie 7 Naciśnij przycisk SOURCE by włączyć tryb USB Podłącz pendrive a do portu USB na przednim panelu urządzenia a miniwieża odczyta go i automatycznie rozpocznie odtwarzanie Podstawowe fun...

Страница 47: ...akresem Ta funkcja umożliwia ograniczenie zakresu dynamicznego sygnału audio Otwórz menu i znajdź DRC użyj przycisków żeby wybrać DRC OFF lub ON naciśnij przycisk żeby zatwierdzić wybór 7 Resetowanie do ustawień fabrycznych Żeby przywrócić w urządzeniu ustawienia początkowe przejdź do menu ustawień fabrycznych a następnie postępuj według wskazówki Press ENTER to prune station naciśnij przycisk ENT...

Страница 48: ...anie muzyki za pomocą interfejsu USB urządzenia Podłączanie urządzenia USB 1 Włącz miniwieżę i wybierz tryb USB naciskając przycisk SOURCE 2 Podłącz urządzenie USB do gniazda USB na przednim panelu miniwieży 3 Miniwieża odtworzy utwory zapisane na dysku USB Uwagi Obsługiwane formaty plików MP3 WMA Nieobsługiwane formaty plików zostaną pominięte Np dokumenty aplikacji Word doc lub pliki MP3 z rozsz...

Страница 49: ...TANDBY by ponownie aktywować urządzenie Dane techniczne Model XL B515D Sygnał radiowy 87 5 108MHz Sygnał DAB 174 928 239 200MHz Zasilanie AC 220 240V 50Hz Pobór mocy 40 W Moc wyjściowa 2 x 7 W RMS Impedancja 2 x 8 Ω Zakres częstotliwości 60Hz 20KHz Bluetooth Wersja V 2 1 EDR Maksymalny poziom przekazywanej mocy 20 dbm Pasma częstotliwości 2402 MHz 2480 MHz Odtwarzacz CD Odtwarzane formaty CD CD R ...

Страница 50: ...50 ...

Страница 51: ......

Страница 52: ...UMC Poland Sp z o o Ostaszewo 57B 87 148 Łysomice Poland Made in China SAU MAN 0053 www sharpconsumer eu ...

Отзывы: