background image

Useful Features

40 

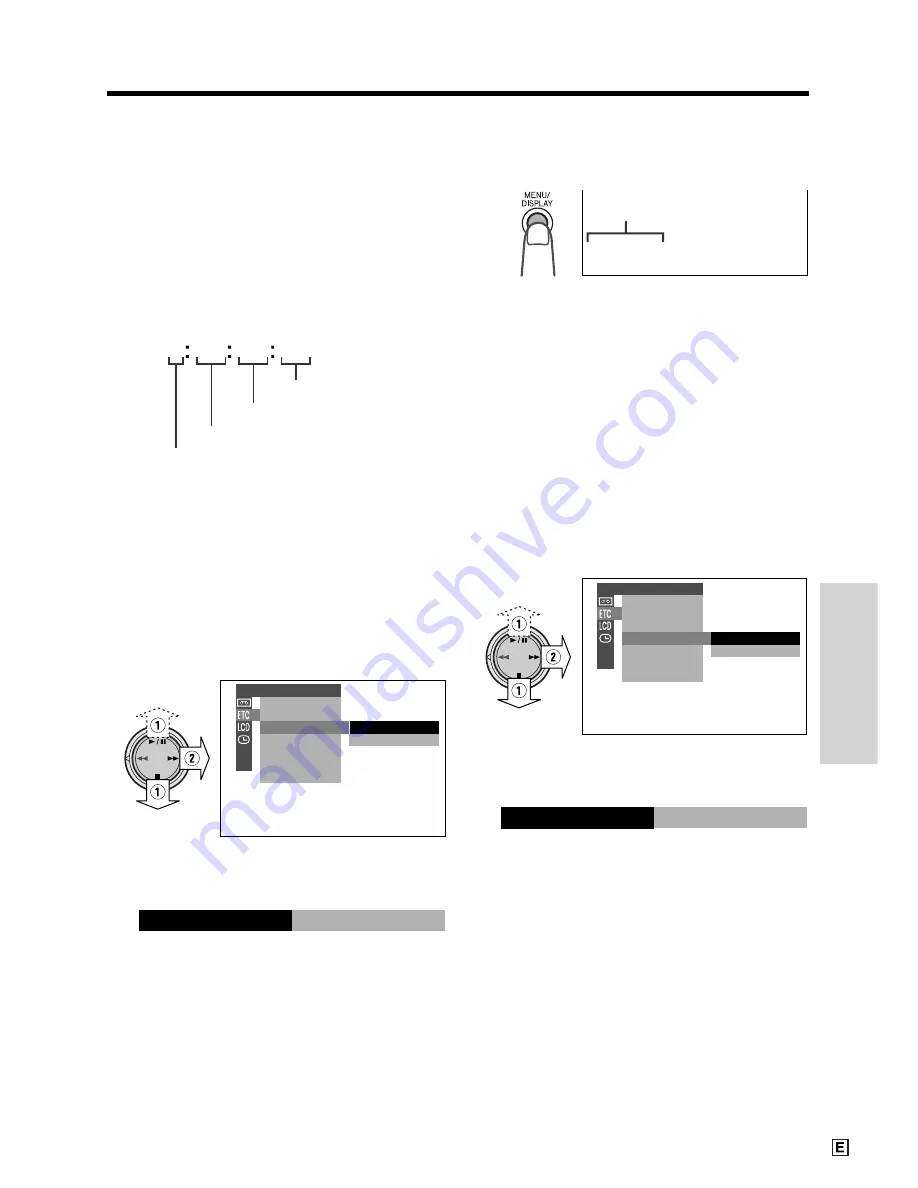
Using the Time Code

The time code shows the hour, minute and
second of recording, and the frame number
(1 frame = approx. 1/25 sec.). This is automati-
cally recorded along with the subject. You can
display the time code on the screen as an
accurate counter in both VCR and CAMERA
modes.

Frame number*

Display format

0

0

0

1 0 2 0

T C

• The example screens for this feature are for VCR

mode.

1

During playback or recording, press the
MENU/DISPLAY button until the menu
screen appears.

2

Select 

I

, then press 

r

 on the

Operation button. Select “TIME CODE”
(

1

), then press 

r

 (

2

).

3

Press 

d

 or 

y

 to select “DISP. ON”,

then press 

e

.

4

Press the MENU/DISPLAY button to
turn off the menu screen.

• The time code appears.

D I SP. OF F

D I SP. ON

OT HERS

REMO T E
SOUND

T I ME CODE
T C OU T

D I SP. ON

T I ME CODE

SP

TC 0 0 5

:

3 5

:

To turn off the time code

Select “DISP. OFF” in step 3 above.

Note:

• When the tape reaches an unrecorded section,

the time code returns to zero (TC0:00:00). Once
recorded, the time code cannot be changed.

Displaying the time code on a TV
during playback

1

In VCR mode, select 

I

, then press 

r

on the Operation button. Select “TC
OUT” (

1

), then press 

r

 (

2

).

OF F

ON

OT HERS

REMO T E
SOUND

T I ME CODE
T C OU T

2

Press 

d

 or 

y

 to select “ON”, then

press 

e

.

ON

T C OU T

Second

Minute

Hour

* Displayed during still

or frame advance
playback.

Time code

Содержание ViewCam VL-WD250E

Страница 1: ...LIQUID CRYSTAL DISPLAY CAMCORDER ENGLISH OPERATION MANUAL VL WD250E ...

Страница 2: ... copyrighted works which must not be recorded without the authority of the owner of the copyright Please refer to relevant laws in your country Power supply This unit can be operated by connecting it to either the AC adapter battery charger or battery pack The AC adapter battery charger incorporates the AUTO VOLTAGE AC 110 240 V 50 60 Hz function NOTE The LCD panel of this camcorder is a very high...

Страница 3: ...order service centre approved by Sharp Information for Australia New Zealand Only ENGLISH NOTE This Camcorder is a high technology product The LCD Panel comprises 61 600 TFT Transistors Due to the high density of transistors it is possible that some pixels may fail Important Copyright may exist in material you wish to record Copying such material without permission of the relevant licensees or own...

Страница 4: ... locks into place Inserting a Mini DV Cassette 1 Attach the power source to the camcorder then slide the cassette compartment door release and open the cassette compartment door 2 Insert the cassette fully with the window facing outwards and with the erasure protect tab facing upwards 3 Press the W mark gently until the cassette holder clicks into place Close the compartment door by pressing the c...

Страница 5: ...ease button 1 and open the LCD monitor to a 90 angle to the camcorder body 2 2 Adjust the LCD monitor to an angle that allows easy viewing on the on screen picture 90 3 Hold down the Lock button and set the Power switch to VCR 4 Press e or r on the Operation button to rewind or fast forward the tape to the desired point 5 Press y to begin playback AUDIO1 2 AUDIO1 2 To stop playback Press d Zooming...

Страница 6: ...L221 AC adapter battery charger Power cord DC cable Remote control AA battery for remote control K 2 CR2025 type lithium battery Audio video cable RCA type Lens cap Shoulder strap PixLab Video Capture Software Lite Version PC connecting cable ...

Страница 7: ...T L441 Standard life intelligent battery pack BT LS222 Extended life intelligent battery pack BT LS442A Zoom microphone VR 5MC Note Some of these accessories may not be available in selected areas PixLab USB Digital Moving Picture Kit VR PKU10E Soft case VR 33SC Mini DV cassette VR DVM60N ...

Страница 8: ...d placing the camcorder in close proximity to lighting equipment The heat from incandescent lights may deform the camcorder or cause it to malfunction Always respect prohibitions or restrictions on the use of electronic equipment on commercial flights or in other sensitive areas Be aware of the temperature and humidity You can use your camcorder at 0 C to L40 C and at 30 to 80 relative humidity Do...

Страница 9: ...ew formation When using the camcorder in a place where dew formation is likely to occur allow the camcorder and the video tape to acclimate to the surroundings for about one hour Dew warning feature If dew forms the word DEW flashes on the screen and the power will automatically turn off in approximately 10 seconds Plastic bag For example when bringing the camcorder indoors after skiing place it i...

Страница 10: ...Notes Excessive use of the cleaning tape however may cause damage to the video heads Please read the instructions accompanying the cleaning tape carefully before using it The fast forward and rewind functions cannot be used when the cleaning tape is in the camcorder 1 Insert a cleaning tape into the camcorder 2 Set the camcorder to VCR mode The video head cleaning screen appears 3 Press e on the O...

Страница 11: ...for Standardization of Consumer Use Digital VCR Formats This product incorporates copyright protec tion technology that is protected by method claims of certain U S patents and other intellectual property rights owned by Macrovision Corporation and other rights owners Use of this copyright protection technology must be authorized by Macrovision Corporation and is intended for home and other limite...

Страница 12: ...s Cap 14 Attaching the Shoulder Strap 14 Using the Viewfinder 15 Using the LCD Monitor 16 Camera Recording Easy Camera Recording in Full Auto Mode 17 Zooming 18 Tips on Recording Positions 18 Remaining Recording Time Display 19 Remaining Battery Power Display 19 Playback Playback 20 Volume Control 20 Watching the Playback on a TV 21 Video Search 22 Still 22 Using the Controls 23 Selecting the User...

Страница 13: ...u Program AE 47 Digital Picture Effects 48 Setting the Confirmation Sounds 48 Using the Zoom Microphone Optional Accessory 49 Playback Playback Zoom 50 Gamma Playback 51 Playback Effects 52 Picture Effect Playback 53 Editing 54 Editing with the DV Terminal IEEE1394 55 Configuring Software for PC Connection 57 Transferring Motion Images to a PC 59 Audio Dubbing Feature 59 Selecting the Audio Playba...

Страница 14: ... indicated in brackets Left view W B White Balance button p 46 CAT S EYE switch p 31 Lens hood Zoom lens Remote sensor p 35 Stereo microphone p 59 GAMMA BRIGHTER button pp 29 30 51 AUTO ON OFF button p 24 Operation button p 23 MENU DISPLAY button p 23 Operation References DIS Digital Image Stabilization switch p 27 ...

Страница 15: ...p 49 LCD monitor p 16 LCD monitor OPEN release button p 16 Lithium battery compartment door p 11 Viewfinder p 15 Dioptre adjustment p 15 Power source PUSH release button pp 8 9 Power source mounting surface pp 8 9 Shoulder strap loop p 14 Bottom view Tripod socket ...

Страница 16: ... Power Zoom Wide angle Telephoto control p 18 VOLume control p 20 Jack cover pp 21 54 RECord START STOP button p 17 Power switch CAMERA VCR select switch p 23 Cassette compartment door p 10 Cassette compartment door release p 10 PC connection jack p 57 DV terminal p 55 EarPHONES jack p 20 Jack cover pp 20 55 57 Speaker p 20 Hand strap p 14 Shoulder strap loop p 14 ...

Страница 17: ...nimal See page 31 Night Recording To record yourself in the scene while monitoring the shot See page 37 Letting the Subject Monitor the Shot To quickly return the tape to the end of the last recorded scene after playback See page 38 Quick Return To focus on an off centred subject See page 41 Manual Focus To turn off the confirmation sounds which are made when you operate the camcorder See page 48 ...

Страница 18: ...FADE QK RETURN MANUAL SET AUD I O DUB P I C EFF ECT AUD I O PB EFF ECT PLAYBACK SET REMOTE SOUND T IME CODE TC OUT DEMO MODE OTHERS FADE PHOTO SNAP SOUND D I SPLAY EF F SNAP QK RE TURN MENU REMOTE SOUND T IME CODE TC OUT OTHERS AUDIO1 2 SP LCD BR I GHT LCD COLOUR BACKL I GHT BR I GHT VF VF SE T LCD LCD BR I GHT LCD COLOUR BACKL I GHT BR I GHT VF VF SE T LCD CAMERA mode VCR mode p 27 p 17 pp 17 24 ...

Страница 19: ...ENDS SOON TAPE DEW LAMP LAMP DEW The tape has reached the end Replace it with a new cassette see page 10 The battery is almost depleted Replace it with a fully charged battery pack see page 8 Dew has formed inside the camcorder Wait for a few hours until the dew disappears see page vi About 10 seconds after this warning appears the camcorder automatically turns off The video heads are clogged and ...

Страница 20: ...n Using the zoom see page 18 and other functions or turning the power on and off frequently will increase power consumption This may result in a decrease of more than 50 in the actual recording time compared to the maximum continuous recording time listed above The charging time and recording time may vary depending on the ambient temperature and the condition of the battery pack See page 65 for m...

Страница 21: ...er source PUSH release button 2 Press the power source PUSH release button 1 and slide the battery pack up and take it out 2 Cautions BEFORE REMOVING THE BATTERY PACK ALWAYS STOP RECORDING OR PLAYBACK AND TURN THE POWER OFF If you remove the battery pack during recording or playback the tape will remain wound around the video head drum potentially causing damage to the tape Remove the battery pack...

Страница 22: ... adapter Connect the supplied power cord to the AC adapter and insert the AC plug into a power outlet The POWER indicator on the AC adapter lights up and the camcorder is supplied power Note When the AC adapter battery charger is used to power the camcorder it cannot be used to charge the battery pack DC OUT jack POWER indicator To power outlet Removing the DC cable from the camcorder Perform step...

Страница 23: ...y retract Close the compartment door by pressing the centre until it clicks into place Removing a Cassette Perform step 1 above then take out the cassette Cautions Do not try to close the cassette compartment door while the cassette holder is extending or retracting Be careful not to get your fingers caught in the cassette holder Do not apply force to the cassette holder except when pressing the W...

Страница 24: ...ift up the battery using a pointed object and take it out Note Replace the battery with a new CR2025 lithium battery when the time indicator of the camcorder starts to fall behind the correct time Notes on the Use of the Lithium battery CAUTION Danger of explosion if battery is incorrectly replaced Replace only with the same or equivalent type CR2025 recommended by the equipment manufacturer X KEE...

Страница 25: ...tton 1 and open the LCD monitor 2 2 Hold down the Lock button and set the Power switch to CAMERA 4 Press r on the Operation button 5 Press d or y 1 to select 2 day and then press r 2 Lock button 6 Press d or y to select 6 month and then press r 0 0 0 SE TT I NG 6 20 0 2 2 1 0 0 0 SE TT I NG 6 20 0 2 2 1 0 3 0 SE TT I NG 6 20 0 2 2 7 Press d or y to select 2002 year and then press r 8 Press d or y ...

Страница 26: ... 1 Hold down the Lock button and set the Power switch to CAMERA or VCR 2 Press the MENU DISPLAY button until the menu screen appears 3 Select P then press r on the Operation button Select DISPLAY 1 then press r 2 4 Press d or y to select DATE or DATEHTIME and then press e 5 Press the MENU DISPLAY button to turn off the menu screen The date or the date and time is displayed Notes Before recording m...

Страница 27: ...will not get in the way 5 6 7 4 3 2 Tabs 2 Hold one end of the strap and thread it through the loop on the left side of the power source mounting surface 3 Loosen the strap in the buckle then feed the end of the strap through the buckle as shown 4 Draw the strap in the direction of the arrow to secure 5 7 To attach the other end of the strap to the loop on the left side of the hand strap open the ...

Страница 28: ...f when the LCD monitor is opened When the vertical rotation of the monitor is between 135 and 180 however the viewfinder is on and the subject is displayed both in the viewfinder and on the monitor see page 37 Be sure to close the viewfinder after use Adjusting the Dioptre Adjust the dioptre according to your eyesight when the picture in the viewfinder is not clear 1 Lift up the viewfinder 2 Hold ...

Страница 29: ...d of the LCD monitor when you want to save battery power Use the viewfinder if the LCD screen becomes difficult to see in bright daylight Closing the LCD monitor Return the LCD monitor to the vertical 90 position with the screen facing in and fold it into the camcorder until it clicks into place Cautions Do not use excessive force when moving the LCD monitor Do not try to rotate the LCD monitor ve...

Страница 30: ...wer switch to OFF without pressing the Lock button Notes Battery power is consumed in Recording Standby mode Turn off the power if you will not be recording again soon If the camcorder remains in Recording Standby mode for more than 5 minutes the power will automatically turn off to save battery power and to protect the tape from being damaged To resume recording set the Power switch to OFF and th...

Страница 31: ...cus on the subject See page 35 for recording macro shots See page 28 for use of the digital zoom Zoom range indicator Tips on Recording Positions To create images that are easy to watch during playback try to record with a stable posture while steadying your camcorder to prevent the image from shaking Holding the camcorder Put your right hand through the hand strap and place your left hand under t...

Страница 32: ... warning indicator will appear Replace the battery pack BAT TERY I S TOO LOW Notes Use the remaining battery power indicator only as an approximate indication The remaining battery power indicator may change to either a higher or lower level if you set the Power switch to OFF and then back to CAMERA or VCR In cold environments the red remaining battery power indicator may appear sooner The battery...

Страница 33: ...automatically rewound when playback reaches the end of the tape Stereo earphones commercially available with a 3 5 mm diameter plug can be plugged directly into the PHONES jack When you use this jack the speaker automatically turns off Watching the Playback in the Viewfinder You can also watch the playback in the viewfinder by closing the LCD monitor with the screen facing in You cannot monitor th...

Страница 34: ...ns Making connections with any of the components left turned on may cause picture noise or malfunc tion Notes If your TV or VCR has only one audio input jack use the white plug for the audio connection on the TV or VCR If your TV or VCR has an S video input socket you can connect it to the S VIDEO socket on the camcorder with a commercially available S video cable When the camcorder is connected t...

Страница 35: ...ess y to return to normal playback Notes The sound is off during search Some picture noise appears during search This is not a malfunction Still The still function makes it possible to pause playback During playback press y on the Operation button AUDIO1 2 To return to normal playback press y again Notes The sound is off in Still mode To protect the tape the camcorder automatically returns to norm...

Страница 36: ...the Lock button Lock button MENU DISPLAY button The MENU DISPLAY button is used to turn the on screen indicators and the menu screens on or off Each time you press the MENU DISPLAY button the on screen display changes as shown below Note The warning indicators and some other indicators cannot be turned off by pressing the MENU DISPLAY button Operation button The Operation button is used to select ...

Страница 37: ...ISPLAY Power switch AUTO ON OFF button 1 Hold down the Lock button and set the Power switch to CAMERA The user mode indicator is displayed AUTO User mode indicator 2 Press the AUTO ON OFF button Each time you press the AUTO ON OFF button the user mode changes between Auto mode and Manual mode To select Easy mode hold down the AUTO ON OFF button for more than two seconds Notes All manual settings i...

Страница 38: ...SPEED CAMERA SE T EFF SNAP 5 Press d or y 1 to select the desired menu setting then press e 2 To adjust another menu item press e then perform steps 3 to 5 00 1 PHOTO SNAP DGTL ZOOM TAPE SPEED CAMERA SE T EFF SNAP To turn off the menu screen Press the MENU DISPLAY button Notes Certain menu items are common among Camcorder modes If the REMOTE menu item for example is set to OFF in CAMERA mode it wi...

Страница 39: ...LP then press e LP TAPE SPEED 5 Press the MENU DISPLAY button to turn off the menu screen The recording mode indicator changes from SP to LP LP 45min To return to SP mode Select SP in step 4 above Notes on the use of LP mode To record in LP mode be sure to use a Mini DV cassette labelled for use with LP mode Frozen images mosaic pattern picture noise audio interruptions or audio loss may occur in ...

Страница 40: ...io recording mode indicator changes from 12bit to 16bit AUTO 16 bit To return to 12 bit audio recording mode Select 12bit in step 4 above Digital Image Stabilization DIS The digital image stabilization DIS function is factory preset to on to stabilize the image by electronically compensating for relatively minor image shaking that is often annoying in close up shots AUTO Note The DIS function cann...

Страница 41: ...ases when higher digital zoom settings are used 1 Set the camcorder to CAMERA mode 2 Press the MENU DISPLAY button until the menu screen appears MAN FOCUS EXPOSURE SHUT SPEED P I C EFFECT SCENE MENU FADE QK RETURN MANUAL SET 3 Select Y then press r on the Operation button Select DGTL ZOOM 1 then press r 2 OFF 50 100 780 PHOTO SNAP DGTL ZOOM TAPE SPEED CAMERA SE T EFF SNAP 4 Press d or y to select ...

Страница 42: ...rtion of the image unaffected GAMMA BRIGHTER button In CAMERA mode press the GAMMA BRIGHTER button once GAMMA appears indicating that Gamma Brightness Compensation is now working To obtain a brighter picture Press the GAMMA BRIGHTER button again The x indicator appears Note When the x indicator is displayed the background will become slightly brighter AUTO AUTO GAMMA AUTO AUTO GAMMA To cancel Gamm...

Страница 43: ...at the gain up function is now working AUTO AUTO GAMMA AUTO AUTO GAMMA L I GHT L I GHT L I GHT L I GHT To obtain a brighter picture Press the GAMMA BRIGHTER button again The indicator appears To cancel the gain up function Press the GAMMA BRIGHTER button until GAMMA disappears Notes Some picture noise appears in Gain up mode The picture noise increases when the indicator is displayed When the indi...

Страница 44: ...s brighter To cancel Night Recording Set the CAT S EYE switch to OFF Notes The picture will turn white if you use Night Recording in a bright location The camcorder may not be able to focus correctly when using Night Recording In such cases use the manual focus function to obtain proper focus see page 41 The following functions do not work when using Night Recording Manual shutter speed Manual exp...

Страница 45: ... FADE is displayed AUTO SP 3 3 min min 0 AUTO FADE FADE SP min 0 12 bit 12 bit Using Fade Mode 1 Press the REC START STOP button to begin recording The picture turns white and the image and sound fade in AUTO SP 3 3 min min 0 AUTO FADE FADE I N I N SP min 0 12 bit 12 bit Fade out FADE indicator 2 Press the REC START STOP button at the point where you wish to stop recording The image and sound fade...

Страница 46: ... the camcorder to CAMERA mode 5 Press y 1 to select PHOTO SNAP then press r 2 6 Press d or y to select the desired still recording mode then press e 7 Press the MENU DISPLAY button to turn off the menu screen Using Still Recording 1 In Recording Standby mode press the STILL button A still image of the subject is displayed 2 Press the REC START STOP button The still image of the subject will be rec...

Страница 47: ...creen Using PHOTO SHOT mode 1 In Recording Standby mode press the STILL button A still image of the subject is displayed 2 Press the REC START STOP button The still image of the subject will be recorded OF F PHOTO SNAP PHOTO SHOT DGTL ZOOM TAPE SPEED CAMERA SE T EFF SNAP PHOTO SHOT EFF SNAP To cancel the still image In SNAP mode press the STILL button while the camcorder is in Recording Standby mo...

Страница 48: ...he Power Zoom control to the W side and then move the camcorder closer to the subject until you obtain the desired angle of view The camcorder will automatically focus on the subject when the lens is set for the widest angle Notes When you are recording a macro shot be sure that the subject receives sufficient illumination It is recommended that you use a tripod for recording macro shots to preven...

Страница 49: ... the Remote Control 1 Open the LCD monitor completely 1 then rotate it 180 vertically 2 2 Set the Power switch on the camcorder to CAMERA or VCR 3 Aim the remote control at the remote sensor of the camcorder and press the control buttons for operation Notes Be careful not to allow direct sunlight or bright light from interior illumination to fall onto the remote sensor as this may prevent the remo...

Страница 50: ...it 180 vertically 2 90 180 2 Set the Power switch to CAMERA The subject is displayed in the viewfinder and a mirror image of the subject is displayed on the LCD monitor 3 Press the REC START STOP button to begin recording Caution Do not invert the image by rotating the monitor during recording Notes The screen image is automatically inverted when the vertical rotation of the monitor is between 135...

Страница 51: ...camcorder enters Recording Standby mode 4 Press the MENU DISPLAY button to turn off the menu screen Notes To cancel the quick return function press r to select STOP then press e If the cassette has been removed since the last recording or if no recording has been made since the cassette was loaded the quick return function cannot be used Edit Search The edit search function lets you search without...

Страница 52: ...ance function allows you to play back still images frame by frame 1 During playback press the PAUSE STILL button g to pause playback 2 Press the h or j button Each time you press the button the picture advances one frame forward or backward To return to normal playback press the PLAY button t Notes The sound is off during reverse slow and frame advance playback If you use the slow or frame advance...

Страница 53: ...DE 1 then press r 2 3 Press d or y to select DISP ON then press e 4 Press the MENU DISPLAY button to turn off the menu screen The time code appears D I SP OFF D I SP ON OTHERS REMOTE SOUND T IME CODE TC OUT D I SP ON T IME CODE SP TC0 05 35 To turn off the time code Select DISP OFF in step 3 above Note When the tape reaches an unrecorded section the time code returns to zero TC0 00 00 Once recorde...

Страница 54: ... e to display the focus setting screen MAN FOCUS AUTO MANUAL EXPOSURE SHUT SPEED P I C E F FECT SCENE MENU FADE QK RETURN MANUAL SET 6 Adjust the Power Zoom control to frame the subject as you desire Lack of contrast e g snow scene Fast moving subject Background is too bright Subject has horizontal stripes Subject is being shot through a dirty or wet window Light reflects off the subject Twosubjec...

Страница 55: ...m control to wide angle and then try refocusing If the lens is dirty or fogged the camcorder may not be able to correctly focus When MF is displayed you can manually adjust the focus by pressing d or y even if the focus setting screen is not displayed When you want to cancel all manual settings and return to Auto mode press the AUTO ON OFF button MANUAL MF FOCUS FAR NEAR 12 bit SP SE T BUT TON MAN...

Страница 56: ...t T then press r on the Operation button Select SHUT SPEED 1 then press r 2 MAN FOCUS EXPOSURE SHUT SPEED P I C EFFECT SCENE MENU FADE QK RETURN MANUAL SET AUTO MANUAL 5 Press e to display the shutter speed setting screen 6 Press d or y 1 to select the desired shutter speed then press e 2 The selected shutter speed is displayed on the menu screen 7 Press the MENU DISPLAY button to turn off the men...

Страница 57: ...fast shutter speed Using a fast shutter speed under fluorescent lighting will cause flickering in the picture and possibly periodic colour shifts The manual shutter speed setting will be cancelled if a scene setting is selected thereafter The manual shutter speed setting cannot be used with Night Recording When you want to cancel all manual settings and return to Auto mode press the AUTO ON OFF bu...

Страница 58: ... on the Operation button Select EXPOSURE 1 then press r 2 MAN FOCUS EXPOSURE SHUT SPEED P I C E F FECT SCENE MENU FADE QK RETURN MANUAL SET AUTO MANUAL 5 Press e to display the exposure setting screen 6 Press d or y to select the desired exposure level The number shown is the selected exposure level The adjustment range is from 5 least light to L5 most light 7 Press e The selected exposure level i...

Страница 59: ...he distance of the object so that the entire screen is white W B button 4 Press the MENU DISPLAY button to set the white balance lock W B LOCK flashes during the locking procedure To cancel the locking proce dure press the MENU DISPLAY button while W B LOCK flashes 5 Press the W B button to turn off the white balance lock screen W B LOCK is displayed To cancel White Balance Lock 1 Press the W B bu...

Страница 60: ... is from a spotlight or candles 1 Set the camcorder to CAMERA mode 2 Press the MENU DISPLAY button until the menu screen appears 3 Select T then press r on the Operation button Select SCENE MENU 1 then press r 2 SPORT SCENE MENU 4 Press d or y to select the scene setting that best fits the recording situation then press e The selected scene setting is displayed on the menu screen SP SPORT 30min 5 ...

Страница 61: ... P I C E F FECT SCENE MENU FADE QK RETURN MANUAL SET B W P I C EFFECT BEEP OFF CH IME REMOTE SOUND T IME CODE TC OUT DEMO MODE OTHERS BEEP SOUND Setting the Confirmation Sounds A confirmation sound is made when you turn on or off the Power switch press the REC START STOP button or perform other desig nated operations Use the procedure below to change the type of sound or to turn off the confirmati...

Страница 62: ...mounted Type of Zoom Microphone modes AUTO The camcorder automatically selects the optimum sound according to the magnifi cation of the zoom lens When the zoom lens is at a wide angle setting the built in micro phone is used to record sounds As the zoom magnification increases the sounds from the zoom microphone and built in microphone are mixed according to the zoom setting TELE The zoom micropho...

Страница 63: ... Advanced Features Playback Shift buttons 1 During playback or still playback press the ZOOM T button to zoom in 2 Press the Shift q w a or s button to shift the displayed image To cancel Playback Zoom Press the ZOOM W button to zoom out to the widest angle Notes Use of Playback Zoom may cause a reduction in picture quality for still images Images in Playback Zoom mode cannot be transferred to a p...

Страница 64: ... image unaffected During playback press the GAMMA BRIGHTER button once GAMMA1 appears and the picture becomes brighter To obtain a brighter picture press the GAMMA BRIGHTER button again GAMMA2 appears To cancel Gamma Playback Press the GAMMA BRIGHTER button until GAMMA1 and GAMMA2 disappear Note Gamma Playback has no effect during still playback GAMMA AUDIO 1 1 2 SP GAMMA AUDIO 1 1 2 SP GAMMA AUDI...

Страница 65: ...r longer An image recorded for less than 6 seconds may not dissolve properly Using Playback Effect 1 In VCR mode press the MENU DISPLAY button until the menu screen appears 2 Select V then press r on the Operation button Select PB EFFECT 1 then press r 2 3 Press d or y to select OVERLAP or WIPE then press e OFF OVERLAP W I PE AUD I O DUB P I C EFF ECT AUD I O PB EFF ECT PLAYBACK SET WIPE PB EFF EC...

Страница 66: ...for this feature are for VCR mode 1 During playback press the MENU DISPLAY button until the menu screen appears 2 Select V then press r on the Operation button Select PIC EFFECT 1 then press r 2 OFF B W SEP I A MOSA I C AUD I O DUB P I C EFF ECT AUD I O PB EFF ECT PLAYBACK SET B W P I C EFFECT 3 Press d or y to select the desired picture effect then press e 4 Press the MENU DISPLAY button to turn ...

Страница 67: ...at you wish to keep 2 Load a video cassette into the recording VCR 3 Press y on the camcorder to begin playback and then press the Record button on the VCR to begin recording 4 Press the Pause Still button on the VCR to pause recording when the source tape reaches the beginning of the sequence to be cut 5 Press the Pause Still or Record button on the VCR to resume recording when the source tape re...

Страница 68: ...e video equipment as the recording source Note Make sure that the video equipment to which you are recording can input dubbing signals via the DV terminal To DV terminal DV cable commercially available To DV terminal To Record from Video Equipment 1 Set the camcorder to VCR mode and insert a Mini DV cassette 2 Begin playback on the video equipment connected to the camcorder Check the camcorder scr...

Страница 69: ... from the video equipment set the Power switch on the camcorder to OFF and then back to VCR or disconnect the DV cable and connect it again COPYRI GHT PROT ECT ED Copyright Protection The digital VCR has far superior recording and playback ability than the traditional analog VCR and in order to protect digital video software copyrights a system for managing copyrights has been established Some dig...

Страница 70: ...hat the PC power is off to insure that images are transferred properly 3 Turn on the PC To RS 232C port D sub 9 pin port PC connecting cable supplied To PC connection jack Notes It is recommended to use the AC adapter battery charger as a power source for extended periods of use Images with the following functions cannot be transferred to a personal computer VCR mode Playback Zoom Picture Effect P...

Страница 71: ...e CD ROM drive icon 4 Double click on the Manual folder 5 Double click on the PDF file of the desired language version Adobe Acrobat Reader launches and the selected PDF manual opens Note If the PDF file does not open Adobe Acrobat Reader may not be properly installed Refer to the steps of Installing Adobe Acrobat Reader to check the installation procedure Printing the PDF Manual Print out the PDF...

Страница 72: ...dio 2 Dubbed stereo left and right sound 16 bit audio recording The dubbed audio is recorded on Audio 2 over the original right sound Both the dubbed and original sounds are in mono Audio 1 Original left sound Audio 2 Dubbed sound Built in stereo microphone Note You can select the 12 bit or 16 bit audio recording mode by performing the procedure on page 27 To USB port Audio Dubbing Feature You can...

Страница 73: ...onal scenes 1 Press the MENU DISPLAY button to turn off the audio dubbing screen 2 Repeat steps 1 to 5 above Notes Audio dubbing cannot be used with record ings made in LP mode It is recommended that you use Audio Dubbing only with recordings made with this camcorder Use of recordings made with other digital video equipment may result in poor audio quality Audio dubbing will automatically pause if...

Страница 74: ...dio 2 Press the MENU DISPLAY button until the menu screen appears 3 Select V then press r on the Operation button Select AUDIO 1 then press r 2 4 Press d or y to select the desired audio playback mode then press e 1 1 2 2 AUD I O DUB P I C EFF ECT AUD I O PB EFF ECT PLAYBACK SE T AUD I O 1 2 5 Press the MENU DISPLAY button to turn off the menu screen The selected audio playback mode indicator is d...

Страница 75: ...ect BACKLIGHT 1 then press r 2 NORMAL BR I GHT AUTO BACKL I GHT BR I GHT LCD COLOUR VF LCD VF SE T LCD BR I GHT 3 Press d or y to select AUTO NORMAL or BRIGHT then press e BACKL I GHT BR I GHT AUTO The camcorder automatically switches between NORMAL and BRIGHT depending on the ambient lighting This mode is only available in CAMERA mode NORMAL For use indoors or under moderate lighting conditions B...

Страница 76: ...es easy to watch during playback Use a wide angle setting for fast moving subjects Optimal lighting range Lighting For clear good quality recording 500 to 100 000 lux is needed Recording is possible with less light but the picture quality may suffer Adequate lighting is also essential for correct white balance Note The figures in the chart are approximations Situation Lux Blue sky Clear day at noo...

Страница 77: ...ly recorded Mini DV cassette is used again for recording the previously recorded material will be automatically erased The Mini DV cassette will not operate if inserted in the wrong direction Do not repeatedly insert and eject the Mini DV cassette without running the tape as this may cause uneven tape winding and damage the tape Do not place the Mini DV cassette in direct sunlight near strong heat...

Страница 78: ...k in a fully discharged state Store the battery pack in a dry cool place When storing a fully charged battery pack put the cover on it so that the CHARGE mark printed on the label is seen through the window as shown When storing a battery pack that is not fully charged put the cover upside down so that only the battery pack casing can be seen through the window Cautions Improper handling of the ba...

Страница 79: ...the casing with a tightly wrung cloth dampened with a diluted neutral detergent Then wipe it again with a soft dry cloth Use a soft cloth to wipe finger marks and other soiling off the LCD screen Use a soft cloth or compressed air and lens paper designed for photographic lenses to clean the lens and the viewfinder eyepiece Using Your Camcorder Abroad Television signal standards and electrical volt...

Страница 80: ...ET 4 Select I then press r on the Operation button Select DEMO MODE 1 then press r 2 Cancelling Demo Mode 1 During the demonstration press the MENU DISPLAY button to pause the demonstration OFF ON REMOTE SOUND T IME CODE TC DEMO MODE OTHERS OUT 2 Select I then press r on the Operation button Select DEMO MODE then press r 3 Press d or y to select OFF then press e OFF DEMO MODE 4 Press the MENU DISP...

Страница 81: ...al stripes Occurs when shooting subject with strong contrast to the background Does not indicate a malfunction Camcorder is unable to focus when zooming in on subject within 1 8 m and automatically zooms out until it focuses on subject No subject in the field of view Camcorder is in Demo mode Video input channel on TV or TV channel is not selected properly Audio video cable is not properly connect...

Страница 82: ...video head cleaning tape p vii Use a new cassette Connect power source properly pp 8 9 Charge battery pack sufficiently p 7 Stop tape and try again p 17 Adjust dioptre p 15 Adjust picture p 62 Connect audio video or DV cable properly pp 54 56 Set REMOTE menu item to ON pp 35 36 Replace remote control batteries with new ones p 35 Use remote control within operating range p 36 Protect remote sensor ...

Страница 83: ... lux with gain up F1 6 Power Requirement DC 7 4 V Power Consumption 4 0 W during camera recording using the viewfinder in Full Auto mode with zoom motor off 4 8 W during camera recording using the LCD monitor in Full Auto mode with zoom motor off and backlight in normal mode Operating Temperature 0 C to L40 C Operating Humidity 30 to 80 Storage Temperature 20 C to L60 C Dimensions approx 93 7 mm W...

Страница 84: ...Note ...

Страница 85: ......

Страница 86: ...Note ...

Страница 87: ...Printed in Malaysia TINSL0280TAZZ 01P04 M G SHARP CORPORATION ...

Отзывы: