background image

Preparation

12 

Attaching and Removing the
Battery Pack

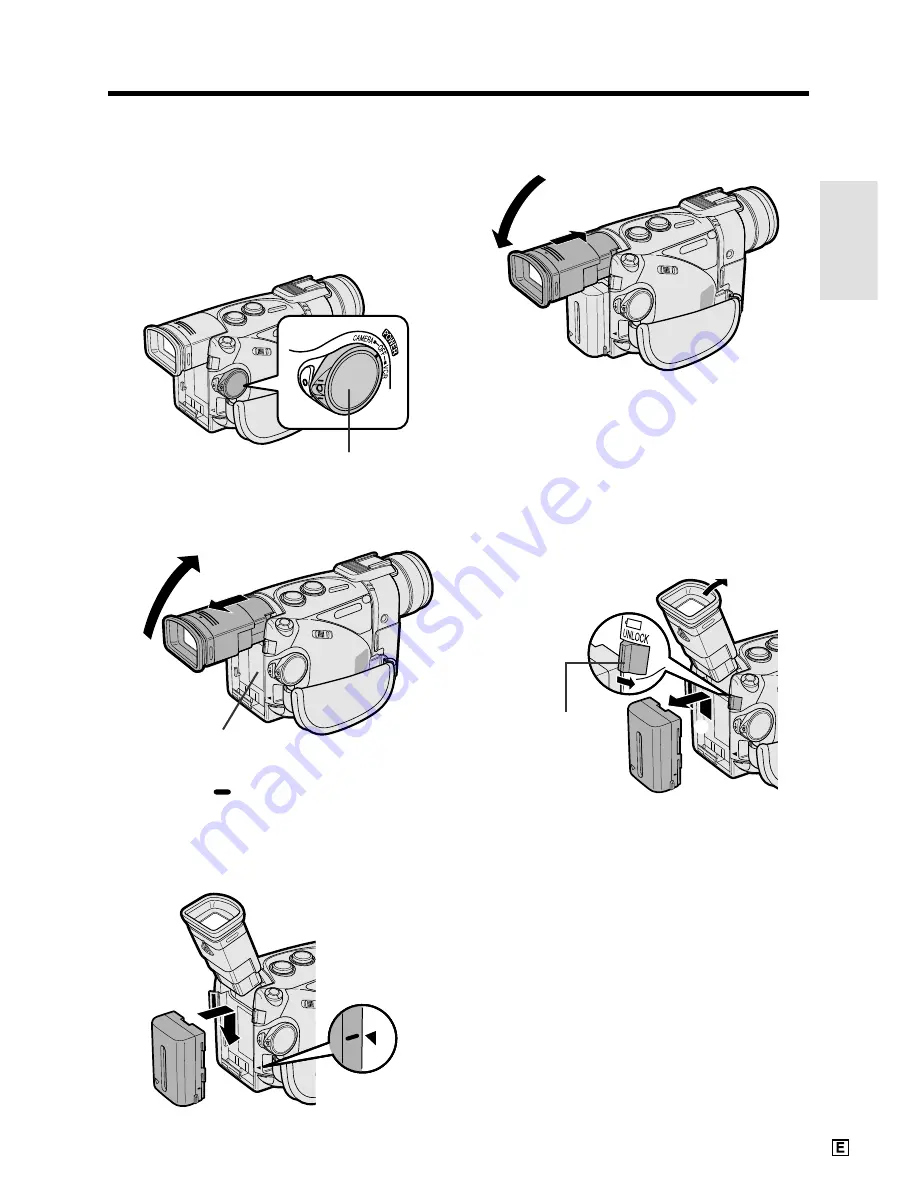
Attaching the Battery Pack

1

Make sure that the POWER switch is set
to OFF.

2

Pull out the viewfinder completely (

1

),

and then lift it up (

2

).

3

Align the 

 mark on the side of the

battery pack with the 

a

 mark on the

camcorder (

1

). Press the battery pack

and slide it down completely until it locks
into place (

2

).

4

Lower the viewfinder, and push it in
completely.

Removing the Battery Pack

1

Perform steps 1 and 2 of “Attaching the
Battery Pack”.

2

Press and hold the power source
UNLOCK release in the direction of the
arrow (

1

), then slide the battery pack

up and take it out (

2

).

Cautions:

BEFORE REMOVING THE BATTERY PACK,
ALWAYS STOP RECORDING OR PLAYBACK
AND TURN THE POWER OFF.

 Removing the

battery pack while shooting or during playback
may damage the tape by causing it to wrap
around the video head drum or may destroy the
card, rendering it unreadable and unwritable.

• Remove the battery pack from the camcorder if

the camcorder is not to be used for a long
period of time.

• Use only SHARP model BT-L221, BT-LS222, BT-

L441, or BT-LS442A battery packs with this
camcorder. Use of other batteries may present a
risk of fire or explosion.

1

2

1

2

2

1

1

2

Power source
UNLOCK release

Power source
connection panel

POWER switch

Содержание ViewCam-Slim VL-ME10E

Страница 1: ...ENGLISH LIQUID CRYSTAL DISPLAY CAMCORDER OPERATION MANUAL VL ME10E ...

Страница 2: ...stors giving you fine picture detail Occasionally a pixel may appear on the screen as a fixed point of blue green red or black Please note that this does not affect the performance of your camcorder Specifications are subject to change without notice Trademarks Microsoft and Windows are either registered trademarks or trademarks of Microsoft Corporation in the United States and or other countries ...

Страница 3: ...a qualified dealer or a Camcorder service centre approved by Sharp Note This Camcorder is a high technology product The LCD Panel comprises 89 856 TFT Transistors Due to the high density of transistors it is possible that some pixels may fail Important Copyright may exist in material you wish to record Copying such material without permission of the relevant licensees or owners of the copyright is...

Страница 4: ...y charged Attaching the Battery Pack 1 Make sure that the POWER switch is set to OFF 2 Pull out the viewfinder completely then lift it up 3 Align the mark on the side of the battery pack with the a mark on the camcorder 1 Press the battery pack and slide it down completely until it locks into place 2 CHARGE indicator 1 2 3 Inserting a Mini DV Cassette 1 Supply power to the camcorder 2 Hold the cam...

Страница 5: ... the slot with the label facing upwards and the chipped corner facing the lens and then push it in as far as it will go 4 Close the card slot cover Label Chipped corner Using the Viewfinder 1 Pull out the viewfinder completely 2 Raise the viewfinder to better aim the camcorder depending on your position Using the LCD Monitor 1 Press the LCD monitor OPEN release in the direction of the arrow 1 and ...

Страница 6: ... to begin recording REC Lock button To pause recording Press the REC START STOP button again To turn the power off Set the POWER switch to OFF without pressing the Lock button Tape Playback 1 Make sure that the recorded Mini DV cassette is inserted 2 Open the LCD monitor and adjust the angle 3 Set the Media Selection switch to TAPE 4 Hold down the Lock button and set the POWER switch to VCR 5 Pres...

Страница 7: ...he desired image and then press PB to set The selected image is displayed in full screen Power Zoom buttons STILL button Media Selection switch POWER switch Lock button NORMAL PLAYBA PLAYBACK 10 0 00 3 3 10 0 00 2 1 PAGE CK 5 4 1 2 3 6 0 0 PB q w 100 0003 100 0003 3 1 2 100 0003 CARD 3 1 2 NORMAL NORMAL NORMAL MULTI MULTI q w q w PB Card Recording 1 Make sure that a card is inserted 2 Remove the l...

Страница 8: ...WER switch to CAMERA 5 Press the Power Zoom buttons to frame the subject as you desire 6 Press the REC START STOP button to begin recording motion images of the subject on a tape Press the REC START STOP button again to pause recording Press the STILL button to record a still image of the subject on a card To turn the power off Set the POWER switch to OFF without pressing the Lock button Lock butt...

Страница 9: ... use of special digital features previously unavailable with conven tional analog formats DV and conventional video cassette tapes There are two kinds of DV format video cassette tapes the Mini DV cassette and the larger DV cassette used for extended playback and recording This camcorder only operates with Mini DV cassettes DV cassettes cannot be used Be sure to use Mini DV cassettes with the mark...

Страница 10: ...um battery Infrared remote control DC cable Zoom microphone Windscreen Shoulder strap 8 MB MultiMediaCard PixLab Video Capture Software Lite version PC connecting cable AA battery for remote control 2 Lens cap Note A ferrite core is attached to the Audio video S video cable supplied with the Camcorder purchased in Australia and New Zealand ...

Страница 11: ...T LS222 Extended life intelligent battery pack BT LS442A IR Flash Light VR 3VIF Mini DV video cassette VR DVM60N Soft case VR 33SC Notes Some of these accessories may not be available in selected areas When using the IR Flash Light VR 3VIF with this camcorder it can only be used as a flash PixLab USB Digital Moving Picture Kit VR PKU10E ...

Страница 12: ...ise in the recorded image Avoid placing the camcorder in close proximity to lighting equipment The heat from incandescent lights may deform the camcorder or cause it to malfunction Always respect prohibitions or restrictions on the use of electronic equipment on commercial flights or in other sensitive areas Be aware of the temperature and humidity You can use your camcorder at 0 C to 40 C and at ...

Страница 13: ... due to dew formation When using the camcorder in a place where dew formation is likely to occur allow the camcorder and the video tape to acclimatise to the surroundings for about one hour For example when bringing the camcorder indoors after skiing place it in a plastic bag 1 Be sure to tightly seal the plastic bag containing the camcorder 2 Remove the bag when the air temperature inside it reac...

Страница 14: ...anying the cleaning tape carefully before using it The fast forward and rewind functions cannot be used when the cleaning tape is in the camcorder 1 Insert a cleaning tape into the camcorder Follow the procedure on page 14 to insert and remove the cleaning tape 2 Open the LCD monitor and adjust the angle POWER switch Media Selection switch 3 Set the Media Selection switch to TAPE 4 Hold down the L...

Страница 15: ...the Hand Strap 20 Attaching the Shoulder Strap 20 Using the Viewfinder 21 Using the LCD Monitor 22 Camera Recording Easy Camera Recording on Tape in Full Auto Mode 23 Zooming 24 Tips on Recording Positions 24 Remaining Tape Time Display 25 Remaining Battery Power Display 25 Playback Tape Playback 26 Volume Control 27 Video Search 27 Still 27 Watching the Playback on a TV 28 Summary of Operations S...

Страница 16: ...6 Tape Playback Functions with the Infrared Remote Control 48 Displaying the Date and Time of Recording 49 Using Earphones Commercially Available 49 Using the Time Code 50 Playback Effects 51 Picture Effect Playback 52 Playback Zoom 53 Gamma Playback 54 Multiple Strobe Playback 54 Useful Features Advanced Features Camera Recording Manual Focus 55 Setting the Shutter Speed 57 Scene Menu Programme A...

Страница 17: ...5 Recording with the Self timer 76 Using the Flash Light Optional Accessory 77 Formatting a Card 78 Playback Card Playback 79 Delete protection 80 Deleting Stored Images 81 Slide Show Playback 83 Dubbing Images from a Card to a Tape 84 Directly Transferring the Data on a Card to a Computer 85 Print Order 86 Appendix Picture Backlight Adjustments 89 Setting the Confirmation Sound 90 Selecting Summe...

Страница 18: ...on the use of each part refer to the page number indicated in brackets Front view Zoom lens Accessory shoe pp 63 77 Power Zoom W Wide angle T Telephoto control buttons p 24 VOLume control buttons p 27 CONTROL dial p 30 EarPHONES jack p 49 Infrared remote sensor p 47 Stereo microphone p 67 ...

Страница 19: ...EASY MANUAL AUTO Selection switch pp 55 62 LCD monitor OPEN release p 22 LCD monitor p 22 Viewfinder p 21 Dioptre adjustment dial p 21 Power source UNLOCK release pp 12 13 MENU DISPLAY button p 30 Power source connection panel pp 12 13 Shoulder strap loop p 20 ...

Страница 20: ...elease p 14 When the cassette compartment door is open Right view White Balance W B button p 60 DV terminal p 66 STILL button pp 39 41 54 73 Terminal cover p 28 Media Selection switch DUAL TAPE CARD selection switch p 29 Hand strap p 20 Audio Video S video AV S terminal pp 28 66 Speaker p 26 Shoulder strap loop p 20 POWER switch CAMERA VCR selection switch pp 29 30 RECord START STOP button pp 23 3...

Страница 21: ... while monitoring the shot See page 45 Letting the Subject Monitor the Shot To enlarge any part of the picture during playback See page 53 Playback Zoom To brighten the dark portion of the playback images without changing the bright portion See page 54 Gamma Playback To focus on an off centred subject See page 55 Manual Focus To record with natural colour See page 60 Adjusting the White Balance To...

Страница 22: ...MODE RETURN OTHERS BACKL I GHT LCD BR I GHT BR I GHT LCD COLOUR VF LCD VF SET D I SPLAY T I ME AREA SE TT I NG 12H 24H CLOCK SE T MAN FOCUS EXPOSURE SHUT SPEED P I C EFFECT SCENE MENU QK D I S RETURN RETURN MANUAL SET QK SOUND DI SPLAY RETURN WIND RETURN MENU AUTO LP 90min RE TURN RE TURN D I ALOG REC RETURN MODE L I GHT GAMMA FADE SRCH SET a s p 35 p 23 pp 31 62 p 38 p 64 p 90 p 49 p 55 p 57 p 61...

Страница 23: ...COLOUR BACKL I GHT BRI GHT VF VF SE T LCD D I SPLAY CLOCK SET AUDIO1 2 AUD I O DUB P I C EFF ECT AUD I O PB EFF ECT MULTI FRAME PLAYBACK SE T RETURN RETURN RETURN RETURN RETURN SET a s e y r d GAMMA TAPE VCR mode p 25 p 69 p 68 p 69 p 52 p 51 p 54 Note See pages 29 to 32 for the procedure to display the desired screen p 46 p 90 p 50 p 50 p 89 p 49 ...

Страница 24: ... SE T D I SPLAY AREA SE TT I NG 12H 24H CLOCK SE T AUTO SCENE SE LF T IMER MENU D I S MAN FOCUS EXPOSURE SHUT SPEED P I C EFFECT MANUAL SET SELF D I SPLAY T IMER SOUND MENU AUTO CARD 90 0 1 RETURN RETURN GU I DE F LASH RETURN RET URN RETURN RETURN CARD CARD 90 0 1 T I ME SUMR NORMAL GAMMA SET a s CARD CAMERA mode EASY mode p 31 p 73 pp 31 62 p 76 p 90 p 49 p 55 p 57 p 61 p 42 p 59 p 76 p 35 p 74 p...

Страница 25: ... E TE AL L PLAYBACK SET SL I DE SHOW EFF ECT P I C DE L E TE PROTECT PR I ORDER DE LETE ALL PLAYBACK SET REMOTE SOUND OTHERS RETURN RETURN RETURN RETURN RETURN CARD 10 0 0001 NORMAL PAGE1 2 PLAYBACK 6 5 4 3 2 1 PB q w SET a s CARD VCR mode p 83 p 52 p 80 p 81 p 82 p 86 p 46 p 90 Note See pages 29 to 32 for the procedure to display the desired screen p 89 p 49 p 79 ...

Страница 26: ...r if one of the manual screen is displayed To check the type of warning rotate the monitor back to within 135 or press the MENU DISPLAY button to turn off the manual screen I NSERT A CASSE TTE There is no video cassette in the camcorder Insert a cassette see page 14 The erasure protect tab on the video cassette has been slid to the record protect position preventing recording see page 96 The tape ...

Страница 27: ...e page 78 The card has not been formatted with this camcorder Format the card see page 78 The card is write protected see page 98 You are trying to delete a protected image Cancel the protection setting to delete the image see page 80 The selected image cannot be read by this camcorder Format the card to use it with this camcorder see page 78 Displayed for 5 seconds Description of warning Note ind...

Страница 28: ...temperatures too low or too high The battery pack and charger become warm during charging This is not a malfunction Using the zoom see page 24 and other functions or turning the power on and off frequently will increase power consumption This may result in a decrease of more than 50 in the actual recording time compared to the maximum continuous recording time listed above The charging time and re...

Страница 29: ...release in the direction of the arrow 1 then slide the battery pack up and take it out 2 Cautions BEFORE REMOVING THE BATTERY PACK ALWAYS STOP RECORDING OR PLAYBACK AND TURN THE POWER OFF Removing the battery pack while shooting or during playback may damage the tape by causing it to wrap around the video head drum or may destroy the card rendering it unreadable and unwritable Remove the battery p...

Страница 30: ...wer cord to the AC adapter and insert the AC plug into a power outlet The POWER indicator on the AC adapter lights up and the camcorder is supplied with power Note When the AC adapter battery charger is used to power the camcorder it cannot be used to charge the battery pack Removing the DC cable from the camcorder Perform steps 1 and 2 above Press and hold the power source UNLOCK release in the d...

Страница 31: ...ke out the cassette Cautions Do not hold the camcorder with the cassette compartment door release facing downwards when you are inserting or removing a cassette It may damage the tape Do not try to close the cassette compartment door while the cassette holder is extending or retracting Be careful not to get your fingers caught in the cassette holder Do not apply force to the cassette holder except...

Страница 32: ...ed corner facing the lens and then push it in as far as it will go 4 Close the card slot cover Card slot cover release Removing a Card 1 Perform steps 1 and 2 of Inserting a Card 2 Push the centre of the card edge in to release the card 3 Pull the card straight out Notes The supplied MultiMediaCard is preformatted for immediate use See pages 97 and 98 for detailed information on the use of MultiMe...

Страница 33: ...S USED OR INSTALLED WITH POLARITY REVERSED DO NOT RECHARGE DISAS SEMBLE OR DISPOSE OF IN FIRE 4 Insert the lithium battery holder back into the compartment 5 Close the card slot cover Note It is recommended to immediately set the date and time after inserting a lithium battery Not setting the date and time causes extra wear of the lithium battery Removing the lithium battery Perform steps 1 and 2 ...

Страница 34: ...r 2 1 2 LCD monitor OPEN release Media Selection switch POWER switch SET a s 1 1 2 2 Hold down the Lock button and set the POWER switch to CAMERA The LCD screen turns on 3 Press the MENU DISPLAY button until the menu screen appears and then press SET 4 Press f or d 1 until 9 HNGKNG appears then press SET 2 Note See Time Zone Chart and Area Table on pages 92 and 93 for the area number and name of t...

Страница 35: ...The internal clock now starts operating 11 Press the MENU DISPLAY button to turn off the menu screen 2 0 00 1 20 0 1 SE TT I NG Changing to the 12 hour Time Mode 1 After performing step 10 above press f or d 1 to select 12H 24H and then press SET 2 2 Press f or d to select 12H then press SET 3 Press the MENU DISPLAY button to turn off the menu screen Notes Providing the date and time have been int...

Страница 36: ...p as shown below Tabs Hook When attaching or removing the lens cap press both tabs on the top and bottom of the cap When recording hang the hook of the lens cap on the hand strap so that the cap will not get in the way Note Always replace the lens cap on the lens when the camcorder is not in use ...

Страница 37: ...asteners of the grip strap and the hand strap flap Caution Do not swing the camcorder by the hand strap 2 1 1 3 2 4 5 6 Loop Buckle Loop Buckle Attaching the Shoulder Strap 1 Hold one end of the strap and thread it through the loop on the left side of the power source connection panel 2 Loosen the strap in the buckle and feed the end of the strap through the buckle as shown 3 Draw the strap in the...

Страница 38: ...n the LCD monitor is opened If the vertical rotation of the monitor is between 135 and 180 when in one of the CAMERA modes however the viewfinder is on and the subject is displayed both in the viewfinder and on the monitor see page 45 It is possible to operate the playback functions in TAPE VCR and CARD VCR modes and adjust the menu and the manual settings through the viewfinder by using the CONTR...

Страница 39: ... on the monitor 3 Hold down the Lock button and set the POWER switch to CAMERA or VCR A picture is displayed on the LCD monitor Notes Battery consumption is larger when the LCD monitor is open Use the viewfinder instead of the LCD monitor when you want to save battery power Use the viewfinder if the LCD screen becomes difficult to see under bright daylight Closing the LCD monitor Return the LCD mo...

Страница 40: ...g Press the REC START STOP button again Recording pauses and the camcorder enters Recording Standby mode To turn the power off Set the POWER switch to OFF without pressing the Lock button Notes Battery power is consumed in Recording Standby mode Turn off the power if you will not be recording again soon If the camcorder remains in Recording Standby mode for more than 5 minutes in TAPE CAMERA or DU...

Страница 41: ...6 for use of the digital zoom 2 1 2 Zooming in when you want to centre attention on the subject Zooming out when you want to show the surroundings Tele photo Wide angle Tips on Recording Positions To create images that are easy to watch during playback try to record with a stable posture while steadying your camcorder to prevent the image from shaking Holding the camcorder Put your right hand thro...

Страница 42: ...ailable modes all modes When using the camcorder with the battery pack as the power source you can turn on and off the remaining battery power display by pressing the MENU DISPLAY button If the battery power becomes very low a warning indicator will appear Replace the battery pack Notes Use the remaining battery power indicator only as an approximate indication Variations in the operational status...

Страница 43: ...5 Press e or r to rewind or fast forward the tape to the desired point Basic Operations Playback Lock button Speaker CONTROL dial e y r y 6 Press y to begin playback To stop playback Pressd To turn the power off Set the POWER switch to OFF without pressing the Lock button Note The tape is automatically rewound when playback reaches the end of the tape Watching the Playback in the Viewfinder You ca...

Страница 44: ...function Still Available mode TAPE VCR The still function makes it possible to pause tape playback During playback in TAPE VCR mode press y To return to normal playback press y again Notes The sound is off in Still mode To protect the tape the camcorder automatically returns to normal playback if it is left in Still mode for more than 5 minutes Increase Decrease VOL buttons Volume Control Availabl...

Страница 45: ...deo terminals are used to separately pass the chroma colour and luminance brightness components of video signals They serve to improve the picture quality in both recording and playback If your TV or VCR has an S video input terminal you can use the S video plug of the supplied audio video S video cable for the video connection on the TV or VCR The yellow video plug does not need to be connected t...

Страница 46: ...ch to TAPE 2 Hold down the Lock button and set the POWER switch to VCR CARD CAMERA mode For recording still images on a card 1 Set the Media Selection switch to CARD 2 Hold down the Lock button and set the POWER switch to CAMERA CARD VCR mode For playing back still images recorded on a card 1 Set the Media Selection switch to CARD 2 Hold down the Lock button and set the POWER switch to VCR Note Wh...

Страница 47: ...indicator and warning indicators cannot be deliberately turned off CONTROL dial The CONTROL dial is used to adjust the settings on the menu screen The procedures for adjusting the menu settings in this operation manual are based upon the use of the five operation buttons under the LCD monitor To adjust the menu settings with the CONTROL dial follow the rules below 1 Turn the CONTROL dial instead o...

Страница 48: ...he following basic menu settings QK RETURN WIND SOUND DISPLAY SELF TIMER EASY MANUAL AUTO Selection switch User mode indicator 1 Open the LCD monitor and adjust the angle see page 22 2 Set the Media Selection switch to TAPE or CARD 3 Hold down the Lock button and set the POWER switch to CAMERA The user mode indicator is displayed 4 Set the EASY MANUAL AUTO Selection switch to the desired mode Note...

Страница 49: ...desired menu setting then press SET 2 The selected menu setting is set To adjust another menu item select RETURN to returns to the status in step 5 or 6 then repeat the procedure from the point To turn off the menu screen Press the MENU DISPLAY button Notes Certain menu items are common among Camcorder modes If the DISPLAY menu item for example is set to DATE TIME in TAPE CAMERA mode it will be au...

Страница 50: ...E CAMERA SE T EFF SNAP SP LP TAPE SPEED 16 9 RETURN SET a s SET a s 1 1 2 5 Press the MENU DISPLAY button to turn off the menu screen The Long Play Recording mode indicator appears To return to SP mode Select SP in step 4 above Notes on the use of LP mode To record in LP mode be sure to use a Mini DV cassette labelled for use with LP mode Frozen images mosaic pattern picture noise audio interrupti...

Страница 51: ...Y button until the menu screen appears 3 Select U then press SET Select AUDIO MODE 1 then press SET 2 4 Press f or d to select 16bit then press SET 5 Press the MENU DISPLAY button to turn off the menu screen The 16 bit audio recording mode indicator appears 16 bit audio recording mode indicator 1 2bit 1 6bit AUD I O MODE WI ND ZOOM MI C AUD I O SE T D I ALOG REC RETURN SET a s 1 6bit AUD I O MODE ...

Страница 52: ...ing the camcorder on a tripod turn off the DIS function The picture will appear more natural when the DIS function is off 1 Set the camcorder to TAPE CAMERA DUAL CAMERA or CARD CAMERA mode see page 29 2 Press the MENU DISPLAY button until the menu screen appears 3 Select T then press SET Select DIS 1 then press SET 2 DIS indicator AUTO 60min GAMMA FADE SRCH SRCH SRCH OFF D I S ON OFF MAN FOCUS EXP...

Страница 53: ...l close up pictures with the same operation as normal zooming Notes The digital zoom is in addition to the optical zoom giving a combined maximum zoom range of 1 200 As the image is enlarged digitally the picture quality decreases when higher digital zoom settings are used 1 Set the camcorder to TAPE CAMERA DUAL CAMERA or CARD CAMERA mode see page 29 2 Press the MENU DISPLAY button until the menu ...

Страница 54: ...in min 60min GAMMA GAMMA FADE FADE GAMMA FADE GAMMA GAMMA FADE FADE GAMMA FADE SRCH SRCH SRCH SRCH SRCH SRCH AUT UTO AUTO 60min min 60min GAMMA GAMMA FADE FADE GAMMA FADE SRCH SRCH SRCH GAMMA FADE GAMMA FADE Note When the x indicator is displayed the background will become slightly brighter To cancel Gamma Brightness Compensation Press GAMMA until the x indicator disap pears Recording in a poorly ...

Страница 55: ... F FECT SCENE MENU QK RETURN START STOP MANUAL SET D I S RETURN SET a s QK RETURN SEARCH SET a s 1 1 2 To cancel the gain up function Press GAMMA until the indicator disappears Notes Some picture noise appears in Gamma Brightness Compensation mode The picture noise increases when the indicator is displayed When the indicator is displayed a residual image may appear behind a subject that exhibits a...

Страница 56: ...d on a card Dual Recording Available mode DUAL CAMERA By setting the camcorder to DUAL CAMERA mode you can automatically record motion images on a tape and still images on a card without operating the Media Selection switch 1 Make sure that a Mini DV cassette and a card are inserted in the camcorder 2 Set the Media Selection switch to DUAL 3 Hold down the Lock button and set the POWER switch to CA...

Страница 57: ...FF EFF SNAP PHOTO SNAP SNAP ST I LL CAMERA SE T EFF SNAP DGTL ZOOM TAPE SPEED 16 9 RETURN REC MODE SET a s PHOTO SNAP ST I LL SET a s 1 1 2 SET a s 1 1 2 7 Press the MENU DISPLAY button to turn off the menu screen Using Still Recording 1 Set the camcorder to TAPE CAMERA mode 2 In Recording Standby mode press the STILL button A still image of the subject is displayed 3 Press the REC START STOP butt...

Страница 58: ...AMES 9 FRAMES 16 CAMERA SE T EFF SNAP DGTL ZOOM TAPE SPEED 16 9 RETURN REC MODE SHOT SET a s PHOTO SHOT EFF SNAP SET a s 1 1 2 Using PHOTO SHOT 9 FRAMES or 16 FRAMES mode 1 Perform the steps in Selecting a still recording effect to select PHOTO SHOT 9 FRAMES or 16 FRAMES 2 In Recording Standby mode press the STILL button In TAPE CAMERA mode a still image of the subject is displayed with the select...

Страница 59: ...on and set the POWER switch to CAMERA or VCR 2 Press the MENU DISPLAY button until the menu screen appears 3 Select T then press SET Select PIC EFFECT 1 then press SET 2 OFF B W SEP I A SOLAR I NEGA MOSA I C MAN FOCUS EXPOSURE SHUT SPEED P I C EFFECT SCENE MENU QK RETURN D I S MANUAL SET RETURN SET a s B W P I C E F FECT MAN FOCUS EXPOSURE SHUT SPEED P I C EFFECT SCENE MENU QK RETURN D I S MANUAL ...

Страница 60: ...mage and sound fade in 2 Press the REC START STOP button at the point where you wish to stop recording The image and sound fade out as the picture gradually turns white The camcorder then returns to Recording Standby mode To cancel Fade mode Press FADE again To use Fade Out only 1 During camera recording in TAPE CAMERA mode press FADE 2 Press the REC START STOP button at the point where you wish t...

Страница 61: ... TAPE CAMERA DUAL CAMERA CARD CAMERA This camcorder lets you shoot close up images of small objects such as flowers and insects or make title frames for your videos When you want to record a magnified image of a subject which is within approximately 1 5 m of the camcorder do not zoom in on it Instead zoom out all the way by pressing the Power Zoom W button and then move the camcorder closer to the...

Страница 62: ...ting the LCD monitor during recording Notes The screen image is automatically inverted when the vertical rotation of the LCD monitor is between 135 and 180 When the monitor is rotated back to within 135 the image returns to normal If the indicator flashes when the LCD monitor is in the inverted position this indicates a warning To check the type of warning rotate the monitor back to within 135 See...

Страница 63: ...e When the batteries are depleted and the remote control does not operate replace them with new AA R6 or UM SUM 3 batteries Caution Do not use old and new batteries or batteries of different brands together 1 2 Turning on the Infrared Remote Control Mode Available modes TAPE VCR CARD VCR 1 Set the camcorder to TAPE VCR or CARD VCR mode see page 29 2 Press the MENU DISPLAY button until the menu scr...

Страница 64: ...rol buttons for operation Notes Be careful not to allow direct sunlight or bright light from interior illumination to fall onto the remote sensor as this may prevent the remote control from operating properly Be sure that there are no obstacles between the remote control and the remote sensor 1 2 180 90 Infrared remote sensor Approximate operating range of remote control Transmitter 5 m TAPE REC S...

Страница 65: ...ow motion During tape playback press the SLOW button To return to normal playback press the PLAY button s Note To protect the tape the camcorder automatically returns to normal playback if it is left in Slow mode for more than 10 minutes Frame Advance The frame advance function allows you to play back still images frame by frame 1 During tape playback press the PAUSE STILL button n to pause playba...

Страница 66: ...TE or DATEHTIME and then press SET 5 Press the MENU DISPLAY button to turn off the menu screen The date or the date and time is displayed Notes Before recording make sure that the date and time have been correctly set see pages 17 and 18 If they have not been set the display will be left blank when playing back the recording The display will also be left blank for unre corded or damaged portions o...

Страница 67: ... Frame number Second Minute Hour Displayed during still or frame advance playback 0 0 0 10 20 TC D I SP OFF D I SP ON OTHERS REMOTE SOUND T IME CODE TC OUT RETURN SET a s ON TC OUT Time code D I SP ON T IME CODE SET a s 1 1 2 SET a s 1 1 2 4 Press the MENU DISPLAY button to turn off the menu screen The time code appears To turn off the time code Select DISP OFF in step 3 above Note When the tape r...

Страница 68: ...er An image recorded for less than 6 seconds may not dissolve properly W I PE PB EFF ECT SET a s 1 1 2 Using Playback Effect 1 In TAPE VCR mode press the MENU DISPLAY button until the menu screen appears 2 Select V then press SET Select PB EFFECT 1 then press SET 2 3 Press f or d to select OVERLAP or WIPE then press SET 4 Press the MENU DISPLAY button to turn off the menu screen 5 Rewind or fast f...

Страница 69: ...R mode 1 During playback in TAPE VCR or CARD VCR mode press the MENU DISPLAY button until the menu screen appears 2 Select V then press SET Select PIC EFFECT 1 then press SET 2 3 Press f or d to select the desired picture effect then press SET 4 Press the MENU DISPLAY button to turn off the menu screen OFF B W SEP I A SOLAR I NEGA MOSA I C AUD I O DUB P I C EFF ECT AUD I O PB EFF ECT MULTI FRAME P...

Страница 70: ...ring playback in TAPE VCR or CARD VCR mode press the ZOOM T button to zoom in 2 Press the Shift q w a or s button to shift the displayed image ZOOM buttons Shift buttons AUDIO DIO1 2 AUDIO1 2 e y r d GAMMA GAMMA e y r d GAMMA AUDIO DIO1 2 AUDIO 2 1 e y r d GAMMA GAMMA e y r d GAMMA To cancel Playback Zoom Press the ZOOM W button to zoom out to the widest angle Notes Use of Playback Zoom may cause ...

Страница 71: ...o capture the action of a fast moving subject at intervals of 1 8 of a second using a 9 or 16 frame picture This is useful when you want to check your form in sports such as tennis or golf 1 In TAPE VCR mode press the MENU DISPLAY button until the menu screen appears 2 Select V then press SET Select MULTI FRAME 1 then press SET 2 3 Press f or d to select 9 FRAMES 9 frame picture or 16 FRAMES 16 fr...

Страница 72: ...es Subject is being shot through a dirty or wet window Fast speed shutter being used under fluorescent lighting Subject has fine repeated patterns Subjects at different distances appear in the centre of the scene at the same time Light reflects off the subject Two subjects at different distances overlap in the same scene Power Zoom buttons MAN FOCUS AUTO MANUAL EXPOSURE SHUT SPEED P I C E F FECT S...

Страница 73: ...QK RETURN D I S MANUAL SET RETURN SET a s 8 Press the MENU DISPLAY button to turn off the menu screen MF is displayed To cancel Manual Focus mode After performing step 4 above select AUTO then press SET Notes The camcorder may not be able to focus correctly if the subject is within approximately 1 5 m Set the zoom control to wide angle and then try refocusing If the lens is dirty or fogged the cam...

Страница 74: ...he most appropriate shutter speed for the ambient light Tips on Using the Manual Shutter Speed Fast shutter speeds can be used with the still recording function see pages 39 to 41 and 73 to record higher quality still images of fast moving subjects If the on screen picture flickers when recording under fluorescent lighting you may be able to compensate by setting the shutter speed to 1 120 sec EAS...

Страница 75: ...speed level The adjustment range is from 1 50 sec slowest to 1 10 000 sec fastest 7 Press the CONTROL dial to set the shutter speed The selected shutter speed level is displayed on the menu screen 8 Press the MENU DISPLAY button to turn off the menu screen To return to Auto Shutter Speed mode After performing step 4 above select AUTO then press SET Notes Recording with a shutter speed faster than ...

Страница 76: ...n until the menu screen appears Effect You can record a fast moving subject with little blurriness The shutter speed is set to 1 500 sec This is effective for recording tennis swings track and field events and so on You can record without darkening the subject even if the background is particularly bright This is effective for recording at ski areas or when swimming in the ocean You can accurately...

Страница 77: ...rding Standby mode set the EASY MANUAL AUTO Selection switch to MANUAL 3 Aim the lens at a white object Adjust the distance of the object so that the entire screen is white 4 Press the W B button to set the white balance lock WHITE BAL flashes and then changes to W B LOCK To cancel the locking procedure press the W B button while WHITE BAL flashes To cancel White Balance Lock Press the W B button ...

Страница 78: ...t background Decrease the exposure level to allow less light through the lens 1 Set the camcorder to TAPE CAMERA DUAL CAMERA or CARD CAMERA mode 2 Set the EASY MANUAL AUTO Selection switch to MANUAL 3 Press the MENU DISPLAY button until the menu screen appears 4 Select T then press SET Select EXPOSURE 1 then press SET 2 5 Press a or s to select MANUAL then press SET The exposure setting screen is ...

Страница 79: ... Full Auto mode indicator Setting the Camcorder to Full Auto Mode Available modes TAPE CAMERA DUAL CAMERA CARD CAMERA To easily record good quality images perform camera shooting in Full Auto mode If AUTO is not displayed on the screen the camcorder is in Manual mode Perform the procedure below to cancel all the manual settings and set the camcorder to Full Auto mode Set the EASY MANUAL AUTO Selec...

Страница 80: ... The selected zoom microphone mode is displayed on the menu screen 5 Press the MENU DISPLAY button to turn off the menu screen Using the Zoom Microphone Available modes TAPE CAMERA DUAL CAMERA With the supplied zoom microphone you can record audio according to the magnification of the zoom lens to produce the optimum sound You can also set the zoom microphone to record only sounds at a distance Mo...

Страница 81: ...f during normal recording If it is left on the recorded audio may sound somewhat muffled when played back OFF ON AUD I O MODE WI ND ZOOM MI C AUD I O SE T D I ALOG REC RETURN SET a s ON WIND SET a s 1 1 2 Dialogue Recording Available modes TAPE CAMERA DUAL CAMERA When you want to record from a distance at a lecture workshop or other such occasion the speaker s voice may blend in with ambient sound...

Страница 82: ...the beginning of the portion that you wish to keep 2 Load a video cassette into the recording VCR 3 Press y to begin playback and then press the Record button on the VCR to begin recording 4 Press the Pause Still button on the VCR to pause recording when the source tape reaches the beginning of the sequence to be cut 5 Press the Pause Still or Record button on the VCR to resume recording when the ...

Страница 83: ...rding Standby mode 4 Press y to begin recording To stop recording Pressd Cutting unwanted sequences 1 Press y to pause recording when the source tape reaches the beginning of the sequence to be cut 2 Press y again to resume recording when the source tape reaches the end of the sequence to be cut Notes Make sure that the video equipment from which you are recording can output dubbing signals via th...

Страница 84: ...o 2 No audio 16 bit audio recording The audio is recorded in stereo with the left and right sound on two separate channels Audio 1 Left sound Audio 2 Right sound In Audio Dubbing mode 12 bit audio recording The dubbed audio is recorded on Audio 2 Audio 1 Original stereo left and right sound Audio 2 Dubbed stereo left and right sound 16 bit audio recording The dubbed audio is recorded on Audio 2 ov...

Страница 85: ...to turn off the audio dubbing screen 2 Repeat steps 1 to 5 above Notes It is recommended that you use Audio Dubbing only with recordings made with this camcorder Use of recordings made with other digital video equipment may result in poor audio quality Audio dubbing will automatically stop if the original audio changes from 12 bit mode to 16 bit mode or vice versa Press START to resume operation A...

Страница 86: ...te with dubbed audio 2 Press the MENU DISPLAY button until the menu screen appears 3 Select V then press SET Select AUDIO 1 then press SET 2 4 Press f or d to select the desired audio playback mode then press SET 1 1 2 2 AUD I O DUB P I C EFF ECT AUD I O PB EFF ECT PLAYBACK SET MULTI FRAME RETURN SET a s AUD I O 1 2 5 Press the MENU DISPLAY button to turn off the menu screen The selected audio pla...

Страница 87: ...t is possible to transfer still images or still playback images from the camcorder to a computer by using the supplied Video Capture Software and PC connecting cable System Requirements IBM PC AT or compatible with Intel Pentium 133 MHz or faster processor Microsoft Windows 95B Windows 95C Windows 98 Windows 98 Second Edition Windows 2000 Professional or Windows Me operating system 32 MB or more o...

Страница 88: ...ired language version Language File name Chinese Simplified ar40chs exe Chinese Traditional ar405cht exe Dutch ar405dut exe English ar405eng exe French ar405fre exe German ar405deu exe Italian ar405ita exe Korean ar405kor exe Portugese ar405por exe Spanish Castilian ar405esl exe Swedish ar405swe exe 6 Follow the on screen instructions to install the software 7 Restart the computer Opening the PDF ...

Страница 89: ...with the optional VR PKU10E PixLab USB Digital Moving Picture Kit Notes It is recommended to use the AC adapter battery charger as a power source for extended periods of use For details see the operation manual for the optional PixLab USB Digital Moving Picture Kit To USB port USB capture cable Match the connectors of the same colour To audio input terminal Audio conversion cable Audio Video S vid...

Страница 90: ...me the subject as you desire Note In CARD CAMERA mode the zoom will give magnification of 1 10 6 Press the STILL button to record a still image of the subject The O indicator flashes red while data is being recorded on the card and returns to white when recording is completed Notes In CARD CAMERA mode the angle of field is slightly wider than in TAPE CAMERA or DUAL CAMERA mode Recording under insu...

Страница 91: ...de but with a lower number of recordable images Image size 640 480 100 180 60 NORMAL ECONOMY FINE Picture quality 1 In CARD CAMERA or DUAL CAMERA mode press the MENU DISPLAY button until the menu screen appears 2 Select Y then press SET Select REC MODE 1 then press SET 2 3 Press f or d to select the desired setting then press SET 4 Press the MENU DISPLAY button to turn off the menu screen The sele...

Страница 92: ...body view of a person FULL BODY This will display a guide frame for recording a full body view of a person 1 In CARD CAMERA mode display the menu screen 2 Select W then press SET Press a or s to select GUIDE FRM then press SET 3 Press a or s to select CLOSE UP PORTRAIT or FULL BODY then press SET FULL BODY REC MODE OFF CLOSE UP PORTRA I T CAMERA SE T FLASH GU I DE RETURN FRM DGTL ZOOM SNAP EFF CAR...

Страница 93: ...operating indicator flashes while the timer counts down The shutter will be automatically released 10 seconds after and a still image of the subject is recorded Notes When recording with the self timer stabilize the camcorder in the horizontal plane by attaching it to a tripod etc To pause the selftimer press the STILL button again in step 3 To cancel the self timer press CANCEL in step 3 Self tim...

Страница 94: ... Using the Flash Light Optional Accessory Available mode CARD CAMERA Using the flash function of the optional IR Flash Light VR 3VIF enables you to record good quality still images even in dark locations Mounting the IR Flash Light 1 Hold the IR Flash Light as shown in the figure and mount it to the accessory shoe by sliding it in the direction of the arrow until it locks into place 2 Turn the scr...

Страница 95: ... cause damage to the camcorder or card It is recommended that you use the AC outlet for the power supply 1 Insert a card to be formatted in the camcorder 2 Set the camcorder to CARD CAMERA mode 3 Press the MENU DISPLAY button until the menu screen appears SCENE SE L F T IMER MENU D I S MAN FOCUS EXPOSURE SHUT SPEED P I C E F FECT MANUAL SET CARD RETURN SET a s 4 Select I then press SET Select FORM...

Страница 96: ...the Lock button and set the POWER switch to VCR The camcorder turns on in CARD VCR mode and the images recorded on the card are displayed in a thumbnail format Note Depending on the amount of data for the recorded image the picture quality indicator displayed during playback may not match the quality setting used during recording Digital Still Camera Features Playback Image number Picture quality ...

Страница 97: ...nes and so on If this happens turn off the camcorder power and remove the card Delete protection Available mode CARD VCR It is possible to prevent your important images recorded on the card from being accidentally erased by using the delete protection function 1 In CARD VCR mode press the MENU DISPLAY button until the menu screen appears 2 Select O then press SET Select PROTECT 1 then press SET 2 ...

Страница 98: ...ges to free up memory of a card for new images Note Deleted images cannot be restored Check whether or not you want the images before performing the procedure below Deleting a Particular Image 1 In CARD VCR mode press the MENU DISPLAY button until the menu screen appears 2 Select O then press SET Select DELETE 1 then press SET 2 3 Press q or w to select the image to be deleted NORMAL 2 2 PAGE 10 0...

Страница 99: ...press the MENU DISPLAY button until the menu screen appears 2 Select O then press SET Select DELETE ALL 1 then press SET 2 To cancel deletion press NO SL I DE SHOW EFF ECT P I C DE L E TE PROTECT PR I ORDER DE L E TE AL L PLAYBACK SE T RETURN CARD SET a s 10 0 0009 10 0 0009 DE LETE DE LETE 2 2 PAGE DE LETE NORMAL 12 11 10 9 8 7 YES NO 10 0 0010 10 0 0010 DE LETE DE LETE 2 2 PAGE 12 11 10 9 8 7 SE...

Страница 100: ...es Slide Show Playback Available mode CARD VCR It is possible to automatically play back consecutive still images recorded on a card This is useful when confirming the data recorded on a card 1 Set the camcorder to CARD VCR mode 2 Press the MENU DISPLAY button until the menu screen appears 3 Select O then press SET Select SLIDE SHOW 1 then press SET 2 1 1 DE LETE DE LET I NG ALL NOW PAGE NORMAL 1 ...

Страница 101: ...ck cannot be used with Picture Effect Playback Dubbing Images from a Card to a Tape Available mode CARD VCR Use the procedure below to select still images recorded on a card and dub them to a tape 1 Insert the recorded card and a Mini DV cassette in the camcorder 2 Set the camcorder to TAPE VCR mode then cue to the location on the tape to be dubbed 3 Set the camcorder to CARD VCR mode 4 If the ima...

Страница 102: ...s recorded using the camcorder are stored on a card as shown below Folder of still image files Sub folder of still images Serial number 100 to 999 Still image 6 Press the REC START STOP button The camcorder enters Recording Standby mode 7 Press REC to begin dubbing the image to the tape 8 Press REC again to stop dubbing 9 Press CANCEL to cancel dubbing the image If you want to dub another image re...

Страница 103: ...F feature when you use a DPOF compatible printer or visit a shop with a service for printing DPOF images Note It is possible to print an image even if no print order has been assigned Assigning Print Order to an Image 1 In CARD VCR mode press the MENU DISPLAY button until the menu screen appears 2 Select O then press SET Select PRI ORDER 1 then press SET 2 SL I DE SHOW EFF ECT P I C DE L E TE PROT...

Страница 104: ... turn off the menu screen 3 Press f or d 1 to select PRI SELECT then press SET 2 to display a thumbnail of the recorded images 4 Press q or w to select the image to which you want to assign a print order Number of printouts NORMAL 2 2 10 0010 0 100 0 0010 0 PR I NT NT PR I NT PAGE 12 11 10 9 8 7 q w RETURN NORMAL 2 2 10 0010 2 10 00 0 0 1 PR I NT NT PR I NT PAGE 0 2 P 12 11 10 9 8 7 q w RETURN Pri...

Страница 105: ...the print order for all images 1 Perform steps 1 and 2 in Assigning Print Order to an Image 2 Press f or d 1 to select PRI NONE then press SET 2 to cancel the print order for all images The M indicators are turned off P P P P P P 12 11 10 9 8 7 NORMAL 2 2 PAGE 10 0 0010 10 0 0010 PLAYBACK PLAYBACK PB q w SL I DE SHOW EFF ECT P I C DE L E TE PROTECT PR I ORDER PR I SEL ECT PR I ALL PR I RETURN NONE...

Страница 106: ...OUR VF LCD VF SE T RETURN SET a s Decrease Increase Darker Brighter 5 Press the MENU DISPLAY button to turn off the menu screen Adjusting the Backlight 1 Press the MENU DISPLAY button until the menu screen appears 2 Select O then press SET Press f or d to select BACKLIGHT 1 then press SET 2 3 Press f or d to select AUTO NORMAL or BRIGHT then press SET AUTO The camcorder automatically switches betw...

Страница 107: ... switch press the REC START STOP button insert and remove a Mini DV cassette or perform other designated operations Use the procedure below to change the type of sound or to turn off the confirmation sounds altogether Confirmation sound setting options CHIME A chiming sound is made BEEP An electronic beeping sound is made OFF No confirmation sound including a warning sound is made 1 Press the MENU...

Страница 108: ...RETURN D I S MANUAL SET RETURN SET a s AUTO 30min 2 0 0 2 6 0 3 0 1 2 GAMMA FADE SRCH SET a s 1 1 2 3 Select P then press SET Select SUMR TIME 1 then press SET 2 4 Press f or d to select ON then press SET The time automatically changes to summer time 5 Press the MENU DISPLAY button to turn off the menu screen The Q indicator appears when the date time is displayed To reset to standard time Select ...

Страница 109: ...reen appears HAWAII CHICAGO DENVER NEW YORK L A CARACAS FN ISL RIO ANCHRGE SAMOA 150 LONDON MOSCOW PARIS AZORES CAIRO DUBAI KARACHI DACCA HNGKNG TOKYO SYDNEY SOLOMON BANGKOK WLLNGTN 180 150 120 90 60 30 0 30 60 90 120 24 2 3 4 5 6 1 7 8 9 11 12 13 14 15 16 17 18 19 20 21 22 23 10 Area number Time Zone Chart AUTO 30min 2 0 0 2 6 2 0 3 0 1 GAMMA FADE SRCH 30min 2 0 0 2 6 2 0 3 9 GAMMA FADE SRCH 3 Se...

Страница 110: ...nited Arab Emirates Maldives Pakistan Bangladesh India Myanmar Cambodia Indonesia Jakarta Thailand Vietnam Australia Perth China Hong Kong Indonesia Borneo Bali Malaysia Philippines Singapore Taiwan Japan Korea Australia Sydney New Caledonia Fiji New Zealand Western Samoa Hawaii Is Tahiti HST Hawaii Standard Time U S A Alaska AST Alaska Standard Time U S A Los Angeles San Francisco PST Pacific Sta...

Страница 111: ...entre see pages 59 and 60 Light from behind Backlighting Battery Pack This camcorder uses a lithium ion type battery pack Charging Charge the battery pack immediately or a day before use The battery pack gradually self discharges even if stored in a fully charged state Charge the battery pack between 10 C and 30 C Fully charge the battery pack Use of an insufficiently charged battery pack will sho...

Страница 112: ...turns off 3Remove the battery pack and store it between 10 C and 20 C Cautions Improper handling of the battery pack may present a risk of fire or explosion Pay close attention to the following Do not allow metallic objects to come in contact with the terminals This can cause a short circuit Do not disassemble or repair the battery pack by yourself Do not use any battery charging equipment other t...

Страница 113: ... strong heat sources or in areas with excessive steam Store the Mini DV cassette in its case and stand it in an upright position If the tape is not properly wound rewind the tape Do not drop the Mini DV cassette or subject it to excessive shocks Erasure protect tab To protect recordings against acciden tal erasure Slide the protect tab on the rear of the Mini DV cassette to the SAVE position To re...

Страница 114: ...atter accumu late on the card contacts or touch them with your fingers or rub or scrape them Static electricity may damage erase data on the card Clean the card by wiping it gently with a soft dry cloth When carrying or storing the card place it in the plastic polyethylene bag it was originally packed in to keep dirt and dust off the contacts and protect it from static electricity This polyethylen...

Страница 115: ...cil or ballpoint pen as these may damage the card or destroy the data on the card Do not remove the card or turn off the power of the camcorder and peripheral equipment while data is being read or written Also do not remove the power source from the camcorder These actions can cause data to be destroyed Please be aware that Sharp Corporation cannot be held liable for any data loss or other loss di...

Страница 116: ...plastic parts are used in the camcorder casing Do not use thinners benzenes or other strong chemical cleaners These may cause discoloration and damage to the casing Clean the casing with a soft dry cloth If the casing is particularly dirty wipe the casing with a tightly wrung cloth dampened with a diluted neutral detergent Then wipe it again with a soft dry cloth Use a soft cloth to wipe finger ma...

Страница 117: ... ON then press SET 6 Set the POWER switch to OFF then hold down the Lock button and set the POWER switch to CAMERA The demonstration begins Cancelling Demo Mode 1 During the demonstration press the MENU DISPLAY button until the menu screen appears 2 Select I then press SET Select DEMO MODE then press SET 3 Press f or d to select OFF then press SET 4 Press the MENU DISPLAY button to turn off the me...

Страница 118: ... Power suddenly turns off Auto focus does not work Bright subject produces wide vertical lines Automatically zooms out without operating Power Zoom buttons On screen displays automatically change No image appears on connected TV screen Playback mode Possible cause Power source is not properly connected Battery pack is not charged Dew in camcorder Safety function is in effect Erasure protect tab on...

Страница 119: ...Old or worn tape Image is delete protected Power source is not properly connected Battery pack is not charged Camcorder is recording Viewfinder dioptre is not properly adjusted Inappropriate picture adjustments Inappropriate picture adjustments Audio video S video or DV cable is not properly connected REMOTE menu item is set to OFF Remote control batteries have run down Remote control used beyond ...

Страница 120: ... Exif2 1 Still Image Recording Medium SD Memory Card MultiMediaCard Power Requirement DC 7 4 V Power Consumption 3 9 W during camera recording in TAPE CAMERA mode using the viewfinder in Full Auto mode with the DIS function on 4 7 W during camera recording in TAPE CAMERA mode using the LCD monitor in Full Auto mode with the DIS function on and backlight in normal mode Operating Temperature 0 C to ...

Страница 121: ...Memo ...

Страница 122: ...Memo ...

Отзывы: