Sharp TL-M4600 Скачать руководство пользователя страница 26

24

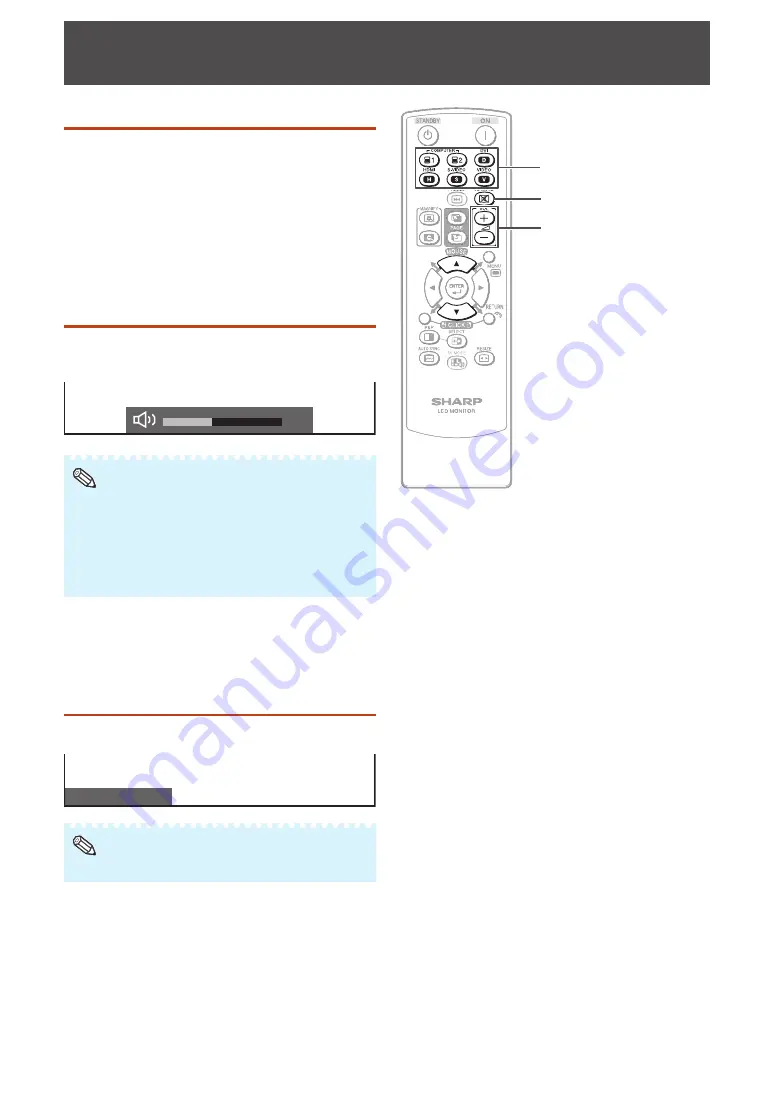
COMPUTER (/), DVI, HDMI, 

S-VIDEO, VIDEO buttons
AV MUTE button

VOL (Volume) buttons (+/-)

Operating with the Remote Control

Switching the input mode

Select the appropriate input mode for the connected 
equipment.

Press 

COMPUTER (1/2), DVI, HDMI, S-VIDEO or 

VIDEO to select the input mode.
•  When you press 

INPUT on the monitor, the 

INPUT list appears.

  Press 

/

 to switch the input mode.

Adjusting the volume

Press 

VOL +/– to adjust the volume.

•  You can also adjust the volume using 

VOL +/– on 

the monitor.

25

• Pressing 

VOL– 

will lower the volume.

• Pressing 

VOL+ 

will raise the volume.

• You can set the volume to different levels for each input 

source.

• To adjust sound via the audio output terminal (MONITOR 

OUT), set “Audio Output” to “VAO” in the “Option” menu. 
(See page 

40

.)

Note

Displaying the black screen 

and turning off the sound 

temporarily

Press 

AV MUTE to temporarily display a black 

screen and turn off the sound.

AV MUTE

• Pressing 

AV MUTE

 again will turn the image back on.

Note

Содержание TL-M4600

Страница 1: ...OPERATION MANUAL Introduction Preparation Appendix Operation LCD MONITOR MODEL TL M5200 TL M4600 ...

Страница 2: ...cessories on page 9 The supplied CD ROM contains operation instructions in English French and Spanish Carefully read through the operation instructions before operating the monitor Le CD ROM contient les instructions de fonctionnement en anglais français et espagnol Veuillez lire attentivement ces instructions avant de faire fonctionner le moniteur El CD ROM contiene instrucciones de operación en ...

Страница 3: ...to alert the user to the presence of important operating and maintenance servicing instructions in the literature accompanying the product WARNING FCC Regulations state that any unauthorized changes or modifications to this equipment not expressly approved by the manufacturer could void the user s authority to operate this equipment CAUTION This product satisfies FCC regulations when shielded cabl...

Страница 4: ...d radio TV technician for help DECLARATION OF CONFORMITY SHARP LCD MONITOR MODEL TL M5200 TL M4600 This device complies with Part 15 of the FCC Rules Operation is subject to the following two conditions 1 This device may not cause harmful interference and 2 this device must accept any interference received including interference that may cause undesired operation RESPONSIBLE PARTY SHARP ELECTRONIC...

Страница 5: ...d Additional Safety Information 15 Power Sources This product should be operated only from the type of power source indicated on the marking label If you are not sure of the type of power supply to your home consult your product dealer or local power company For products intended to operate from battery power or other sources refer to the operating instructions 16 Overloading Do not overload wall ...

Страница 6: ...tallation do not place the product in an enclosed place such as a bookcase or rack unless proper ventilation is provided or the manufacturer s instructions are followed The Liquid Crystal panel used in this product is made of glass Therefore it can break when the product is dropped or applied with impact Be careful not to be injured by broken glass pieces in case the panel breaks Heat The product ...

Страница 7: ...ailable to clean it To protect the panel do not use a dirty cloth liquid cleaners or chemical cloth to clean it such materials may damage the panel surface To clean the outer cabinet use the same method Do not use liquid or aerosol cleaners Do not display a still picture for a long time as this could cause an afterimage to remain Never rub or tap the monitor with hard objects Please understand tha...

Страница 8: ...rk flashes or does not turn on change the fluorescent tubes with new exclusive ones For more information please contact your product dealer Because of the property of fluorescent tubes the screen may flash during the initial period of use If this happens please turn off the power of the monitor and turn on again to confirm operation ...

Страница 9: ...2 Installing the batteries 22 Remote control operation range 22 Operation Turning the Monitor On Off 23 Turning on the power 23 Turning off the power 23 Operating with the Remote Control 24 Switching the input mode 24 Adjusting the volume 24 Displaying the black screen and turning off the sound temporarily 24 Resize mode 25 Auto Sync adjustment Auto Sync 27 Freezing a moving image 27 Selecting AV ...

Страница 10: ...e click the PDF file to access the SETUP MANUAL For Macintosh 1 Insert the CD ROM in the CD ROM drive 2 Double click the CD ROM icon 3 When you want to view the operation manual 1 Double click the MANUALS and the M520_460 folder 2 Double click the language name of the folder that you want to view 3 Double click the PDF file to access the operation manual When you want to view the SETUP MANUAL 1 Do...

Страница 11: ... household waste Follow the disposal instructions for your area Codes in are Replacement parts codes Note n Optional accessories The listed optional accessories are available for the LCD Monitor Please contact the nearest Sharp Authorized Dealer o Speaker unit AN 52SP2 AN 46SP2 o Wall mount bracket AN 52AG4 o USB remote receiver AN MR2 Some of the optional accessories may not be available dependin...

Страница 12: ...ee page 17 DVI IN terminals See pages 16 17 and 18 AC input terminal See page 21 COMPUTER IN 1 terminals See pages 16 17 and 18 COMPUTER IN 2 terminals See pages 16 17 and 18 MONITOR OUT terminals See page 18 SPEAKER OUT terminals See page 19 Handles Fixed type The illustrations in this operation manual are for explanation purposes and may vary slightly from the actual operations The illustrations...

Страница 13: ...button For setting items selected or adjusted on the menu See page 30 INPUT buttons For selecting the input mode See page 24 VOL Volume buttons For adjusting the speaker sound level See page 24 Adjustment buttons For selecting and adjusting menu items See page 30 S VIDEO IN terminal See pages 17 and 18 VIDEO IN terminal See pages 17 and 18 AUDIO terminals See page 18 ...

Страница 14: ... settings for picture and audio See page 27 RESIZE button For switching the picture size See page 25 PAGE UP PAGE DOWN buttons Functions the same as the Page Up and Page Down keys on a computer keyboard using the optional USB remote receiver when the monitor is connected to a computer See page 29 STANDBY button For putting the monitor into the standby mode See page 23 FREEZE button For freezing im...

Страница 15: ...y at least 2 people When moving the monitor be sure to hold it with the handles both on the rear and the unit bottom Do not hold the LCD panel This may cause product damage failure or injury This monitor should be used at an ambient temperature between 32 F 0 C and 104 F 40 C Provide enough space around the monitor to prevent heat from accumulating inside Do not block any ventilation openings If t...

Страница 16: ...stallation and may cause serious injuries Installing the monitor requires special skill that should only be performed by qualified service personnel Customers should not attempt to do the work themselves SHARP bears no responsibility for improper mounting or mounting that results in accident or injury Using a SHARP recommended bracket to mount the monitor You can ask a qualified service profession...

Страница 17: ... to prevent dust from entering the underside of monitor where the stand has been detached 3 6 Unfasten the 4 screws used to secure the stand in place Connect and bind the power cord and terminal cables Detach the 4 caps at the 4 locations on the rear of the monitor Attach the wall mount brackets L R 5 4 Set the monitor on the wall How to Install the Monitor ...

Страница 18: ...ment Cable commercially available Terminal on the monitor Computer RGB output terminal RGB cable COMPUTER IN 1 RGB output terminal 5 BNC to 15 pin D sub cable COMPUTER IN 2 DVI digital output terminal DVI Digital cable DVI IN DVI D HDCP Images may not be displayed properly depending on the computer graphics board to be connected See page 49 Computer compatibility chart for a list of computer signa...

Страница 19: ...to RCA adaptors Component video cable Depending on specifications of video equipment or HDMI to DVI digital cable the signal transmission may not work properly The HDMI specification does not support all connections to video equipment that has HDMI digital output terminal using HDMI to DVI digital cable For details on compatibility for connection see support information on DVI connection provided ...

Страница 20: ...IO for COMPUTER IN 1 for COMPUTER IN 2 RCA audio output terminal RCA audio cable AUDIO for S VIDEO IN for VIDEO IN Audio output terminal Cables for a camera or a video game Monitor RGB input terminal RGB cable MONITOR OUT Amplifier ø3 5 mm audio input terminal ø3 5 mm stereo or mono audio cable AUDIO for MONITOR OUT RCA audio input terminal ø3 5 mm stereo minijack to RCA audio cable When using the...

Страница 21: ...d that you use the optional Sharp speaker unit AN 52SP2 AN 46SP2 for external speakers Note Connecting multiple monitors You can connect multiple monitors by using the RGB COMPONENT input terminals COMPUTER IN 1 or COMPUTER IN 2 and the RGB COMPONENT output terminals MONITOR OUT The length of the signal cables or surrounding environment may affect the image quality When connecting multiple monitor...

Страница 22: ... manual of the computer for details Refer to SETUP MANUAL contained on the supplied CD ROM for the RS 232C specifications and commands Do not connect the RS 232C cable to a terminal other than the RS 232C terminal on the computer This may damage your computer or monitor Do not connect or disconnect an RS 232C serial control cable to or from the computer while it is on This may damage your computer...

Страница 23: ... AC power outlet Binding Cables Hole for the power cord clamp Fastened part Band Power cord clamp 1 2 3 n Attaching the cable clamp The cables connected to the terminals on the back of the monitor can be neatly bundled using the supplied cable clamp as shown in the illustration A cable clamp cannot be easily removed once it is attached Note n Fastening the power cord The power cord can be fastened...

Страница 24: ...using a cloth The batteries included with this monitor may run down in a short period depending on how they are kept Be sure to replace them as soon as possible with new batteries Remove the batteries from the remote control if you will not be using the remote control for a long time Comply with the rules ordinance of each local government when disposing of worn out batteries Remote control operat...

Страница 25: ...trol The monitor enters standby mode The POWER indicator on the monitor changes from green to red Press POWER on the monitor The POWER indicator on the monitor turns off When the monitor is turned off by POWER on the monitor you cannot turn on the power by pressing ON on the remote control POWER indicator Lighting Green Power ON Lighting Red Standby Lights off Power OFF Flashing Orange When Power ...

Страница 26: ...justing the volume Press VOL to adjust the volume You can also adjust the volume using VOL on the monitor 25 Pressing VOL will lower the volume Pressing VOL will raise the volume You can set the volume to different levels for each input source To adjust sound via the audio output terminal MONITOR OUT set Audio Output to VAO in the Option menu See page 40 Note Displaying the black screen and turnin...

Страница 27: ...played on the screen You can also set the Resize mode from the Option menu See page 42 Note AV input Selectable items Description Normal Normal Zoom 14 9 S Stretch Cinema 14 9 Cinema 16 9 Full For 4 3 standard pictures A side bar appears on each side Zoom 14 9 Normal Zoom 14 9 S Stretch Cinema 14 9 Cinema 16 9 Full For 14 9 letterbox pictures A thin side bar appears on each side and the top and bo...

Страница 28: ...function to select an image size with a different aspect ratio to a TV program or video image the image will look different from its original appearance Keep this in mind while choosing an image size The use of the Resize or split screen function to compress or stretch the image for commercial purposes public displays in a café hotel etc may be an infringement of copyright protected by law for cop...

Страница 29: ...der Standard Presentation Movie Game sRGB See page 32 for details on AV mode sRGB is displayed only when RGB signal is input Note Displaying an enlarged portion of an image Graphs tables and other portions of images can be enlarged This is helpful when providing more detailed explanations 1 Press MAGNIFY Enlarges the image Pressing or MAGNIFY enlarges or reduces the image 1 2 3 4 9 16 36 Press Pre...

Страница 30: ...t either screen to be active The active screen surrounded by a blue frame has sound output 3 Press COMPUTER 1 2 DVI HDMI S VIDEO or VIDEO to select another input source on the active screen A selected image appears 4 Press P P to exit split screen This function does not work under the following input conditions 1 Two pictures from the same source 2 Two pictures from HDMI and DVI 3 Pictures from S ...

Страница 31: ...er supports only a one click mouse such as Macintosh Press L CLICK or R CLICK L CLICK and R CLICK have common function When using Page Up or Page Down Same as the Page Up and Page Down keys on a computer keyboard Press PAGE UP or PAGE DOWN PAGE UP PAGE DOWN buttons Adjustment MOUSE buttons R CLICK button L CLICK button This function only works with the Microsoft Windows OS and Mac OS However this ...

Страница 32: ... L 0 R Standard Power Control 4 Press or to select the desired item or adjust the item to the desired level Press ENTER if necessary 5 Press MENU to exit the MENU Press RETURN as necessary to return to the previous MENUs n Using the control panel of the monitor You can also operate the Menu using the control panel of the monitor Button operations on the control panel correspond to the ones on the ...

Страница 33: ...age 37 Position H Position Page 37 V Position Page 37 Reset Page 37 Fine Sync Resolution Page 37 Signal Info Page 37 Auto Sync Page 37 H Position Page 38 V Position Page 38 Clock Page 38 Phase Page 38 Reset Page 38 Standby Mode Page 38 Auto Restart Page 38 RS 232C Page 38 DHCP Client Page 38 TCP IP Page 39 Status Page 39 All Reset Page 39 Option Closed Caption Page 40 Audio Output Page 40 Video Sy...

Страница 34: ...layed in a natural tint based on an original image when sRGB is selected For additional information about the sRGB function visit http www srgb com You cannot set the items Red Green Blue Color Temp when sRGB is selected When sRGB is selected the image may become dark but this does not indicate a malfunction Note n Picture adjustment You can adjust the picture to your preference Backlight cannot b...

Страница 35: ...ctable items Description High White with bluish tone Mid High Middle Mid Low Low White with reddish tone DNR Digital Noise Reduction Reduces noise on the screen and produces a clearer video image Film Mode Automatically detects a film based source originally encoded at 24 25 frames second depending on the vertical frequency analyses it then recreates each still film frame for high definition picture ...

Страница 36: ...ement Factory preset value Mode1 If no signal inputs for approximately 8 minutes the power shuts down Even if you start using the computer and the signal inputs again the monitor stays off The monitor turns on again by pressing ON on the remote control Mode2 If no signal inputs for approximately 8 seconds the power shuts down When you start using the computer and the signal inputs again the monito...

Страница 37: ...All Reset Auto Restart Standby Mode n Setting a password Password If you do not want others to change the setting for the Setup menu set a password 1 Select Password then press ENTER The screen for entering the password appears Enter your new password Use 4 digits Old Password MENU Setup Password New Password Reconfirm 2 Press to set the first digit in New Password then press 3 Enter the remaining...

Страница 38: ...el1 Only the ON STANDBY buttons on the remote control are available Level2 All of the operation buttons on the remote control are unavailable When you cannot unlock the operation buttons using the menu for example when all of the operation buttons on the monitor and the remote control are locked simultaneously follow the steps below To unlock all of the buttons on the monitor and the remote contro...

Страница 39: ...l and vertical position Selectable Items Description H Position Centers the image by moving it to the left or right V Position Centers the image by moving it up or down For resetting all adjustment items to the factory preset values press to select Reset press ENTER press to select Yes and then press ENTER Adjustments are stored separately according to input source Images may not be displayed prop...

Страница 40: ...Mode3 Power consumption is low while in standby mode The RS 232C and Network functions are switched off in standby mode n Auto restart function Auto Restart Selectable items Description On If the power cord is unplugged from the outlet or the breaker switch is turned off when the monitor is on then the monitor automatically turns on when the power cord is plugged into the AC outlet or the breaker ...

Страница 41: ... set to 000 000 000 000 Confirm the existing network s segment IP address group to avoid setting an IP address that duplicates the IP addresses of other network equipment or computers If 192 168 150 002 is not used in a network with an IP address of 192 168 150 XXX you don t have to change the monitor IP address For details about each setting consult your network administrator Note n Confirming th...

Страница 42: ...ing with VOLUME Selectable items Description FAO Fixed Audio Output Audio output that does not vary in strength with the volume level of the source monitor VAO Variable Audio Output Audio output that varies in strength with the volume level of the source monitor When Audio Output is set to VAO sound via speakers is muted When Audio Output has been set to VAO first make sure to lower the volume of ...

Страница 43: ...scription Computer 1 2 Auto Input signals are automatically recognized as RGB or component RGB Set when RGB signals are received Component Set when component signals are received DVI D PC RGB Set when digital PC RGB signals are received from a computer D PC Comp Set when digital PC component signals are received from a computer D VIDEO RGB Set when digital video RGB signals are received from video...

Страница 44: ... items Selectable items Description Auto View Enable Disable Set whether or not to use Resize mode based on signal recognition including an HDMI signal Audio Select Digital Analog Select Digital for audio signal via the HDMI terminal Select Analog for audio signal via the audio input terminal Refer to your external equipment operation manual for the above settings When connecting a DVI HDMI conver...

Страница 45: ...de at power on When not specifying the screen at the previous power off appears Caution Do not switch off the power after setting the Schedule Specify the correct day and time using Clock before setting Schedule Schedule does not function unless the day and time are specified Set time On and Off values that are within 12 hours of each other Up to 8 Schedule items can be registered When Schedule is...

Страница 46: ...gnal 3x1 4x1 3x3 4x4 S VIDEO VIDEO NTSC N A N A N A N A PAL N A N A N A N A SECAM N A N A N A N A Computer1 Computer2 480I N A N A 576I N A N A Not Available Status and Position may not be selected depending on the input signal Depending on the number of monitors and or the input signal a distributor for the input signal commercially available is required For details refer to the SETUP MANUAL Note...

Страница 47: ...See page 32 Check the signal type setting See page 41 Unstable picture Is a non compatible signal being input See page 49 Try the AUTO SYNC button on the remote control See page 27 TIMER indicator flashes red Power is suddenly turned off The unit s internal temperature has increased Check whether the monitor is placed at a location where a quick rise in temperature is likely Internal temperature r...

Страница 48: ...hweiz AG 0041 1 846 63 11 cattaneo sez sharp eu com http www sharp ch Sweden Sharp Electronics Nordic AB 46 8 6343600 vision support sen sharp eu com http www sharp se Austria Sharp Electronics Europe GMBH Branch Office Austria 0043 1 727 19 123 pogats sea sharp eu com http www sharp at Benelux SHARP Electronics Benelux BV 0900 SHARPCE 0900 7427723 Neder land 9900 0159 Belgium http www sharp nl ht...

Страница 49: ...nput Video input Audio input mini Din 4 pin RCA RCA OSD language English French Spanish Italian German Dutch Japanese External control LAN RS 232C Power Requirement AC 100 240 V 50 60 Hz Power Consumption 312 W 3 2 A 278 W 2 8 A Standby Power Consumption TL M5200 33 W Mode1 1 4 W Mode2 0 3 W Mode3 at AC 120 V TL M4600 30 W Mode1 1 4 W Mode2 0 3 W Mode3 at AC 120 V Weight 61 8 lbs 28 0 kg without S...

Страница 50: ...lues TL M5200 48 61 64 1243 Unit inch mm 45 9 16 1157 15 3 4 400 3 63 64 101 3 5 32 80 28 43 64 728 25 21 32 651 6 14 11 32 364 15 3 4 400 5 23 64 136 TL M4600 15 3 4 400 3 23 64 85 15 3 4 400 40 19 64 1023 4 43 43 64 1109 25 19 32 650 22 43 64 575 6 4 11 64 106 6 55 64 174 12 13 16 325 ...

Страница 51: ... Standard DVI D Support Display PC VGA 640x400 31 5 70 Upscale 720x400 31 5 70 37 9 85 640x480 31 5 60 37 9 72 37 5 75 43 3 85 SVGA 800x600 31 3 50 35 2 56 37 9 60 48 1 72 46 9 75 XGA 1024x768 48 4 60 56 5 70 58 1 72 60 0 75 WXGA 1280x720 44 7 60 1280x768 47 8 60 1360x768 47 7 60 SXGA 1280x1024 64 0 60 80 0 75 SXGA 1400x1050 64 0 60 65 3 60 1920x1080 67 5 60 True MAC 13 640x480 35 0 67 Upscale 16 ...

Страница 52: ...ers Information about resolution and other parameters is exchanged between the two This function can be used if the computer supports DDC and it has been configured to detect plug and play monitors There are several types of DDC depending on the communication method used This monitor supports DDC2B n Connecting pin assignments DVI D input terminal DVI D 24 pin Pin No Signal Pin No Signal 1 T M D S ...

Страница 53: ...o input green sync on green 10 GND 3 Video input blue 11 Not connected 4 Not connected 12 Not connected 5 Not connected 13 Horizontal sync signal TTL level 6 Earth red 14 Vertical sync signal TTL level 7 Earth green sync on green 15 DDC clock 8 Earth blue LAN terminal LAN RJ 45 8 1 Pin No Signal Pin No Signal 1 TX 5 2 TX 6 RX 3 RX 7 4 8 HDMI terminal 1 19 18 2 Pin No Signal Pin No Signal 1 T M D S...

Страница 54: ... 24 Input skip 36 IP Address 39 Keylock 36 LAN 10 20 LAN terminal 10 20 Language 42 LED 44 Magnify 27 Menu tree 31 MONITOR OUT terminals 10 18 Monochrome 33 Mouse 29 Multi Screen 44 Network 20 OPC 32 OPC indicator sensor 10 33 Optional accessories 9 Password 35 Phase 38 P P Picture and Picture 28 Picture Flip 43 Position 37 Power cord 21 Power Management 34 POWER indicator 10 23 Power On Delay 44 ...

Страница 55: ...SHARP ELECTRONICS CORPORATION Sharp Plaza Mahwah New Jersey 07495 1163 SHARP CORPORATION ...

Отзывы: