


B. Installation procedure
(1) SF-2040
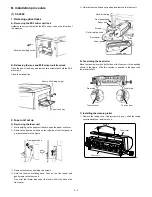
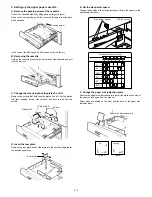
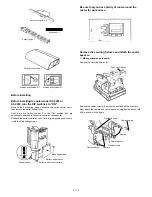
1. Releasing optical locks
A. Removing the #2/3 mirror unit lock
Unfasten the screw that holds the #2/3 mirror unit on the left side of
the machine.
B. Releasing the lens and #4/5 mirror unit from lock
Open the paper feed tray and remove two screws that hold the #4/5
mirror unit.
Close the manual tray.
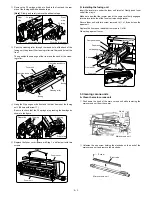
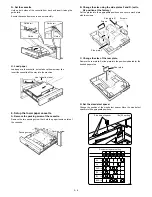
2. Fuser unit set up
A. Removing the fuser unit
1
While holding up the paper exit handle, open the paper exit cover.
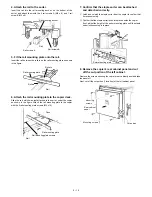
2
Remove the front panel band on the left side of the front panel in
a manner shown in the figure.
3
Remove the fuser unit holding two screws.
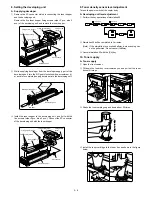
4
Hold the fuser unit rotating knob. Push on the front panel and
gently remove the fuser unit.
Do not let the locator pins under the fuser unit hit the ribs on the
front cover.
5
Hold the fuser unit hand carry strap and remove the fuser unit.
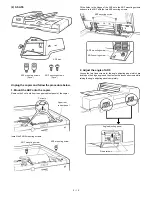
B. Tensioning the heat roller
Move the tension levers on both sides of the fuser unit to the position
shown in the figure. With this, tension is applied to the upper and
lower heat rollers.
C. Installing the cleaning roller
1
Remove the fusing cover fixing screws (2 pcs.), slide the fusing
cover towards you, and remove it.
Mirror unit holding screw
Mirror unit holding screw
Paper feed tray
1
2
Front panel band
Hand hold strap
Front panel band
Paper exit
Screws
Roller rotating knob
Front panel
Fuser unit
Ribs
Locator pins
Front side
Rear side
Tension lever
Tension lever
Screws
Fuser cover
Fuser unit
5 – 2
Содержание SF-2040
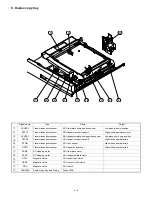
Страница 27: ...9 Desk unit SF D23 11 12 16 17 13 18 10 9 8 7 6 2 5 4 3 1 23 21 22 19 20 14 15 4 10 ...
Страница 63: ...5 5 C F 10 D 7 6 11 G E 8 9 H 12 6 2 ...
Страница 65: ...3 B 3 E 13 C 4 5 6 7 8 F 14 D 10 11 9 6 4 ...
Страница 67: ...2 1 3 A D 9 8 11 10 B 4 5 E 12 13 14 C 7 6 6 6 ...
Страница 69: ...A a 1 1 D 4 4 B 1 b 1 1 E 5 5 7 6 8 9 8 5 C 2 3 3 F 5 11 12 6 8 ...
Страница 71: ...1 2 3 3 4 5 A D 13 11 10 7 6 6 7 B E 14 8 12 9 C F 15 G 16 16 6 10 ...
Страница 73: ...A a 1 D 11 10 10 9 8 B 4 2 3 E 13 12 12 C 5 7 6 7 6 12 ...
Страница 75: ...C 4 F 9 9 9 10 9 5 6 D G 11 E 8 7 6 14 ...
Страница 78: ...Volume PWB 8 9 10 10 6 17 ...
Страница 80: ...C 5 F 11 P D F R 7 6 6 12 13 G 12 13 E 8 9 a 8 H 14 6 19 ...