background image

1

CONTENTS

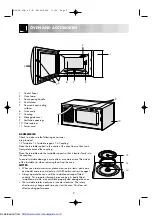
Oven and Accessories

 . . . . . . . . . . . . . . . . . . . . . . . . . . . . . . . . . . . . . . . . . . . . . . . . . . . . . . .2

Control Panel

 . . . . . . . . . . . . . . . . . . . . . . . . . . . . . . . . . . . . . . . . . . . . . . . . . . . . . . . . . . . . . .3 

Safety:

Installation  . . . . . . . . . . . . . . . . . . . . . . . . . . . . . . . . . . . . . . . . . . . . . . . . . . . . . . . . . . . . . . . .4
Important Safety Instructions   . . . . . . . . . . . . . . . . . . . . . . . . . . . . . . . . . . . . . . . . . . . . . . . . . . .5 

Operation:

Maff Heating Category  . . . . . . . . . . . . . . . . . . . . . . . . . . . . . . . . . . . . . . . . . . . . . . . . . . . . . . .5 
Microwaving  . . . . . . . . . . . . . . . . . . . . . . . . . . . . . . . . . . . . . . . . . . . . . . . . . . . . . . . . . . . . . .6
Microwave Power Levels  . . . . . . . . . . . . . . . . . . . . . . . . . . . . . . . . . . . . . . . . . . . . . . . . . . . . . .6
Before Operation  . . . . . . . . . . . . . . . . . . . . . . . . . . . . . . . . . . . . . . . . . . . . . . . . . . . . . . . . . . .7
Setting the Clock . . . . . . . . . . . . . . . . . . . . . . . . . . . . . . . . . . . . . . . . . . . . . . . . . . . . . . . . . . . .7
How to operate the oven  . . . . . . . . . . . . . . . . . . . . . . . . . . . . . . . . . . . . . . . . . . . . . . . . . . . . . .8
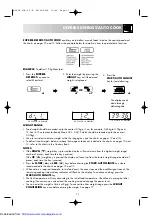
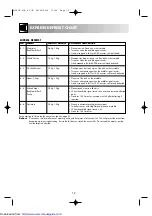
Express Cook  . . . . . . . . . . . . . . . . . . . . . . . . . . . . . . . . . . . . . . . . . . . . . . . . . . . . . . . . . . . . . .9
Express Cook Chart  . . . . . . . . . . . . . . . . . . . . . . . . . . . . . . . . . . . . . . . . . . . . . . . . . . . . . . . . .10
Express Defrost / Auto Cook  . . . . . . . . . . . . . . . . . . . . . . . . . . . . . . . . . . . . . . . . . . . . . . . . . . .11
Express Defrost / Auto Cook Charts  . . . . . . . . . . . . . . . . . . . . . . . . . . . . . . . . . . . . . . . . . . . . . .12-13
Convenient Functions:  . . . . . . . . . . . . . . . . . . . . . . . . . . . . . . . . . . . . . . . . . . . . . . . . . . . . . . . .14-17

Cooking Advice:

Suitable Cookware  . . . . . . . . . . . . . . . . . . . . . . . . . . . . . . . . . . . . . . . . . . . . . . . . . . . . . . . . . .18-19
Food Handling & Preparation  . . . . . . . . . . . . . . . . . . . . . . . . . . . . . . . . . . . . . . . . . . . . . . . . . .19-20
Advice for Cooking . . . . . . . . . . . . . . . . . . . . . . . . . . . . . . . . . . . . . . . . . . . . . . . . . . . . . . . . . .20
Advice for Defrosting . . . . . . . . . . . . . . . . . . . . . . . . . . . . . . . . . . . . . . . . . . . . . . . . . . . . . . . . .21
Advice for Reheating . . . . . . . . . . . . . . . . . . . . . . . . . . . . . . . . . . . . . . . . . . . . . . . . . . . . . . . . .22

Cookbook

 . . . . . . . . . . . . . . . . . . . . . . . . . . . . . . . . . . . . . . . . . . . . . . . . . . . . . . . . . . . . . . . . .23-47

Aftercare:

Cleaning and Maintenance  . . . . . . . . . . . . . . . . . . . . . . . . . . . . . . . . . . . . . . . . . . . . . . . . . . . .48
Troubleshooting  . . . . . . . . . . . . . . . . . . . . . . . . . . . . . . . . . . . . . . . . . . . . . . . . . . . . . . . . . . . .48-49
To Replace the Mains Plug  . . . . . . . . . . . . . . . . . . . . . . . . . . . . . . . . . . . . . . . . . . . . . . . . . . . . .49
Calling for Service  . . . . . . . . . . . . . . . . . . . . . . . . . . . . . . . . . . . . . . . . . . . . . . . . . . . . . . . . . .50
Guarantee  . . . . . . . . . . . . . . . . . . . . . . . . . . . . . . . . . . . . . . . . . . . . . . . . . . . . . . . . . . . . . . . .50
Specifications  . . . . . . . . . . . . . . . . . . . . . . . . . . . . . . . . . . . . . . . . . . . . . . . . . . . . . . . . . . . . . .51

OPERATION MANUAL

This operation manual contains important information which you should read carefully

before using your microwave oven.

IMPORTANT: There may be a serious risk to health if this operation manual is not followed

or if the oven is modified so that it operates with the door open.

R-383M O/M & C/B  28/04/2000  11:39  Page 1

Downloaded from: 

http://www.usersmanualguide.com/

Содержание R-383M

Страница 1: ...g Lb AUTO START CLOCK KG LB TURN STIR PCS MICRO COOK 10min 1min 10sec LESS MORE DOWN UP Time ROAST PORK AST PORK ROAST POUL AST POULTR TRY CHICKEN CHICKEN POR PORTIONS TIONS ROAST AST BEEF LAMB BEEF LAMB SOUP Kg Lb Pcs TIMER KITCHEN R 383M O M C B 28 04 2000 11 39 Page A Downloaded from http www usersmanualguide com ...

Страница 2: ...R 383M O M C B 28 04 2000 11 39 Page B Downloaded from http www usersmanualguide com ...

Страница 3: ...ing Preparation 19 20 Advice for Cooking 20 Advice for Defrosting 21 Advice for Reheating 22 Cookbook 23 47 Aftercare Cleaning and Maintenance 48 Troubleshooting 48 49 To Replace the Mains Plug 49 Calling for Service 50 Guarantee 50 Specifications 51 OPERATION MANUAL This operation manual contains important information which you should read carefully before using your microwave oven IMPORTANT Ther...

Страница 4: ...o that it locates firmly into the coupling To avoid turntable damage ensure dishes or containers are lifted clear of the turntable rim when removing them from the oven NOTES When you order accessories please mention two items part name and model name to your dealer or SHARP authorised service agent Always operate the oven with the turntable and support fitted correctly This promotes thorough even ...

Страница 5: ...or maximum weight number is reached the display will not change even if you continue to press the DOWN or UP key 13 EXPRESS DEFROST key Press to select 1 of 6 EXPRESS DEFROST programmes 3 CONTROL PANEL R 383 POWER LEVEL STOP CLEAR START AUTO MINUTE Kg Lb AUTO START CLOCK KG LB TURN STIR PCS MICRO COOK 10min 1min 10sec LESS MORE DOWN UP Time ROAST PORK ROAST POULTRY CHICKEN PORTIONS ROAST BEEF LAMB...

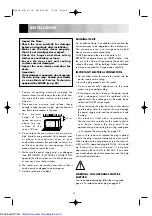
Страница 6: ...ted within a kitchen unit The microwave oven is not designed to be built above or near a conventional oven SHARP recommend the use of the build in kit EBR 4800 available from your SHARP dealer Only the use of this frame will guarantee the quality and safety of the oven When building follow installation instructions supplied for A type models carefully IMPORTANT ELECTRICAL CONNECTION Do not allow w...

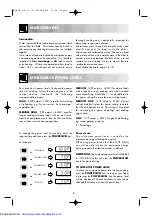
Страница 7: ...stifle any flames IMPORTANT SAFETY INSTRUCTION READ CAREFULLY AND KEEP FOR FUTURE REFERENCE MAFF HEATING CATEGORY E 900W The heating category a letter A to E developed by MAFF Ministry of Agriculture Fisheries and Food with microwave oven and food manufacturers indicates the ability of the oven to heat small quantities of food up to 500g 1lb 2oz It does not represent the general performance of the...

Страница 8: ... key As long as your finger is pressing the POWER LEVEL key the power level will be displayed The oven continues to count down although the display will show the power level To change the power level for cooking enter the required time and then press the POWER LEVEL key For example Your oven has 5 power levels To choose the power level for cooking follow the advice given in the recipe section Gene...

Страница 9: ...lay x2 x3 1 Select the 24 hour clock 2 To enter the hours press the 10 MIN key twice Check the display KG LB TURN STIR PCS MICRO COOK To set the time of day Example To set the 24 hour clock to 23 35 x2 10min 10min 1min 1min 3 Then the 1 MIN key 3 times x5 x1 x3 5 To enter the minutes press the 10 MIN key 3 times 4 To change from hours to minutes press the AUTOSTART CLOCK key once 6 Then press the ...

Страница 10: ... 70P MEDIUM for 30 seconds x2 x1 1 Press the 10 SEC key 3 times 2 To input the power level press the POWER LEVEL key twice x3 10sec START AUTO MINUTE 3 Press the START AUTO MINUTE key once KG LB TURN STIR PCS MICRO COOK KG LB TURN STIR PCS MICRO COOK KG LB TURN STIR PCS MICRO COOK The display will count down through the set cooking time NOTE 1 Yourovencanbeprogrammedupto99minutes 90seconds 99 90 2...

Страница 11: ... START AUTO MINUTE x1 2 Enter the weight by pressing the WEIGHT keys until the desired weight is displayed 1 Press the ROAST PORK key twice to select cooking from chilled KG LB TURN STIR PCS MICRO COOK Example 2 To cook Roast Pork from chilled weighing 0 6kg x2 x1 DOWN DOWN Kg Lb Kg Lb Pcs x13 OR 3 Press the START AUTO MINUTE key to start cooking START AUTO MINUTE x1 KG LB TURN STIR PCS MICRO COOK...

Страница 12: ...e on the turntable Do not cover Stir when the audible signal sounds Stand for 2 minutes after cooking NOTE It is not possible to use the LESS function for minced meat Soup 0 5kg 1 5kg Pour soup into casserole dish Microwave safe plastic container for frozen soup Cover with microwave cling film Place on turntable Stir when audible signals sound Stand for 2 minutes after cooking 10 WEIGHT RANGE Food...

Страница 13: ...st weight range number of pieces each time the key is pressed If the UP weight key is pressed the display will count up from the lowest weight range number of pieces each time the key is pressed Press the MORE or LESS keys before pressing the START AUTO MINUTE key where recommended in the charts on pages 12 and 13 When action is required example to turn food over the oven stops and the audible sig...

Страница 14: ... sounds Stand wrapped in foil for 15 30 minutes until evenly defrosted d 5 Minced Meat 0 2kg 1 0kg Place minced meat in a flan dish Beef Lamb Pork When the audible signal sounds turn over and remove defrosted Poultry parts Stand for 15 30 minutes covered with foil after defrosting if required d 6 Casserole 0 5kg 1 5kg Freeze in microwave safe plastic container To defrost cover with clingfilm and p...

Страница 15: ...function for these menus Cottage pie AC 3 Fresh Fish 0 1kg 0 6kg Arrange in a single layer in a large flan dish cover dish whole fillets steaks tightly with microwave cling film and pierce in several places oily fish e g Place on the turntable salmon mackerel After cooking leave to stand for 5 minutes before serving white fish e g NOTE cod haddock For white fish press the MORE key before pressing ...

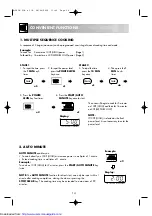
Страница 16: ... as the final power level it is not necessary to enter the power level START AUTO MINUTE x1 KG LB TURN STIR PCS MICRO COOK Display 6 Press the START AUTO MINUTE key once to start POWER LEVEL x4 5 Press the POWER LEVEL key four times 2 AUTO MINUTE AUTO MINUTE enables you To cook directly on 100P HIGH microwave power in multiples of 1 minute Extend cooking time in multiples of 1 minute Example To co...

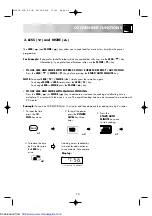
Страница 17: ...s time than the preset programmes For Example If you prefer Jacket Potatoes which are cooked but still crisp use the LESS key Alternatively if you prefer Jacket Potatoes softer use the MORE key TO USE LESS AND MORE WITH EXPRESS COOK EXPRESS DEFROST AUTO COOK Press the LESS MORE key before pressing the START AUTO MINUTE key NOTE To cancel LESS MORE simply press the same key again To change MORE to ...

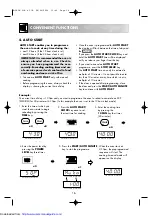
Страница 18: ...h is not in multiples of 10 minutes If the door is opened after programming close the door and press the START AUTO MINUTE key to continue with AUTO START Example The current time of day is 1 00pm and you want to programme the oven to reheat a casserole on 50P MEDIUM for 40 minutes at 4 30pm In this example the oven is set to the 12 hour clock mode 1 Enter the time at which you want the casserole ...

Страница 19: ... START function is set 6 WEIGHT CONVERSION Your oven comes set for kg You can use the weight conversion function to convert kg to lbs or vice versa The oven memorises the weight unit of the last operation until you change it To change from kg to lbs press the WEIGHT CONVERSION key when the display shows the time of day or before entering the weight Example To change from kg to lbs when using EXPRE...

Страница 20: ...facturer s instructions Be careful as these become very hot Popcorn Only use microwave popcorn in recommended packaging follow popcorn manufacturer s instructions Never use oil unless the manufacturer recommends and never cook for longer than instructed NO YES NO Use small pieces of aluminium foil to shield food from overheating Keep foil at least 2cm from the oven walls Foil containers are not re...

Страница 21: ... roasting bags or popcorn packaging direct steam away from face and hands For even cooking stir turn or rearrange food during cooking Where recommended leave food to stand after cooking or defrosting The initial temperature of food affects the amount of cooking time needed eg chilled food requires more cooking than food at room temperature The temperature of the container is not a true indication ...

Страница 22: ...ooking than peas four potatoes will take longer to cook than two Food hygiene standards storage handling and preparation apply to microwaving Always store convenience foods as recommended by the food manufacturer and keep no longer than the Use By date WARNING Always attend the oven when in use Carefully follow the SHARP Operation Manual at all times If you exceed recommended cooking times and or ...

Страница 23: ...a flan dish separate during defrosting and turn over at least 2 3 times Shield if necessary Place in a flan dish stir or turn over at least 3 4 times during defrosting remove defrosted parts each time For frozen blocks of meat see Minced Meat in the charts on page 24 or the Express Defrost chart on page 12 Place in a flan dish separate during defrosting and turn over at least twice Shield if neces...

Страница 24: ...oultry or meat portions reheat these separately see below Place smaller items of food to the centre of the plate larger and thicker foods to the edge Cover with vented microwave cling film and reheat on 50P MEDIUM stir rearrange halfway through reheating Ensure food is thoroughly reheated before serving Cover with vented microwave cling film or suitable lid reheat on 50P MEDIUM Stir frequently to ...

Страница 25: ...from 20 C DO NOT COOK FROM FROZEN Frozen foods are to be cooked from 18 C Where dishes are covered use vented microwave clingfilm unless otherwise stated Where dishes are lined use greaseproof paper unless otherwise stated Please note that all preparation times and serving quantities are approximate All ingredients are given in both metric and imperial measures Use either set but not a combination...

Страница 26: ...es 25 30 Minutes 25 30 Minutes 15 20 Minutes 5 10 Minutes 15 20 Minutes DEFROSTING CHARTS DEFROSTING CHARTS 24 POULTRY Chicken Turkey Max 3 5kg 8lb Duck Max 1 8kg 4lb Chicken Portions Chicken Turkey Breasts Chicken Turkey Drumsticks Minced Turkey DEFROSTING TIME 20 Minutes 450g 1lb 20 Minutes 450g 1lb 20 Minutes 450g 1lb 8 9 Minutes 450g 1lb 10 Minutes 450g 1lb 9 10 Minutes 450g 1lb 8 Minutes 450g...

Страница 27: ...rrants Gooseberries Raspberries Blackberries Rhubarb Strawberries MICROWAVE POWER LEVEL MEDIUM LOW 30P MEDIUM LOW 30P MEDIUM LOW 30P MEDIUM LOW 30P MEDIUM LOW 30P MEDIUM LOW 30P METHOD Place in a dish Stir during defrosting Place in a dish Stir during defrosting Place in a dish Stir during defrosting Place in a dish Stir during defrosting Place in a dish Stir during defrosting Place in a dish Stir...

Страница 28: ...gh cooking Place in a flan dish Turn over halfway through cooking Place in a bowl Stir 2 3 times during cooking Place in a flan dish Turn over halfway through cooking Place in a flan dish Turn over halfway through cooking Place in a flan dish Turn over halfway through cooking Place in a flan dish Turn over halfway through cooking Place in a flan dish Turn over halfway through cooking Place in a fl...

Страница 29: ... HIGH 100P POULTRY Chicken Turkey Max 2 7kg 6lb Duck Max 1 8kg 4lb Chicken Portions Chicken Turkey Breasts Chicken Turkey Drumsticks Minced Turkey METHOD Place in a flan dish Turn over halfway through cooking Place in a flan dish Turn over halfway through cooking Place in a flan dish Turn over halfway through cooking Place in a flan dish Turn over halfway through cooking Place in a flan dish Turn ...

Страница 30: ...r halfway through cooking Add 30ml 2tbsp water Cover dish Stir halfway through cooking Break into florets Add 30ml 2 tbsp water Cover Stir halfway through cooking Add 45ml 3tbsp water Cover dish Stir halfway through cooking Slice Add 30ml 2tbsp water Cover Stir halfway through cooking Slice Add 30ml 2tbsp water Cover dish Stir halfway through cooking Add 30ml 2tbsp water Cover Stir halfway through...

Страница 31: ...lace in a dish and cover Stir during cooking Place in a dish and cover Stir during cooking Place in a dish and cover Stir during cooking Place in a dish and cover Stir during cooking Place in a dish and cover Stir during cooking Slice Place in a dish and cover Stir during cooking STANDING TIME 1 2 Minutes 2 Minutes 1 2 Minutes 2 Minutes 1 2 Minutes 2 Minutes FROZEN VEGETABLES Beans green Broccoli ...

Страница 32: ...olk and white in 3 4 places Cook on 100P HIGH for 40 50 seconds STANDING TIME 5 Minutes 5 Minutes 4 Minutes 4 Minutes 4 Minutes 4 Minutes RICE PASTA DRIED White rice long grain Brown rice Spaghetti short cut Macaroni short cut Tagliatelle Pasta shells Twists COOKING TIME 13 14 Mins 20 21 Mins 10 11 Mins 11 12 Mins 9 10 Mins 10 11 Mins MICROWAVE POWER LEVEL MEDIUM HIGH 70P MEDIUM HIGH 70P MEDIUM HI...

Страница 33: ...from can Place in a dish and cover Stir halfway through cooking Remove from can Drain Place in a dish and cover Stir halfway through cooking Remove from can Drain Place in a dish and cover Stir halfway through cooking Place on kitchen roll Place on kitchen roll Place in a flan dish Do not exceed cooking time advised by food manufacturer Place in a flan dish Do not exceed cooking time advised by fo...

Страница 34: ... the flour to form a paste Gradually add the stock 3 Stir in the marjoram salt and pepper to taste Cook on 100P HIGH for 8 minutes stir halfway through cooking 4 Blend the soup and add the milk Check the seasoning and cook on 100P HIGH for 6 minutes Variation Lentil and bacon soup Make as above After Stage 2 add 50g 2oz cooked lentils and 2 rashers of bacon cooked and chopped Omit the French bread...

Страница 35: ...ason with salt and pepper to taste and stir in the parsley Cook on 100P HIGH for 2 minutes 2 Cut the avocados in half Remove the stone and brush the flesh with lemon juice Fill each avocado half with the breadcrumb mixture 3 Place the filled avocados in a flan dish and sprinkle with the grated cheese 4 Cook on 100P HIGH for 1 minute until the cheese has melted Garnish with sprigs of fresh parsley ...

Страница 36: ...minutes An excellent party or supper dish TROUT WITH ORANGE AND ALMONDS Serves 2 2 medium trout approx 225g 8oz each salt and pepper to taste juice and rind of 1 orange 50g 2oz flaked almonds slices of orange to garnish 1 Wash the trout Discard heads and tails and pat dry Place in a large flan dish pierce in several places Season Pour over the orange juice and sprinkle with the rind and flaked alm...

Страница 37: ...for 40 minutes Stir halfway through cooking and add the cornflour to thicken 2 To make the pastry place the flour salt baking powder and suet in a bowl and mix well 3 Add enough cold water to form a soft dough Knead lightly Roll out 2 3 of the pastry and line a 1 litre 13 4 pint greased pudding basin with this pastry Roll out the remaining pastry and cut a circle large enough to cover the surface ...

Страница 38: ...egg and milk mixture 4 Place two pasties in a greased flan dish and cook on 70P MEDIUM HIGH for 8 minutes Repeat for the remaining pasties MOUSSAKA Serves 6 450g 1lb aubergines thinly sliced 30ml 2tbsp olive oil 225g 8oz onion chopped 15ml 1tbsp fresh parsley chopped 2 cloves garlic crushed 350g 13oz minced lamb 150ml 1 4 pint hot beef stock 2 large fresh tomatoes peeled and quartered 30ml 2tbsp t...

Страница 39: ...to taste 4 chicken portions 1 Place mushrooms onion and garlic in a large casserole dish Cook on 100P HIGH for 4 minutes 2 Stir in all remaining ingredients apart from the chicken Finally add the chicken and coat with the sauce 3 Cook on 70P MEDIUM HIGH for 30 minutes Stir and coat the chicken twice during cooking Serve with rice or jacket potatoes CHICKEN BROCCOLI BAKE Serves 4 450g 1lb boneless ...

Страница 40: ...p tomato purée 150ml 1 4 pint chicken stock 1 Place the chicken breasts in a casserole dish 2 Mix all remaining ingredients together and pour over the chicken Salt and pepper to taste 3 Cook on 100P HIGH for 12 minutes Rearrange and coat the chicken with the sauce twice during cooking CHEESY SALMON PIE Serves 4 200g 7oz long grain white rice 1 medium onion chopped salt and pepper to taste 600ml 1 ...

Страница 41: ... oil 450g 1lb aubergines cut in 2 5cm 1 cubes 225g 8oz onions roughly chopped 1 clove garlic crushed 3 sticks of celery chopped 450g 1lb canned chopped tomatoes 5ml 1tsp fresh basil chopped pinch of allspice 100g 4oz canned butter beans 100g 4oz canned black eyed beans 100g 4oz okra salt and pepper to taste 30ml 2tbsp fresh parsley chopped 1 Heat the olive oil in a large bowl on 100P HIGH for 40 s...

Страница 42: ...and salt to taste in a large bowl and cover with boiling water Cook on 100P HIGH for 11 12 minutes until almost tender Do not drain until the rest of the dish is prepared 4 Flake the trout discarding all bones and skin Stir into the courgettes and add the yogurt Season with salt and pepper to taste 5 Heat on 100P HIGH for 3 minutes until hot and slightly thickened spoon onto the drained pasta and ...

Страница 43: ...be 100ml hot water 100ml red wine 20g button mushrooms sliced 1 Mix together the flour salt pepper and herbs and toss the beef and bacon in the seasoned flour until well coated 2 Put the butter in the microwave bowl and melt on 100P HIGH for 30 seconds Stir in the beef bacon carrot and onions 3 Pour in the beef stock and wine add the mushrooms cover loosely and cook for 25 minutes for 0 5kg 35 min...

Страница 44: ...nge tout Cover and cook on 100P HIGH for 4 5 minutes and season to taste BRUSSEL SPROUTS WITH ALMONDS Serves 4 450g 1lb Brussels sprouts peeled 30ml 2tbsp water 50g 2oz almonds flaked 50g 2oz butter salt and pepper to taste 1 Place Brussels sprouts and water in a large bowl Cover and cook on 100P HIGH for 10 minutes stirring halfway through cooking Drain 2 Place almonds and butter in a dish and co...

Страница 45: ...ugar together until light and fluffy Beat in the eggs and fold in the sifted flour alternately with the milk 3 Pour into prepared container Cook on 100P HIGH for 5 minutes until a skewer comes out cleanly 4 Leave the cake to stand for 5 minutes before turning out GOLDEN SYRUP DUMPLINGS Serves 4 syrup 300ml 1 2 pint water 200g 7oz brown sugar 60ml 4tbsp golden syrup 50g 2oz butter grated rind of 1 ...

Страница 46: ...d fold into the cake mixture Add the chocolate drops and milk and mix 4 Spoon the mixture into a greased 20 4cm 8 PYREX dish and cook on 50P MEDIUM for 22 minutes 5 Leave to stand for 5 minutes before serving APPLE WALNUT CAKE Serves 6 8 1000g 200g wholemeal self raising flour 2 5ml 1 2tsp mixed spice 150g 5oz margarine 150g 5oz light brown soft sugar 3 eggs size 3 beaten 250g 9oz cooking apples p...

Страница 47: ...nds 25g 1oz glace cherries 1 Cream the sugar and margarine until light and fluffy 2 Beat in the eggs one at a time 3 Sift the flour and fold into the mixture 4 Dissolve the coffee in the hot water and fold both the coffee and almond essence into the mixture 5 Spoon into a greased and lined 7 PYREX cake dish 6 Cook on 50P MEDIUM for 15 minutes 7 Leave to stand for 5 minutes 8 Mix the icing sugar an...

Страница 48: ...d the golden syrup and sugar mix well 2 Cook on 100P HIGH for 6 7 minutes stirring every minute until thickened This sauce is ideal with vanilla ice cream CHOCOLATE SAUCE Makes 150ml 1 4 pint 50g 2oz plain chocolate 30ml 2tbsp water 90ml 6tbsp evaporated milk 5ml 1tsp cornflour 5ml 1tsp caster sugar 5ml 1tsp vanilla essence 1 Heat chocolate and water on 100P HIGH for 1 minute stir every 30 seconds...

Страница 49: ...g 8oz currants 175g 6oz brown sugar 2 cloves garlic crushed 1 medium onion chopped 10ml 2tsp salt 5ml 1tsp chilli powder 300ml 1 2 pint vinegar 1 Place all ingredients in a large bowl mix well 2 Cook on 70P MEDIUM HIGH for 20 minutes stir every 3 4 minutes 3 Spoon into hot clean jars Cover seal and label FUDGE Makes 675g 11 2lb 100g 4oz milk chocolate broken into pieces 100g 4oz butter melted 450g...

Страница 50: ...protection against exposure to microwave energy The door seal stops microwave leakage during oven operation but does not form an airtight seal It is normal to see drops of water light or feel warm air around the oven door Food with a high moisture content will release steam and cause condensation inside the door which may drip from the oven Repairs Modifications Do not attempt to operate the oven ...

Страница 51: ...ing PROBLEM Digital display does not light up Draught circulates around the door Flashing or arcing from within the cavity when cooking Arcing potatoes Control panel buttons do not operate Oven cooks too slowly Oven makes a noise Condensation forms in the oven and may drip from the door The wires in the mains cable are colour coded as shown opposite As the colours of the cores in the mains lead of...

Страница 52: ...to do this may affect the quality and safety of the product or prejudice your guarantee 5 In the unlikely event of your equipment requiring repair please contact the dealer or supplier from whom it was purchased You will need to provide proof of date of purchase to the repairing company Please keep your invoice or receipt which is supplied at the time of purchase Where it is not possible to contac...

Страница 53: ...cy of continuous improvement we reserve the right to alter design and specification without notice No part of this publication may be reproduced stored in a retrieval system or transmitted in any form electronically mechanically photocopied recorded translated or other means without prior permission from SHARP Electronics U K Ltd The illustrations technical information and data contained in this p...

Страница 54: ...R 383M O M C B 28 04 2000 11 43 Page 52 Downloaded from http www usersmanualguide com ...

Страница 55: ...R 383M O M C B 28 04 2000 11 43 Page 53 Downloaded from http www usersmanualguide com ...

Страница 56: ... LTD Manchester U K 0990 274 277 PRINTED IN THE UK TINS A234URR0 100 of the pulp used in making this paper comes from sustainable forests R 383M O M C B 28 04 2000 11 43 Page 54 Downloaded from http www usersmanualguide com ...

Страница 57: ... tv dvd and othes Manual users user manuals user guide manual owners manual instruction manual manual owner manual owner s manual guide manual operation operating manual user s manual operating instructions manual operators manual operator manual product documentation manual user maintenance brochure user reference pdf manual Downloaded from http www usersmanualguide com ...
Отзывы: