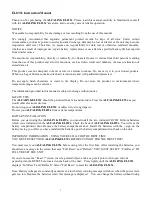

Entering characters using the frameless pad
Example: Enter the word “clump” in an English-Japanese dictionary
1
Before entering the word in an English-Japanese dictionary,
touch
枠数
to switch the pad to the frameless pad. *
* You can only switch to the frameless pad when entering alphabet characters.
2
Use the stylus to write the word “clump” in the handwriting area.
If automatic recognition is set, the character will be
recognized and a candidate character will appear in
the character entry display area 1 to 2 seconds after
the stylus has been removed.
If manual recognition is set, write the fi nal character
and then touch
認識
to let it be recognized. For
longer words, enter up to twelve characters and
touch
採用
to transfer them to the entry area.
3
If the word is correctly recognized, touch
採用
to transfer it
to the entry area.
4
If the word is not correctly recognized, use the following method.
<Switching characters>
If the number of recognized characters is correct and
one of the characters is incorrect, touch the incorrect
character. Candidate characters will be displayed below
the entry area. Touch the correct character to replace the
incorrect character to the correct one.
<Selecting from candidates>
When the number of recognized characters (and/or the
characters themselves) is incorrect, touch
別候補
and
then select a correctly spelled word from the displayed
candidates.
Points on writing handwritten characters
Paying attention to the following points will ensure that handwritten characters are
easily recognized.
• Write each individual stroke clearly. Ensure that characters have the correct
number of strokes.
• Write clearly and do not use short or conventional forms. Avoid writing
sloping characters.
• On the single-frame or dual-frame pad, write lower case characters smaller
to distinguish between identical-looking upper and lower case characters
such as upper case “C” and lower case “c”. Small characters such as the
small “
っ
”should also be written smaller.
• Write English letters in block form and do not attach ornamentation to the
ends of strokes.
• When using frameless entry, write English characters separately, one at
a time. You cannot write in cursive style or return to previously formed
characters to add dots or crosses.
• When using frameless entry, write words on a single line. You cannot write
on two lines.
• When writing letters, do not press hard; always write lightly.
Using the
mark on the screen
Appearance of the
例
,
解説
,
NOTE
,
図
,
表
, or
動画
mark on the details screen indicates more information related to the entry is
available, such as example sentences, explanations, notes, illustrations, diagrams,
tables, and videos.
By pressing
例/解説
in screens where this mark is displayed, the mark will
display inverted.
When there are multiple marks, move to the desired mark by using
,
,
, or
. By pressing
検索/決定
, the contents are displayed.
To exit, press
戻る
twice.
Listen to audio
When the
mark appears, audio of the displayed information can be played
back.
Press
to select the fi rst mark, and the color of the mark is inverted.
Press
,
,
, or
to move the highlight to the desired mark and
press
検索/決定
(or touch the mark) to play back the contents.
Example: Play back the audio using “
英会話とっさのひとこと
辞典
”
.
1
Press
辞書メニュー
, use
to select “
英語系Ⅰ
”, and
then use
to select “
英会
話とっさのひとこと辞典
”.
Press
検索/決定
until the
details screen is displayed.
2
Press
and the mark
becomes inverted (
).
Each time you press
検索/決定
, the audio
plays.
If several
marks appear, press
or
to move the cursor to
the desired mark and press
検索/決定
.
By highlighting an English word and pressing
検索/決定
, you can look
up the word in English-Japanese dictionary and play back the audio.
◆
Press
戻る
to stop the audio during play. Press
戻る
and the color
of
reverts to non-inverted.
◆
Use
音量小
or
音量大
to fi rst set the volume to low, then adjust it
to the desired level.
Selecting functions by touching
You can select various functions by touching the screen with the stylus, (or
highlighting by dragging).
1
Press
英和/和英
.
2
Enter the word (Eg.: “header”) in the “
スペル?
” fi eld, and
press
検索/決定
.
3
Touch the starting point
“
文
” and drag to highlight
the words up to the end
point “
ど
”.
4
Touch the function to execute (Eg.: “
マーカー (マーカーを
引きます)
” (mark user-selected words).
The marker color selection window appears.
5
Select the marker color to use (green, yellow, pink, orange,
purple).
The words are registered in the word dictionary and marked in the selected
color.
• To select a different function such as Audio or S-jump, select the desired
function in Step 4 by touching it.
Entering a text memo
• When using a microSD memory card, insert it before switching to the Text
Memo screen. The unit exits Text Memo mode when a card is inserted or
removed while on the Text Memo screen.
Cards should be inserted or removed when on the Home screen.
Example: Enter “
パラオ(Palau)は、風光明媚な国です。
”
1
Press
Home
and then select “
テキストメモ
” (Text Memo).
2
Touch
カ
on the handwriting pad to select the character
type. Then enter “
パ ラ オ
” and confirm it by pressing
検索/決定
.
•
Kana cannot be entered in a text memo using 50-character kana entry.
3
Press
音量大
once or twice to display the full width symbol
palette, and then select “
(
” to enter it.
4
Touch
_a
on the handwriting pad to switch the character
type. Then press
機能
,
P
,
A
,
L
,
A
, and
U
to enter “Palau”.
5
Repeat step 3 to enter “
)
”.
6
Touch
あ
on the handwriting pad to switch the character
type. Then enter “
は、
” and press
検索/決定
.
“
、
” is entered when
文字大
is pressed.
7
Enter “
ふうこうめいびな
” and then press
.
The entered characters change to “
風 光 姪 雛
” with “
風 光
” in red
characters and “
姪雛
” in blue characters.
Red characters indicate the current conversion target.
8
Since “
風 光
” is correct, press
検索/決定
to move the
conversion target to the next block.
“
姪
” turns red and becomes the conversion target.
9
Select “
明
” using
or
and then press
検索/決定
.
“
姪
” changes to “
明
”, and “
雛
” turns red, indicating that it is now the
conversion target.
10
Since “
雛
” is not a conversion segment delimiter (i.e. a
phrase), it needs to be changed. Press
一括検索
or
to
contract the phrase.
“
雛
” changes to “
美名
”, and “
美
” turns red.
11
Select “
媚
” using
, and then press
検索/決定
. Then
select “
な
” in the same way and press
検索/決定
again.
The entered characters change to “
風光明媚な
”.
12
Enter “
くにです
”, select “
国です
” using
, and then press
検索/決定
.
13
Press
文字小
, enter “
。
”, and then press
検索/決定
.
14
When text entry is fi nished, save the data.
(1) Press
切替
to display the fi le menu, and then select “
名前を付けて
保存
”. The fi le save screen appears.
(2) Touch
本体
or
カード
as necessary, (or press
切替
) and
select memory.
(3) Enter a fi le name in the entry area and press
検索/決定
. The fi le is
saved with the entered name.
15
Press
Home
to exit Text Memo.
Note: Operation may not always proceed as described above due to the learning
function.
For details on using Text Memo, see “
テキストメモ
for Brain
使
用説明
” in the manual.
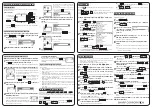
Entering characters using the handwriting pad
Parts and functions
The handwriting pad is set to enter characters when the cursor is in any part of
the character entry area.
[
Single-frame pad]
• Touching the
枠数
button switches the single-frame pad to the dual-frame
pad or frameless pad.
認識
button
枠数
button
自動/手動
button
書き直し
button
拡大
button
手書/50音
button
Backlight button
Handwriting area (frame)
Candidate list display area
スペース
button
Character entry type
indicator
Automatic/manual
recognition indicator
Entering characters using the single-frame pad
Example: Enter a Japanese word “
持つ
” from a Japanese-English dictionary.
1
Press
英和/和英
and then
to move the cursor to the
Japanese entry area.
The handwriting pad is now switched to enter kanji and kana.
2
Use the stylus to write “
持
” in the handwriting area.
3
If the character in the entry area is not the one you desired,
use the stylus to touch and select the desired character in
the list.
The character in the entry area changes.
• If you cannot fi nd the character in the list, touch
書き直し
or press
後退
to erase it and redraw it on the pad.
4
Likewise, enter “
つ
” in the entry area.
5
Press
検索/決定
.
The details screen appears.
The character shown in the candidate list display area
is also placed in the entry area so that the dictionary
search can proceed.
• When the manual recognition is used or when you
want to have the entry recognized soon after you
finished writing, press
認識
.
• When you start drawing, the previous entry is confi rmed
and then erased.
PW-AC900_QUICK REFER_ura_E.indd 2
6/25/2009 10:54:03 AM