background image

58

4

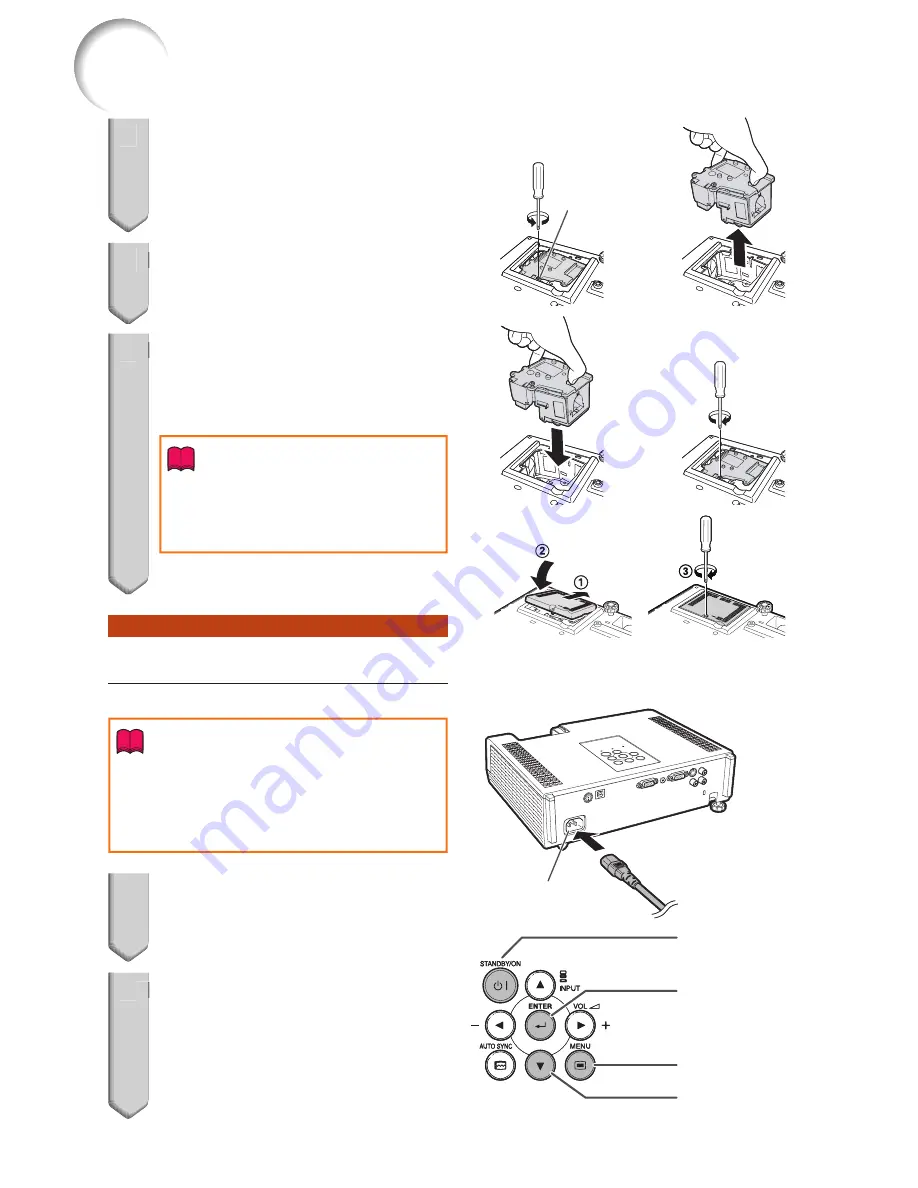
  Remove the lamp unit. 

Loosen the securing screw from the lamp 
unit. Hold the lamp unit and pull it in the 
direction of the arrow. At this time, keep 
the lamp unit horizontal and do not tilt it.

5

  Insert the new lamp unit.

Press the lamp unit fi rmly into the lamp unit 
compartment. Fasten the securing screw.

6

  Replace the lamp unit cover.

Align the tab on the lamp unit cover 
(

1

) and close it (

2

). Then tighten the user 

service screw (

3

) to secure the lamp unit 

cover.

Info

If the lamp unit and lamp unit cover 
are not correctly installed, the power 
will not turn on, even if the power 
cord is connected to the projector.

Resetting the Lamp Timer

Reset the lamp timer after replacing the lamp. 

Info

Make sure to reset the lamp timer only when 
replacing the lamp. If you reset the lamp timer 
and continue to use the same lamp, this may 
cause the lamp to become damaged or 
explode.

1

  Connect the power cord and 

open the lens shutter fully.

Plug the power cord into the AC socket of 
the projector.

2

  Reset the lamp timer.

While simultaneously holding down 

MENU

,

ENTER

 and 

R

 on the projector, 

press 

STANDBY/ON

 on the projector and 

keep all four buttons pressed down until 
the lamp indicator starts blinking green.
“LAMP 0000H” is displayed, indicating 
that the lamp timer is reset.

4

Securing
screw

Securing
screw

5

6

AC socket

AC socket

1

ENTER button

MENU button

R

 button

STANDBY/ON 
button

ENTER button

MENU button

R

 button

STANDBY/ON 
button

2

Regarding the Lamp (Continued)

Содержание PG-D2500X

Страница 1: ...Introduction Easy Start Setup Connections Basic Operation Useful Features Appendix OPERATION MANUAL DATA PROJECTOR MODEL PG D2500X ...

Страница 2: ...lease record the Model and Serial Number located on the bottom of the projector and retain this information Before recycling the packaging please ensure that you have checked the con tents of the carton thoroughly against the list of Supplied accessories on page 11 Model No Serial No ...

Страница 3: ... appropriate plug to the mains lead follow the instructions below WARNING THIS APPARATUS MUST BE EARTHED IMPORTANT The wires in this mains lead are coloured in accordance with the following code Green and yellow Earth Blue Neutral Brown Live As the colours of the wires in the mains lead of this apparatus may not correspond with the coloured markings identifying the terminals in your plug proceed a...

Страница 4: ...s español italiano holandés sueco portugués chino coreano y árabe Lea cuidadosamente las instrucciones de operación antes de utilizar el proyector Il CD ROM in dotazione contiene istruzioni per l uso in inglese tedesco francese spagnolo italiano olandese svedese portoghese cinese coreano e arabo Leggere attentamente le istruzioni per l uso prima di usare il proiettore De meegeleverde CD ROM bevat ...

Страница 5: ...o operate this equipment U S A ONLY WARNING This is a Class A product In a domestic environment this product may cause radio interference in which case the user may be required to take adequate measures The lightning flash with arrowhead sym bol within an equilateral triangle is in tended to alert the user to the presence of uninsulated dangerous voltage within the product s enclosure that may be o...

Страница 6: ... the bulb cracking When the lamp replacement indicator and on screen display icon are illuminated it is recommended that the lamp be replaced with a new one immediately even if the lamp appears to be operating normally Should the lamp break there is also a possibility that glass particles may spread inside of the projector In such a case it is recommended you contact your nearest Sharp Authorized ...

Страница 7: ... ENTER 3 Press P R O Q to adjust the item selected then press ENTER Info To display the advanced settings and adjustments select Go To Complete Menu Press ENTER to display the Complete Menu screen If you do not want to display the Quick Start Menu set Go To Complete Menu PRJ ADJ2 Quick Start Menu to Off See page 51 1 2 3 Example SEL ADJ ENTER END Input Search Start Resolution Resize 0 Eco Quiet La...

Страница 8: ...rol as the Wireless Computer Mouse 34 Menu Items 35 Using the Menu Screen 38 Menu Selections Quick Start Menu 38 Quick Start Menu 39 Menu Selections Complete Menu 39 Picture Adjustment Picture Menu 41 Selecting the Picture Mode 41 Adjusting the Image 42 Adjusting the Color Temperature 42 Adjusting the Colors 42 Selecting the Film Mode 43 Reducing Image Noise DNR 43 Eco Quiet 43 Signal Adjustment S...

Страница 9: ... Button Operation 51 STANDBY Mode 52 DLP LinkTM 52 DLP LinkTM Invert 52 Returning to the Default Settings 52 Checking the Lamp Life Status 52 Appendix Maintenance 53 Maintenance Indicators 54 Regarding the Lamp 56 Lamp 56 Caution Concerning the Lamp 56 Replacing the Lamp 56 Removing and Installing the Lamp Unit 57 Resetting the Lamp Timer 58 Connecting Pin Assignments 59 RS 232C Specifications and ...

Страница 10: ...cturer 9 Transportation A product and cart combination should be moved with care Quick stops excessive force and uneven surfaces may cause the product and cart combination to overturn 10 Ventilation Slots and openings in the cabinet are provided for ventilation to ensure reliable operation of the product and to protect it from overheating and these openings must not be blocked or covered The openi...

Страница 11: ...19 Replacement Parts When replacement parts are required be sure the service technician has used replacement parts specified by the manufacturer or have the same characteristics as the original part Unauthorized substitutions may result in fire electric shock or other hazards 20 Safety Check Upon completion of any service or repairs to this product ask the service technician to perform safety checks...

Страница 12: ...t may appear when the power is first turned on This is normal and is not a malfunction It will disappear after the projector is used for a while When using the projector in high altitude areas such as mountains at altitudes of approximately 1 500 meters 4 900 feet or more When you use the projector in high altitude areas with thin air set Fan Mode to High Neglecting this can affect the longevity of...

Страница 13: ...s Reserved Bitstream Vera is a trademark of Bitstream Inc Permission is hereby granted free of charge to any person obtaining a copy of the fonts accompanying this license Fonts and associated documentation files the Font Software to reproduce and distribute the Font Software including without limitation the rights to use copy merge publish distribute and or sell copies of the Font Software and to ...

Страница 14: ... Windows For Macintosh skip step Insert the CD ROM in the CD ROM drive Double click the My Computer icon Double click the CD ROM drive Double click the MANUALS folder Double click the model name of the folder that you want to view Double click the language name of the folder that you want to view Double click the pdf file to access the projector manuals If the desired pdf file cannot be opened by do...

Страница 15: ... and CD ROM UDSKAA121WJZZ Remote control RRMCGA837WJSA Two R 6 batteries AA size UM SUM 3 HP 7 or similar RGB cable 10 3 0 m QCNWGA086WJPZ Codes in are Replacement parts codes Note Optional accessories Lamp unit Ceiling mount adaptor Ceiling mount bracket Ceiling mount unit Ceiling mount extension tube Remote receiver 3 RCA to mini D sub 15 pin cable 10n 3 0 m DIN D sub RS 232C adaptor 5 57 64o 15...

Страница 16: ...l sensor 15 8 Speaker 49 9 Intake vent 53 Top View 10 Temperature warning indicator 54 11 Lamp indicator 54 12 Power indicator 54 13 STANDBY ON button 25 For turning the power on and putting the projector into Standby mode 14 INPUT buttons P R 29 For switching Input mode 15 AUTO SYNC button 33 For automatically adjusting images when connected to a computer 16 Adjustment buttons P R O Q 38 For sele...

Страница 17: ...MPUTER COMPONENT input terminal 21 22 Terminal for computer RGB and component signals 6 S VIDEO input terminal 22 Terminal for connecting video equipment with an S video terminal 7 VIDEO input terminal 22 Terminal for connecting video equipment 8 AUDIO 2 input terminal 23 9 AC socket 24 Connect the supplied power cord 10 Kensington Security Standard connector 11 Rear adjustment foot 27 12 Security...

Страница 18: ...emote receiver For changing the pointer or spot area 10 KEYSTONE button 28 For entering the Keystone Correction mode 11 AUTO SYNC button 33 49 For automatically adjusting images when connected to a computer 12 FUNCTION button 51 For operating and executing a function assigned to FUNCTION Button 13 ECO QUIET button 32 For lowering the noise of the cooling fan and extending the lamp life 14 FREEZE b...

Страница 19: ...e them to leak Battery fluid from leaked batteries is harmful to skin therefore ensure you wipe them first and then remove them using a cloth The batteries included with this projector may run down in a short period depending on how they are kept Be sure to replace them as soon as possible with new batteries Remove the batteries from the remote control if you will not be using the remote control for...

Страница 20: ... 3 ON button 6 INPUT buttons 5 Adjustment buttons P R O Q 6 INPUT buttons 6 STANDBY ON button 3 8 Focus ring 4 HEIGHT ADJUST lever 4 Zoom ring 4 6 O Q buttons 1 Place the projector facing a wall or a screen BP 18 When connecting equipment other than a computer see pages 22 and 23 2 Connect the projector to the computer and plug the power cord into the AC socket of the projector BPP 21 24 On the pr...

Страница 21: ...upper side Shrinks lower side 5 Correct trapezoidal distortion BP 28 Press INPUT P R to display the INPUT list Use INPUT P R to select the Input mode and use O Q to select the audio input terminal On the projector On the remote control INPUT list COMPUTER INPUT Audio S VIDEO S VIDEO V On the projector On the remote control 6 Select the Input mode BP 29 7 Turn the computer on BP 25 8 Turn the power...

Страница 22: ...tup Front Projection Place the projector at the required distance from the screen according to the desired picture size See page 19 300 762 cm 200 508 cm 100 254 cm 40 102 cm 3 4 0 4 1 3 1 0 4 m 1 2 6 m 2 2 8 2 7 6 6 9 m 8 4 m 1 1 4 1 3 9 3 5 m 4 2 m 4 6 5 6 1 4 m 1 7 m 240 180 610 cm 457 cm 160 120 406 cm 305 cm 80 60 203 cm 152 cm 32 24 81 cm 61 cm Picture Size Projection Distance Indication of ...

Страница 23: ...11 3 m 37 1 13 7 m 44 11 82 cm 32 13 32 62 cm 24 33 64 250 635 cm 553 cm 218 311 cm 123 9 4 m 30 11 11 4 m 37 5 69 cm 27 52 cm 20 27 64 200 508 cm 443 cm 174 249 cm 98 7 5 m 24 9 9 1 m 29 11 55 cm 21 39 64 42 cm 16 11 32 150 381 cm 332 cm 131 187 cm 74 5 6 m 18 6 6 8 m 22 5 41 cm 16 13 64 31 cm 12 1 4 120 305 cm 266 cm 105 149 cm 59 4 5 m 14 10 5 5 m 18 0 33 cm 12 31 32 25 cm 9 13 16 100 254 cm 22...

Страница 24: ...ble mounted rear projection with a translucent screen Menu item Rear Ceiling mounted front projection Menu item Ceiling Front Ceiling mounted rear projection with a translucent screen Menu item Ceiling Rear a Ceiling Mount Setup It is recommended that you use the optional Sharp ceiling mount adaptor and unit for this installation Before mounting the projector contact your nearest Sharp Authorized ...

Страница 25: ...ector Equipment Terminal on connected equipment Cable Terminal on the projector Computer RGB output terminal RGB cable supplied COMPUTER COMPONENT See page 66 Computer Compatibility Chart for a list of computer signals compatible with the projector Use with computer signals other than those listed may cause some of the functions to not work A Macintosh adaptor may be required for use with some Mac...

Страница 26: ...VIDEO Camera Video game Component video output terminal Cables for a camera or a video game 3 RCA to mini D sub 15 pin cable optional AN C3CP2 RCA adaptor plug commercially available COMPUTER COMPONENT S video output terminal Cables for a camera or a video game S VIDEO Video output terminal Cables for a camera or a video game VIDEO When you connect video equipment with a 21 pin RGB output Euro sca...

Страница 27: ...udio output terminal RCA audio cable commercially available AUDIO 2 Audio output terminal Cables for a camera or a video game Monitor RGB input terminal RGB cable supplied or commercially available MONITOR OUT When using the ø3 5 mm mono audio cable the volume level will be half of when using the ø3 5 mm stereo audio cable You can select AUDIO 1 or AUDIO 2 in the INPUT list See page 29 RGB signals...

Страница 28: ... optional AN A1RS To RS 232C terminal To RS 232C terminal The RS 232C function may not operate if your computer terminal is not correctly set up Refer to the operation manual of the computer for details See pages 59 and 60 for connection of an RS 232C serial control cable Note Info Do not connect the RS 232C cable to a port other than the RS 232C terminal on the computer This may damage your compu...

Страница 29: ...e power indicator illuminates green After the lamp indicator illuminates the projector is ready to start operation About the Lamp Indicator The lamp indicator illuminates to indicate the status of the lamp Green The lamp is on Blinking in green The lamp is warming up Red The lamp is shut down abnormally or the lamp should be replaced When switching on the projector a slight flickering of the image ...

Страница 30: ... 4 ENTER 2 HEIGHT ADJUST However you can adjust the focus or height angle regardless of the highlighted item If you do not want to display the Setup Guide for the next time set Menu SCR ADJ Setup Guide to Off See page 48 Note Adjusting the Projected Image 1 Adjusting the Focus You can adjust the focus with the focus ring on the projector Rotate the focus ring to adjust the focus while watching the...

Страница 31: ... degrees from the standard position When adjusting the height of the projector trapezoidal distortion occurs Follow the procedures in Keystone Correction to correct the distortion See pages 28 and 46 Note 3 Adjusting the Picture Size You can adjust the picture size using the zoom ring on the projector Rotate the zoom ring to enlarge or shrink the picture size Using the knob on the zoom ring will m...

Страница 32: ...rrection mode 2 Press P Q or O R to adjust the Keystone Correction To return to the default setting press RETURN while the on screen display of the Keystone Correction mode is on the screen Note 3 Press KEYSTONE The on screen display of the Keystone Correction mode will disappear 1 2 3 KEYSTONE button Adjustment buttons P R O Q RETURN button On screen display Keystone Correction mode 0 KEYSTONE AD...

Страница 33: ...ctor on off or when changing the input signal When you do not want to output the sound from the projector s speaker while the projector is connected to external equipment set Speaker in the PRJ ADJ1 menu to Off See page 49 Note Displaying the Black Screen and Turning Off the Sound Temporarily Press AV MUTE on the remote control or close the lens shutter to temporarily display a black screen and tu...

Страница 34: ...720 1024 576 1280 720 1360 768 1024 578 1360 768 1366 768 1024 576 1366 768 1280 768 1024 614 1280 768 960 576 1024 576 1280 800 1024 640 1280 800 922 576 Input signal For 4 3 screen For 16 9 screen Computer Image type NORMAL FULL NATIVE BORDER 16 9 Resolution lower than XGA 4 3 aspect ratio 2 1 1 XGA 2 Resolution higher than XGA SXGA 1280 1024 5 4 aspect ratio 1280 720 16 9 aspect ratio 1 2 2 136...

Страница 35: ...t included in the original signals 1 The Image Shift function can be used for these images 2 Same as NORMAL mode About Copyrights When using the Resize function to select an image size with a different aspect ratio to a TV program or video image the image will look different from its original appearance Keep this in mind while choosing an image size The use of the Resize or Keystone Correction fun...

Страница 36: ...able while the projector is operating the following functions Auto Sync Freeze AV Mute Input Search Note 1 2 Displaying the Pointer 1 Press POINTER and press P R O Q on the remote control to move the pointer Press EFFECT to change the pointer icon 5 types Star Finger1 Finger2 Heart Underline 2 Press POINTER again The pointer will disappear Using the Spot Function 1 Press SPOT and press P R O Q on ...

Страница 37: ...page 41 for details on the Picture mode Note sRGB is displayed only when RGB signal is input 1 2 Displaying an Enlarged Portion of an Image Graphs tables and other portions of projected images can be enlarged This is helpful when providing more detailed explanations 1 Press MAGNIFY on the remote control Enlarges the image Pressing or MAGNIFY enlarges or reduces the projected image 1 2 3 4 Press Pr...

Страница 38: ...d in the following way after it is connected When moving the cursor Press MOUSE Adjustment buttons P R O Q When left clicking Press L CLICK When right clicking Press R CLICK When your computer supports only a one click mouse such as Macintosh Press L CLICK or R CLICK L CLICK and R CLICK have common function When using Page Up or Page Down MOUSE Adjustment buttons _ R CLICK button L CLICK button PA...

Страница 39: ...Level 1 Level 2 Level 3 C M S Hue C M S Saturation C M S Value Page 42 Page 42 Page 42 Reset Return 30 30 R 30 30 30 30 30 30 30 30 30 30 C G B Y M Reset 1 Item when inputting RGB signal through COMPUTER 2 Items when inputting component signal through COMPUTER or when selecting S VIDEO or VIDEO Quick Start Menu Main menu Normal Full Native Area Zoom V Stretch Border 16 9 Quick Start Menu Input Sea...

Страница 40: ...h Border 16 9 English Deutsch Español Nederlands Français Italiano Svenska Português polski Magyar Türkçe Signal adjustment SIG ADJ menu Main menu Sub menu SIG ADJ Page 44 Page 44 Page 44 Page 44 Page 45 Signal Type Video Setup Signal Info Auto RGB YPbPr Resolution 0 IRE 7 5 IRE Page 45 Page 45 Video System Auto PAL SECAM NTSC4 43 NTSC3 58 PAL M PAL N PAL 60 30 30 60 60 150 150 150 150 Clock Phase...

Страница 41: ... Page 49 Page 49 Page 50 Page 51 Fan Mode Page 50 Normal High RS 232C Page 49 9600bps 38400bps 115200bps Auto Sync On Off Page 49 Main menu Sub menu Page 51 Page 52 Page 52 Page 52 Page 52 Page 51 PRJ ADJ2 FUNCTION Button Input Search Audio Mute Image Shift Signal Info STANDBY Mode Quick Start Eco All Reset Lamp Timer Life Page 52 DLP LinkTM On Off DLP LinkTM Invert Quick Start Menu On Off Page 49...

Страница 42: ...O Q to adjust the item selected then press ENTER Info To display the advanced settings and adjustments select Go To Complete Menu Press ENTER to display the Complete Menu screen If you do not want to display the Quick Start Menu set Go To Complete Menu PRJ ADJ2 Quick Start Menu to Off See page 51 1 2 3 Example SEL ADJ ENTER END Input Search Start Resolution Resize 0 Eco Quiet Language Keystone Inf...

Страница 43: ...d on the screen See page 48 Information Displays the input signal lamp use time remaining lamp life etc Go To Complete Menu Displays the Complete Menu for advanced settings and adjustments The setting of Resize mode will be made independently for each Input mode The setting of Eco Quiet mode will be made independently for each Input mode and each Picture mode Note Menu Selections Complete Menu Exa...

Страница 44: ...Items to be adjusted The item displayed by itself Press ENTER 0 Bright Picture SEL ADJ Rtn Menu END Picture Mode Standard SEL ADJ Single ADJ END Resize Image Shift 0 0 Keystone Normal Picture Mode Contrast 0 0 Standard SEL ADJ END 0 0 Red Blue CLR Temp BrilliantColorTM C M S Setting C M S Eco Quiet 0 1 On Off Reset Bright 0 DNR Level 2 Picture Pict SCR ADJ SIG PRJ1 PRJ2 SIG SCR PRJ1 PRJ2 Picture I...

Страница 45: ... Gives natural tint to the projected image 1 0 On Game Gives sharpness to the projected image 0 1 Off sRGB For high fidelity reproduction of images from a computer Off sRGB is displayed only when RGB signal is input You can set or adjust each item in the Picture menu to your preference Any changes you make are retained in memory You can also press PICTURE MODE on the remote control to select the Pi...

Страница 46: ... Values on CLR Temp are only for general standard purposes Note 4 Adjusting the Colors This function adjusts each of the six main colors that comprise the color wheel altering their Hue Saturation or Value Selectable items Description C M S Hue Sets the hue of the main colors C M S Saturation Sets the saturation of the main colors C M S Value Sets the brightness of the main colors Reset The adjust...

Страница 47: ...All signals Note 6 Reducing Image Noise DNR Video digital noise reduction DNR provides high quality images with minimal dot crawl and cross color noise Selectable items Description Level 1 Sets the DNR level for viewing a clearer picture Level 2 Level 3 This function is not available for some signals Note Menu operation n Page 39 7 Eco Quiet Selectable items Brightness and Power consumption On App...

Страница 48: ...n To reset all adjustment items select Reset and press ENTER The adjustable range of H Pos H Position and V Pos V Position may vary depending on the screen resolution of the computer Note 2 Resolution Setting Ordinarily the type of input signal is detected and the correct Resolution mode is automatically selected However for some signals the optimal Resolution mode in Resolution may need to be sel...

Страница 49: ...signal can only be set in S VIDEO or VIDEO mode When Video System is set to Auto you may not receive a clear picture due to signal differences Should this occur switch to the video system of the source signal Note 5 Setting the Video Setup Selectable items Description 0 IRE Sets the black level to 0 IRE 7 5 IRE Sets the black level to 7 5 IRE This function is available for the following signals Wi...

Страница 50: ...et the Resize mode See page 30 Note 2 Adjusting the Image Position You can move the projected image vertically Q button O button This function only works in some Resize modes See pages 30 and 31 Note 3 Keystone Correction When the image is projected either from the top or from the bottom towards the screen at an angle the image becomes distorted trapezoidally The function for correcting trapezoida...

Страница 51: ...al This function does not work when the Resize mode is set to Border This function is available in the following cases only Resize mode Keystone Correction Normal Area Zoom V Stretch 40 40 16 9 12 12 Closed Caption is a system which allows conversations narration and sound effects in TV programs Limited regions and home videos to be viewed as captions on the screen Not all programs and videos will...

Страница 52: ...een or with a mirror Ceiling Rear Reversed and inverted image Projected with a mirror See page 20 for details of Projection PRJ Mode Adjusting the Projected Image SCR ADJ Menu Continued Menu operation n Page 39 0 Selecting the Wall Color This function allows you to project the image to a colored white or dark green surface or wall without using a screen Selectable items Description Off The Wall Co...

Страница 53: ...disabled When the Auto Power Off function is set to On 5 minutes before the projector enters Standby mode the message Enter STANDBY mode in X min will appear on the screen to indicate the remaining minutes Note Q PRJ ADJ2 Pict SCR PRJ ADJ2 SIG SEL ADJ ENTER END DLP Link TM h Off FUNCTION Button Input Search STANDBY Mode Quick Start 0 min 0 Lamp Timer Life 100 DLP Link TM Invert Quick Start Menu On...

Страница 54: ... the first time press R on the projector for four times Setting the System Lock PRJ ADJ1 Old Code New Code Reconfirm 1 2 3 Adjusting the Projector Function PRJ ADJ1 2 Menu Continued If you input a wrong keycode the cursor returns to the first point of the Old Code The preset keycode is 4 R buttons on the projector When you press the R button four times the keycord input screen disappears Note 4 Press...

Страница 55: ...king the Keylock Off Hold down ENTER on the projector for about 5 seconds On screen display Info Even when Keylock function is set to On STANDBY ON on the projector can be used to turn on and off the power Keylock cannot be set while the projector is displaying the Setup Guide or Menu screens in Standby mode warming up changing input signals operating the Auto Sync or Input Search function in Free...

Страница 56: ...initialize the settings you have made in the projector The following items or menu cannot be initialized Resolution Language Lamp Timer Life System Lock Note Menu operation n Page 39 Checking the Lamp Life Status You can confirm the cumulative lamp usage time and the remaining lamp life percentage Lamp usage condition Remaining lamp life Life 100 5 Operated exclusively with Eco Quiet set to On Appr...

Страница 57: ... mild detergent diluted with water wring the cloth well and then wipe the projector Strong cleaning detergents may discolor warp or damage the coating on the projector Make sure to test on a small inconspicuous area on the projector before use M i l d d e t e r g e n t Mild detergent diluted with water Thinner Wax Cleaning the lens Use a commercially available blower or lens cleaning paper for gla...

Страница 58: ... the projector will enter Standby mode When you find the temperature warning indicator blinking be sure to perform the measures described on page 55 About the lamp indicator When the remaining lamp life becomes 5 or less yellow and Change The Lamp will be displayed on the screen When the percentage becomes 0 it will change to red the lamp will automatically turn off and then the projector will auto...

Страница 59: ...he lamp does not illuminate Burnt out lamp Lamp circuit failure Power indicator Green on Red on Green blinks Cooling Red blinks The power indicator blinks in red when the projector is on The lamp unit cover is open If the power indicator blinks in red even when the lamp unit cover are securely installed contact your nearest Sharp Authorized Projector Dealer or Service Center see page 69 for advice...

Страница 60: ...ition and the frequency of use It is important to note that failure can often result in the bulb cracking When the lamp replacement indicator and on screen display icon are illuminated it is recommended that the lamp be replaced with a new one immediately even if the lamp appears to be operating normally Should the lamp break there is also a possibility that glass particles may spread inside of th...

Страница 61: ...r and lamp unit 1 Press STANDBY ON on the projector or STANDBY on the remote control to put the projector into Standby mode 2 Disconnect the power cord Unplug the power cord from the AC socket Leave the lamp until it has fully cooled down about 1 hour 3 Remove the lamp unit cover Close the lens shutter and turn the projector over Loosen the user service screw 1 that secures the lamp unit cover Rem...

Страница 62: ... Lamp Timer Reset the lamp timer after replacing the lamp Info Make sure to reset the lamp timer only when replacing the lamp If you reset the lamp timer and continue to use the same lamp this may cause the lamp to become damaged or explode 1 Connect the power cord and open the lens shutter fully Plug the power cord into the AC socket of the projector 2 Reset the lamp timer While simultaneously ho...

Страница 63: ...mini DIN 9 pin female connector Pin No Signal Name I O Reference 1 2 3 4 5 6 7 8 9 RD SD SG RS CS Receive Data Send Data Signal Ground Request to Send Clear to Send Input Output Not connected Connected to internal circuit Connected to internal circuit Not connected Connected to internal circuit Not connected Connected to CS in internal circuit Connected to RS in internal circuit Not connected RS 2...

Страница 64: ... Computer Pin No 4 5 6 4 5 6 USB Terminal Type B USB connector Pin No Signal Name 1 2 3 4 VCC USB USB SG USB power USB data USB data Signal Ground 5 1 9 6 5 1 9 6 Depending on the controlling device used it may be necessary to connect Pin 4 and Pin 6 on the controlling device e g computer Note Depending on the controlling device used it may be necessary to connect Pin 4 and Pin 6 on the controllin...

Страница 65: ...hen controlling the projector using RS 232C commands from a computer wait for at least 30 seconds after the power has been turned on and then transmit the commands After sending an input selection or picture adjustment command and then receiving an OK response code the projector may take some time to process the command If a second command is sent while the projector is still processing the first c...

Страница 66: ...or Name Check P J N 0 _ _ _ 1 Projector Name Input Change COMPUTER I R G B _ _ _ 1 OK or ERR ERR S VIDEO I V E D _ _ _ 1 OK or ERR ERR VIDEO I V E D _ _ _ 2 OK or ERR ERR Input RGB Check I R G B 1 COMPUTER or ERR ERR Input Video Check I V E D 1 S VIDEO 2 VIDEO or ERR ERR Input Mode Check I M O D 1 RGB 2 VIDEO ERR Input Check I C H K 1 COMPUTER 2 S VIDEO 3 VIDEO ERR Volume Volume 0 60 V O L A _ _ O...

Страница 67: ... V A P I _ OK or ERR ERR Bright 30 30 V A B R _ OK or ERR ERR Red 30 30 V A R D _ OK or ERR ERR Blue 30 30 V A B E _ OK or ERR ERR Color 30 30 V A C O _ OK or ERR ERR Tint 30 30 V A T I _ OK or ERR ERR Sharp 30 30 V A S H _ OK or ERR ERR CLR Temp 1 1 V A C T _ _ OK or ERR ERR BrilliantColor 0 2 V A W E _ _ _ OK or ERR ERR Film Mode Auto V A F M _ _ _ 0 OK or ERR ERR Off V A F M _ _ _ 1 OK or ERR E...

Страница 68: ...ent Reset I A R E _ _ _ 1 OK or ERR ERR Image Shift 96 96 L N D S _ OK or ERR ERR Overscan On O V S N _ _ _ 1 OK or ERR ERR Off O V S N _ _ _ 0 OK or ERR ERR OSD Display On I M D I _ _ _ 1 OK or ERR ERR Off I M D I _ _ _ 0 OK or ERR ERR Video System Auto M E S Y _ _ _ 1 OK or ERR ERR PAL M E S Y _ _ _ 2 OK or ERR ERR SECAM M E S Y _ _ _ 3 OK or ERR ERR NTSC4 43 M E S Y _ _ _ 4 OK or ERR ERR NTSC3 ...

Страница 69: ...ck Horizontal T F R Q _ _ _ 1 kHz or ERR ERR Vertical T F R Q _ _ _ 2 Hz or ERR ERR Fan Mode Normal H L M D _ _ _ 0 OK or ERR ERR High H L M D _ _ _ 1 OK or ERR ERR Input Search 2 Start I S E S _ _ _ 1 OK or ERR ERR Video Setup 0 IRE V I S U _ _ _ 0 OK or ERR ERR 7 5 IRE V I S U _ _ _ 1 OK or ERR ERR Wall Color Off W L C O _ _ _ 0 OK or ERR ERR Blackboard W L C O _ _ _ 1 OK or ERR ERR Whiteboard W...

Страница 70: ...6 SVGA 832 624 49 7 75 MAC 19 XGA 1024 768 60 2 75 TRUE MAC 21 SXGA 1152 870 68 7 75 Intelligent Compression Optimum image quality will be achieved by matching your computer s output resolution to the resolution that corresponds to TRUE in the Display column shown above When Screen resolution of the computer is different from the resolution displayed on the projected image follow the procedures sh...

Страница 71: ...t only Input signal type RGB Component is incorrectly set 45 44 Picture is blurred noise appears Adjust the focus 26 The projection distance exceeds the focus range 19 There is fog on the lens If the projector is carried from a cold room into a warm room or if it is suddenly heated condensation may form on the surface of the lens and the image will become blurred Set up the projector at least one ...

Страница 72: ...ment works improperly If this happens frequently replace the lamp 21 24 57 The lamp needs much time to turn on The lamp will eventually need to be changed While the remaining lamp life draws to a close replace the lamp 57 Picture is dark The remote control cannot be used Operate the remote control while pointing it at the projector s remote control sensor The remote control may be too far away fro...

Страница 73: ...rp eu com http www sharp at Benelux SHARP Electronics Benelux BV 0900 SHARPCE 0900 7427723 Nederland 9900 0159 Belgium http www sharp nl http www sharp be http www sharp lu Australia Sharp Corporation of Australia Pty Ltd 1300 135 022 http www sharp net au New Zealand Sharp Corporation of New Zealand Phone 09 573 0111 Fax 09 573 0112 http www sharp net nz Singapore Sharp Roxy Sales S Pte Ltd 65 22...

Страница 74: ...W Operation temperature 41ºF to 95ºF 5ºC to 35ºC Cabinet Plastic Dimensions main body only W H D 11 52 64 3 1 8 9 19 64 300 79 236 mm Weight approx 6 2 lbs 2 8 kg As a part of policy of continuous improvement SHARP reserves the right to make design and specification changes for product improvement without prior notice The performance specification figures indicated are nominal values of production un...

Страница 75: ...hes mm 9 19 64 236 13 32 10 13 32 10 3 1 8 79 11 52 64 300 2 61 64 75 1 21 32 41 7 2 5 16 58 5 1 15 32 37 3 1 1 2 38 1 31 32 50 1 9 32 32 5 M4 4 7 64 104 8 19 32 218 1 15 16 49 21 32 16 5 2 61 64 75 4 21 32 118 5 27 64 137 5 M4 M4 M4 ...

Страница 76: ...8 Keystone Correction 28 46 Lamp 56 Lamp indicator 54 Lamp Timer Life 52 Lamp unit 57 Language on screen display language 48 L CLICK EFFECT button 32 34 Lens shutter 25 29 MAGNIFY buttons 33 MENU button 38 MONITOR OUT terminal 23 MOUSE Adjustment buttons 34 38 NATIVE 30 NORMAL 30 31 ON button 25 Optional accessories 11 OSD Display 47 Overscan 47 PAGE DOWN button 34 PAGE UP button 34 PDF 10 Phase 4...

Страница 77: ......

Отзывы: