Operation
27
ON/OFF
POWER
LAMP
TEMP.
KEYSTONE
INPUT
BACK
ENTER
MENU
AUTO SYNC
2
,
3
,
4
2
,
3
1
,
5
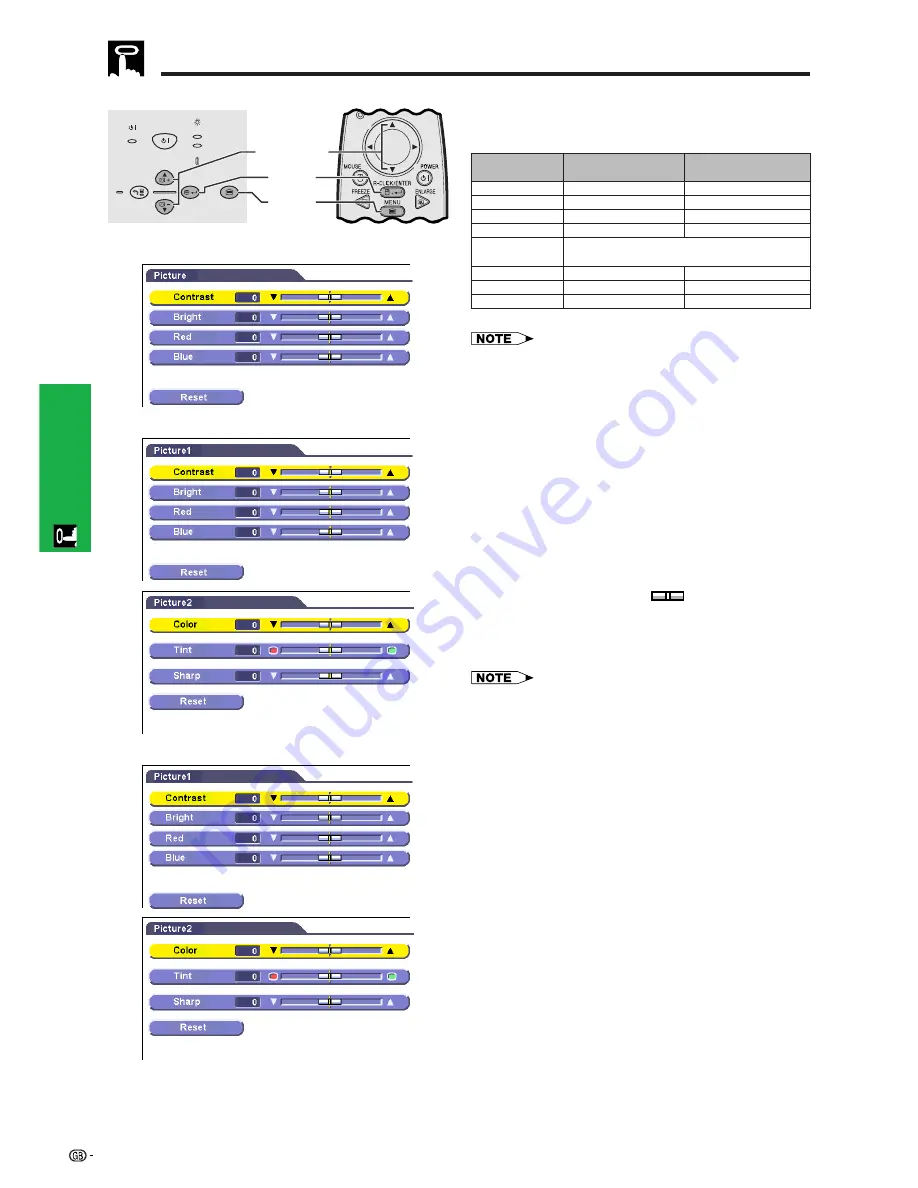
Picture Adjustments
You can adjust the projector’s picture to your prefer-
ences with the following picture settings.
Projector
Remote control
(GUI) On-screen Display
INPUT 1 (RGB) mode
INPUT 1 (COMPONENT) mode
INPUT 2 (S-VIDEO) or INPUT 3 (VIDEO) mode
All image adjustment items are returned to the factory preset
settings.
Description of Adjustment Items
For less contrast
For less brightness
For weaker red
For weaker blue
For less colour intensity
Skin tones become purplish
For less sharpness
Selected item
For more contrast
For more brightness
For stronger red
For stronger blue
For more colour intensity
Skin tones become greenish
For more sharpness
ƒ
button
∂
button
Contrast
Bright
Red
Blue
Reset
Color
Tint
Sharp
• “Color”, “Tint” and “Sharp” do not appear in the INPUT 1
(RGB) mode.
• “Tint” does not appear when receiving “PAL”, “SECAM”,
“PAL M”, “PAL N” or “PAL (60 Hz)” in the INPUT 2 (S-VIDEO)
or INPUT 3 (VIDEO) mode.
1
Press
MENU
.
2
Press
∂
/
ƒ
to select “Picture” in INPUT 1 (RGB)
mode, or to select “Picture1” or “Picture2” in
INPUT 1 (COMPONENT), INPUT 2 (S-VIDEO) or
INPUT 3 (VIDEO) mode, and then press
ENTER
.
3
Press
∂
/
ƒ
to select a specific adjustment item,
and then press
ENTER
.
4
Press
∂
/
ƒ
to move the
mark of the selected
adjustment item to the desired setting.
5
To exit from the GUI, press
MENU
.
• To reset all adjustment items, select “Reset”, and then press
ENTER
.
• The adjustments can be stored separately in the INPUT 1,
INPUT 2 and INPUT 3 modes.
Содержание Notevision PG-C20XA
Страница 11: ...Setup Connections 10 Setup Connections ...
Страница 53: ...SHARP CORPORATION ...


