Sharp MX-7081 Скачать руководство пользователя страница 26

26

BEFORE USING THE MACHINE

Large capacity trays (MX-LCX3 N)
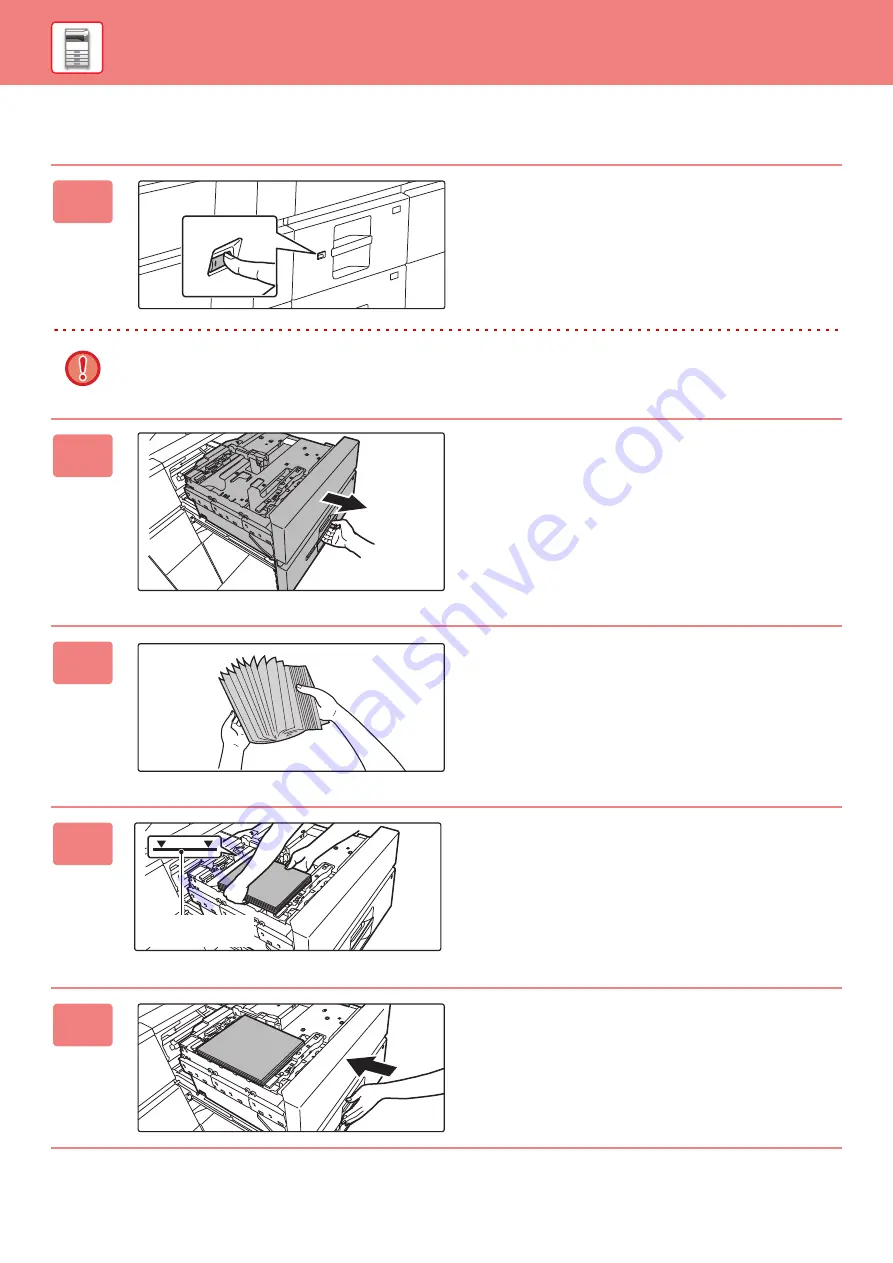
1

Press the operation button.

The operation button blinks, and the tray paper table goes 
down to the paper loading position. Wait until the operation 
button light goes off.

Do not pull out the tray until the light goes off. If you pull out the tray forcibly while the button lights up or blinks, a 
machine failure may be resulted.

2

Pull out the paper tray.

Gently pull the tray out until it stops.

3

Fan the paper.

Fan the paper well before loading it. If the paper is not 
fanned, multiple sheets may feed at once and cause a 
misfeed.

4

Load the paper.

Load the paper with the print side facing down. The stack 
must not be higher than the indicator line (maximum of 2500 
sheets).

5

Gently push the paper tray into the 
machine.

Push the tray firmly all the way into the machine slowly. The 
paper table goes up after the tray is pushed in.
 The operation button blinks while the paper table goes up. 
The button lights up when the paper table has gone up.

Indicator line

Содержание MX-7081

Страница 1: ...nction FACSIMILE Using the fax function SCANNER Using the scan function DOCUMENT FILING Storing jobs as files on the local drive SYSTEM SETTINGS Configuring settings to make the machine easier to use MANUAL FINISHING Using the manual finishing function DIGITAL FULL COLOR MULTIFUNCTIONAL SYSTEM DIGITAL FULL COLOR MULTIFUNCTIONAL SYSTEM DIGITAL FULL COLOR MULTIFUNCTIONAL SYSTEM MX 7081 MX 8081 Quick...

Страница 2: ...ls in PDF format This guide appears when you tap the icon on the machine s touch panel The guide explains the basic procedures for operating the machine In addition the manuals can be printed page 3 To print a manual see HOW TO PRINT A MANUAL page 4 User s Manual Detailed explanations of the functions that can be used on the machine are provided in the User s Manual The User s Manual can be downlo...

Страница 3: ...int Release Guide This guide explains how to use the print release function When you have multiple MFPs that support the print release function on the same network you can access and print the data that is saved on a MFP from any other MFPs This manual is intended to help you get started using the basic and convenient functions of the machine This manual provides answers to frequently asked questi...

Страница 4: ...ap the Start key to start printing When a language is selected other than a language that is displayed by step 2 of DOWNLOADING THE OPERATION GUIDE page 6 in the display languages on the touch panel and Operation Guide is tapped English may appear To change the language displayed on the touch panel refer to the User s Manual Toner Quantity M C Bk Y Operation Guide Enlarge Display Mode Settings Tot...

Страница 5: ...OS Chrome Windows Latest version or immediately previous major release The Web page will appear The machine settings may require that user authentication is performed in order to open the Web page Please ask the administrator of the machine for the password that is required for user authentication Print Release Easy Scan Easy Fax Easy Copy Toner Quantity M C Bk Y Operation Guide Enlarge Display Mo...

Страница 6: ... toner even while printing is in progress Always open the toner cover to replace toner Do not open the bottom cover by mistake This will cause printing to stop and may result in a misfeed 1 Click Operation Manual Download in the menu of the Web page 2 Select the desired language Only the displayed languages are supported 3 Select the manual you want to download and click the Download button 1 Engl...

Страница 7: ... ORIGINALS 16 ADJUSTING THE VOLUME 17 LOADING PAPER 18 SAVING CONTACTS IN THE ADDRESS BOOK 28 USER AUTHENTICATION 29 FUNCTIONS THAT CAN BE USED ON THE MACHINE 30 MAKING COPIES 34 COPY MODE 36 COPYING ON SPECIAL PAPER Bypass Copy 37 PRINTING IN A WINDOWS ENVIRONMENT 40 PRINTING IN A macOS ENVIRONMENT 42 DIRECTLY PRINTING A FILE IN USB MEMORY 44 SENDING A FAX 46 FAX MODE 48 BEFORE USING THE MACHINE ...

Страница 8: ...NAL 51 SCANNER MODE 53 USES OF THE DOCUMENT FILING FUNCTION 56 SAVING A DOCUMENT ONLY Scan to Local Drive 57 PRINTING A SAVED FILE 60 MANUAL FINISHING 62 USING MANUAL FINISHING 62 SETTING MODE 66 SCANNER DOCUMENT FILING MANUAL FINISHING SETTING MODE ...

Страница 9: ...pheral devices and the procedures for placing originals and loading paper PART NAMES AND FUNCTIONS 10 TURNING ON THE POWER 13 OPERATION PANEL 14 PLACING ORIGINALS 16 ADJUSTING THE VOLUME 17 LOADING PAPER 18 SAVING CONTACTS IN THE ADDRESS BOOK 28 USER AUTHENTICATION 29 FUNCTIONS THAT CAN BE USED ON THE MACHINE 30 BEFORE USING THE MACHINE ...

Страница 10: ... received fax printouts into the right tray allows you to separate them from other printed paper 8 Bypass tray Use this tray to feed paper manually When loading paper larger than 8 1 2 11 R or A4R pull out the extension guide LOADING PAPER IN OTHER TRAYS page 21 9 Output tray center tray Printed paper is output into this tray 10 USB port A type This is used to connect a USB device such as a USB me...

Страница 11: ...tray to feed paper manually When loading paper larger than 8 1 2 11 R or A4R pull out the extension guide LOADING PAPER IN OTHER TRAYS page 21 6 Finisher This staples paper A punch module can also be installed to punch holes in output paper You can also perform stapling manually 7 Saddle Stitch Finisher This staples paper A punch module can also be installed to punch holes in output paper 8 Trimmi...

Страница 12: ...eversing paper when 2 sided printing is performed Open this cover to remove a paper misfeed 10 The main power switch Use this switch to turn on the power for the machine When using the fax or Internet fax functions always keep this switch in the position 11 Waste toner bottle This bottle collects excess toner that is produced during printing 12 Transfer belt This belt takes the image formed with t...

Страница 13: ...er switch Main power indicator When turning off the main power switch press the Power button on the operation panel and then turn the main power switch to the position In a sudden case of main power outage turn the power for the machine back on and then turn it off in the correct order If the machine is left for a long time with the main power having been turned off prior to the Power button being...

Страница 14: ...isplay the machine s status other than the job using icons c Display the job in progress or waiting with text or icon d Select shortcut keys for modes or functions e Switch the pages for displaying shortcut keys f Display Toner Quantity g Display Operation Guide h Use these keys to select functions that make the machine easier to use i Select functions that can be utilized in respective modes Tap ...

Страница 15: ...rotates the preview image of whole page in the arrow s direction The printing result is not rotated 1 2 This reduces the image 1 This displays preview images of respective pages 1 2 This displays the scroll bar for enlargement reduction operations Moving the slider to the left reduces the image and moving the slider to the right enlarges the image This displays thumbnails of preview images 1 2 Thi...

Страница 16: ...e not pinched when closing the automatic document feeder After placing the original be sure to close the automatic document feeder If left open parts outside of the original will be copied black causing excessive use of toner Set the orientation of the image to ensure that the orientation of the placed original is correctly recognized For more information see the User s Manual Adjust the original ...

Страница 17: ... Settings Image Send Internet Fax Configure settings for sounds generated when an Internet fax is received and when a communication error occurs Sound Settings Beep Sound Settings Common Keys Touch Sound Configure settings for the sound generated when a key is tapped and whether a sound is generated when the key for a default setting is tapped Easy Copy Operation Guide Easy Copy Easy Scan File Ret...

Страница 18: ...e of paper depending on the tray used For Letter Head and Pre Printed set the paper in the reverse orientation Place with the print side facing the direction indicated below Tray In normal status With letter head or pre printed paper set Trays 1 4 Facing up Facing down Bypass tray Tray 5 Tray 6 Facing down Facing up Tray 2 Tray 1 Tray 5 Bypass tray Tray 3 Tray 4 Tray 2 Bypass tray Tray 5 Tray 6 Tr...

Страница 19: ...t once and cause a misfeed 3 Lift the feed roller and place paper into the tray Load the paper with the print side facing up The stack must not be higher than the indicator line maximum of 1200 sheets for tray 1 or maximum of 800 sheets for tray 2 4 Lower the feed roller and gently push the paper tray into the machine Push the tray firmly all the way into the machine slowly Forcefully inserting th...

Страница 20: ... dimensions of the paper to be loaded The guide plates A and B are slidable Slide each guide plate while squeezing its lock lever to adjust to the paper size A non standard size of paper can only be loaded in tray 4 A non standard size of paper cannot be loaded in tray 3 3 Fan the paper Fan the paper well before loading it If the paper is not fanned multiple sheets may feed at once and cause a mis...

Страница 21: ...R or A4R pull out the extension guide Pull the bypass tray extension all the way out 2 Adjust the bypass tray guides to the size of paper to be loaded Adjust the bypass tray guides so that they slightly contact the loaded paper 3 Load the paper with the print side facing down Insert the paper along the bypass tray guides all the way into the bypass tray until it stops slowly Inserting the paper wi...

Страница 22: ...ay extension Remove the bypass tray guide at the rear end and attach them to the inserter tray Pull the bypass tray extension all the way out When loading paper larger than 8 1 2 14 or A3W remove the bypass tray guides at the rear end Do not place heavy objects on the bypass tray or press down on the tray 3 Insert the paper along the bypass tray guides all the way into the bypass tray until it sto...

Страница 23: ... the paper Fan the paper well before loading it If the paper is not fanned multiple sheets may feed at once and cause a misfeed 3 Place the paper in the center of the paper table Load the paper with the print side facing down The stack must not be higher than the indicator line maximum of 3500sheets 4 Gently push the paper tray into the machine Push the tray firmly all the way into the machine slo...

Страница 24: ...l the operation button light goes off Do not pull out the tray until the light goes off If you pull out the tray forcibly while the button lights up or blinks a machine failure may be resulted 2 Pull out the paper tray Gently pull the tray out until it stops 3 Fan the paper Fan the paper well before loading it If the paper is not fanned multiple sheets may feed at once and cause a misfeed ...

Страница 25: ...and stops Repeat this operation in the same way to load paper Do not insert your hand into the space inside the paper table when you load paper Do not insert spare paper or objects into the space inside the tray 5 Gently push the paper tray into the machine Push the tray firmly all the way into the machine slowly The paper table goes up after the tray is pushed in The operation button blinks while...

Страница 26: ...er tray Gently pull the tray out until it stops 3 Fan the paper Fan the paper well before loading it If the paper is not fanned multiple sheets may feed at once and cause a misfeed 4 Load the paper Load the paper with the print side facing down The stack must not be higher than the indicator line maximum of 2500 sheets 5 Gently push the paper tray into the machine Push the tray firmly all the way ...

Страница 27: ...ay Bypass Tray Inserter Upper Inserter Lower Plain 1 B4 Plain 1 A4 OK Plain 1 A3 Plain 1 8 x11 Plain 1 8 x11 Plain 1 A4 Plain 1 A4 Plain 1 A3 Plain 1 A3 4 3 2 6 5 1 Y Total Count LCD Control 10 15 AM Job Status 2 5 6 1 3 4 LCD Control 10 15 AM Guide Display Mode LCD Control Count Feeding Approved Job Paper Property Type Plain 1 Size Tray Settings Plain 1 60 89g m2 Plain 2 90 105g m2 Heavy Paper 1 ...

Страница 28: ...ype is set as the default address If no address has the checkbox next to it selected a confirmation screen will appear asking you if you want to select a default address Operation Guide Enlarge Display Mode Settings Total Count LCD Control Toner Quantity Address Control Manual Finishing Tray Settings File Retrieve Job Status M C Bk Y 10 15 AM Name Initial Category 1 Number of Addresses Search Numb...

Страница 29: ...ers to log in using a login name and password received from the administrator of the machine or the administrator of the LDAP server When starting the machine the login screen appears AUTHENTICATION BY QUICK AUTHENTICATION This can only be used on the machine when carrying out user authentication This method provides simple authentication for an administer who has been previously registered on the...

Страница 30: ...x 8 1 2 B5 size originals are mixed with 8 1 2 x 11 A4 size originals When copying you can combine the mixed originals setting and auto ratio setting to change the ratio used for each original and print all pages on the same size of paper Counting the number of scanned original sheets and display the count before transmission Checking the number of scanned original sheets before transmission helps...

Страница 31: ...tomatically set scan settings appropriate for the original tap the Auto Set key in the base screen of Easy Mode Image Orientation Resolution and Blank Page Skip Duplex Setup PDF Skew Adjustment Automatically Detect Mono2 Grayscale are set automatically Hidden Pattern Print Tracking Information Print Characters to prevent unauthorized copying such as pre set or customized text are placed as invisib...

Страница 32: ...mitted as two separate pages This function is useful when you wish to fax the left and right pages of a book or other bound document as separate pages This function splits a saddle stitch original such as a catalogue or a pamphlet page by page and copies in sequence Erase Verification Stamp The erase function is used to erase shadows on images produced when scanning thick originals or books This f...

Страница 33: ...33 This section explains the basic procedures for using the copier function MAKING COPIES 34 COPY MODE 36 COPYING ON SPECIAL PAPER Bypass Copy 37 COPIER ...

Страница 34: ...riginal Exposure N Up Card Shot 1 When a finisher finisher large stacker saddle stitch finisher or saddle stitch finisher large stacker is installed 2 When a punch module finisher finisher large stacker saddle stitch finisher or saddle stitch finisher large stacker is installed To select more detailed settings tap the Detail key and select settings in normal mode COPY MODE page 36 Easy Fax Print R...

Страница 35: ... black white binary scanning When you tap the B W Start key the machine scans in black white binary For details see the User s Manual To check a preview of a document tap the Preview key PREVIEW SCREEN page 15 Preview B W Start Color Start Copies Auto Image Slightly Reduce 3 Reduction Original Paper By Paper Size Copy Ratio 8 x11 8 x11 11x17 11x17 100 25 400 CA Original Staple Punch Copy Ratio 2 S...

Страница 36: ...s the list of function keys Frequently used Others can be registered 12 Check the current settings 13 Displays the list of keys other than the function keys indicated above FUNCTIONS THAT CAN BE USED ON THE MACHINE page 30 14 Indicates the presence or absence of an original and size of paper loaded in each tray Tapping this makes the paper select screen opened 15 Starts black and white or color Pr...

Страница 37: ...ode Settings Total Count LCD Control Job Status Type Heavy Paper 1 Size Auto Inch Auto AB Auto Inch Size Set Direct Entry Auto AB A3W 12x18 A3 A4W 9x12 A4 A5R B4 B5 B5R 216x330 8 x13 11x17 8 x11 320x450 225x320 Auto Inch 12x18 A3W 11x17 9x12 A4W 8 x14 8 x11 8 x11R 7 x 10 R 5 x 8 R A3 A4 B4 B5 320x450 225x320 Bypass Feeding Approved Job Paper Property Tray Settings 10 15 AM Detection Size Selection...

Страница 38: ... you tap the B W Start key the machine scans in black white binary For details see the User s Manual To check a preview of a document tap the Preview key PREVIEW SCREEN page 15 Detail Staple Punch Copy Ratio 2 Sided Copy Paper Select 8 x11 Tray 1 1 1 100 Off CA Preview B W Start Color Start Copies Original 8 x11 8 x 11 8 x 11 8 x 14 11 x 17 8 x 11 Original Staple Punch Copy Ratio 2 Sided Copy Pape...

Страница 39: ... procedures are primarily for Windows 10 in Windows environments and macOS 10 12 in macOS environments The window varies depending on the operating system version the printer driver version and the application PRINTING IN A WINDOWS ENVIRONMENT 40 PRINTING IN A macOS ENVIRONMENT 42 DIRECTLY PRINTING A FILE IN USB MEMORY 44 PRINTER ...

Страница 40: ...Select Print from the File menu of WordPad 2 Select the machine s printer driver and click the Preferences button If the printer drivers appear as a list select the name of the printer driver to be used from the list 3 Select print settings 1 Click the Main tab 2 Select the original size To select settings on other tabs click the desired tab and then select the settings 3 Click the OK button Help ...

Страница 41: ... for envelope printing 1 Click the Paper Source tab 2 Select the envelope size from Output Size When Output Size is set to DL Paper Type is also automatically set to Envelope 3 Select Bypass Tray or the Tray 4 from the Paper Tray 4 Click the Print button Printing begins 1 2 3 ...

Страница 42: ...macOS To install the printer driver and configure settings in a macOS environment see the Software Setup Guide 1 Select Page Setup from the File menu 2 Select paper settings 1 Make sure that the correct printer is selected 2 Select the paper settings Set the paper size paper orientation and copy ratio 3 Click the OK button 3 Select Print from the File menu 1 2 3 ...

Страница 43: ...e Setup in many applications and then perform the following steps 1 Select the envelope size from Paper Size 2 Select Paper Feed 3 Select Bypass Tray or the Tray 4 from the All Page From 4 Select print settings 1 Make sure that the correct printer is selected 2 Select items from the menu and configure the settings as needed 3 Click the Print button 1 2 3 1 2 3 ...

Страница 44: ...pear follow these steps 1 Tap the File Retrieve key 2 Tap Select File from USB Memory to Print on the action panel 3 Tap the key of the file that you wish to print and tap Choose Print Settings on the action panel When printing multiple files tap the keys of the files you wish to print and tap Print on the action panel Tap to switch to thumbnails 4 Select print settings and tap the Start key 5 Rem...

Страница 45: ...45 This section explains the basic procedures for using the fax function of the machine SENDING A FAX 46 FAX MODE 48 FACSIMILE ...

Страница 46: ...ey of the desired destination Addresses of the current mode are selected from addresses whose checkboxes were selected when the tapped destination was registered If no addresses were registered with the checkbox selected tap the Yes key in the confirmation screen and select the desired addresses To add another destination tap the key of the destination Toner Quantity M C Bk Y Operation Guide Enlar...

Страница 47: ...l mode FAX MODE page 48 9 Tap the Start key To check a preview of a document tap to return to the base screen of Easy Fax and tap the Preview key PREVIEW SCREEN page 15 Direct Entry Address Sort CA Frequent Use Category All Start AAA AAA BBB BBB CCC CCC DDD DDD EEE EEE FFF FFF AAA AAA 123456789 Direct Entry All Destinations Delete Info AAA AAA 1 CA Start All Destinations Delete Info AAA AAA 1 1234...

Страница 48: ...nction keys indicated above FUNCTIONS THAT CAN BE USED ON THE MACHINE page 30 13 Shows the amount of free memory available for fax reception 14 Tap to dial in speaker mode 15 Enter the fax number 16 Displays the functions that can be utilized in the Fax Mode 17 Searches for the address 18 Displays the address book CA Preview Start Original Address Fax Number Address Book Sending History Direct Ent...

Страница 49: ...ses of the network scanner function and the basic procedure for using scan mode The Internet fax expansion kit is required to use the Internet fax function NETWORK SCANNER FUNCTION 50 SCANNING AN ORIGINAL 51 SCANNER MODE 53 SCANNER ...

Страница 50: ...server use Scan to FTP To send an image to a shared folder on your computer use Scan to Network Folder To process an image in a specific application use Scan to Desktop Use this mode to save an image to USB memory Scan modes USB memory mode Internet fax mode Use this mode to send a fax via the Internet The machine supports Direct SMTP PC scan mode Use this mode to scan a photo while making correct...

Страница 51: ...nt mode are selected from addresses whose checkboxes were selected when the tapped destination was registered If no addresses were registered with the checkbox selected tap the Yes key in the confirmation screen and select the desired addresses To add another destination tap the key of the destination Print Release Easy Scan Easy Copy Toner Quantity M C Bk Y Operation Guide Enlarge Display Mode Se...

Страница 52: ...s between full color and black white binary scanning When you tap the B W Start key the machine scans in black white binary For details see the User s Manual To check a preview of a document tap to return to the base screen of Easy Scan and tap the Preview key PREVIEW SCREEN page 15 CA Address 123 ne jp Sort AAA AAA BBB BBB CCC CCC DDD DDD EEE EEE FFF FFF Frequent Use Category All B W Start Color ...

Страница 53: ...ER Job Status FTP Desktop Easy Copy Easy Scan File Retrieve Sharp OSA 10 15 AM Toner Quantity M C Bk Y Operation Guide Enlarge Display Mode Settings Total Count LCD Control Job Status Fax E Mail Copy LINE PRINTER Job Status Easy Copy Easy Scan File Retrieve Sharp OSA 10 15 AM Toner Quantity M C Bk Y Operation Guide Enlarge Display Mode Settings Total Count LCD Control Job Status LINE PRINTER 10 15...

Страница 54: ...list of function keys Frequently used Others can be registered 14 Checking the current settings 15 Displays the list of keys other than the function keys indicated above FUNCTIONS THAT CAN BE USED ON THE MACHINE page 30 16 Transmission will start 17 Displays the functions that can be utilized in the Image Send mode 18 Searches for the address 19 Displays the address book Address Book History Globa...

Страница 55: ...rforming a copy print or other job You can print or perform other operations using the saved file at a later time This section introduces several of the document filing functions USES OF THE DOCUMENT FILING FUNCTION 56 SAVING A DOCUMENT ONLY Scan to Local Drive 57 PRINTING A SAVED FILE 60 DOCUMENT FILING ...

Страница 56: ...e to store a document on the local drive without performing printing or transmission Like File a user name file name and folder can be specified You can also download a file stored by Scan to Local Drive from the Web page Files saved with Quick File are stored in this folder If a folder is not specified when a file is saved with File or Scan to Local Drive the file is stored in the main folder In ...

Страница 57: ...an You can save a file in the main folder or My Folder when user authentication is enabled 1 Press the Home Screen key The Home screen appears 2 Tap the Easy Scan mode icon 3 Place the original Place the original in the document feeder tray of the automatic document feeder or on the document glass PLACING ORIGINALS page 16 4 Tap the Scan to USB Local Drive key Easy Fax Print Release Easy Scan Easy...

Страница 58: ...ument tap the Preview key PREVIEW SCREEN page 15 CA Preview Auto Set B W Start Color Start Scan to USB Scan to Local Drive Scan to USB Local Drive CA Preview Auto Set Original Address Detail B W Start Color Start Address Book History Global Address Search Scan to USB Local Drive 8 x11 Main Folder Cancel scanning Cancel Scan ...

Страница 59: ...l using the automatic document feeder this screen does not appear 5 Check the Sending data has been completed message and remove the USB memory device from the machine Easy Fax Print Release Easy Scan Easy Copy Toner Quantity M C Bk Y Operation Guide Enlarge Display Mode Settings Total Count LCD Control Job Status 10 15 AM Print from external memory device USB Scan to External Memory Device Perfor...

Страница 60: ...ing tap Print and Delete the Data on the action panel so that appears 3 Tap the Print Now key Toner Quantity M C Bk Y Operation Guide Enlarge Display Mode Settings Total Count LCD Control Job Status 10 15 AM Tray Settings File Retrieve Manual Finishing Address Control Scan to Local Drive Scan to External Memory Device Select File from FTP to Print Select File from USB Memory to Print Main Folder A...

Страница 61: ...61 This section explains the basic procedures for using the manual finishing function MANUAL FINISHING 62 USING MANUAL FINISHING 62 MANUAL FINISHING ...

Страница 62: ...ined below 1 Press the Home Screen key The Home screen appears 2 Tap the Manual Finishing mode icon 3 Set the guides to the size of the paper Grasp the guide lock lever to adjust the guide When you have finished the adjustment release the lock lever When loading paper larger than 8 1 2 11 R or A4R extend the bypass tray all the way out If it is not pulled all the way out the size of the loaded pap...

Страница 63: ...Copies Pages Type and Size Double Fold Z Fold Detail Punch Fold Middle Tray Lower Tray Start CA Upper Tray Lower Tray Plain 1 Plain 1 2 3 Hole Punch Upper Tray Output Tray Inserter Staple Off 1 Staple at Back 2 3 Hole Punch Saddle Fold Half Fold C Fold 1 Staple at Front 2 Staples Saddle Stitch Off Off Accord ion Fold Copies Pages Type and Size Double Fold Z Fold Detail Punch Fold Middle Tray Lower...

Страница 64: ...nisher large stacker PUNCH A punch module is required for paper punch FOLD A folding unit is required to be installed in order to use paper folding functions other than saddle folds To use the saddle fold function you need to mount a saddle stitch finisher large stacker Touch panel key Orientation Result Touch panel key Orientation Result 1 Staple at Back A A A A 1 Staple at Front A A 2 Staples A ...

Страница 65: ...e operation of the machine to suit the needs of your workplace This section briefly introduces several of the setting mode For detailed explanations of the system settings see SETTING MODE in the User s Manual SETTING MODE 66 SETTING MODE ...

Страница 66: ... that you want to set on menu tab a or setting menu b To exit setting mode tap the Cancel key Setting mode when an administrator is logged in page 68 Easy Fax Print Release Easy Scan Easy Copy Toner Quantity M C Bk Y Operation Guide Enlarge Display Mode Settings Total Count LCD Control Job Status 10 15 AM Status Home Screen Settings Copy Settings Printer Settings System Settings Sitemap Administra...

Страница 67: ...the home screen background Copy Settings You can select copy settings Printer Settings You can select print settings Image Send Settings Configure settings for image send such as fax and Scan to E mail Document Filing Settings You can select Document Filing settings Sharp OSA Settings You can select Sharp OSA settings Authentication Settings Configure the user authentication method Alternatively c...

Страница 68: ...ed settings may be allowed without entering the administrator password based on the rights of the logged in user For the state of the settings ask the administrator of the machine When you select an item in setting mode that requires administrator login the administrator login screen will appear For the items available in setting mode when an administrator is logged in see SETTING MODE in the User...

Страница 69: ...RP Service Department Aside from instances provided for by law SHARP is not responsible for failures occurring during the use of the product or its options or failures due to incorrect operation of the product and its options or other failures or for any damage that occurs due to use of the product Warning Reproduction adaptation or translation of the contents of the manual without prior written p...

Страница 70: ...2020C US1 ...

Отзывы: