Sharp MX-5112 Скачать руководство пользователя страница 6


Authentication at the MFP


How to 


Authenticate 


at the Sharp MX-5112 


Содержание MX-5112

Страница 1: ...Print Copy Control Solution Sharp MFP s Card Windows Authentication ...

Страница 2: ......

Страница 3: ...Photocopier Guide and Reference Information 1 Print Copy Control Solution Access control using Proximity Card Windows Authentication ...

Страница 4: ...Photocopier Guide and Reference Information 2 Important Notice The core of this manual is based on the Sharp MX 5112 If you are using other Sharp copier models please refer to pages 23 36 of this manual ...

Страница 5: ...ation Methods 3 User Authentication Methods at the Multifunctional Photocopier Windows Log on Card NOTE At least one of the following methods of authentication will be enabled on the Sharp Multifunctional Product MFP ...

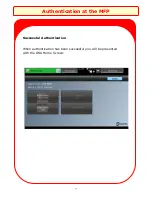
Страница 6: ...Authentication at the MFP 4 How to Authenticate at the Sharp MX 5112 ...

Страница 7: ...2 The input of your Windows user credentials Authentication using Card You should present your card at the reader on the right hand side of the device The reader is embedded within the machine so it is not visible to the eye However you should present your card against the recess as shown above Authentication at the MFP ...

Страница 8: ...tion using Logon Credentials Authentication at the MFP The above screen is the default screen which will be presented when you walk up to the device You are required to input your username followed by your password ...

Страница 9: ...7 Authentication at the MFP Successful Authentication When authentication has been successful you will be presented with the OSA Home Screen ...

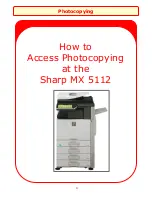
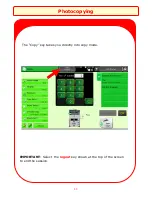
Страница 10: ...8 Photocopying How to Access Photocopying at the Sharp MX 5112 ...

Страница 11: ...pying Once you have authenticated at the MFP see Page 5 for details Select Enable Device Black White or Enable Device Color from the OSA Home Screen The Enable device key presents you with the Device Home Screen ...

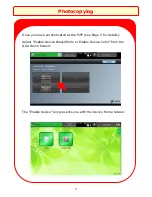
Страница 12: ...10 Photocopying Select the Copy key on the Device Home Screen ...

Страница 13: ...11 Photocopying IMPORTANT Select the logout key shown at the top of the screen to end the session The Copy key takes you directly into copy mode ...

Страница 14: ... Printer Guide and Reference Information MAC Printer Box and Printer Features Screen Important If you require colour please select the Automatic option and not the colour option Select the required Duplex ...

Страница 15: ...om the File menu 2 Select the Follow You printer which will be called Sharp from the drop down menu in the printer name box 3 Set the number of prints required 4 Click on Properties and check that the Colour Black and White tick box is set correctly for the way in which you want to print 5 Select the Document Style and Finishing options are set as required duplex or stapling 6 Click OK for all set...

Страница 16: ...s IMPORTANT Black only is the printing default To print in colour untick the Black and White Print box IMPORTANT Select the required 1 Sided or 2 Sided Select Staple requirements Only select when the printer is fit ted with a staple unit DO NOT USE THIS COLOUR TAB ...

Страница 17: ...erver that serves your office site Select OK to print NOTE When your print has been sent to a Follow You Sharp print queue you can go to any of the Sharp printers and photocopiers that are situated around the site to retrieve your prints Prints will be stored in the Follow You queue for a maximum of 20 hours after which they will be automatically deleted Follow You Printing Guide ...

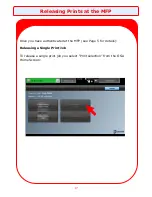
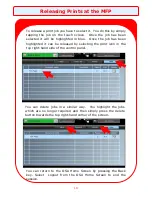
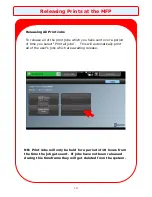
Страница 18: ...16 How to Release Prints at the Sharp MX 5112 Releasing Prints at the MFP ...

Страница 19: ...7 Once you have authenticated at the MFP see Page 5 for details Releasing a Single Print Job To release a single print job you select Print selection from the OSA Home Screen Releasing Prints at the MFP ...

Страница 20: ...as been highlighted it can be released by selecting the print icon in the top right hand side of the control panel You can delete jobs in a similar way You highlight the jobs which are no longer required and then simply press the delete button towards the top right hand corner of the screen You can return to the OSA Home Screen by pressing the Back key Select Logout from the OSA Home Screen to end...

Страница 21: ...t over a period of time you select Print all jobs This will automatically print all of the user s jobs which are awaiting release NB Print Jobs will only be held for a period of 10 hours from the time the job gets sent If jobs have not been released during this timeframe they will get deleted from the system ...

Страница 22: ...Scan to Email and Home Folder 20 How to Scan at the Sharp MX 5112 ...

Страница 23: ...enticated at the MFP see Page 5 for details Select Enable Device Black White or Enable Device Color from the OSA Home Screen The Enable device key presents you with the Device Home Screen Scan2me allows you to scan directly back to your own home folder ...

Страница 24: ...back to the authenticated user s email address select email key or home folder select Network Key Once the documents have been inserted into the document feeder the Scan2me button on the right hand side of the control panel will begin the scan process IMPORTANT Select the logout key shown at the top of the screen to end the session ...

Страница 25: ...Authentication at the MFP 23 How to Authenticate at the Sharp MX 311 312 ...

Страница 26: ...1 Presenting your card or 2 The input of your Windows user credentials Authentication using Card You should present your card at the reader on the right hand side of the device The reader is embedded within the machine so it is not visible to the eye However you should present your card against the recess as shown above ...

Страница 27: ...tion at the MFP Authentication using Logon Credentials The above screen is the default screen which will be presented when you walk up to the device You are required to input your username followed by your password ...

Страница 28: ...26 Authentication at the MFP Successful Authentication When authentication has been successful you will be presented with the OSA Home Screen ...

Страница 29: ...Photocopying 27 How to Access Photocopying at the Sharp MX 311 312 ...

Страница 30: ... authenticated at the MFP see Page 24 for details Select Enable Device from the OSA Home Screen Photocopying The Enable device key presents you with the Device Home Screen Select the Copy key on the Device Home Screen ...

Страница 31: ...opy key takes you directly into copy mode On completion of your photocopying select Logout on the operation panel This will take you back to the OSA Home Screen see top of Page 28 IMPORTANT Select Logout to end the session ...

Страница 32: ...30 How to Release Prints at the Sharp MX 311 312 Releasing Prints at the MFP ...

Страница 33: ...1 Releasing Prints at the MFP Once you have authenticated at the MFP see Page 5 for details Releasing a Single Print Job To release a single print job you select Print selection from the OSA Home Screen ...

Страница 34: ...ighted in blue Once the job has been highlighted it can be released by selecting the print icon in the top right hand side of the control panel You can delete jobs in a similar way You highlight the jobs which are no longer required and then simply press the delete button towards the top right hand corner of the screen You can return to the OSA Home Screen by pressing the Back key ...

Страница 35: ...bs which you have sent over a period of time you select Print all jobs This will automatically print all of the user s jobs which are awaiting release NB Print Jobs will only be held for a period of 10 hours from the time the job gets sent If jobs have not been released during this timeframe they will get deleted from the system ...

Страница 36: ...34 How to Scan at the Sharp MX 311 312 Scan to Folder ...

Страница 37: ... have authenticated at the MFP see Page 24 for details Select Enable Device from the OSA Home Screen The Enable device key presents you with the Device Home Screen Scan2me allows you to scan directly back to your own home folder ...

Страница 38: ...the authenticated user s home folder Once the documents have been inserted into the document feeder the Scan2me button on the right hand side of the control panel will begin the scan process To return to the OSA Home Screen you simply press the OSA key shown at the top of the screen IMPORTANT Select Logout to end the session ...

Страница 39: ...nt bangor ac uk Check your print history eprint bangor ac uk 83 Buy printer credits online https bangor pcounterwebpay com Help and Support For help and support please follow the instructions from the sticker on the front of the machine ...

Страница 40: ...Head Office Northern House Moor Knoll Lane East Ardsley Wakefield WF3 2EE www iotplc com Branches throughout the UK London Bristol Basildon Long Eaton Wigan and Ayr ...

Отзывы: