background image

ENGLISH

01/4/26     99secl_E_4.fm

E-16

U

seful Feat

ure

s

-A

dva

n

c

e

d

 P

lay

b

a

ck

-


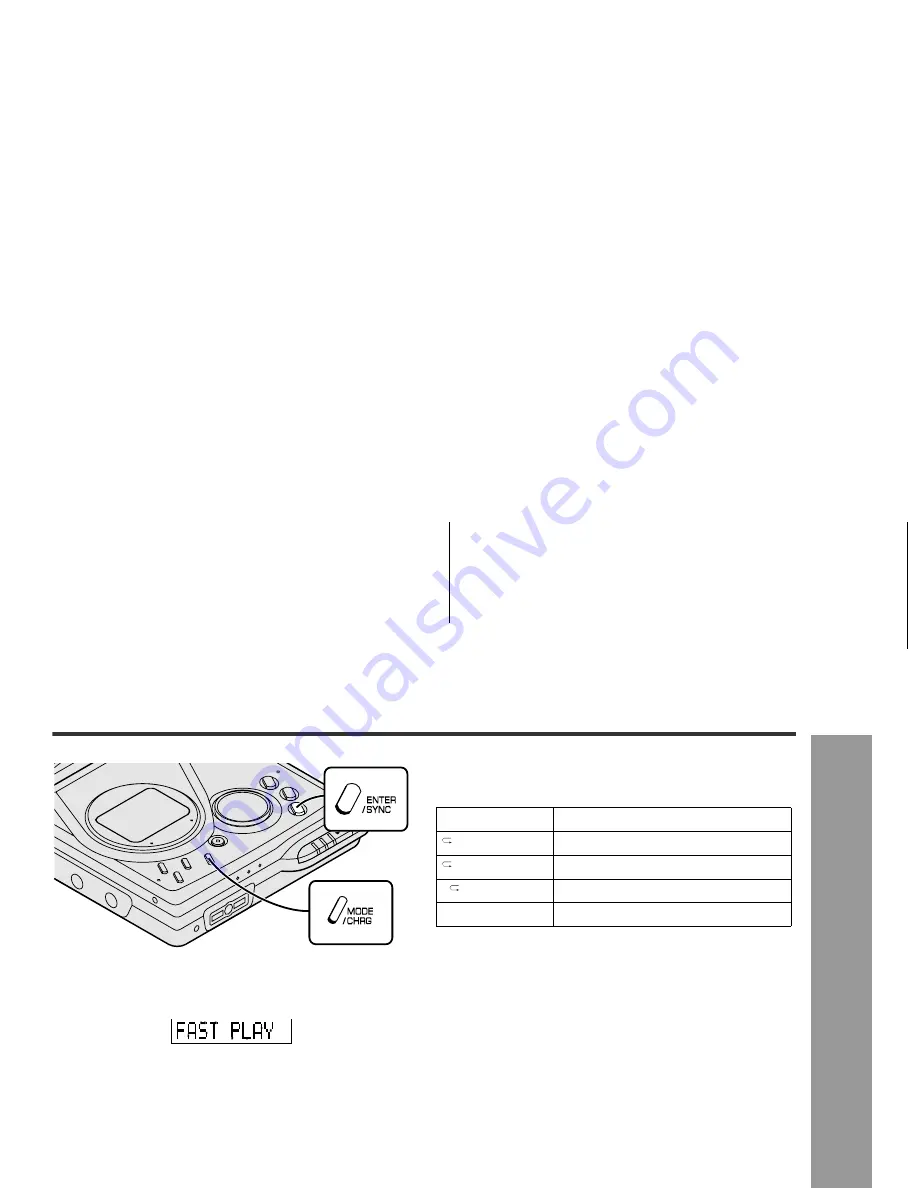
To play at double speed

Press the ENTER/SYNC button whilst a MiniDisc
recorded in the monaural mode is being played.

z

If a track recorded in the stereo mode is reached dur-
ing fast playback, the fast playback mode will be can-
celled.

z

Depending on the contents recorded on a MiniDisc, it
may be difficult to hear them.

To interrupt fast playback

Press the PLAY/PAUSE button during playback.
When the PLAY/PAUSE button is pressed again, the unit
will resume fast playback.

To return to normal playback

Press the ENTER/SYNC button.

Random play or repeat play

During playback, press the MODE/CHRG button repeat-
edly to select the playback mode.

Notes:

z

If the playback mode is selected whilst stopped, press
the PLAY/PAUSE button to start playback.

z

When "TOC" is displayed, random play or repeat play
is impossible.

z

In random play the unit will select and play tracks auto-
matically. (You cannot select the order of the tracks.)
After all of the tracks have been played once each in
random order, the unit will stop automatically.

z

During random, random repeat, or single track repeat
play, you can forward or reverse the MiniDisc only
within the track being played.

z

During random play, the unit cannot find the beginning
of any track which has been played.

z

Repeat play lasts until you stop the unit. 

RANDOM

Random play

RANDOM

Repeat play of tracks in random order

Repeat play of all of the tracks

1

Repeat play of a single track

No display

Normal playback

MD-MT99C

Содержание MD-MT99C

Страница 1: ... Please refer to pages E 1 to E 48 Se reporter aux pages F 1 à F 48 ...

Страница 2: ...ack 15 16 Advanced Recording 17 22 Recording from a Microphone 23 26 Advanced Features Changing Default Settings 32 Titling a MiniDisc 33 36 Editing a Recorded MiniDisc 37 39 Listening through Another System 40 References Other Features and Caution 41 MiniDisc System Limitations 42 Error Messages 43 44 Troubleshooting 45 46 Maintenance 46 Specifications 47 48 Thank you for purchasing this SHARP pr...

Страница 3: ...nction of this unit z The letters in brackets contained in the model number indicate the colour of the product only Operation and specifications are unaffected z Audio visual material may consist of copyrighted works which must not be recorded without the authority of the owner of the copyright Please refer to the relevant laws in your country Accessories Remote Control x 1 Headphones x 1 AC Adapt...

Страница 4: ...Auto Mark Time Mark Button 21 26 33 6 Display Character Select Button 27 33 7 Mode Charge Button 10 16 17 29 32 8 Record Track Mark Button 9 21 9 Volume Cursor Fast Forward Fast Reverse Recording Level Name Select Button 9 14 15 33 34 10 Play Pause Button 10 14 11 Stop Power Off Hold Button 10 14 31 12 Enter Fast Play Synchro Button 16 19 33 13 Remote Control Headphones Line Output Socket 13 40 14...

Страница 5: ...ining Recording Time Indicator 27 12 Total Track Number Indicator 27 13 Fast Play Indicator 16 14 Battery Indicator 28 15 Random Indicator 16 16 Track Number Indicator 27 17 Character Time Information Indicator Remote control unit Reference page 1 Headphones Socket 13 2 Bass Delete Track Mark Button 14 21 34 3 Volume Down Cursor Button 14 34 4 Volume Up Cursor Button 14 34 5 Hold Switch 31 6 Play ...

Страница 6: ...e to improper use Refer all servicing to a SHARP authorised service centre Storing the unit Avoid using or leaving the unit in the following places z If the unit is used near radio tuners or TVs noise and or picture interference may result If you experience these problems move the unit away from such devices z Do not use your headphones whilst driving a motor vehicle It may create a traffic hazard...

Страница 7: ...orce the MiniDisc into the unit as it may cause damage to the unit If resis tance is felt remove the MiniDisc and reload it z The lid cannot be opened if TOC is displayed refer to the instruction on page 11 1 Slide the OPEN lever to release the compart ment door 2 Lift it up 3 Insert a MiniDisc as shown 4 Close the compartment door MD MT99C ...

Страница 8: ...Preparation Connections Connections You can record your favourite CDs or tapes to MD ...

Страница 9: ...Preparation Connections MD MT99C ...

Страница 10: ...el so that the maximum sound volume from the source makes the reading swing somewhere between 4 dB and 0 dB Level meter indicator Digital recording You can adjust the level in 1dB increments within the range of 12 12dB Once you adjust the digital recording level the set ting remains even after the recording stops For cancellation instructions see page 32 ...

Страница 11: ...ew recording from being lost it is not possible to remove the MiniDisc whilst TOC is dis played Notes z Changing the volume level whilst recording does not affect the recording z You cannot adjust the bass level whilst recording 4 Press the PAUSE button on the stereo system to enter the playback pause mode Here you can search for the track to record 5 Press the MODE CHRG button repeatedly to se le...

Страница 12: ...or editing function the MiniDisc unit lid is locked and the MiniDisc cannot be removed until the process is finalised Warning If the power is removed Battery AC adaptor whilst TOC is displayed the MiniDisc unit lid will remain locked until the battery main power is restored and the unit is turned on Your new recordings or edited changes will be lost and your MiniDisc may become unusable Caution Wh...

Страница 13: ... not attached properly the MiniDisc may jam inside the unit and it may not be possible to remove it About sampling rate converter This portable MD incorporates a sampling rate converter meaning it can record from digital radios or DAT tape recorders Note for digital recording You cannot copy a MiniDisc that you recorded from digital inputs to another MiniDisc or DAT It is prevented by the SCMS Ser...

Страница 14: ...Basic Operation Playback Playback ...

Страница 15: ...yback may start automatically when electricity resumes z If you connect the AC adaptor without installing the rechargeable battery playback may start automati cally Be sure to turn off the power z Reduce the volume before starting to play MiniDiscs compared to ordinary cassette tapes have very little noise If the volume is adjusted according to your usual expectations of noise high volume may dama...

Страница 16: ... the pause mode When the beginning of the first track is reached during fast reverse the unit will enter the playback mode To move to the beginning of the next track Press the button during playback To restart the track being played Press the button during playback To locate the next track Press the button whilst the unit is stopped To locate the previous track Press the button whilst the unit is ...

Страница 17: ...he playback mode is selected whilst stopped press the PLAY PAUSE button to start playback z When TOC is displayed random play or repeat play is impossible z In random play the unit will select and play tracks auto matically You cannot select the order of the tracks After all of the tracks have been played once each in random order the unit will stop automatically z During random random repeat or s...

Страница 18: ...n monaural you can record twice as long as the stereo recording A track recorded in monaural can be played back in dou ble speed see page 16 The recording mode remains unchanged until a new mode is selected 1 When a recording is paused press the MODE CHRG button repeatedly to select the recording mode Each time the button is pressed the display will change as follows 2 Start recording ...

Страница 19: ...audible sound Since the sound is selected based on psychoacoustics masking the sound quality is not impaired This unit is equipped with the ATRAC3 com pressing system that can reduce the sound data to 1 10 or 1 20 of its original size By employing this system 2 times and 4 times long recordings are enabled in stereo mode About the recording mode You can select the recording mode from stereo record...

Страница 20: ...ore the recording will be paused pause function does not work for approximately 10 seconds after a recording starts When the unit receives sound again recording auto matically starts 1 Press the REC button 4 Press the PAUSE button on the stereo system to enter the playback pause mode Select the starting point for your recording and press the PAUSE button 5 Press the MODE CHRG button repeatedly to ...

Страница 21: ...hen make recording after that point See Editing a Recorded MiniDisc page 39 1 During playback press the PLAY PAUSE button at the point where you want to begin recording 2 Press the REC button To cancel the operation press the OFF button 3 Press the ENTER SYNC button All of the tracks and track names will be erased fol lowing the point where the playback is paused 4 Press the MODE CHRG button repea...

Страница 22: ...cks in certain amount of time SORRY will be displayed and the oper ation will be disabled In that case wait until the next operation can be resumed Recording tracks as a single track You can record several pieces of music as a single track by disabling the auto marker function When a recording is paused or whilst recording Press the EDIT button Note When making digital recordings using a CD player...

Страница 23: ...e as on the source z Track numbers may not be created properly depend ing on the connected stereo system 1 Track numbers are created automatically during re cording via the analogue connection when a silence of 1 second or more is detected Auto marker func tion A series of tracks can be recorded as one by disabling the auto marker function see page 21 2 When recording from a CD or a MiniDisc using...

Страница 24: ...Useful Features Recording from a Microphone Recording from a Microphone To record from a microphone ...

Страница 25: ...s on the MiniDisc Press the OFF button whilst in the stop mode 1 Connect a stereo microphone to the MIC IN socket 2 Insert a recordable MiniDisc page 6 3 Press the REC button 4 Press the or button to adjust the record ing level Level meter indicator Adjust the recording level so that the maximum sound volume from the source makes the reading swing between 4 dB and 0 dB 5 Press the MODE CHRG button...

Страница 26: ...5 mm 1 8 diameter ste reo mini plug z If the unit starts recording too often from low unwanted noises set the microphone input to MIC SYNC L z Recording sensitivity can be changed whilst recording 1 Press the REC button 2 Press the or button to adjust the recording level Level meter indicator 3 Press the MODE CHRG button repeatedly to select the recording mode page 17 4 Press the ENTER SYNC button...

Страница 27: ...ple Set to 5 minutes During a mic manual recording Timed auto marks will be created every 5 minutes During a mic synchro recording If a silence lasts for 3 seconds or more a timed auto mark will be created 5 minutes after the previous mark is created Creating track numbers manually Press the REC button whilst recording 1 When a recording is paused or whilst recording press the EDIT button repeated...

Страница 28: ...ime will not be displayed with a playback only MiniDisc z Elapsed playback time and remaining playback time may be different from the actual time To check the remaining recording time and the total playing time Whilst in the stop mode press the DISP button Each time the button is pressed the display will change as follows Remaining recording time varies depending on the set recording mode Track nu...

Страница 29: ...ery which you stopped charging halfway may appear It does not mean that the battery is completely charged z The battery indicator will not correctly display the remaining capacity for approximately 10 seconds after the power has been turned on z When the AC adaptor or a separately available car adaptor is used the battery indicator will not be shown z The number of bars shown in the battery indica...

Страница 30: ...is charged or used it will get slightly warm This is normal z When the portable MD is turned on or operating the battery will not be charged 1 Insert the rechargeable battery A rechargeable battery other than the one supplied or the optional one AD N70BT cannot be charged 2 Plug the AC adaptor into the wall socket and then insert the plug on the other end into the DC IN 5V socket 3 Press the MODE ...

Страница 31: ... that specified Using with the rechargeable or alkaline bat tery Notes z Setting the volume level to 0 whilst recording with the rechargeable or an alkaline battery reduces the bat tery drain z When you do not use the unit for hours remove the battery The battery drains gradually even when the power is turned off z Carry the battery in the supplied case z This unit can be used with the AC adaptor ...

Страница 32: ... more whilst the unit is in the hold mode HOLD OFF will be shown To cancel the hold mode Move the HOLD switch away from the safety position the opposite direction of the arrow The present operation condition can be kept even if other buttons are accidentally pressed in a place such as a crowded train If the hold function is active whilst the power is turned off the power cannot be turned on by mis...

Страница 33: ...r save function automatically adjusts the storage time between 5 and 40 seconds to reduce the power consumption If this func tion is cancelled the storage time cannot be adjusted It cannot be adjusted even if it is operated on the battery charger The storage time varies depending on the play back mode Digital recording level D L MODE 1 The digital recording level you set will be kept even after ca...

Страница 34: ...use mode press the EDIT button to select TRACK NAME 2 Press the ENTER SYNC button z The unit will enter the character input mode z To cancel the operation press the OFF but ton 3 Press the DISP button repeatedly to select the type of characters The first 3 characters in the group of the selected characters will be displayed for about 1 second 4 Press the or button repeatedly to select the letter 5...

Страница 35: ...or VOL button to move the cursor to the character you want to erase and then press the BASS button To enter a space Press the VOL button to move the cursor to the right Characters symbols 6 To enter more letters repeat steps 3 5 7 When the name has been completely entered press the EDIT button 8 TOC will be displayed To write the updated contents to the MiniDisc press the OFF but ton You cannot re...

Страница 36: ...which you want to add a new character 3 Select the character to add Perform steps 3 4 on page 33 4 Press the ENTER SYNC button 5 Press the EDIT button 6 TOC will be displayed To write the updated contents to the MiniDisc press the OFF but ton You cannot remove the MiniDisc whilst TOC is 1 What is a master MiniDisc A recordable MiniDisc that contains tracks and charac ter information You cannot tra...

Страница 37: ... operation 1 Insert a Master MiniDisc Do not mistake the Master MiniDisc for the target one 2 Whilst in the stop mode press the EDIT button to select NAME STAMP 3 Press the ENTER SYNC button To cancel the operation press the OFF button 4 Press the ENTER SYNC button again 5 When the unit displays CHANGE MD remove the master MiniDisc Operation of the MiniDisc for stamping 6 Load a MiniDisc for stamp...

Страница 38: ...and press the PLAY PAUSE button 2 Press the EDIT button repeatedly to select ERASE 3 Press the ENTER SYNC button To cancel the operation press the OFF button 4 Press the ENTER SYNC button again The track will be erased 5 To erase other tracks repeat steps 1 4 1 Whilst in the stop mode press the EDIT button repeatedly to select ALL ERASE 2 Press the ENTER SYNC button To cancel the operation press t...

Страница 39: ...FF button 4 Press the ENTER SYNC button again The track will be divided into two tracks and the unit will pause at the beginning of the second of the two new tracks 1 Start playing the last of the two tracks to be combined and press the PLAY PAUSE button 2 Press the EDIT button repeatedly to select COMBINE 3 Press the ENTER SYNC button To cancel the operation press the OFF button 4 Press the ENTER...

Страница 40: ...them using the COMBINE function When one or both tracks to be combined have a name The first track name will be used However when the first track does not have a name the second track name will be used In the following cases tracks may not be combined 1 Play the track to be moved and press the PLAY PAUSE button 2 Press the EDIT button repeatedly to select MOVE 3 Press the ENTER SYNC button To canc...

Страница 41: ...t be set to maximum when listening through a stereo system z When recording with stereo system eliminate the con firmation sound page 32 Otherwise it will also be Listening through a car stereo Notes z Adjust the volume of both this portable MD and a car stereo z Do not operate this portable MD whilst you drive a car It may distract your attention and cause a traffic acci dent MD MT99C ...

Страница 42: ...one AD N70BT z When the battery is charged for the first time or is charged after not being used for a long period the operating time may be shorter than normal The bat tery life will recover with normal use i e charging and discharging z To avoid shortening the service life of the battery only recharge the battery after it has been completely dis charged z If the rechargeable battery is used in a...

Страница 43: ...ast 12 or fewer seconds to display the remaining recording time The time may not increase even if you erase short tracks The total of the recorded time and the remaining time does not match the max imum recordable time One cluster approximately 2 seconds is the minimum unit for re cording For example a 3 second track uses 2 clusters approxi mately 4 seconds Therefore the actual recordable time may...

Страница 44: ...one Can t REC z Recording cannot be performed cor rectly due to vibration or shock ERROR MES SAGES MEANING Can tSTAMP z Stamp function does not work Check the number of tracks Can tWRITE z Cannot save the TOC information cor rectly to a MiniDisc DEFECT z The disc is scratched If the recorded sound is not right retry recording or replace the disc with a re cordable one DISC FULL z The disc is out o...

Страница 45: ... on a playback only disc SORRY z Since a track number is currently be ing located or updated the unit cannot accept your command Wait for a whilst and try the operation again ERROR MES SAGES MEANING TEMP OVER z The temperature is too high Turn off the power and wait for a whilst TOC FORM z There is an error in the recording sig nal Erase all of the tracks and then record again TOC FULL z There is ...

Страница 46: ...ng to play a MiniDisc with data on it instead of a MiniDisc containing music When the operation buttons are pressed the unit does not respond z Is the unit in the hold mode z Is the battery exhausted Some sounds are skipped z Is the battery exhausted z Is the unit being subjected to excessive vibration The MiniDisc cannot be ejected z Has the track number or character information been written on t...

Страница 47: ...rom a cool place to a warm place To remove condensation Remove the MiniDisc and leave the unit for approxi mately 1 hour The condensation should evaporate and Maintenance Cleaning Clean the plugs and the connecting sockets If the plugs or sockets are dirty noise may be heard Cleaning will prevent noise Caution z Do not use chemicals for cleaning petrol paint thin ner etc It may damage the cabinet ...

Страница 48: ...mption 7 W AC adaptor Output power RMS 20 mW 10 mW 10 mW 0 2 T H D Charging time Approx 3 5 hours 90 Approx 5 5 hours fully charged When using the AC adaptor included with the unit Dimensions Width 81 1 mm 3 7 32 Height 19 9 mm 13 16 Depth 92 4 mm 3 21 32 Weight 172 g 0 38 lbs with rechargeable battery Input socket Line optical digital microphone powered by the main unit Output socket Headphones i...

Страница 49: ...tery fully charged included with the unit Continuous recording Approx 7 5 hours Continuous play Approx 13 hours Continuous recording Approx 10 5 hours Continuous play Approx 15 5 hours Continuous recording Approx 13 5 hours Continuous play Approx 17 5 hours When using a commercially available high capacity AA size LR6 alkaline battery Continuous recording Approx 3 hours Continuous play Approx 15 h...

Страница 50: ...cture avancée 15 16 Enregistrement avancé 17 22 Enregistrement à partir d un microphone 23 26 Fonctions avancées Modifications des réglages par défaut 32 Titrage d un minidisc 33 36 Montage d un minidisc enregistré 37 39 Écoute à travers un autre système 40 Références Autres fonctions et précautions 41 Limites du minidisc 42 Messages affichés 43 44 Dépannage 45 46 Entretien 46 Fiche technique 47 4...

Страница 51: ...ulter d un mauvais fonctionnement de l appareil z Les lettres mises en parenthèses du numéro de modèle indiquent la couleur du produit concerné Le fonctionne ment et les caractéristiques ne varient pas selon la cou leur du modèle z Le matériel audio visuel peut comporter des oeuvres fai sant l objet de droits d auteur qui ne peuvent pas être enregistrées sans l autorisation du possesseur du droit ...

Страница 52: ...emps 21 26 33 6 Sélecteur d affichage caractères 27 33 7 Touche de mode recharge 10 16 17 29 32 8 Touche d enregistrement marque de morceaux 9 21 9 Touche de volume curseur avance rapide inversion niveau d enregistrement sélection de titre 9 14 15 33 34 10 Touche de lecture pause 10 14 11 Touche d arrêt hors tension maintien 10 14 31 12 Touche d entrée lecture rapide synchro 16 19 33 13 Jack de té...

Страница 53: ...ceau 27 11 Voyant de temps d enregistrement restant 27 12 Voyant de nombre de morceaux total 27 13 Voyant de lecture rapide 16 14 Voyant de pile 28 15 Voyant de lecture au hasard 16 16 Voyant de numéro de morceau 27 17 Voyant d information en caractères temps Télécommande Page de référence 1 Jack de casque 13 2 Touche de graves annulation numérotage 14 21 34 3 Touche de volume bas curseur 14 34 4 ...

Страница 54: ...reil risque de se détériorer z SHARP n est pas responsable des dommages causés par une mauvaise utilisation Pour toute réparation confier l appareil au centre de service autorisé par SHARP Conservation de l appareil Mettre l appareil à l abri des ennemis suivants pour évi ter des problèmes z Si l on utilise cet appareil à proximité d un poste de radio ou d un téléviseur une émission radiodiffusée ...

Страница 55: ... un minidisc dans l appa reil Si on constate une gêne retirer le MD et rées sayer z Le compartiment ne s ouvre pas si l appareil affiche TOC Se reporter aux instructions à la page 11 1 Agir sur le levier OPEN pour déverrouiller le compartiment 2 Ouvrir le compartiment 3 Mettre un MD en place voir illustration 4 Refermer le compartiment MD MT99C ...

Страница 56: ...Avant l utilisation Raccordement Raccordement On peut enregistrer des CD ou cassettes favoris sur un MD ...

Страница 57: ...Avant l utilisation Raccordement MD MT99C ...

Страница 58: ...nt analogique Le niveau sonore maximal devra alors être situé en tre 4 dB et 0 dB Voyant de compteur de niveau Enregistrement numérique On peut ajuster le niveau par paliers de 1 dB dans une plage comprise entre 12 12 dB Une fois réglé le niveau d enregistrement numéri que reste en mémoire même après l arrêt de l enre gistrement Pour l annulation voir page 32 ...

Страница 59: ...rement contre la perte le MD ne se retire pas pendant l affichage de TOC Notes z La modification du niveau sonore au cours d enregis trement ne donne aucun effet sur l enregistrement z Il est impossible de régler le niveau des graves pen dant l enregistrement 4 Appuyer sur la touche PAUSE sur la chaîne hi fi pour mettre cette dernière en pause Maintenant on peut rechercher un morceau à enre gistre...

Страница 60: ...reste verrouillé et le MD ne se retire qu après la finalisation Avertissement Si on retire la source d alimentation pile adaptateur CA malgré l affichage de TOC l appareil refuse de s ouvrir jusqu au rétablissement de courant L enregistrement ou le montage qu on vient d effectuer sera perdu et le MD sera inutilisable Attention Suivre les instructions ci dessous pendant l affichage de TOC ou de TOC...

Страница 61: ...tir Convertisseur de taux d échantillonnage Cet appareil est doté d un convertisseur de taux d échan tillonnage grâce auquel l enregistrement à partir d un tuner numérique ou d une cassette DAT est possible Note pour l enregistrement numérique Il est impossible de copier un minidisc qu on a enregistré numériquement à partir d un MD ou DAT Il est interdit selon le système SCMS Serial Copy Managemen...

Страница 62: ...Fonctionnement de base Lecture Lecture ...

Страница 63: ...e cas contraire la lecture se déclenche automatiquement dès le rétablissement de courant z Si on branche l adaptateur CA sans mettre la batterie rechargeable en place la lecture peut démarrer Pen ser à éteindre l appareil z Réduire le volume avant d entamer la lecture Les MD à la différence des cassettes ordinaires donnent très peu de bruit Si on règle le niveau sonore comme s il s agissait d une ...

Страница 64: ...sque l inversion atteint le début du disque l appareil entre en mode de lecture Pour passer au morceau suivant Appuyer en cours de lecture sur la touche Pour repasser le morceau en cours Appuyer en cours de lecture sur la touche Pour localiser un morceau suivant Appuyer en cours d arrêt sur la touche Pour localiser un morceau précédent Appuyer en cours d arrêt sur la touche z Pour sauter plusieurs...

Страница 65: ...onner le mode de lec ture Notes z Si on choisit le mode de lecture en laissant l appareil en arrêt appuyer sur la touche PLAY PAUSE pour déclencher la lecture z Pendant l affichage de TOC la lecture au hasard ou la répétition n est pas autorisée z La lecture au hasard consiste à sélectionner et à reproduire des morceaux automatiquement On ne peut pas spécifier l ordre de lecture Elle s arrête aprè...

Страница 66: ...t en stéréo Enregistrement monaural En monaural la durée d enregistrement sera doublée Un morceau enregistré en monaural peut être reproduit à une vitesse doublée Se reporter à la page 16 1 Pour sélectionner un mode d enregistrement mettre l enregistrement en pause et agir sur la touche MODE CHRG Chaque fois que la touche est pressée l affichage se modifie comme suit 2 Déclencher l enregistrement ...

Страница 67: ...oustic Coding compresse des données sonores à 1 5 en sup primant les sons inaudibles Grâce au masquage de la psychologie acoustique la qualité sonore reste assurée Le système ATRAC3 équipant cet appareil permet de réduire des données à 1 10 ou 1 20 et assure l enregis trement 2 ou 4 fois plus long en stéréo Du mode d enregistrement On peut sélectionner l un des modes d enregistrement stéréo 2 fois...

Страница 68: ...strement sera mis en pause la fonction de pause ne marche pas dans les 10 secondes qui sui 1 Appuyer sur la touche REC 2 Déclencher la lecture sur un système hi fi rac cordé à ce lecteur enregistreur MD portable 4 Appuyer sur la touche PAUSE sur la chaîne hi fi pour mettre cette dernière en pause Sélectionner un point de démarrage pour l enregis trement et puis réappuyer sur la touche PAUSE 5 Agir...

Страница 69: ...s de lecture appuyer sur la touche PLAY PAUSE lorsqu on atteindra un point par lequel on commencera l enregistrement 2 Appuyer sur la touche REC Pour annuler l opération appuyer sur la touche OFF 3 Appuyer sur la touche ENTER SYNC L enregistreur efface tous les morceaux et tous les titres qui suivent le point de pause 4 Agir à plusieurs reprises sur la touche MODE CHRG pour sélectionner un mode d ...

Страница 70: ...x dans un laps de temps donné l appareil refuse l opération en affi chant SORRY Il faut alors attendre une opération suivante qui va démarrer Enregistrement des morceaux comme un seul On peut enregistrer des morceaux de musique comme un seul en désactivant le numérotage automatique En cours d enregistrement ou de pause Appuyer sur la touche EDIT Note S il s agit d un enregistrement numérique au mo...

Страница 71: ... chaîne hi fi 1 Les morceaux sont numérotés automatiquement en cours d enregistrement raccordement analogique lorsqu un passage silencieux dure plus de 1 seconde numérotage automatique On peut aussi enregistrer des morceaux consécutifs comme un seul en désac tivant le numérotage automatique voir page 21 2 Lorsque l on enregistre à partir d un CD ou MD en raccordant un élément numériquement les mor...

Страница 72: ...Fonctions pratiques Enregistrement à partir d un microphone Enregistrement à partir d un microphone Pour enregistrer par un microphone ...

Страница 73: ... sur la touche OFF Pour écrire l enregistrement sur MD Appuyer en arrêt sur la touche OFF 1 Brancher un microphone stéréo sur le jack MIC IN 2 Mettre un minidisc en place page 6 3 Appuyer sur la touche REC 4 Appuyer sur la touche ou pour régler le niveau d enregistrement Voyant de compteur de niveau Le niveau sonore maximal devra alors être situé en tre 4 dB et 0 dB 5 Agir à plusieurs reprises sur...

Страница 74: ...gistrement démarre souvent de manière inat tendue mettre l entrée de microphone sur MIC SYNC L z La sensibilité de l enregistrement peut être commutée en cours d enregistrement 1 Appuyer sur la touche REC 2 Appuyer sur la touche ou pour régler le ni veau d enregistrement Voyant de compteur de niveau 3 Agir à plusieurs reprises sur la touche MODE CHRG pour sélectionner un mode d enregistre ment pag...

Страница 75: ...rvalle Exemple numérotage à 5 minutes Pendant l enregistrement manuel par micro Le numérotage s effectue à un intervalle de 5 minutes Pendant l enregistrement synchronisé par micro Si un silence dure 3 secondes ou plus le numérotage marque de temps se fait à un intervalle de 5 minutes à compter d une marque précédente Numérotage manuel Appuyer en cours d enregistrement sur la touche REC 1 Agir en ...

Страница 76: ...estant s affiche seulement s il s agit d un MD enregistrable z Le temps écoulé ou le temps restant pour la lecture peut différer du temps affiché Pour vérifier le temps d enregistrement res tant et le temps de lecture total En mode d arrêt appuyer sur la touche DISP Chaque fois que la touche est pressée l affichage se modifie comme suit Le temps d enregistrement restant diffère selon le mode chois...

Страница 77: ...ré une recharge incomplète z Le voyant de pile n affiche pas correctement l état d usure pendant les 10 secondes qui suivent la mise sous tension z Lorsque l appareil fonctionne sur l adaptateur CA ou l adaptateur automobile en option le voyant de pile ne s affiche pas z Le nombre de segments dans le voyant de pile varie selon l opération en cours Il ne s agit pas d une panne c est normal 1 En mod...

Страница 78: ...uffe légèrement pendant l utilisation ou la recharge Il ne s agit pas d une panne c est normal z La batterie ne se recharge pas pendant que l appareil marche ou reste allumé 1 Introduire la batterie rechargeable Il est possible de recharger seulement la batterie li vrée avec l appareil ou en option AD N70BT 2 Brancher l adaptateur CA sur une prise murale et puis sur le jack DC IN 5V 3 Appuyer sur ...

Страница 79: ...Avec la batterie rechargeable ou une pile alcaline Notes z Si on réduit le niveau sonore à 0 pendant l enregis trement avec la batterie rechargeable ou une pile alca line on peut épargner l énergie z En période de non emploi même pour quelques heu res retirer la batterie La batterie se consomme même si l appareil est éteint z Mettre la batterie dans le boîtier fourni pour la trans porter z Cet app...

Страница 80: ...la touche HOLD enfon cée pour 2 secondes ou plus L appareil affiche HOLD OFF Pour annuler le mode de maintien Déplacer le commutateur HOLD dans le sens opposé de la flèche L appareil gardera son fonctionnement en cours même si une touche est pressée accidentellement dans un train bondé par exemple Si on active la fonction de maintien en laissant l enre gistreur éteint ce dernier ne sera pas rallum...

Страница 81: ...tion d économie d énergie règle automatiquement ce temps entre 5 et 40 secondes pour épargner de l énergie Si on annule cette fonction le temps de stockage n est plus réglable Il n est pas réglable même en cas de fonctionnement avec le chargeur Le temps de stockage varie suivant le mode de lecture Niveau d enregistrement numérique D L MODE 1 Le niveau d enregistrement numérique une fois réglé res ...

Страница 82: ...SC NAME En mode de pause ap puyer sur la touche EDIT pour sélectionner TRACK NAME 2 Appuyer sur la touche ENTER SYNC z L appareil passe en mode d entrée de caractè res z Pour annuler l opération appuyer sur la touche OFF 3 Sélectionner un type de caractère en agissant sur la touche DISP L appareil affiche pour 1 seconde les 3 premiers ca ractères du type choisi 4 Agir à plusieurs reprises sur la t...

Страница 83: ...aractère Appuyer sur la touche VOL ou VOL pour déplacer le curseur sur un caractère à effacer et puis appuyer sur la touche BASS Pour insérer un espace Appuyer sur la touche VOL pour déplacer le curseur vers la droite Caractères symboles 6 Pour saisir d autres caractères renouveler les étapes 3 5 7 La saisie de caractères terminée on pressera sur la touche EDIT 8 L appareil affiche TOC pour écrire...

Страница 84: ...Sélectionner un caractère à ajouter Suivre les étapes 3 et 4 à la page 33 4 Appuyer sur la touche ENTER SYNC 5 Appuyer sur la touche EDIT 6 L appareil affiche TOC pour écrire de nouvel les données sur le MD On pressera alors sur la touche OFF Pendant l affichage de TOC on ne peut pas retirer 1 Qu est ce qu un MD de source Un minidisc enregistrable qui contient des morceaux et leurs informations en...

Страница 85: ... de source en place Ne pas le confondre avec celui de cible 2 En mode d arrêt appuyer sur la touche EDIT pour sélectionner NAME STAMP 3 Appuyer sur la touche ENTER SYNC Pour annuler l opération appuyer sur la touche OFF 4 Réappuyer sur la touche ENTER SYNC 5 Lorsque l appareil affiche CHANGE MD on retire ra le MD de source Opération pour côté cible 6 Mettre un MD de cible en place 7 Appuyer sur la...

Страница 86: ...LAY PAUSE 2 Agir à plusieurs reprises sur la touche EDIT pour sélectionner ERASE 3 Appuyer sur la touche ENTER SYNC Pour annuler l opération appuyer sur la touche OFF 4 Réappuyer sur la touche ENTER SYNC Le morceau s efface 5 Pour effacer un autre morceau renouveler les étapes 1 4 1 En mode d arrêt agir à plusieurs reprises sur la touche EDIT pour sélectionner ALL ERASE 2 Appuyer sur la touche ENT...

Страница 87: ... opération appuyer sur la touche OFF 4 Réappuyer sur la touche ENTER SYNC Le morceau est alors divisé en deux et l appareil se cale sur le début d un deuxième morceau ainsi créé 1 Reproduire le deuxième des deux morceaux à fusionner et appuyer sur la touche PLAY PAU SE 2 Appuyer sur la touche EDIT pour sélectionner COMBINE 3 Appuyer sur la touche ENTER SYNC Pour annuler l opération appuyer sur la ...

Страница 88: ...on les fusionnera avec la fonction COMBINE Titre d un morceau fusionné Le titre du premier morceau sera adopté Si le premier n est pas titré celui du deuxième sera utilisé Deux morceaux ne seront pas fusionnés dans les cas suivants 1 Reproduire le morceau à déplacer et appuyer sur la touche PLAY PAUSE 2 Appuyer sur la touche EDIT pour sélectionner MOVE 3 Appuyer sur la touche ENTER SYNC Pour annul...

Страница 89: ... moyen d une chaîne hi fi z S il s agit d un enregistrement sur une chaîne hi fi annuler le bip de confirmation page 32 Sinon le bip sera aussi enregistré Avec un autoradio Notes z Régler le volume sur l enregistreur MD et un autora dio z Ne pas utiliser l enregistreur MD en conduisant une voiture pour éviter un accident de la route z Utiliser seulement l adaptateur AD CA20X en option MD MT99C ...

Страница 90: ...recharge complète on remplacera la batterie par une neuve AD N70BT z La durée de la batterie peut être plus courte que prévu si on l a rechargée pour la première fois ou après une période de non utilisation prolongée Ce problème sera résolu après plusieurs cycles de charge décharge z Pour assurer la longévité de la batterie on la rechar gera après l avoir déchargée complètement z La durée de la ba...

Страница 91: ...e 12 secondes ou moins Le temps affiché restera donc inchangé même si on efface de tels morceaux Le total du temps d enregistrement ef fectué et du temps restant sur le disque peut ne pas correspondre au temps d enregistrement maximal Le cluster 2 secondes d enregistrement est une unité minimale pour l enregistrement L enregistrement de 3 secondes par exemple utilise donc 2 clusters une seconde de...

Страница 92: ...ce ou le rem placer Can t REC z L enregistrement ne peut pas être ef fectué correctement à cause des vi brations ou des chocs subis MESSAGES D ERREUR SIGNIFICATION Can tSTAMP z La copie de titres est impossible Vérifier le nombre des morceaux Can tWRITE z Les informations TOC ne sont pas cor rectement enregistrées DEFECT z Le disque est rayé Si le son enregistré n est pas bon re commencer l enregi...

Страница 93: ...enté d enregistrer sur un disque non enregistrable SORRY z En cours d écriture du numéro l appa reil refuse une commande Patienter un instant et tenter de nou veau MESSAGES D ERREUR SIGNIFICATION TEMP OVER z La température est trop élevée Éteindre l appareil et patienter un ins tant TOC FORM z Il s est glissé une erreur dans les don nées On effacera tout et recommencera l en registrement TOC FULL ...

Страница 94: ...nidisc musical Les touches ne répondent pas à la pression z L appareil est il en mode de maintien z La batterie est elle épuisée z La télécommande ou le casque est il branché Perte de son z La batterie est elle épuisée z L appareil a t il subi des vibrations Le minidisc refuse de s éjecter z L appareil n a pas encore écrit le numéro de morceau ou les données en caractères z L enregistrement ou le ...

Страница 95: ...ge Si le cas se présente retirer le disque La condensation s évaporera 1 heure plus tard et l appareil fonctionnera alors correctement Entretien Nettoyage Nettoyer les fiches et les jacks du câble de raccorde ment Cela supprimera des bruits Attention z Ne pas appliquer à l appareil de produit chimique essence diluant etc La qualité et la couleur de l enveloppe peuvent s altérer z Ne pas lubrifier ...

Страница 96: ...tie RMS 20 mW 10 mW 10 mW 0 2 de D H T Temps de recharge Environ 3 5 heures 90 Environ 5 5 heures complètement rechargé avec l adaptateur CA livré avec l appareil Dimensions Largeur 81 1 mm Hauteur 19 9 mm Profondeur 92 4 mm Poids 172 g avec pile rechargeable Jack d entrée Ligne optique numérique microphone s alimentant depuis l appareil Jack de sortie Casque impédance 16 ohms télécommande Type Le...

Страница 97: ... rompu 7 5 heures envi ron Lecture inin terrompue 13 heures en viron Enregistre ment ininter rompu 10 5 heures envi ron Lecture inin terrompue 15 5 heures environ Enregistre ment ininter rompu 13 5 heures envi ron Lecture inin terrompue 17 5 heures environ Avec une pile alcaline de haute capacité au format de AA LR6 en vente dans le com merce Enregistre ment ininter rompu 3 heures envi ron Lecture...

Страница 98: ...ivery of the Sharp product together with proof of r an Authorized Sharp Servicing Dealer In home warranty ger and on any Sharp Over The Range Microwave Oven e or their agent or employee is authorized to extend enlarge liability for direct or indirect damages or losses or for any kmanship relating to the product including damages for the or any removal reinstallation transportation and insurance et...

Страница 99: ...rte à la condition que le produit entre agréé de service Sharp ou à un Détaillant autorisé au téléviseurs Sharp dont l écran est de 27 pouces ou plus et sur aucun centre de service leurs représentants ou employés ette garantie au nom de Sharp Dans la mesure où la loi en rects pour les pertes ou les dommages imprévus et pour les eliés à la perte de temps ou d utilisation de ce produit Sharp ppareil...

Страница 100: ...A0105 TO PRINTED IN MALAYSIA IMPRIMÉ EN MALAISIE DA LTD L4Z 1W9 9906 ...

Страница 101: ......

Отзывы: