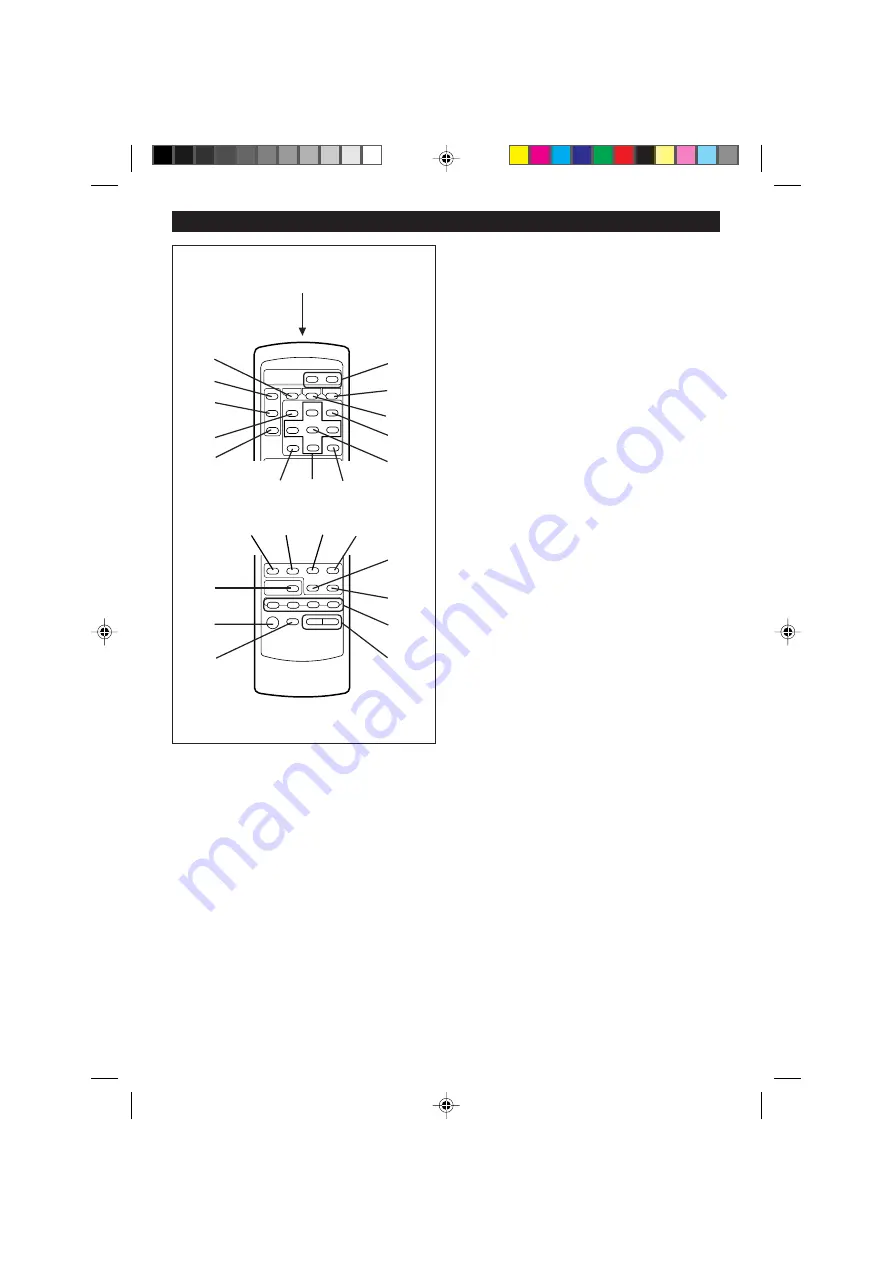
Sharp MD-M1 Скачать руководство пользователя страница 8

7


Remote control

1. Remote Control Transmitter LED
2. Surround Button
3. Clock Button
4. Timer Button
5. Name/TOC Edit Button
6. Sleep Button
7. (TUNER) Preset Up/Down Buttons
8. Extra Bass Button
9. Preset Equalizer Button

10. (MD) Display Button
11. Enter Button
12. Clear Button
13. Character Select Buttons
14. (CD/MD/TUNER) Memory Button

15. (CD/MD) Time  Button
16. (CD/MD) Play Mode Button
17. (CD/MD) Track Down/Review Button
18. (CD/MD) Track Up/Cue Button
19. (MD) Record Button
20. (CD/MD) Stop Button
21. (CD/MD) Play/Pause Button

22. Power Button
23. Dimmer Button
24. Function Selector Buttons
25. Volume Buttons

(Continued)

1

2

3

5

7

4

8

9

10

11

13

12

14

15

16

17

19

21

20

24

22

23

25

18

6

Содержание MD-M1

Страница 1: ...nk you for purchasing this SHARP product To obtain the best performance from this product please read this manual carefully It will guide you in operating your SHARP product MD M1 MD micro system consisting of MD M1 main unit and CP M1 speaker system ...

Страница 2: ...n full compliance with the copyright laws of the United States and that prior permission be ob tained from copyright owners whenever neces sary US and foreign patents licensed from Dolby Laboratories Licensing Corporation FOR YOUR RECORDS For your assistance in reporting this unit in case of loss or theft please record below the model number and serial number which are located on the rear of the u...

Страница 3: ...ed on or pinched by items placed upon or against them paying particular attention to cords at plugs convenience receptacles and the point where they exit from the appliance 10 Do not use liquid cleaners or aerosol cleaners Use a damp cloth for cleaning 11 Power Lines An outdoor antenna should be located away from power lines 12 Outdoor Antenna Grounding If an outside an tenna is connected to the r...

Страница 4: ...PERATION 31 33 USING EXTERNAL UNITS 34 35 WHAT IS A MINIDISC 36 MINIDISC SYSTEM LIMITATIONS 37 TROUBLESHOOTING 37 38 ERROR MESSAGES 39 RESETTING THE MICROCOMPUTER 40 MAINTENANCE 40 SPECIFICATIONS 41 CONSUMER LIMITED WARRANTY Back cover CONTENTS ACCESSORIES Remote control RRMCG0190AWSA 1 AC power cord QACCD0025AWZZ 1 Note Parts and accessories mentioned in this operation manual other than those in ...

Страница 5: ...electrical storm is taking place near you it is suggested that you disconnect the AC power cord from the AC outlet for safety Warning The voltage used must be the same as that speci fied on this unit Using this product with a higher voltage other than which is specified is dangerous and may result in a fire or other type of accident causing damage SHARP will not be held respon sible for any damage...

Страница 6: ...ton TUNER Preset Up Button 13 CD MD Track Down Review Button TUNER Preset Down Button 14 CD 0MD Edit Button 15 Surround Button 16 Preset Equalizer Button 17 Extra Bass Button 18 Headphone Jack 19 Volume Control Rear panel 1 Speaker Terminals 2 FM 75 Ohms Antenna Terminal 3 Antenna Ground Terminal 4 AM Loop Antenna Terminal 5 Auxiliary Input Analog Level Control 6 Demo Switch 7 Auxiliary Input Anal...

Страница 7: ...otal Indicator 15 CD MD Remaining Time Indicator 16 Timer Record Timer Play Indicator 17 CD Indicator 18 MD Indicator 19 MD Record Indicator 20 AM PM Indicator 21 Sleep Indicator 8 L R OVER ST DISC TOC SURROUND X BASS TRACK MEMORY RANDOM TOTAL REMAIN REC PLAY REC kHz MHz SLEEP AM PM 8888888 88 1 2 8 L R OVER REC PLAY REC kHz MHz SLEEP AM PM 8888888 88 8 ST DISC TOC SURROUND X BASS TRACK MEMORY RAN...

Страница 8: ...Button 11 Enter Button 12 Clear Button 13 Character Select Buttons 14 CD MD TUNER Memory Button 15 CD MD Time Button 16 CD MD Play Mode Button 17 CD MD Track Down Review Button 18 CD MD Track Up Cue Button 19 MD Record Button 20 CD MD Stop Button 21 CD MD Play Pause Button 22 Power Button 23 Dimmer Button 24 Function Selector Buttons 25 Volume Buttons Continued 1 2 3 5 7 4 8 9 10 11 13 12 14 15 16...

Страница 9: ...Connect the AM loop antenna wire to the AM and GND terminals Position the AM loop antenna for optimum recep tion Place the AM loop antenna on a shelf etc or attach it to a stand or a wall with screws not sup plied Notes When static is still heard even after adjusting the position of the AM loop antenna try reversing the wire connections Do not place the AM loop antenna and the FM antenna wire on t...

Страница 10: ...t least 4 10 cm away Note Do not place the system or speakers near the television set as the magnetic fields produced may cause irregular colours to be displayed To an AC outlet To AC INPUT AC 120 V 60 Hz DEMO ON OFF When the AC power cord is first connected the unit will enter the demonstration mode and the words will scroll across the display continuously To cancel the demonstration mode When in...

Страница 11: ...for long periods of time This will prevent potential damage due to battery leakage Caution Do not use rechargeable batteries nickel cadmium battery etc Notes concerning use Replace the batteries if the operating distance is reduced or if the operation becomes erratic Periodically clean the transmitter LED on the remote control and the sensor on the main unit with a soft cloth Exposing the sensor o...

Страница 12: ...ress the ENTER button DISC TOC TRACK MEMORY RANDOM TOTAL REMAIN REC kHz MHz SLEEP 8 Adjust the minutes by pressing the or button DISC TOC TRACK MEMORY RANDOM TOTAL REMAIN REC kHz MHz SLEEP When the button is pressed once the time will increase by 1 minute When the button is pressed once the time will decrease by 1 minute The hour setting will not advance even if min utes advance from 59 to 00 9 Pr...

Страница 13: ... AM PM 0 1 2 29 30 MAX Main unit Remote control REC SLEEP Extra bass X BASS Press the X BASS button to emphasize the bass region of the frequency spectrum X BASS ON will appear Press the X BASS button again to cancel the extra bass mode X BASS OFF will appear Surround When the EQUALIZER button is pressed the cur rent mode setting will be displayed To change to a different mode press the EQUALIZER ...

Страница 14: ...o interrupt playback Press the 0 6 button 6 will appear Press the 0 6 button again to resume playback from the same point To stop playback Press the button After use Press the POWER button to enter the stand by mode Caution Do not open the CD compartment during play back or while paused Keep foreign objects out of the CD compartment Subjecting the unit to shock or vibration may cause mistracking W...

Страница 15: ...ton again to resume playback from the same point To stop playback Press the button To remove a MiniDisc Press the 7 MD EJECT button Notes If TV or radio interference occurs when using the MD move the unit away from the TV or radio Although MiniDiscs will not normally skip due to vibration you may hear a skip in the sound if there is continuous vibration If the volume is turned up too high a skip m...

Страница 16: ...he disc will play continuously To listen again to the track being played Press the 5 3 button for less than 0 5 seconds during playback To move to the beginning of the next track Press the 2 4 button for less than 0 5 seconds during playback To skip a number of tracks Press the 5 3 or 2 4 button repeatedly until the desired track number is shown To start playing at a desired track Press the 5 3 or...

Страница 17: ...hile the MEMORY indicator is flashing Each time the button is pressed one track will be cleared beginning with the last track pro grammed To cancel the APMS While the unit is stopped in the APMS mode press the CLEAR button to turn off the MEMORY dis play The program contents will be erased When you open the CD compartment or a MiniDisc is ejected the APMS mode will be can celed To check which trac...

Страница 18: ...TAL REMAIN REC TOTAL REMAIN Notes During random play the total remaining playing time cannot be displayed Depending on a CD or MD to be played the play ing time display may not match the total playing time which is indicated on the CD or MD jacket as the time between the tracks is not included Changing the display during MD playback Each time the DISPLAY button is pressed during playback or when i...

Страница 19: ...uning auto scan tuning may stop automatically at that point If a weak station signal is found during auto scan tuning the station will be skipped To stop the auto tuning press the TUNING X or W button again 5 To receive an FM stereo transmission press the TUNER BAND button so that the ST indica tor on the display lights up j will appear when an FM broadcast is in stereo If the FM reception is weak...

Страница 20: ...will flash and the pro grammed stations will be tuned in sequentially for 5 seconds each 2 Press the PRESET X or W button again to stop the memory scan at the desired station Note When the preset memory does not have any sta tions stored in it the preset memory scan will not function To erase all memorized stations When the unit is in the stand by mode hold and press theTUNER andTUNING X buttons a...

Страница 21: ...rded TOC is flashing and do NOT impart shock to the unit Otherwise TOC will not be correctly recorded and consequently proper playback may not be possible About track numbers When recording from a CD New track numbers will be created automatically according to the original tracks Synchro mark func tion When you record from a CD to a MiniDisc the track numbers recorded on the MiniDisc may not match...

Страница 22: ...the MD button 2Load a MiniDisc 3Press the DISPLAY button to find the time fol lowed by a hyphen The total the number of tracks previously re corded and the available time remaining will be displayed 4 seconds later the unit will return to the original display To cancel the operation Before pressing the CD 0 MD EDIT button press the button To stop recording Press the button Playback and recording w...

Страница 23: ...MS recording start To stop recording Press the button Playback and recording will stop and the track numbers will be written to the MiniDisc Note It is not possible to pause in the recording mode To record without using One Touch Editing Without using one touch recording the following operation allows you to record from the first track 1 Press the CD button 2 Load a compact disc and a recordable M...

Страница 24: ... can be tuned in most clearly During recording you cannot change the station 5 Press the 0 6 button To stop recording Press the button The recording will stop and the track number will be written on the MiniDisc Note It is not possible to pause in the recording mode To record the track number while record ing The recording is performed as a single track To identify different sections of a recordin...

Страница 25: ...s and you can create disc or track names Playback only MiniDiscs cannot be edited ERASE ALL ERASE Tracks you want to erase can be erased one at a time or all at once Once a track has been erased it cannot be recovered Double check the track number before erasing it Page 30 A B C A B D E D 1 2 3 4 1 2 3 4 E 5 A B C D E F G H I J K L M N O P Q R S T U V W X Y Z 1 2 3 4 5 6 7 8 9 0 _ characters Chara...

Страница 26: ...isc name will be recorded To erase a disc name After performing steps 1 to 3 1Press the CLEAR button for 2 seconds or more NAME CLEAR will flash 2Press the ENTER button Notes Up to 40 characters can be entered This function cannot be used in the random play mode and APMS play mode 1 Press the button after pressing the MD but ton The total number of tracks and the total playing time on an MD will a...

Страница 27: ... type is the same as the previous character step 3 can be skipped 6 After entering all of the characters in the name press the NAME TOC EDIT button REC SLEEP The track name will be recorded The unit will return to normal playback Press the 0 6 button in the pause mode the unit will return to normal playback To erase a track name After performing steps 1 to 2 1Press the CLEAR button for 2 seconds o...

Страница 28: ...y disc or track names created on other equipment if they are over 40 charac ters In this case erase the name and then enter a new name Example To change BESUT to BEST 1 To change disc names perform steps 1 3 on page 25 To change track names perform steps 1 2 on page 26 2 Press the or button to make the character you want to erase begin flashing To cancel the operation press the button 3 Press the ...

Страница 29: ...o make any further divisions of tracks Page 37 This function cannot be used in the random play mode and APMS play mode 3 4 H 1 2 2 Remote control operation 1 While in the stop mode select the second of the two adjacent tracks you want to combine by pressing the 5 3 or 2 4 button Or start playing the second of the two tracks you want to combine and then press the 0 6 button 2 Press the NAME TOC EDI...

Страница 30: ... 3 or 2 4 but ton Or start playing the track to be moved and then press the 0 6 button 2 Press the NAME TOC EDIT button and within 10 seconds select MOVE by pressing the or button 3 Within 10 seconds press the ENTER button 3 5 H 1 2 1 2 4 Remote control operation Continued To combine two non contiguous tracks Example the first and third tracks Move the third track to the second track using the MOV...

Страница 31: ...rt playing the track to be erased and then press the 0 6 button 2 Press the NAME TOC EDIT button and within 10 seconds select ERASE by pressing the or button 3 Within 10 seconds press the ENTER button To cancel the operation press the button 4 Press the ENTER button again The track is erased and the unit is stopped at the beginning of the next track Notes Once a track has been erased it cannot be ...

Страница 32: ...ANDOM TOTAL REMAIN REC SLEEP PLAY DISC TOC TRACK MEMORY RANDOM TOTAL REMAIN REC SLEEP PLAY 8 Press the or button to set the minute to stop then press the ENTER button DISC TOC TRACK MEMORY RANDOM TOTAL REMAIN REC SLEEP PLAY DISC TOC TRACK MEMORY RANDOM TOTAL REMAIN REC SLEEP PLAY PLAY 9 Press the VOLUME button to adjust the sound volume I Be careful not to turn the volume up too high 10 Press the ...

Страница 33: ...OM TOTAL REMAIN REC SLEEP REC 8 Press the or button to set the minute to stop then press the ENTER button DISC TOC TRACK MEMORY RANDOM TOTAL REMAIN REC SLEEP REC DISC TOC TRACK TOTAL REMAIN REC SLEEP REC REC 9 Press the VOLUME button to adjust the sound volume Be careful not to turn the volume up too high 10 Press the POWER button to enter the stand by mode The TIMER STAND BY indicator will light ...

Страница 34: ...d during the sleep operation REC SLEEP 5 Press the ENTER button SLEEP DISC TOC TRACK MEMORY RANDOM TOTAL REMAIN REC SLEEP 6 The unit will enter the stand by mode automati cally after the preset sleep time has elapsed To cancel the sleep operation Press the POWER button to enter the stand by mode The sleep operation can also be canceled as fol lows if you can not set the unit to the stand by mode d...

Страница 35: ...te plug To LEFT Commercially available RCA cord AUX INPUT LEVEL RIGHT LEFT RIGHT LEFT Note When the audio output signal of an external unit is connected to this unit oscillation may occur In such a case disconnect either the input or output connection Headphones Notes Before plugging in or unplugging the headphones make sure the volume level is reduced Be sure your headphones have a 1 8 3 5mm diam...

Страница 36: ...sound is obtained Adjust the recording level so that the OVER in dicator does not light at the maximum level L R OVER OVER 4 Adjust the sound level using the VOLUME buttons on the remote control or the VOLUME control on this main unit 4 4 2 1 2 1 MAX MIN AUX INPUT LEVEL 3 1 Press the POWER button to turn the power on 2 Load a recordable MD 3 Press the AUX button 4 Press the I REC button 5 Start pl...

Страница 37: ...ptiveTRansform Acoustic Cod ing ATRAC The ATRAC Adaptive TRansform Acoustic Cod ing is a new technology that is designed to eliminate the information in sounds which you can not hear and to compress the remaining sound data so that the recording uses about 1 5 of the original sound information Sound data is analyzed and filtered to take advantage of psycho acous ticmasking The acoustic quality of ...

Страница 38: ...ombined A cluster about 2 seconds is normally the minimum unit of recording So even if a track is less than 2 seconds long it will use about 2 seconds of space on the disc Therefore the time actually available for recording may be less than the remaining time displayed If there are scratches on discs those sections will be auto matically avoided no recording will be placed in those sec tions There...

Страница 39: ...disc Load the correct disc Place the unit on a firm level surface free from vibration Remove the disc and leave the power turned on The unit should function properly in about 1 hour Symptom Even though a disc has been loaded CD NO DISC or ERR is displayed Playback stops in the middle of a track or playback is not performed properly Playback sounds are skipped Symptom Radios make unusual noise con ...

Страница 40: ...by mode and try to write the TOC again Remove any source of shock or vibration while writing Replace it with another disc Replace the disc with another recordable disc Meaning Nothing is recorded A track cannot be edited Recording cannot be performed correctly due to vibration or shock in the unit Timer recording is impossible or there is no available space on the MD A CD has not been loaded The d...

Страница 41: ...mode 2 Press the POWER button while holding down the EQUALIZER button and the PLAY button ALL CLEAR will appear Caution The operation explained above will erase all data stored in memory including clock and timer settings and tuner MD and CD presets 1 2 2 NO YES Correct Compact discs are fairly resistant to damage how ever mistracking can occur due to an accumulation of dirt on the disc surface Fo...

Страница 42: ... converter Coding ATRAC Adaptive TRansform Acoustic Coding Sampling frequency 44 1 kHz Recording method Magnetic modulation overwrite method Frequency response 20 20 000 Hz D A converter 1 bit D A converter Wow and flutter Unmeasurable less than 0 001 W peak Signal noise ratio 95 dB 1 kHz Dynamic range 90 dB 1 kHz Audio channel Stereo 2 channels Monaural 1 channel playback only long time recording...

Страница 43: ...42 MEMO ...

Страница 44: ...me period described herein on behalf of Sharp The warranties described herein shall be the sole and exclusive warranties granted by Sharp and shall be the sole and exclusive remedy available to the purchaser Correction of defects in the manner and for the period of time described herein shall constitute complete fulfillment of all liabilities and responsibilities of Sharp to the purchaser with res...

Страница 45: ... tv dvd and othes Manual users user manuals user guide manual owners manual instruction manual manual owner manual owner s manual guide manual operation operating manual user s manual operating instructions manual operators manual operator manual product documentation manual user maintenance brochure user reference pdf manual Downloaded from http www usersmanualguide com ...

Отзывы: