background image

22

ENGLISH

FRANÇAIS

ESPAÑOL

Enjoy Movie Files

1.  Press 

[RED]

 button to switch the media type to MOVIE.

2.  Press 

[   /   /   /   ]

 to select the movie you want to view.

3.  Press 

[ENTER]

 to play the movie.

4.  Press 

[EXIT]

 to exit the video and return to the previous directory.

5.  When enjoying the video, press 

[MENU]

 button to display / exit the tool bar. Press 

[   /ENTER]

 to enter the submenu 

and press 

[EXIT]

 to return to the upper menu.

6.  Press 

[ASPECT]

 button one or more times to enlarge the image by Wide and Normal.

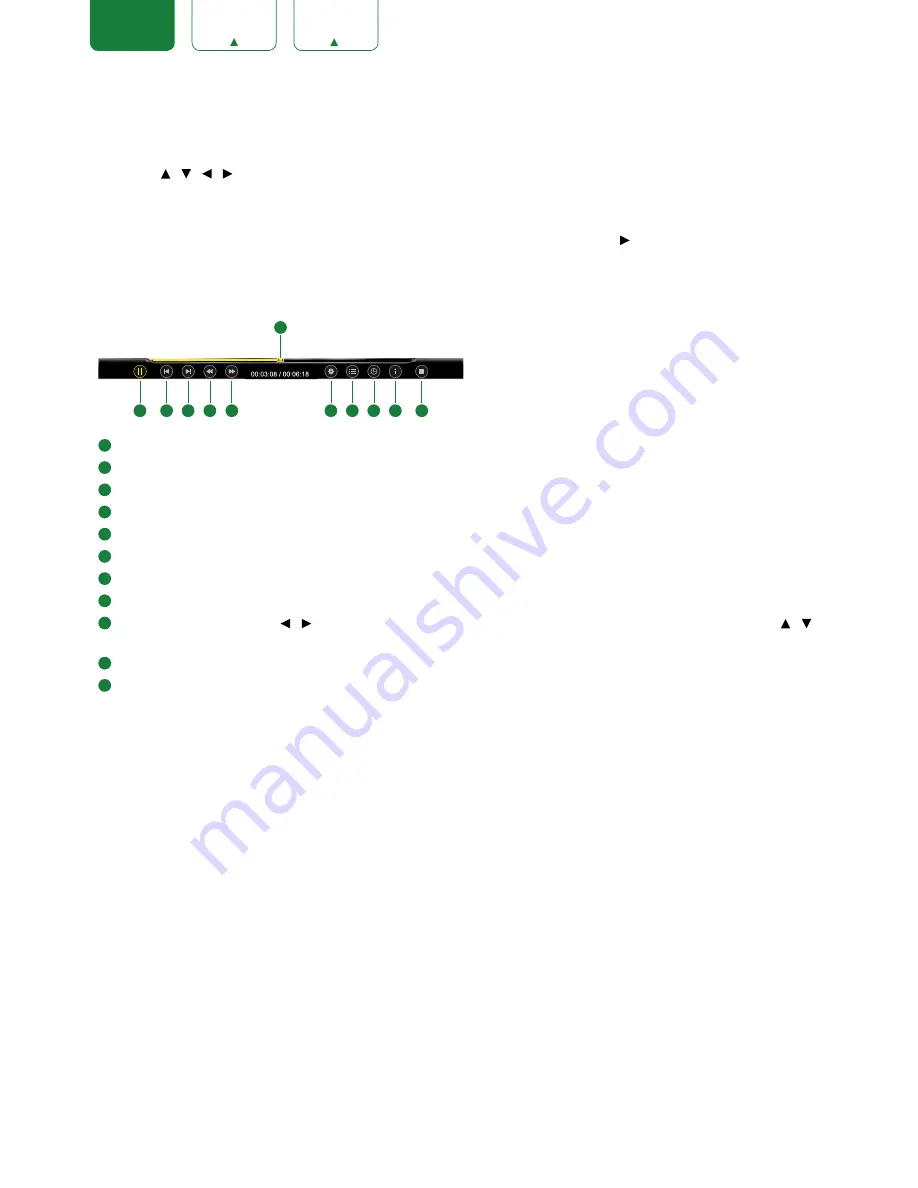
Tool bar

1

 Progress bar.

2

 Play / Pause the video.

3

 Play the previous video.

4

 Play the next video.

5

 Fast backward. Press 

[ENTER]

 to select the backward speed.

6

 Fast forward. Press 

[ENTER]

 to select the forward speed.

7

 Options. Adjust Repeat Mode, Zoom Mode, Audio Track, and Subtitle.

8

 Play list. You can select the video you want to view, then press 

[ENTER]

 to play.

9

 Select time to play. Press 

[   /   ]

 to select the position you want to set, press 

[0~9]

 to set the time (or press 

[   /   ]


to adjust it), then press 

[ENTER]

 to confirm and the video will to play at the time you have set.

10

 Video Info. Displays details on image resolution, audio and video code, subtitle, audio track, program and time.

11

 Stop playback.

1

2

3

4

5

6

7

8

9

10

11

Содержание LC - 40N3000U

Страница 1: ...USER MANUAL Before using the TV please read this manual thoroughly and retain it for future reference ENGLISH FRANÇAIS ESPAÑOL ES G1612C8 ...

Страница 2: ...USER MANUAL Before using the TV please read this manual thoroughly and retain it for future reference ENGLISH ...

Страница 3: ...equests for permission to store reproduce transmit or distribute materials may be made in writing to the following address USA Hisense USA Corporation PO Box 3289 Suwanee GA 30024 CANADA Hisense Canada Co Ltd 405 Britannia Rd E Suite 11 Mississauga Ontario L4Z 3E6 MEXICO Hisense Mexico S de RL de CV Boulevard Miguel de Cervantes Saavedra No 301 Torre Norte Piso 2 Colonia Ampliación Granada C P 115...

Страница 4: ...d or implied that the Application Service will be uninterrupted or error free including but not limited to vagaries of weather disruption of Service acts of God warranties of title local or regional limitations no infringement NOR IMPLIED WARRANTIES OF MERCHANTABILITY OR FITNESS FOR A PARTICULAR PURPOSE No advice or information given by the licensors or manufacturers providers affiliates or contra...

Страница 5: ...kers or other audio receivers 6 Connecting a digital sound bar to use Audio Return Channel ARC 7 Using Your TV Remote Control 8 Buttons on your TV remote 8 Remote control range information 8 Begin using your remote 9 Completing the First Time Setup Menu 10 Shortcuts Instructions 12 Selecting the input source 12 Changing Channels Volume 12 Shortcuts Instructions 12 Basic Settings 14 Using the Menu ...

Страница 6: ...BLE port on the side of TV 3 Using your remote press the INPUT button and select TV as the input source Connecting a satellite receiver DVD player or other audio visual AV device with a composite video cable yellow red white To connect an AV device with a composite video cable not provided 1 Use the audio and video cables to connect the composite video audio ports of the external AV device to the ...

Страница 7: ...gital devices In addition some devices such as a PVR or DVD player require an HDMI signal to be set to Output in the settings of the device Please refer to the User Manual that came with your device for step by step instructions To connect an AV device with an HDMI cable not provided 1 Use an HDMI cable to connect the HDMI output port of the AV device to the HDMI port of the TV 2 Plug the connecte...

Страница 8: ... page 7 NOTES When a digital audio system is connected to the DIGITAL OUTPUT port decrease the TV and system volume 5 1 CH channel audio is available when the TV is connected to an external device that supports a 5 1 channel surround sound You can receive 5 1 channel audio in one of two ways The first way is to connect the DIGITAL OUTPUT port from the device to the Amplifier The second way is to c...

Страница 9: ...ltiple remotes for each device To connect a digital sound bar with an HDMI cable not provided 1 Connect the cable that s attached to the sound bar to the HDMI ARC port on the TV 2 Turn on the sound bar by pressing the Power button 3 Press the MENU button on your remote and go to System CEC Function 4 Turn on the CEC Control setting 5 Turn on the Audio Receiver setting NOTES Only digital sound bars...

Страница 10: ...ction buttons Audio select button Mono Stereo SAP operation Move Up Down Left Right or adjust settings Display the channel name Infrared transmitter Select input source Next channel Previous channel Select HDMI source Set the sleep timer Adjust closed caption mode MENU button Close the menu Increase volume Decrease volume Display current time Media content control function buttons Select component...

Страница 11: ... your new SHARP television please refer to the User s Manual supplied by your Cable or Satellite provider The Cable or Satellite providers User s Manuals should include instructions on how to program their remote to your television A list of SHARP codes for the most common Cable and Satellite providers are listed below Use the SHARP code that is associated with your Cable or Satellite provider if ...

Страница 12: ... Year Month Day Time are not available Setting the Time Press to select the number you want to set and press to set Press to select your Picture Mode Home Mode or Retail Mode press ENTER button to confirm If you select Retail Mode a message appears Are you sure you want retail mode Select Yes to continue or select No to change your selection ENTER MENU EXIT Choose Your Menu Language English França...

Страница 13: ...take several minutes to scan channels Please allow the process to complete without interruption If you press EXIT to exit the scanning a message appears Please Run Channel Auto Scan scan channels from the menu ENTER MENU EXIT Choose Your TV Source Antenna Cable Enter Select Return Exit Select if using an antenna for standard or HD TV EXIT Scanning for Channels 0 Digital Channels 0 Analog Channels ...

Страница 14: ...el search guide When you select TV as input if no TV channels were saved before you will be prompted to do a channel search Before channel tuning could start you must specify the Tuner Mode Antenna or Cable You can also go to Setting menu Channel to change the channel settings Shortcuts Instructions Picture Press to set the picture mode It can be set as Vivid Standard Theater Energy Savings or Cus...

Страница 15: ...me movie in this mode the display image is stretched proportionately to fill the TV screen When watching a widescreen 1 78 1 signal program or movie the display image fills the TV screen Auto Automatically adjusts the image based on the screen size and the TV program Zoom Stretch the 4 3 aspect ratio image vertically and horizontally to fill the screen at 1 1 78 aspect ratio Cinema Stretch the 4 3...

Страница 16: ...button to enter the menu 3 In each menu you can Press to select an item Press to adjust the value Press ENTER to enter the submenu Press MENU to back the previous menu 4 Press EXIT to exit the menu NOTE The menus in the user manual may vary slightly from the actual screen ENTER MENU EXIT Enter Select Previous Exit Adjust settings to affect picture quality Picture Picture Mode Standard Brightness 5...

Страница 17: ...d dark areas of the picture You can select Off Low or High Backlight Sets the overall brilliance of the screen When the option of Dynamic Backlight Control is turned Low or High you cannot change the Backlight setting Aspect Ratio To choose the screen aspect ration from Wide Cinema Auto Normal and Zoom NOTE The Aspect Ratio option is different in different inputs For more information see Shortcuts...

Страница 18: ...hannel audio regardless of the input format RAW When the data stream carries Dolby signal digital SPDIF outputs Dolby data stream When the data stream carries no Dolby signal it transports PCM data stream MTS SAP Select the default audio stream you can select Mono Stereo or SAP Second Audio Program Mono Select this option if there is noise or static on weak stereo broadcasts Stereo Select this opt...

Страница 19: ...lay your Favorite List You can add or delete channels to create your favorite list Channel Labels Change the channel name Press to select the character you want to change then press to set the character Signal Strength You can check the digital signal strength to determine if you need to adjust your antenna or digital cable input NOTE Only available in Digital channels Audio Only Turn off the scre...

Страница 20: ...s to select the Input Source that you want to label and then press to move to the custom label field Press to select the character that you prefer After you have completed the label the next time you press INPUT your label will appear in the Input Source list CEC Function CEC Function lets you control HDMI CEC compatible devices connected to the HDMI ports on your TV using the remote control that ...

Страница 21: ... and TV programs for Canadian Ratings Change Password If you want to change the default password first enter the new password then enter the same password again Open V Chip Display an advanced V Chip ratings table for digital channels USA only Reset Parental Control Settings Resets all parental control settings to factory mode Clean All Reset all your settings to factory mode Following is the desc...

Страница 22: ...tal Guidance 14 Viewers 14 years and older 18 Adult Programming Canadian French Ratings Rating Defined as G General 8 ans 8 General Not recommended for young children 13 ans Programming may not be suitable for children under the age of 13 16 ans Programming is not be suitable for children under the age of 16 18 ans Programming restricted to adults NOTE As you block ratings all ratings higher than ...

Страница 23: ...f your TV while viewing video photo Press INPUT button to display the INPUT menu press button to highlight the USB source then press ENTER button to confirm If you want to exit DMP you can press INPUT button to switch to other sources Press RED button to switch the media type Press YELLOW BLUE button to turn to the previous next page Media content control function buttons When viewing video photo ...

Страница 24: ... Progress bar 2 Play Pause the video 3 Play the previous video 4 Play the next video 5 Fast backward Press ENTER to select the backward speed 6 Fast forward Press ENTER to select the forward speed 7 Options Adjust Repeat Mode Zoom Mode Audio Track and Subtitle 8 Play list You can select the video you want to view then press ENTER to play 9 Select time to play Press to select the position you want ...

Страница 25: ...to enter the submenu and press EXIT to return to the upper menu Tool bar NOTE The menu will change while you are browsing through or pausing your photos 1 Play Pause the photo 2 Stop browsing the photo 3 Browse the previous photo 4 Browse the next photo 5 Allows the photo to rotate 90 degrees clockwise 6 Allows the photo to rotate 90 degrees anti clockwise 7 Zoom in the photo 8 Zoom out the photo ...

Страница 26: ...any damage to your data and the unit A USB Memory Stick that requires its own driver or the device with a special system such as fingerprint recognition are not supported This unit is not allowed to use the USB Memory Stick which requires an external power supply 500mA or more Playable Format List Video Support List File Extension Container Video Codec Spec Bitrate bps mpg mpeg MPG MPEG MPEG2 MP H...

Страница 27: ...plug it after 60 seconds Check that the Color is set to 50 or higher Try different TV channels The sound and or picture is distorted or appears wavy An electric appliance may be affecting the TV Turn off any appliances that are nearby and move it farther away from the TV Insert the power plug of the TV set into another power outlet The sound and picture is blurry or cuts out If using an external a...

Отзывы: