background image

English

   - 9 -

Quickly plugging and unplugging USB devices, is a very hazardous 

• 

operation.  Especially,  do  not  repeatedly  quickly  plug  and  unplug 

the drive. This may cause physical damage to the USB player and 

especially the USB device itself.

Do not pull out USB module while playing or recording a file.

• 

Programme Recording

To record a programme, you should first connect a USB disk to your 

TV while the TV is switched off. You should then switch on the TV to 

enable recording feature.

IMPORTANT: When using a new USB hard disk drive, it is recommended 

that you first format the disk using your TV’s “Format Disk” option.

To use the recording function a USB 2.0 certified device of at least 

• 

1GB should be used, If the connected USB device is not USB 2.0 an 

error message will be displayed.
Recorded programmes are saved into the connected USB disk in .TS 

• 

format (MPEG-2 transport stream). If desirable, you can back up / 

copy these saved recordings into a personal computer.

Note: It is possible that recorded broadcasts in .TS format may not be 

supported by your media playback software. In such a case, you should 

install an appropriate media playback software to your computer.

An hour of the recordings stored occupies approximately 2 GB of 

• 

space.
For  more  information  on  recording  programmes,  see  sections 

• 

“Instant Recording”, “Timeshifting”, “Electronic Programme Guide”, 

“Recordings Library” or “Recording Timers” in the following parts.
Recorded programmes are split into 1GB partitions. Names of the 

• 

stored recordings’ last three digits indicates this: Such as 4801-000.

ts , 4801-001.ts.
Recorded programmes are stored in the following directory of the 

• 

connected USB disk: \DVR\RECS. All recordings are indicated with 

a number (such as 4801-000.ts). A text (txt) file is created for each 

recording. This text file includes information such as broadcaster, 

programme, and recording time.

If  the  writing  speed  of  the  connected  USB  disk  is  not  sufficient, 

• 

recording may fail and timeshifting feaute may not be available.
Recordings  of  HD  programmes  can  occupy  bigger  size  on  the 

• 

USB disk depending on the broadcast’s resolution. For this reason 

it is recommended to use USB hard disk drives for recording HD 

programmes.
Do not plug out the USB/HDD during the recording. This may harm 

• 

the connected USB/HDD.
Only two partitions on a HDD unit can be supported.

• 

Some  stream  packets  may  not  be  recorded    because  of  signal 

• 

problems, so sometimes video may freezes during playback. 
Record,  Play,  Pause,  Display  (for  PlayListDialog)  keys  could  not 

• 

be used when teletext is ON. If a recording starts from timer when 

teletext is ON, teletext is automatically turned off. Also teletext usage 

is disabled when there is ongoing recording or playback. 

If the recording time of an event is longer than the memory capacity, 

the following message will appear on the screen: “There is not enough 

space for ‘event’ but it will be recorded until the drive is full”.

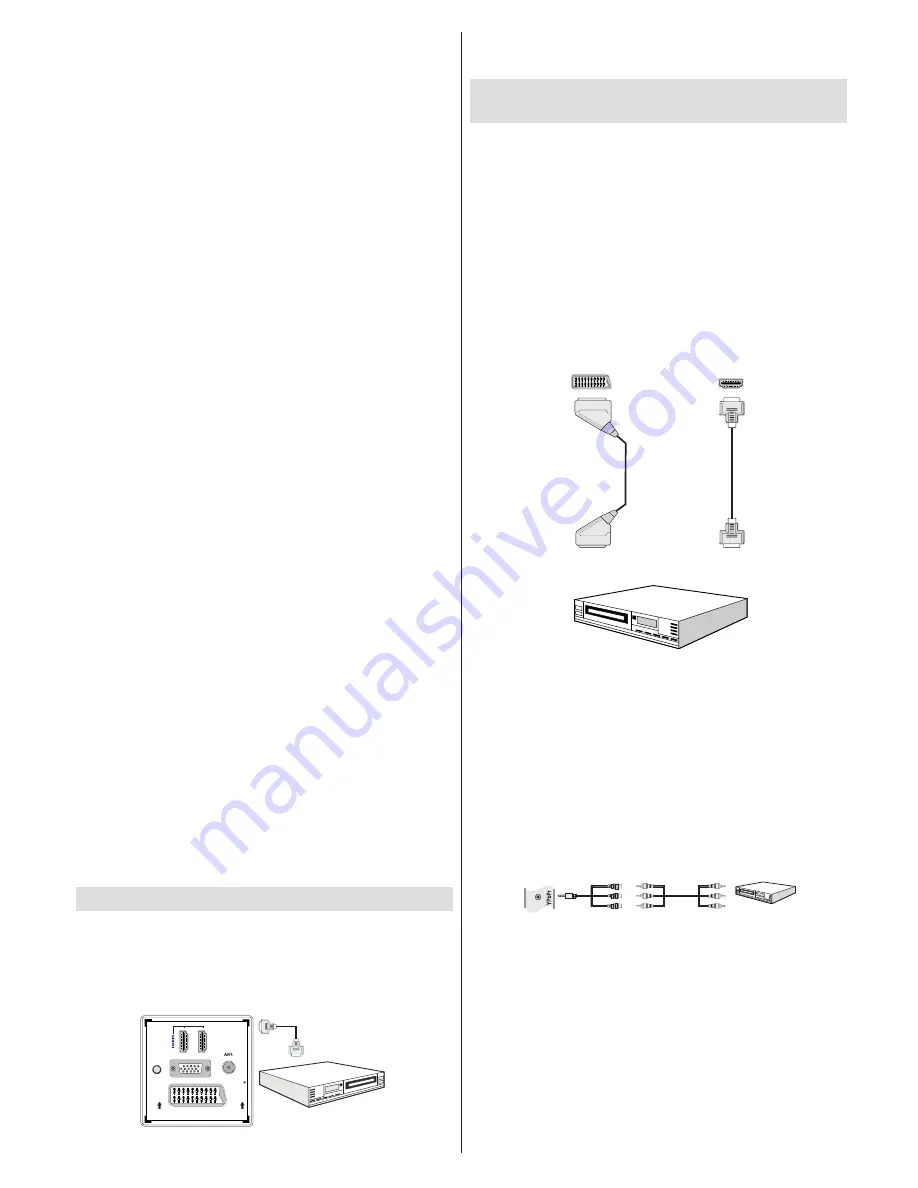
Connecting to a DVD Player via HDMI

Please refer to your DVD player’s instruction book for additional 

information. Power off both the TV and the device before making 

any connections.
Note

: Not all cables shown in the illustration are supplied.

If your DVD player has an 

• 

HDMI

 socket, you can connect via 

HDMI 

for 

better video and audio quality.

SPDIF

SCART

VGA

Coax.OUT

1

2

External device

(not


supplied)

HDMI Cable

When you connect to DVD player as illustrated above, switch to the 

• 

connected 

HDMI 

source.  See, 

Input  Selection

  section  for  more 

information on changing sources.

Connecting to a DVD Player via Component 

Sockets (YPbPr) or Scart Cable

If you want to connect a DVD player to your LCD TV, you can use 

connectors of the TV set. DVD players may have different connectors. 

Please  refer  to  your  DVD  player’s  instruction  book  for  additional 

information. Power off both the TV and the device before making any 

connections.

Note

: Cables shown in the illustration are not supplied.

If your DVD player has an HDMI socket, you can connect via HDMI. 

• 

When you connect to DVD player as illustrated below, switch to HDMI 

source. See, “Input Selection” section.
You may also connect through the scart socket. Use a SCART cable 

• 

as shown below.

Note

: These two methods of connection perform the same function 

but in different levels of quality. It is not necessary to connect by all 

three methods.

HDMI

inputs

Scart  sockets

DVD  Player

Scart  Cable

(not  supplied)

HDMI  Cable

(not  supplied)

HDMI

SCART

Some DVD players are connected through 

• 

COMPONENT SOCKETS 

(YPbPr)

. In this case, you must use the supplied Component video 

connection cable for enabling connection. First, plug single jack of 

the cable to the TV’s YPbPr socket (side). Afterwards, insert your 

component cable’s (not supplied) connectors into the plural part of the 

Component video connection cable (see illustration below). Colours 

of the connected jacks should match. 
To enable audio connection, use the 

• 

VGA/Component Audio cable

First, plug single jack of the cable to the TV. Afterwards, insert your 

DVD player’s audio cable’s connectors into the plural part of the 

VGA/

Component audio connection cable 

(

see illustration below

). Colours 

of the connected jacks should match. 

Side  AV  Input

Audio  Cable

(Not  supplied)

Side  Video/Audio 

Connection  Cable

(Supplied)

SI

D

AV

YPbPr

Side  view

DVD  Player

Connection  Cable

(supplied)

YPbPr  Video  Cable

(Not  supplied)

When the connection is made, switch to 

• 

YPbPr

 source. See, 

Input 

selection

 section.

Note: 

To connect YPb Pr device, you should use supplied 

component (YPbPr) connection cable.

Содержание LC-32SH130K

Страница 1: ...LC 32SH130K LCD COLOUR TELEVISION OPERATION MANUAL ENGLISH 50201858 SHARP ELECTRONICS Europe GmbH Sonninstraße 3 D 20097 Hamburg SHARP CORPORATION http www sharp eu com ...

Страница 2: ...g a Channel 14 Deleting a Channel 14 Renaming a Channel 14 Locking a Channel 14 Managing Stations Favourites 14 Button Functions 14 Managing Stations Sorting Channel List 14 On Screen Information 14 Media Playback Using Media Browser 15 Viewing Videos via USB 15 Viewing Photos via USB 15 Slideshow Options 15 Playing Music via USB 15 Recordings Library 16 Media Browser Settings 16 Timeshift Recordi...

Страница 3: ...rivate domestic use and may not be used for industrial and commercial purposes We exclude liability in principle if the device is not used as intended or unauthorized modifications have been made To operate your LCD TV in extreme ambient conditions may cause the damage of the device Preparation For ventilation leave a free space of at least 10 cm all around the set To prevent any fault and unsafe ...

Страница 4: ...openings This product is not designed for built in installation do not place the product in an enclosed place such as a bookcase or rack unless proper ventilation is provided or the manufacturer s instructions are followed The LCD panel used in this product is made of glass Therefore it can break when the product is dropped or impact applied If the LCD panel is broken be careful not to be injured ...

Страница 5: ... should not be disposed of with household waste Please dispose of used batteries in an environmentally friendly manner Find out about the legal regulations which apply in your area Do not try to recharge batteries there is a danger of explosion Replace batteries only with the same or equivalent type This symbol on the product or on its packaging means that your electrical and electronic device sho...

Страница 6: ...save the environment but also you can save money by reducing electricity bills thanks to the energy efficiency feauture of this TV To reduce energy consumption you should take the following steps You can use Power Save Mode setting located in the Other Settings menu If you set Power Save Mode as On the TV will switch to energy saving mode and luminance level of TV set will be decreased to optimum ...

Страница 7: ...Red button 19 Green button List Schedule in EPG Tag Untag All in 20 favourite list Play Slideshow in Media Browser Loop Shuffle in Media Browser Picture mode selection Changes picture mode in Media 21 Browser video mode No function 22 Teletext Mix in TXT mode 23 Subtitle on off in DVB channels 24 Previous programme 25 AV Source selection 26 Menu on off 27 Okay Confirm Hold in TXT mode Edit Channel...

Страница 8: ...o HDMI connection RF Input 3 connects to an aerial antenna system Note that if you use a decoder or a media recorder you should connect the aerial cable through the device to the television with an appropriate antenna cable as shown in the illustration in the following pages SCART 4 input or output for external devices Connect the SCART cable between SCART socket on TV and SCART socket on your ext...

Страница 9: ...Aerial Connection Connect the aerial cable TV plug to the AERIAL INPUT socket located at the rear of the TV SPDIF SCART VGA Coax OUT 1 2 Using USB Inputs USB Connection You can connect a USB hard disk drive or USB memory stick to your TV by using the USB inputs of the TV This feature allows you to play files stored in a USB drive or record programmes 2 5 and 3 5 inch hdd with external power supply...

Страница 10: ...f Also teletext usage is disabled when there is ongoing recording or playback If the recording time of an event is longer than the memory capacity the following message will appear on the screen There is not enough space for event but it will be recorded until the drive is full Connecting to a DVD Player via HDMI Please refer to your DVD player s instruction book for additional information Power o...

Страница 11: ...s will be described in accordance with the menu system of your TV Volume Setting Press V button to increase the volume Press V button to decrease the volume A volume level scale slider will be displayed on the screen Connecting the LCD TV to a PC For displaying your computer s screen image on your LCD TV you can connect your computer to the TV set Power off both computer and display before making ...

Страница 12: ...tton Prev Day Displays the programmes of previous day Green button Next day Displays the programmes of the next day Yellow button Zoom Expands programme information Blue button Filter Views filtering options INFO Details Displays the programmes in detail Numeric buttons Jump Jumps to the preferred channel directly via numeric buttons OK Options views records or sets timer for future programs Text ...

Страница 13: ...e and the following message will be displayed on the screen To select the Yes or No option highlight the item by using or buttons and press OK button Afterwards the following OSD will be displayed on the screen and the digital television will search for digital terrestrial TV broadcasts Note You can press MENU button to cancel IMPORTANT If you are located at a TV regional border or are able to rec...

Страница 14: ...ally and only that multiplex or frequency are searched for the channels After selecting search type as Digital Aerial you can enter the multiplex or frequency number using the numeric buttons and press OK button to search Analogue Manual Search After selecting search type as analogue you can use button to highlight an item and then press or button to set an option Enter the channel number or frequ...

Страница 15: ...will be asked to enter parental control PIN Default PIN is set as 0000 Enter the PIN number Press OK button when the desired channel is highlighted to lock unlock the channel Lock symbol will be displayed next to the selected channel Managing Stations Favourites You can create a list of favourite programmes Press MENU button to view main menu Select Channel List item by using or button Press OK to...

Страница 16: ...ing style GREEN button Activates Loop Shuffle functions BLUE button Changes media type Play button Starts the video playback Stop button Stops the video playback Pause button Pause the video playback Rewind button Goes backward Forward button Goes forward Subtitle Audio LANG button Sets subtitle Audio Jump GREEN button Jumps to time Use numeric buttons to type the desired time and press GREEN butt...

Страница 17: ...yle Sets default browsing mode Music FF FR Speed Sets forwarding advancing speed Slide Show Interval Sets slide show interval time Show Subtitle Sets subtitle enabling preference Subtitle Position Sets subtitle position as up or down Subtitle Font Size Sets subtitle font size max 54pt Timeshift Recording IMPORTANT To record a programme you should first connect a USB disk to your TV while the TV is...

Страница 18: ...e watching recorded programmes slow forward feature will be available You can use button to slow forward Pressing button consecutively will change slow forwarding speed Changing Image Size Picture Formats You can change the aspect ratio image size of the TV for viewing the picture in different zoom modes Press SCREEN button repeatedly to change the image size Available zoom modes are listed below ...

Страница 19: ...ction can be set to one of these options Low Medium High or Off Game Mode When Game Mode is set to On specific game mode settings which are optimized for better video quality will be loaded Note When Game Mode is on some items in the Picture Settings menu will be unavailable to be set Picture Zoom Sets the picture size toAuto 16 9 Subtitle 14 9 14 9 Zoom 4 3 Panoramic or Cinema Reset Resets the pi...

Страница 20: ... Press MENU button to exit Settings Menu Items Conditional Access Controls conditional access modules when available Language Configures language settings Parental Configures parental settings Timers Sets timers for selected programmes Date Time Sets date and time Sources Enables or disables selected source options Other Settings Displays other setting options of the TV set Using a Conditional Acc...

Страница 21: ...ns are not available Parental Control To prohibit viewing of certain programmes channels and menus can be locked by using the parental control system This function enables or disables the menu protection system and allows the PIN code to be changed Press MENU button and select the icon by using or button Press OK button to view Settings menu Use or button to highlight Parental and press OK to cont...

Страница 22: ...You set recording timer s starting time to start earlier by using this setting Available only for EU country options End Late You set recording timer s end time to end later by using this settings Available only for EU country options Max Timeshift This setting allows you to set the maximum time allowed for timeshifting Duration options are approximate and can change accordingly depending on the b...

Страница 23: ...ck for blind and visually impaired viewers of visual media including television and movies The description narrator talks through the presentation describing what is happening on the screen during the natural pauses in the audio and sometimes during dialogue if deemed necessary You can use this feature only if the broadcaster supports that additional narration track Auto TV Off You can set the tim...

Страница 24: ...d to the TV at the same time In such a case disconnect one of the peripherals No Picture Is the aerial connected properly Are the plugs connected tightly to the aerial socket Is the aerial cable damaged Are suitable plugs used to connect the aerial If you are in doubt consult your dealer No Picture means that your TV is not receiving a transmission Have you selected the correct button on the remot...

Страница 25: ...1360x768 60 Hz Appendix B AV and HDMI Signal Compatibility Input Signal Types Source Supported Signals Available EXT SCART PAL 50 60 O NTSC 60 O RGB 50 O RGB 60 O Side AV PAL 50 60 O NTSC 60 O YPbPr 480I 60Hz O 480P 60Hz O 576I 50Hz O 576P 50Hz O 720P 50Hz O 720P 60Hz O 1080I 50Hz O 1080I 60Hz O 1080P 50Hz O 1080P 60Hz O HDMI1 HDMI2 480I 60Hz O 480P 60Hz O 576I 50Hz O 576P 50Hz O 720P 50Hz O 720P ...

Страница 26: ...ion 24Hz 25Hz 30Hz 50Hz 60Hz 480i þ 480p þ 576i þ 576p þ 720p þ þ 1080i þ þ 1080p þ þ þ þ þ Appendix D Supported File Formats for USB Mode Supported Players Player Stream Video Decoder MSVD Audio Decoder MSAD Audio MP3 None MP3 Audio WAV AIFF None LPCM MPEG1 Program Stream MPEG 1 MPEG1 MP3 AC 3 and PCM MPEG2 Program Stream MPEG 2 MPEG2 MP3 AC 3 and PCM AVI Xvid XVID MPEG2 MP3 AC 3 and PCM ...

Страница 27: ... is found and downloaded successfully with next power up TV opens with new software version Note on reboot operation Reboot is the last step in software upgrade operation if download of new software is finished successfully During reboot TV makes final initializations In reboot sequence panel power is closed and front led indicates the activity with blinking Around 5 minutes later TV restarts with...

Страница 28: ...3 16 9 Audio MPEG Layer I II 32 44 148kHz Specifications TV BROADCASTING PAL SECAM B G D K K I I L L RECEIVING CHANNELS VHF BAND I III UHF BAND U HYPERBAND NUMBER OF PRESET CHANNELS 1000 CHANNEL INDICATOR On Screen Display RF AERIAL INPUT 75 Ohm unbalanced OPERATING VOLTAGE 220 240V AC 50Hz AUDIO German Nicam Stereo AUDIO OUTPUT POWER WRMS 10 THD 2 x 6 POWER CONSUMPTION W 150 W max 0 5 W Standby P...

Страница 29: ...English 28 Dimensional Drawings ...

Страница 30: ...English 29 End of life disposal ...

Страница 31: ...chable Stand Uninstallation Method To install the TV on the wall first of all foot assembly should be removed Unscrew the 4 screws that attach the foot assembly to the panel and remove the foot assembly from the panel ...

Страница 32: ...the product LC 24LE510E LC 24LE510K LC 24DV510E LC 24DV510K Ø4 30 4 75 x 75 W x H To the wall M4 18 4 To the product LC 32LE510E LC 32LE530E Ø4 30 8 200 x 100 W x H To the wall M4 18 4 To the product LC 40LE510E LC 40LE530E Ø4 30 8 400 x 400 W x H To the wall M8 30 4 To the product LC 32SH130E LC 32SH130K LC 32SH340E Ø4 30 8 200 x 100 W x H To the wall M6 30 4 To the product LC 40SH340E LC 40SH340...

Отзывы: